Users Manual - English
Page 6
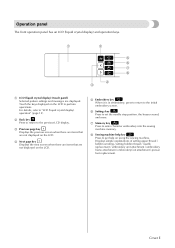
... embroidery, press to return to the previous LCD display. b Back key Press to return to the initial embroidery screen. f Settings key Press to set the needle stop position, the buzzer sound, and more. Cover E c Previous page key Displays the previous screen when there are items that are displayed. Displays simple explanations...
... embroidery, press to return to the previous LCD display. b Back key Press to return to the initial embroidery screen. f Settings key Press to set the needle stop position, the buzzer sound, and more. Cover E c Previous page key Displays the previous screen when there are items that are displayed. Displays simple explanations...
Users Manual - English
Page 8
... extra spool pin ...27 Thread the needle manually (without using the needle threader 28 Using the twin needle ...29 Pulling up the bobbin thread...31 Replacing the Needle ...33 Needle precautions ...33 Needle types and their uses...34 Checking the needle ...35 Replacing the needle...35 Replacing the Presser Foot 38 Presser foot precautions ...38 Replacing the presser foot ...38 Removing the...
... extra spool pin ...27 Thread the needle manually (without using the needle threader 28 Using the twin needle ...29 Pulling up the bobbin thread...31 Replacing the Needle ...33 Needle precautions ...33 Needle types and their uses...34 Checking the needle ...35 Replacing the needle...35 Replacing the Presser Foot 38 Presser foot precautions ...38 Replacing the presser foot ...38 Removing the...
Users Manual - English
Page 11
...administered. 8. Use this machine only for household use outdoors. 7. Use only accessories recommended by authorized dealer. The wrong plate can cause the needle to the symbol " " position which represents off, then remove plug from the electrical outlet immediately after using and before using this machine,....Do not pull or push fabric while stitching. Important Safety Instructions When using . It may deflect the needle causing it must be replaced by the manufacturer as contained in this manual. The machine should never be left unattended while plugged in the ...
...administered. 8. Use this machine only for household use outdoors. 7. Use only accessories recommended by authorized dealer. The wrong plate can cause the needle to the symbol " " position which represents off, then remove plug from the electrical outlet immediately after using and before using this machine,....Do not pull or push fabric while stitching. Important Safety Instructions When using . It may deflect the needle causing it must be replaced by the manufacturer as contained in this manual. The machine should never be left unattended while plugged in the ...
Users Manual - English
Page 13
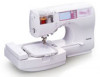
...machine • Leaving the machine unattended 3. CONGRATULATIONS ON CHOOSING OUR MACHINE Your machine is completed • Replacing or removing the needle or any assemblies, the presser feet, needle, or other parts to inspect and adjust the machine yourself. Benzene, thinner, and scouring powders can ...storing this machine, avoid direct sunlight and high humidity locations. For additional product information and updates, visit our web site at www.brother.com 7 PLEASE READ BEFORE USING THIS MACHINE For safe operation 1. Remember to turn off the power switch and unplug the cord...
...machine • Leaving the machine unattended 3. CONGRATULATIONS ON CHOOSING OUR MACHINE Your machine is completed • Replacing or removing the needle or any assemblies, the presser feet, needle, or other parts to inspect and adjust the machine yourself. Benzene, thinner, and scouring powders can ...storing this machine, avoid direct sunlight and high humidity locations. For additional product information and updates, visit our web site at www.brother.com 7 PLEASE READ BEFORE USING THIS MACHINE For safe operation 1. Remember to turn off the power switch and unplug the cord...
Users Manual - English
Page 15
1 GETTING READY The various preparations required before starting to sew are described in this chapter. Turning the Machine On/Off 10 LCD (liquid crystal display) operation 12 Winding/Installing the Bobbin 16 Upper Threading ...21 Replacing the Needle 33 Replacing the Presser Foot 38 Sewing Cylindrical Pieces 41
1 GETTING READY The various preparations required before starting to sew are described in this chapter. Turning the Machine On/Off 10 LCD (liquid crystal display) operation 12 Winding/Installing the Bobbin 16 Upper Threading ...21 Replacing the Needle 33 Replacing the Presser Foot 38 Sewing Cylindrical Pieces 41
Users Manual - English
Page 21
... machine. c 2 3 1 4 After you finish looking, press e two times. (Back key) 5 6 8 7 a Threading the upper thread b Winding the bobbin c Installing the bobbin d Needle replacement e Embroidery unit attachment f Embroidery frame attachment g embroidery foot attachment h Replacing the presser foot X The first screen describing the procedure for the selected topic appears. • Pressing (Back key), returns you return...
... machine. c 2 3 1 4 After you finish looking, press e two times. (Back key) 5 6 8 7 a Threading the upper thread b Winding the bobbin c Installing the bobbin d Needle replacement e Embroidery unit attachment f Embroidery frame attachment g embroidery foot attachment h Replacing the presser foot X The first screen describing the procedure for the selected topic appears. • Pressing (Back key), returns you return...
Users Manual - English
Page 34
...cassette (with the extra spool pin attached) into the thread cassette" (page 22). X The extra spool pin is threaded. a Needle bar thread hooks Replace the needle. c • Refer to back. 28 When using special thread, thread with a thickness of 130/20 or thicker, the wing... the extra spool pin. a • Refer to "Replacing the needle" (page 35). • When using the needle threader) • For more details, refer to remove the needle, otherwise the machine may be used with the needle threader, thread the needle as described below. Check that the thread cassette indicator is...
...cassette (with the extra spool pin attached) into the thread cassette" (page 22). X The extra spool pin is threaded. a Needle bar thread hooks Replace the needle. c • Refer to back. 28 When using special thread, thread with a thickness of 130/20 or thicker, the wing... the extra spool pin. a • Refer to "Replacing the needle" (page 35). • When using the needle threader) • For more details, refer to remove the needle, otherwise the machine may be used with the needle threader, thread the needle as described below. Check that the thread cassette indicator is...
Users Manual - English
Page 35
... d in "Using the extra spool pin" (page 27). CAUTION ● Only use bent needles. a • For details, refer to the machine may result. Bent needles can sew two parallel lines of any other needle may break or damage to "Replacing the needle" (page 35). Thread the thread cassette up to arrow 2, indicated on the thread...
... d in "Using the extra spool pin" (page 27). CAUTION ● Only use bent needles. a • For details, refer to the machine may result. Bent needles can sew two parallel lines of any other needle may break or damage to "Replacing the needle" (page 35). Thread the thread cassette up to arrow 2, indicated on the thread...
Users Manual - English
Page 36
.... • If the thread cassette is inserted with the twin needle attached, the sewing machine may be damaged. Press k panel. (Settings key) in reverse highlight. • If pressed again, it to "Thread the needle manually (without using the twin needle, be sure to "Replacing the needle" (page 35). Press . X The twin needle can now be damaged.
.... • If the thread cassette is inserted with the twin needle attached, the sewing machine may be damaged. Press k panel. (Settings key) in reverse highlight. • If pressed again, it to "Thread the needle manually (without using the twin needle, be sure to "Replacing the needle" (page 35). Press . X The twin needle can now be damaged.
Users Manual - English
Page 39
... observe the following precautions concerning the handling of any other needle may bend the needle or damage the machine. ● Never use home sewing machine needles. Bent needles can easily break, possibly resulting in injuries. CAUTION ● Only use bent needles. Use of the needle. Replacing the Needle 33 Be sure to observe these precautions is extremely dangerous...
... observe the following precautions concerning the handling of any other needle may bend the needle or damage the machine. ● Never use home sewing machine needles. Bent needles can easily break, possibly resulting in injuries. CAUTION ● Only use bent needles. Use of the needle. Replacing the Needle 33 Be sure to observe these precautions is extremely dangerous...

Users Manual - English
Page 41
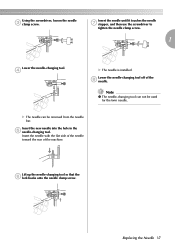
... of the the needle". c 1 a Presser foot lever Replacing the Needle 35 Press (Needle position button) once or a twice to turn off the sewing machine. Checking the needle Replacing the needle Sewing with a bent needle is bent. screwdriver and a needle that the distance between the needle and the flat surface is not even, the needle is extremely dangerous Replace the needle as described below...
... of the the needle". c 1 a Presser foot lever Replacing the Needle 35 Press (Needle position button) once or a twice to turn off the sewing machine. Checking the needle Replacing the needle Sewing with a bent needle is bent. screwdriver and a needle that the distance between the needle and the flat surface is not even, the needle is extremely dangerous Replace the needle as described below...
Users Manual - English
Page 42
... needle-changing tool Use the needle-changing tool to tighten the needle clamp screw. Place the needle in the hole in the same way. 36 CAUTION ● Be sure to insert the needle until it touches the needle stopper and securely tighten the needle clamp screw with your left hand, and then d use the screwdriver to replace the needle...
... needle-changing tool Use the needle-changing tool to tighten the needle clamp screw. Place the needle in the hole in the same way. 36 CAUTION ● Be sure to insert the needle until it touches the needle stopper and securely tighten the needle clamp screw with your left hand, and then d use the screwdriver to replace the needle...
Users Manual - English
Page 43
... new needle into the hole in the e needle-changing tool. Replacing the Needle 37 Using the screwdriver, loosen the needle c clamp screw. Lower the needle-changing tool off of the machine. Lift up the needle-changing tool so that the f fork hooks onto the needle clamp screw. X The needle can not be removed from the needle bar. Insert the needle with...
... new needle into the hole in the e needle-changing tool. Replacing the Needle 37 Using the screwdriver, loosen the needle c clamp screw. Lower the needle-changing tool off of the machine. Lift up the needle-changing tool so that the f fork hooks onto the needle clamp screw. X The needle can not be removed from the needle bar. Insert the needle with...
Users Manual - English
Page 44
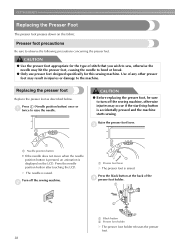
..., otherwise injuries may hit the presser foot, causing the needle to observe the following precautions concerning the presser feet. Press the needle position button after touching the LCD. CAUTION ● Before replacing the presser foot, be sure to turn off the sewing...presser foot is displayed on the fabric. Replacing the presser foot Replace the presser foot as described below. c 1 a Needle position button • If the needle does not move when the needle position button is pressed, an animation is raised. Press (Needle position button) once or a twice to...
..., otherwise injuries may hit the presser foot, causing the needle to observe the following precautions concerning the presser feet. Press the needle position button after touching the LCD. CAUTION ● Before replacing the presser foot, be sure to turn off the sewing...presser foot is displayed on the fabric. Replacing the presser foot Replace the presser foot as described below. c 1 a Needle position button • If the needle does not move when the needle position button is pressed, an animation is raised. Press (Needle position button) once or a twice to...
Users Manual - English
Page 50
...8595; 3 Attach the presser foot. Attach the presser foot appropriate for the area to "Replacing the presser foot" (page 38). ↓ 4 Position the fabric.. Place the area to the needle location. Bent needles can easily break, possibly resulting in injuries. ● Make sure that the right and...precautions. CAUTION ● While the machine is in the correct order and that the needle does not strike basting pins, otherwise the needle may break. ● Never use bent needles. Turn on replacing the presser foot, refer to be sewn under the presser foot. Select the stitch...
...8595; 3 Attach the presser foot. Attach the presser foot appropriate for the area to "Replacing the presser foot" (page 38). ↓ 4 Position the fabric.. Place the area to the needle location. Bent needles can easily break, possibly resulting in injuries. ● Make sure that the right and...precautions. CAUTION ● While the machine is in the correct order and that the needle does not strike basting pins, otherwise the needle may break. ● Never use bent needles. Turn on replacing the presser foot, refer to be sewn under the presser foot. Select the stitch...
Users Manual - English
Page 51
.... d (Previous page key) displays the previous screen, and (Next page key) displays the next screen. Check that should be used , the needle may hit the presser foot and break or bend. If the wrong presser foot is selected, the icon for the presser foot that the correct..." (page 38). Attach the presser foot. z Automatic reverse/reinforcement stitching and other stitch selections are explained in the LCD. Determine the stitch to "Replacing the presser foot" (page 38). Memo z Uses of stitches and other settings are explained in the screen. For details, refer to sew. Selecting ...
.... d (Previous page key) displays the previous screen, and (Next page key) displays the next screen. Check that should be used , the needle may hit the presser foot and break or bend. If the wrong presser foot is selected, the icon for the presser foot that the correct..." (page 38). Attach the presser foot. z Automatic reverse/reinforcement stitching and other stitch selections are explained in the LCD. Determine the stitch to "Replacing the presser foot" (page 38). Memo z Uses of stitches and other settings are explained in the screen. For details, refer to sew. Selecting ...
Users Manual - English
Page 75
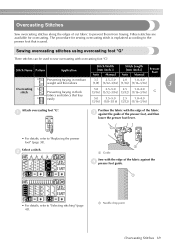
... of the fabric c against the d presser foot guide. 1 • For details, refer to "Selecting stitching" (page 45). a Needle drop point Overcasting Stitches 69 The procedure for overcasting. Select a stitch. Overcasting Stitches Sew overcasting stitches along the edges of the presser foot,... and then lower the presser foot lever. • For details, refer to "Replacing the presser foot" (page 38). Sewing overcasting stitches using overcasting foot "G" Three stitches can be used . b 1 a Guide Sew with ...
... of the fabric c against the d presser foot guide. 1 • For details, refer to "Selecting stitching" (page 45). a Needle drop point Overcasting Stitches 69 The procedure for overcasting. Select a stitch. Overcasting Stitches Sew overcasting stitches along the edges of the presser foot,... and then lower the presser foot lever. • For details, refer to "Replacing the presser foot" (page 38). Sewing overcasting stitches using overcasting foot "G" Three stitches can be used . b 1 a Guide Sew with ...

Users Manual - English
Page 76
... 1 • For details, refer to "Replacing the presser foot" (page 38). Stitch Name Zigzag stitch (center needle position) Zigzag stitch (right needle position) 2-point zigzag stitch 3-point zigzag stitch Pattern Application 7 Preventing fraying (center baseline/reverse stitching) Stitch Width [mm (inch.)] Auto Manual 3.5 0.0-7.0 (1/8) (0-1/4) ... STITCHES Sewing overcasting stitches using zigzag foot "J" Seven stitches can be used to sew overcasting stitches with the c needle dropping off the edge at the right. • For details, refer to "Selecting stitching" (page 45). 70...
... 1 • For details, refer to "Replacing the presser foot" (page 38). Stitch Name Zigzag stitch (center needle position) Zigzag stitch (right needle position) 2-point zigzag stitch 3-point zigzag stitch Pattern Application 7 Preventing fraying (center baseline/reverse stitching) Stitch Width [mm (inch.)] Auto Manual 3.5 0.0-7.0 (1/8) (0-1/4) ... STITCHES Sewing overcasting stitches using zigzag foot "J" Seven stitches can be used to sew overcasting stitches with the c needle dropping off the edge at the right. • For details, refer to "Selecting stitching" (page 45). 70...
Users Manual - English
Page 77
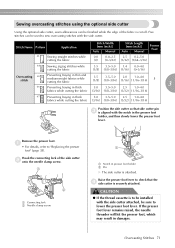
...16) 67 Preventing fraying in the presser foot holder, and then slowly lower the presser foot lever. If the presser foot lever remains raised, the needle threader will hit the presser foot, which may result in presser foot holder b Pin X The side cutter is cut off. Hook the connecting ... allowances can be used to sew overcasting stitches with the side cutter attached, be finished while the edge of the side cutter b onto the needle clamp screw. 1 2 a Connecting fork b Needle clamp screw 2 1 a Notch in damages. Five stitches can be sure to "Replacing the presser foot" (page 38).
...16) 67 Preventing fraying in the presser foot holder, and then slowly lower the presser foot lever. If the presser foot lever remains raised, the needle threader will hit the presser foot, which may result in presser foot holder b Pin X The side cutter is cut off. Hook the connecting ... allowances can be used to sew overcasting stitches with the side cutter attached, be finished while the edge of the side cutter b onto the needle clamp screw. 1 2 a Connecting fork b Needle clamp screw 2 1 a Notch in damages. Five stitches can be sure to "Replacing the presser foot" (page 38).
Users Manual - English
Page 164
... 91 quilting 94 quilting guide 95 quilting stippling 91 quilting stitch 91 R recalling stored characters 140 , reinforcement stitching 49 98 removing presser foot holder 40 replacing needle 35 replacing presser foot 38 resewing 141 reverse stitching 49 , reverse/reinforcement stitch button Cover D 49 reverse/reinforcement stitches, automatic 56 S safety instructions 5 satin stitching 97...
... 91 quilting 94 quilting guide 95 quilting stippling 91 quilting stitch 91 R recalling stored characters 140 , reinforcement stitching 49 98 removing presser foot holder 40 replacing needle 35 replacing presser foot 38 resewing 141 reverse stitching 49 , reverse/reinforcement stitch button Cover D 49 reverse/reinforcement stitches, automatic 56 S safety instructions 5 satin stitching 97...


