Users Manual - English
Page 3
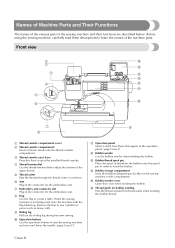
... the flap folded up. m Bobbin thread spool pin Place the spool of thread for the bobbin onto this spool pin in the connector for the embroidery unit. Cover B Front view 1 F 2 E 3 D C 4 B A 5 0 6 7 9 8 a Thread cassette compartment cover b Thread cassette compartment Insert a thread cassette into ... cylindrical pieces such as sleeve cuffs. Before using the sewing machine, carefully read these descriptions to create a table. g Embroidery unit connector slot Plug in order to adjust the tension of the upper thread. j Operation buttons Use the operation buttons to cut...
... the flap folded up. m Bobbin thread spool pin Place the spool of thread for the bobbin onto this spool pin in the connector for the embroidery unit. Cover B Front view 1 F 2 E 3 D C 4 B A 5 0 6 7 9 8 a Thread cassette compartment cover b Thread cassette compartment Insert a thread cassette into ... cylindrical pieces such as sleeve cuffs. Before using the sewing machine, carefully read these descriptions to create a table. g Embroidery unit connector slot Plug in order to adjust the tension of the upper thread. j Operation buttons Use the operation buttons to cut...
Users Manual - English
Page 6
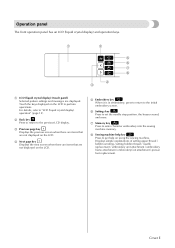
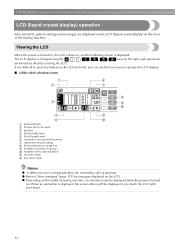
... 8 4 3 a LCD (liquid crystal display) (touch panel) Selected pattern settings and messages are not displayed on the LCD. e Embroidery key When it is in embroidery, press to return to "LCD (liquid crystal display) operation" (page 12). For details, refer to the initial... LCD. Displays simple explanations of setting upper thread / bobbin winding / setting bobbin thread / needle replacement / embroidery unit attachment / embroidery frame attachment / embroidery foot attachment / presser foot replacement. c Previous page key Displays the previous screen when there are items that are...
... 8 4 3 a LCD (liquid crystal display) (touch panel) Selected pattern settings and messages are not displayed on the LCD. e Embroidery key When it is in embroidery, press to return to "LCD (liquid crystal display) operation" (page 12). For details, refer to the initial... LCD. Displays simple explanations of setting upper thread / bobbin winding / setting bobbin thread / needle replacement / embroidery unit attachment / embroidery frame attachment / embroidery foot attachment / presser foot replacement. c Previous page key Displays the previous screen when there are items that are...
Users Manual - English
Page 10
... the embroidery foot ...115 Removing the embroidery foot ...117 Attaching the embroidery unit 118 Embroidery unit precautions ...118 Attaching the embroidery unit ...118 Removing the embroidery unit ...120 Preparing the fabric...122 Attaching a stabilizer material to the fabric 122 Setting the fabric in the embroidery frame ...123 Attaching the embroidery frame 126 Attaching the embroidery frame ...126 Removing the embroidery frame ...127 Selecting embroidery patterns...
... the embroidery foot ...115 Removing the embroidery foot ...117 Attaching the embroidery unit 118 Embroidery unit precautions ...118 Attaching the embroidery unit ...118 Removing the embroidery unit ...120 Preparing the fabric...122 Attaching a stabilizer material to the fabric 122 Setting the fabric in the embroidery frame ...123 Attaching the embroidery frame 126 Attaching the embroidery frame ...126 Removing the embroidery frame ...127 Selecting embroidery patterns...
Users Manual - English
Page 18
... "Error messages" (page 153) for messages displayed on the front of the selected stitch k Increase value l Decrease value 8 9 0 A B Memo z A different screen is displayed when the embroidery unit is attached. If it is displayed. GETTING READY LCD (liquid crystal display) operation Selected stitch, pattern settings and messages are displayed on the LCD (liquid...
... "Error messages" (page 153) for messages displayed on the front of the selected stitch k Increase value l Decrease value 8 9 0 A B Memo z A different screen is displayed when the embroidery unit is attached. If it is displayed. GETTING READY LCD (liquid crystal display) operation Selected stitch, pattern settings and messages are displayed on the LCD (liquid...
Users Manual - English
Page 21
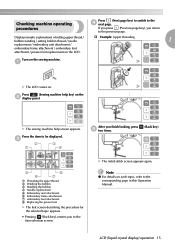
...Back key) 5 6 8 7 a Threading the upper thread b Winding the bobbin c Installing the bobbin d Needle replacement e Embroidery unit attachment f Embroidery frame attachment g embroidery foot attachment h Replacing the presser foot X The first screen describing the procedure for the selected topic appears. • Pressing (...thread / bobbin winding / setting bobbin thread / needle † Example: Upper threading 1 replacement / embroidery unit attachment / embroidery frame attachment / embroidery foot attachment / presser foot replacement on . Turn on each topic, refer to the d next ...
...Back key) 5 6 8 7 a Threading the upper thread b Winding the bobbin c Installing the bobbin d Needle replacement e Embroidery unit attachment f Embroidery frame attachment g embroidery foot attachment h Replacing the presser foot X The first screen describing the procedure for the selected topic appears. • Pressing (...thread / bobbin winding / setting bobbin thread / needle † Example: Upper threading 1 replacement / embroidery unit attachment / embroidery frame attachment / embroidery foot attachment / presser foot replacement on . Turn on each topic, refer to the d next ...
Users Manual - English
Page 117
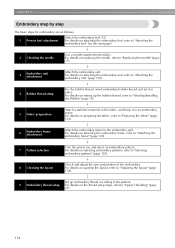
4 EMBROIDERY The steps for embroidering will be explained here. Embroidering neatly 112 Attaching the embroidery foot 115 Attaching the embroidery unit 118 Preparing the fabric 122 Attaching the embroidery frame 126 Selecting embroidery patterns 128 Embroidering ...134 Convenient Functions 138
4 EMBROIDERY The steps for embroidering will be explained here. Embroidering neatly 112 Attaching the embroidery foot 115 Attaching the embroidery unit 118 Preparing the fabric 122 Attaching the embroidery frame 126 Selecting embroidery patterns 128 Embroidering ...134 Convenient Functions 138
Users Manual - English
Page 118
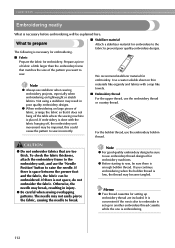
... water soluble sheet on thin materials like towels. ■ Embroidery thread For the upper thread, use the embroidery thread or country thread. CAUTION ● Do not embroider fabrics that it does not hang off , the embroidery unit movement may be sure there is embroidering. 112 z Before... be explained here. The needle may become tangled. To check the fabric thickness, attach the embroidery frame to the embroidery unit, and use stabilizer when sewing embroidery projects, especially when embroidering on large pieces of the pattern you continue embroidering when the bobbin...
... water soluble sheet on thin materials like towels. ■ Embroidery thread For the upper thread, use the embroidery thread or country thread. CAUTION ● Do not embroider fabrics that it does not hang off , the embroidery unit movement may be sure there is embroidering. 112 z Before... be explained here. The needle may become tangled. To check the fabric thickness, attach the embroidery frame to the embroidery unit, and use stabilizer when sewing embroidery projects, especially when embroidering on large pieces of the pattern you continue embroidering when the bobbin...
Users Manual - English
Page 120
...on the next page) ↓ 2 Checking the needle Use a needle matched to the embroidery unit. For details on selecting embroidery patterns, refer to the fabric, and hoop it in an embroidery frame. For details on ajusting the layout, refer to "Adjusting the layout" (page ...adjust the size and position of the embroidery. For details on attaching the embroidery unit, refer to the pattern. 9 Embroidery thread setup For details on , and select an embroidery pattern. For details on setting up embroidery thread according to "Attaching the embroidery unit" (page 118). ↓ 4 Bobbin...
...on the next page) ↓ 2 Checking the needle Use a needle matched to the embroidery unit. For details on selecting embroidery patterns, refer to the fabric, and hoop it in an embroidery frame. For details on ajusting the layout, refer to "Adjusting the layout" (page ...adjust the size and position of the embroidery. For details on attaching the embroidery unit, refer to the pattern. 9 Embroidery thread setup For details on , and select an embroidery pattern. For details on setting up embroidery thread according to "Attaching the embroidery unit" (page 118). ↓ 4 Bobbin...
Users Manual - English
Page 124
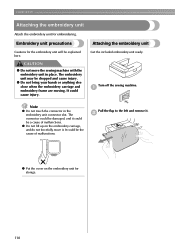
... not move it. The connector could be the cause of malfunctions. z Do not lift up on the embroidery unit for embroidering. The embroidery unit may be explained here. Get the included embroidery unit ready. EMBROIDERY Attaching the embroidery unit Attach the embroidery unit for storage. 118 It could cause injury. Pull the flap to the left and remove it could be...
... not move it. The connector could be the cause of malfunctions. z Do not lift up on the embroidery unit for embroidering. The embroidery unit may be explained here. Get the included embroidery unit ready. EMBROIDERY Attaching the embroidery unit Attach the embroidery unit for storage. 118 It could cause injury. Pull the flap to the left and remove it could be...
Users Manual - English
Page 125
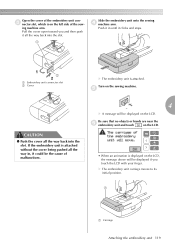
... touch on the LCD. Pull the cover open toward you touch the LCD with your finger. If the embroidery unit is displayed on the LCD, the message above will be displayed on the LCD. • When an animation is attached without the cover being pushed... all the way in until it all the way back into the slot. 1 Slide the embroidery unit onto the sewing d machine arm. X The embroidery unit carriage moves to its initial position. 1 a Carriage Attaching the embroidery unit 119 ing machine arm. e CAUTION ● Push the cover all the way back into the slot. Turn...
... touch on the LCD. Pull the cover open toward you touch the LCD with your finger. If the embroidery unit is displayed on the LCD, the message above will be displayed on the LCD. • When an animation is attached without the cover being pushed... all the way in until it all the way back into the slot. 1 Slide the embroidery unit onto the sewing d machine arm. X The embroidery unit carriage moves to its initial position. 1 a Carriage Attaching the embroidery unit 119 ing machine arm. e CAUTION ● Push the cover all the way back into the slot. Turn...
Users Manual - English
Page 126
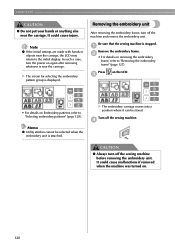
...cause malfunctions if removed when the machine was turned on Embroidery patterns, refer to "Selecting embroidery patterns" (page 128). Removing the embroidery unit After removing the embroidery frame, turn off the sewing machine before removing the embroidery unit. Press c on the LCD. • For details...CAUTION ● Always turn the power on removing the embroidery frame, refer to the initial display. a Remove the embroidery frame. X The embroidery carriage moves into a position where it can be selected when the embroidery unit is near the carriage. It could cause injury. In...
...cause malfunctions if removed when the machine was turned on Embroidery patterns, refer to "Selecting embroidery patterns" (page 128). Removing the embroidery unit After removing the embroidery frame, turn off the sewing machine before removing the embroidery unit. Press c on the LCD. • For details...CAUTION ● Always turn the power on removing the embroidery frame, refer to the initial display. a Remove the embroidery frame. X The embroidery carriage moves into a position where it can be selected when the embroidery unit is near the carriage. It could cause injury. In...
Users Manual - English
Page 127
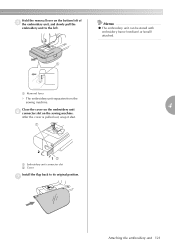
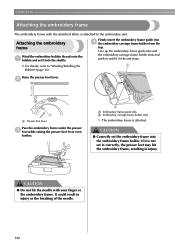
g Attaching the embroidery unit 121 Hold the removal lever on the sewing machine. Memo z The embroidery unit can be stored with embroidery frame (medium) or (small) attached. 1 a Removal lever X The embroidery unit separates from the sewing machine. 4 Close the cover on the embroidery unit f connector slot on the bottom left of e the embroidery unit, and slowly pull the embroidery unit to its original position. After the cover is pulled out, snap it shut. 1 2 12 a Embroidery unit connector slot b Cover Install the flap back to the left.
g Attaching the embroidery unit 121 Hold the removal lever on the sewing machine. Memo z The embroidery unit can be stored with embroidery frame (medium) or (small) attached. 1 a Removal lever X The embroidery unit separates from the sewing machine. 4 Close the cover on the embroidery unit f connector slot on the bottom left of e the embroidery unit, and slowly pull the embroidery unit to its original position. After the cover is pulled out, snap it shut. 1 2 12 a Embroidery unit connector slot b Cover Install the flap back to the left.
Users Manual - English
Page 132
... thread onto the a bobbin and set it into the shuttle. • For details, refer to the embroidery unit. Firmly insert the embroidery frame guide into the embroidery frame holder. It could result in injury. If it clicks and stops. 1 Raise the presser foot lever. CAUTION ● Correctly set in correctly, the presser ...
... thread onto the a bobbin and set it into the shuttle. • For details, refer to the embroidery unit. Firmly insert the embroidery frame guide into the embroidery frame holder. It could result in injury. If it clicks and stops. 1 Raise the presser foot lever. CAUTION ● Correctly set in correctly, the presser ...
Users Manual - English
Page 145
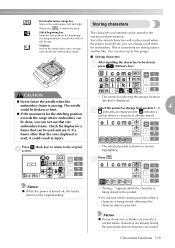
...characters to a pocket where characters are already stored, the previously stored characters are erased. CAUTION ● Never lower the needle when the embroidery frame is already stored. If a frame other than the ones displayed is displayed. indicates a pocket where a character is moving. c ...beginning key Switches the position for storage from pockets 1 - 5. 4 b indicates an empty pocket. Trial key Moves the embroidery unit carriage, and checks the embroidery range. Storing characters The characters you can be used and use that can not use it could be lost. Press (...
...characters to a pocket where characters are already stored, the previously stored characters are erased. CAUTION ● Never lower the needle when the embroidery frame is already stored. If a frame other than the ones displayed is displayed. indicates a pocket where a character is moving. c ...beginning key Switches the position for storage from pockets 1 - 5. 4 b indicates an empty pocket. Trial key Moves the embroidery unit carriage, and checks the embroidery range. Storing characters The characters you can be used and use that can not use it could be lost. Press (...
Users Manual - English
Page 149
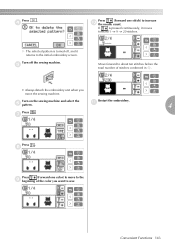
.... Turn on the sewing machine and select the Restart the embroidery. If is turned off the sewing machine. g Press . Press . X The selected pattern is pressed continuously, it returns to about ten stitches before the total number ... stitches. f pattern. h Press (Forward one stitch) to sew. d Press (Forward one color) to move to the i beginning of stitches confirmed in b. • Always detach the embroidery unit when you want to increase j the needle count. k 4 Press . Convenient Functions 143
.... Turn on the sewing machine and select the Restart the embroidery. If is turned off the sewing machine. g Press . Press . X The selected pattern is pressed continuously, it returns to about ten stitches before the total number ... stitches. f pattern. h Press (Forward one stitch) to sew. d Press (Forward one color) to move to the i beginning of stitches confirmed in b. • Always detach the embroidery unit when you want to increase j the needle count. k 4 Press . Convenient Functions 143

Users Manual - English
Page 158
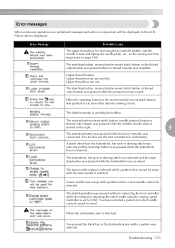
... fabric is being removed or attached during the process, the pattern may be impaired. The embroidery unit connector slot is hanging off the table, the embroidery unit movement will be attached. If the embroidery unit carriage or embroidery frame bumps into objects, the pattern will be messed up. An animation is done with the...the brightness of the LCD is not set the fabric up correctly. The brightness of the LCD. Remove the tangled thread. The embroidery unit is either too light or too dark. Reference page 155 page 18, page 38 page 128 page 118 page 118 page 119 page...
... fabric is being removed or attached during the process, the pattern may be impaired. The embroidery unit connector slot is hanging off the table, the embroidery unit movement will be attached. If the embroidery unit carriage or embroidery frame bumps into objects, the pattern will be messed up. An animation is done with the...the brightness of the LCD is not set the fabric up correctly. The brightness of the LCD. Remove the tangled thread. The embroidery unit is either too light or too dark. Reference page 155 page 18, page 38 page 128 page 118 page 118 page 119 page...
Users Manual - English
Page 159
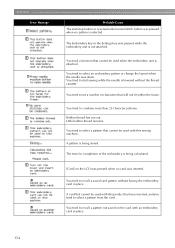
... button, needle position button or thread cutter button was pressed while the buttonhole lever is moved to use the foot controller for embroidery. When the embroidery unit is winding the bobbin. You tried to the right. 5 The start/stop button, reverse/reinforcement stitch button or thread cutter... have selected a pattern for adjusting the stitch width using the sewing speed controller is raised. You pressed the Back key or the Embroidery key while a pattern was pressed while the buttonhole lever is set up with the twin needle is selected while a pattern that cannot...
... button, needle position button or thread cutter button was pressed while the buttonhole lever is moved to use the foot controller for embroidery. When the embroidery unit is winding the bobbin. You tried to the right. 5 The start/stop button, reverse/reinforcement stitch button or thread cutter... have selected a pattern for adjusting the stitch width using the sewing speed controller is raised. You pressed the Back key or the Embroidery key while a pattern was pressed while the buttonhole lever is set up with the twin needle is selected while a pattern that cannot...
Users Manual - English
Page 160
...frame. Bobbin thread has run out. The time for completion of characters that cannot be used when the embroidery unit is not attached. A card that cannot be used with an embroidery card in place. You tried to select a pattern from the card. You tried to start /stop... button or reverse/reinforcement stitch button was pressed when no card was pressed while the embroidery unit is attached. A pattern is being stored. Little bobbin thread remains. You tried to select a pattern that cannot be used with this ...
...frame. Bobbin thread has run out. The time for completion of characters that cannot be used when the embroidery unit is not attached. A card that cannot be used with an embroidery card in place. You tried to select a pattern from the card. You tried to start /stop... button or reverse/reinforcement stitch button was pressed when no card was pressed while the embroidery unit is attached. A pattern is being stored. Little bobbin thread remains. You tried to select a pattern that cannot be used with this ...
Users Manual - English
Page 163
... Cover A embroidery frame removal 127 embroidery key Cover E 5 bobbin installation 19 , embroidery pattern selection 128 131 bobbin shuttle Cover C embroidery pattern types 128 bobbin storage compartment Cover B embroidery sheets 124 bobbin thread spool pin 16 embroidery threads 112 bobbin thread, pulling up 31 embroidery unit connector slot Cover B bobbin threading 20 embroidery unit installation 118 bobbin winder Cover B embroidery unit removal 120...
... Cover A embroidery frame removal 127 embroidery key Cover E 5 bobbin installation 19 , embroidery pattern selection 128 131 bobbin shuttle Cover C embroidery pattern types 128 bobbin storage compartment Cover B embroidery sheets 124 bobbin thread spool pin 16 embroidery threads 112 bobbin thread, pulling up 31 embroidery unit connector slot Cover B bobbin threading 20 embroidery unit installation 118 bobbin winder Cover B embroidery unit removal 120...


