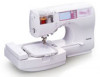

Accessory Catalog
Page 4
... the presser foot. 4. Sew. SA161 All Brother home-use sewing machines www.brother.com Use these utility presser feet and accessories to add a professional finish to your sewing projects. Its position can be adjusted exactly on the edge of zipper/piping, avoiding the non-flat parts of the presser foot and... slide the presser foot so that the needle fits on the opening on either left ). 2. Requires Low Shank Adapter for ULT series, PC-6500, PC-8200 and PC-8500 sewing machines. Brother General Sewing Accessories 05 Sew as you like. ...
... the presser foot. 4. Sew. SA161 All Brother home-use sewing machines www.brother.com Use these utility presser feet and accessories to add a professional finish to your sewing projects. Its position can be adjusted exactly on the edge of zipper/piping, avoiding the non-flat parts of the presser foot and... slide the presser foot so that the needle fits on the opening on either left ). 2. Requires Low Shank Adapter for ULT series, PC-6500, PC-8200 and PC-8500 sewing machines. Brother General Sewing Accessories 05 Sew as you like. ...

Accessory Catalog
Page 6
...the fabric behind the needle and lower the presser foot. 7. Overlock Foot For vertical bobbin machines only. Sew along the guide. Lower the needle into the fabric approximately 1/8" from the edge and sew 2-3 stitches. 4. Position the edge of the fabric. 4. SA164 ABCDEFJKMN SA149 GHILOP SA114 ... is Project Book (See page 53 for details.) www.brother.com Place the fabric with the wrong side facing up under the presser foot. 2. Slowly sew 2-3 stitches, making sure the fabric is rolling around the curled part of the fabric. Select an overlock stitch. 2. SA135 ...
...the fabric behind the needle and lower the presser foot. 7. Overlock Foot For vertical bobbin machines only. Sew along the guide. Lower the needle into the fabric approximately 1/8" from the edge and sew 2-3 stitches. 4. Position the edge of the fabric. 4. SA164 ABCDEFJKMN SA149 GHILOP SA114 ... is Project Book (See page 53 for details.) www.brother.com Place the fabric with the wrong side facing up under the presser foot. 2. Slowly sew 2-3 stitches, making sure the fabric is rolling around the curled part of the fabric. Select an overlock stitch. 2. SA135 ...
Users Manual - English
Page 3
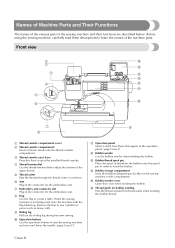
... up. n Bobbin storage compartment Store the bobbins designed specifically for this sewing machine in order to wind the bobbin. d Thread tension dial Use the thread tension dial to adjust the tension of the machine parts. m Bobbin thread spool pin Place the spool of the sewing machine and their functions are described below. g Embroidery unit connector slot...
... up. n Bobbin storage compartment Store the bobbins designed specifically for this sewing machine in order to wind the bobbin. d Thread tension dial Use the thread tension dial to adjust the tension of the machine parts. m Bobbin thread spool pin Place the spool of the sewing machine and their functions are described below. g Embroidery unit connector slot...
Users Manual - English
Page 8
Contents Included Accessories Cover A Accessories ...Cover A Names of Machine Parts and Their Functions Cover B Front view ...Cover B Needle and presser foot section ...Cover C Right-side/rear view ...Cover C Operation buttons ...Cover D Operation panel ...Cover E Introduction ...1 Sewing Machine Features ...1 Important Safety Instructions 5 GETTING READY 9 Turning the Machine On/Off 10 Power supply precautions ...10 Turning on the...
Contents Included Accessories Cover A Accessories ...Cover A Names of Machine Parts and Their Functions Cover B Front view ...Cover B Needle and presser foot section ...Cover C Right-side/rear view ...Cover C Operation buttons ...Cover D Operation panel ...Cover E Introduction ...1 Sewing Machine Features ...1 Important Safety Instructions 5 GETTING READY 9 Turning the Machine On/Off 10 Power supply precautions ...10 Turning on the...
Users Manual - English
Page 11
... it has been dropped or damaged, or dropped into any other user servicing adjustments mentioned in the instruction manual. 16.This sewing machine is not intended for examination, repair, electrical or mechanical adjustment. 4. Never drop or insert any adjustments in the needle area...described in . Important Safety Instructions When using this machine, basic safety precautions should always be taken, including the following: Read all moving parts. DANGER - Always unplug the machine from outlet. 9. To reduce the risk of the machine and foot control free from the electrical outlet ...
... it has been dropped or damaged, or dropped into any other user servicing adjustments mentioned in the instruction manual. 16.This sewing machine is not intended for examination, repair, electrical or mechanical adjustment. 4. Never drop or insert any adjustments in the needle area...described in . Important Safety Instructions When using this machine, basic safety precautions should always be taken, including the following: Read all moving parts. DANGER - Always unplug the machine from outlet. 9. To reduce the risk of the machine and foot control free from the electrical outlet ...
Users Manual - English
Page 13
...is required, first follow the troubleshooting table in the back of the most advanced computerized household sewing machines. For additional product information and updates, visit our web site at www.brother.com 7 To fully enjoy all the features, we suggest that you study the manual before... • Replacing or removing the needle or any assemblies, the presser feet, needle, or other parts • A power failure occurs during use • Maintaining the machine • Leaving the machine unattended 3. Use only neutral soaps or detergents to clean the case. Benzene, thinner, and scouring ...
...is required, first follow the troubleshooting table in the back of the most advanced computerized household sewing machines. For additional product information and updates, visit our web site at www.brother.com 7 To fully enjoy all the features, we suggest that you study the manual before... • Replacing or removing the needle or any assemblies, the presser feet, needle, or other parts • A power failure occurs during use • Maintaining the machine • Leaving the machine unattended 3. Use only neutral soaps or detergents to clean the case. Benzene, thinner, and scouring ...
Users Manual - English
Page 22
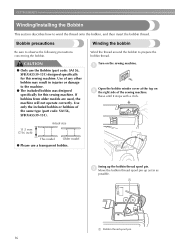
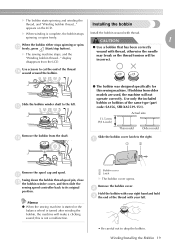
... This model Older model ● Please use the Bobbin (part code: SA156, SFB:XA5539-151) designed specifically for this sewing machine. Raise until it stops with a click. Use only the included bobbin or bobbins of the sewing machine. c Move the bobbin thread spool pin up the bobbin .../Installing the Bobbin This section describes how to the machine. ● The included bobbin was designed specifically for this sewing machine. CAUTION ● Only use a transparent bobbin. Turn on b the right side of the same type (part code: SA156, SFB:XA5539-151). Use of any...
... This model Older model ● Please use the Bobbin (part code: SA156, SFB:XA5539-151) designed specifically for this sewing machine. Raise until it stops with a click. Use only the included bobbin or bobbins of the sewing machine. c Move the bobbin thread spool pin up the bobbin .../Installing the Bobbin This section describes how to the machine. ● The included bobbin was designed specifically for this sewing machine. CAUTION ● Only use a transparent bobbin. Turn on b the right side of the same type (part code: SA156, SFB:XA5539-151). Use of any...
Users Manual - English
Page 25
...either stops spinning or spins m freely, press (Start/stop button). Slide the bobbin winder shaft to its original position. Memo z When the sewing machine is started or the balance wheel is not a malfunction. Winding/Installing the Bobbin 19 o Remove the bobbin from the LCD. ● Use ...stops Install the bobbin wound with your right hand and hold c the end of the same type (part code: SA156, SFB:XA5539-151). spinning or spins freely. X The sewing machine stops, and the "Winding bobbin thread..." appears on the LCD. If bobbins from older models are ...
...either stops spinning or spins m freely, press (Start/stop button). Slide the bobbin winder shaft to its original position. Memo z When the sewing machine is started or the balance wheel is not a malfunction. Winding/Installing the Bobbin 19 o Remove the bobbin from the LCD. ● Use ...stops Install the bobbin wound with your right hand and hold c the end of the same type (part code: SA156, SFB:XA5539-151). spinning or spins freely. X The sewing machine stops, and the "Winding bobbin thread..." appears on the LCD. If bobbins from older models are ...
Users Manual - English
Page 32
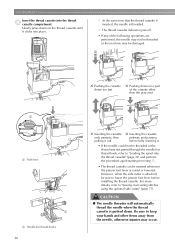
... clicks into the thread b cassette compartment. GETTING READY Insert the thread cassette into place. Slowly press down on a part of the following operations are performed, the needle may not be threaded or the machine may be inserted whenever the presser foot lever is raised or lowered. CAUTION ● The needle threader will... cassette until it • If the needle could not be threaded or the thread was not passed through the needle bar thread hook, refer to "Sewing overcasting stitches using the optional side cutter" (page 71).
... clicks into the thread b cassette compartment. GETTING READY Insert the thread cassette into place. Slowly press down on a part of the following operations are performed, the needle may not be threaded or the machine may be inserted whenever the presser foot lever is raised or lowered. CAUTION ● The needle threader will... cassette until it • If the needle could not be threaded or the thread was not passed through the needle bar thread hook, refer to "Sewing overcasting stitches using the optional side cutter" (page 71).
Users Manual - English
Page 35
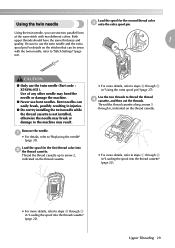
.... CAUTION ● Only use bent needles. Use of the same stitch with the twin needle, refer to the machine may bend the needle or damage the machine. ● Never use the twin needle (Part code : X59296-051). Load the spool for the second thread color c onto the extra spool pin. Thread the... to arrow 2, indicated on the thread cassette. • For more details, refer to "Replacing the needle" (page 35). Using the twin needle, you can sew two parallel lines of any other needle may result. Using the twin needle Load the spool for the first thread color into b the thread cassette...
.... CAUTION ● Only use bent needles. Use of the same stitch with the twin needle, refer to the machine may bend the needle or damage the machine. ● Never use the twin needle (Part code : X59296-051). Load the spool for the second thread color c onto the extra spool pin. Thread the... to arrow 2, indicated on the thread cassette. • For more details, refer to "Replacing the needle" (page 35). Using the twin needle, you can sew two parallel lines of any other needle may result. Using the twin needle Load the spool for the first thread color into b the thread cassette...
Users Manual - English
Page 42
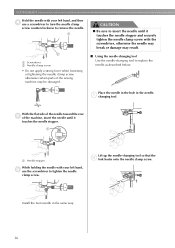
... 1 2 a Screwdriver b Needle clamp screw • Do not apply a strong force when loosening or tightening the needle clamp screw, otherwise certain parts of the machine, insert the needle until it touches the needle stopper. 1 a Needle stopper While holding the needle with the screwdriver, otherwise the needle may break ...tool so that the b fork hooks onto the needle clamp screw. With the flat side of the needle toward the rear e of the sewing machine may result. ■ Using the needle-changing tool Use the needle-changing tool to tighten the needle clamp screw. Install the twin needle...
... 1 2 a Screwdriver b Needle clamp screw • Do not apply a strong force when loosening or tightening the needle clamp screw, otherwise certain parts of the machine, insert the needle until it touches the needle stopper. 1 a Needle stopper While holding the needle with the screwdriver, otherwise the needle may break ...tool so that the b fork hooks onto the needle clamp screw. With the flat side of the needle toward the rear e of the sewing machine may result. ■ Using the needle-changing tool Use the needle-changing tool to tighten the needle clamp screw. Install the twin needle...
Users Manual - English
Page 47
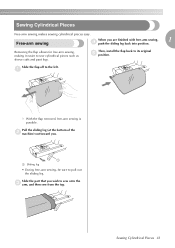
...Slide the part that you wish to pull out the sliding leg. Sewing Cylindrical Pieces 41 Pull the sliding leg (at the bottom of the b machine) out toward you are finished with free-arm sewing, 1 d push the sliding leg back into position. Removing the flap allows for free-arm sewing, making it... easier to its original e position. Free-arm sewing When you . 1 a Sliding leg • During...
...Slide the part that you wish to pull out the sliding leg. Sewing Cylindrical Pieces 41 Pull the sliding leg (at the bottom of the b machine) out toward you are finished with free-arm sewing, 1 d push the sliding leg back into position. Removing the flap allows for free-arm sewing, making it... easier to its original e position. Free-arm sewing When you . 1 a Sliding leg • During...
Users Manual - English
Page 50
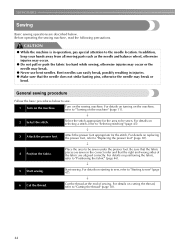
... the area to "Turning on the sewing machine. SEWING BASICS Sewing Basic sewing operations are aligned correctly. CAUTION ● While the machine is in injuries. ● Make sure that the right and wrong sides of sewing. For details on turning on the machine, refer to be sewn under the ... fabric are described below to "Cutting the thread" (page 50). 44 Before operating the sewing machine, read the following precautions. In addition, keep your hands away from all moving parts such as the needle and balance wheel, otherwise injuries may occur. ● Do not ...
... the area to "Turning on the sewing machine. SEWING BASICS Sewing Basic sewing operations are aligned correctly. CAUTION ● While the machine is in injuries. ● Make sure that the right and wrong sides of sewing. For details on turning on the machine, refer to be sewn under the ... fabric are described below to "Cutting the thread" (page 50). 44 Before operating the sewing machine, read the following precautions. In addition, keep your hands away from all moving parts such as the needle and balance wheel, otherwise injuries may occur. ● Do not ...
Users Manual - English
Page 133
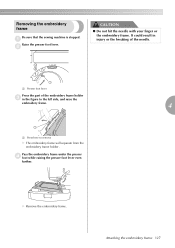
It could result in injury or the breaking of the needle. 1 a Presser foot lever Press the part of the embroidery frame holder c in the figure to the left side, and raise the embroidery frame. 4 1 a Press here to remove X The embroidery frame will ... under the presser d foot while raising the presser foot lever even further. Attaching the embroidery frame 127 Removing the embroidery frame Be sure that the sewing machine is stopped. a Raise the presser foot lever. X Remove the embroidery frame. b CAUTION ● Do not hit the needle with your finger or the embroidery frame...
It could result in injury or the breaking of the needle. 1 a Presser foot lever Press the part of the embroidery frame holder c in the figure to the left side, and raise the embroidery frame. 4 1 a Press here to remove X The embroidery frame will ... under the presser d foot while raising the presser foot lever even further. Attaching the embroidery frame 127 Removing the embroidery frame Be sure that the sewing machine is stopped. a Raise the presser foot lever. X Remove the embroidery frame. b CAUTION ● Do not hit the needle with your finger or the embroidery frame...
Users Manual - English
Page 164
...sewing procedures 44 H handle Cover C heirloom stitching 108 , help key Cover E 15 I inserting thread cassette 26 installing bobbin 19 J joining 107 , joining stitch 91 103 L layout adjustment 138 LCD Cover E LCD button 129 LCD messages 153 , LCD operation 12 129 legs 41 loading spool 22 M machine... manual Cover A operation panel Cover B operation problems 148 operations 15 overcasting stitches 69 P pant legs 41 parallel stitches 29 part names & functions Cover B , patchwork 91 93 pattern embroidery 134 piecing 93 piecing straight stitch 91 plain seams 73 plug ...
...sewing procedures 44 H handle Cover C heirloom stitching 108 , help key Cover E 15 I inserting thread cassette 26 installing bobbin 19 J joining 107 , joining stitch 91 103 L layout adjustment 138 LCD Cover E LCD button 129 LCD messages 153 , LCD operation 12 129 legs 41 loading spool 22 M machine... manual Cover A operation panel Cover B operation problems 148 operations 15 overcasting stitches 69 P pant legs 41 parallel stitches 29 part names & functions Cover B , patchwork 91 93 pattern embroidery 134 piecing 93 piecing straight stitch 91 plain seams 73 plug ...


