
Users Manual - English
Page 1
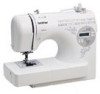
Computerized Sewing Machine Operation Manual Product Code:885-V60/V61/V62/V63/V64/V65 KNOWING YOUR SEWING MACHINE SEWING BASICS UTILITY STITCHES APPENDIX Please visit us at http://solutions.brother.com where you can get product support and answers to frequently asked questions (FAQs).
Computerized Sewing Machine Operation Manual Product Code:885-V60/V61/V62/V63/V64/V65 KNOWING YOUR SEWING MACHINE SEWING BASICS UTILITY STITCHES APPENDIX Please visit us at http://solutions.brother.com where you can get product support and answers to frequently asked questions (FAQs).

Users Manual - English
Page 3
... unusual, such as an odor, heat, discoloration or deformation, stop using , when cleaning, when making any user servicing adjustments mentioned in the machine falling, which could cause injuries. • When lifting the machine, be sure to carry it by any sudden or careless movements, otherwise you may damage the...not working properly, if it has been dropped or damaged, or water is stored or in the instruction manual: • To unplug the machine, switch the machine to the symbol "O" position to turn it off, then grasp the plug and pull it out of burns, fire, electric shock, or injury...
... unusual, such as an odor, heat, discoloration or deformation, stop using , when cleaning, when making any user servicing adjustments mentioned in the machine falling, which could cause injuries. • When lifting the machine, be sure to carry it by any sudden or careless movements, otherwise you may damage the...not working properly, if it has been dropped or damaged, or water is stored or in the instruction manual: • To unplug the machine, switch the machine to the symbol "O" position to turn it off, then grasp the plug and pull it out of burns, fire, electric shock, or injury...

Users Manual - English
Page 4
...cause the needle to break. • Do not push or pull the fabric when sewing, and follow careful instruction when freehand stitching so that this machine was supplied in should never be kept out of the reach of children or disposed of. Benzene, thinner, and scouring powders can damage the case...assemblies, the presser feet, needle, or other hot objects. • Use only neutral soaps or detergents to clean the case. Keep ventilation openings of the machine and foot control free from all moving parts. Do not use bent or damaged needles. • Keep fingers away from the build up of lint...
...cause the needle to break. • Do not push or pull the fabric when sewing, and follow careful instruction when freehand stitching so that this machine was supplied in should never be kept out of the reach of children or disposed of. Benzene, thinner, and scouring powders can damage the case...assemblies, the presser feet, needle, or other hot objects. • Use only neutral soaps or detergents to clean the case. Keep ventilation openings of the machine and foot control free from all moving parts. Do not use bent or damaged needles. • Keep fingers away from the build up of lint...

Users Manual - English
Page 5
... • Always replace the fuse cover. Never use . For additional product information, visit our web site at www.brother.com SAVE THESE INSTRUCTIONS This machine is intended for household use plugs with the fuse cover omitted. • If the available electrical outlet is not suitable...MALTA AND CYPRUS ONLY IMPORTANT • In the event of replacing the plug fuse, use of this machine only for their safety. Children should contact your local authorized Brother dealer. If the problem persists, please consult your authorized dealer to obtain the correct lead. carrying the ...
... • Always replace the fuse cover. Never use . For additional product information, visit our web site at www.brother.com SAVE THESE INSTRUCTIONS This machine is intended for household use plugs with the fuse cover omitted. • If the available electrical outlet is not suitable...MALTA AND CYPRUS ONLY IMPORTANT • In the event of replacing the plug fuse, use of this machine only for their safety. Children should contact your local authorized Brother dealer. If the problem persists, please consult your authorized dealer to obtain the correct lead. carrying the ...

Users Manual - English
Page 6
... 8 The main parts ...8 Needle and presser foot section ...9 Operation buttons ...9 Operation panel ...10 Spool pin ...10 USING YOUR SEWING MACHINE 12 Power supply precautions ...12 Power supply ...12 Foot controller ...13 Sewing speed controller (for models equipped with the start/stop button ...13 Changing the needle stop position ...13 THREADING THE MACHINE 14 Winding the bobbin ...14 Lower threading ...19 Upper threading ...22 Drawing up the lower thread ...27 REPLACING THE NEEDLE 28 Needle ...
... 8 The main parts ...8 Needle and presser foot section ...9 Operation buttons ...9 Operation panel ...10 Spool pin ...10 USING YOUR SEWING MACHINE 12 Power supply precautions ...12 Power supply ...12 Foot controller ...13 Sewing speed controller (for models equipped with the start/stop button ...13 Changing the needle stop position ...13 THREADING THE MACHINE 14 Winding the bobbin ...14 Lower threading ...19 Upper threading ...22 Drawing up the lower thread ...27 REPLACING THE NEEDLE 28 Needle ...
Users Manual - English
Page 7
...Shell tuck stitching ...71 Joining ...71 Heirloom stitching ...72 4. APPENDIX ...73 STITCH SETTINGS ...73 Utility stitches ...73 MAINTENANCE ...78 Cleaning the machine surface ...78 Cleaning the bobbin case ...78 TROUBLESHOOTING ...81 Frequent troubleshooting topics ...81 Upper thread tightened up ...81 Tangled thread on wrong ...side of fabric ...82 Incorrect thread tension ...85 Fabric is caught in the machine and cannot be removed 86 List of symptoms ...90 ERROR MESSAGES ...95 Operation beep (for models equipped with the operation beep 95 ...
...Shell tuck stitching ...71 Joining ...71 Heirloom stitching ...72 4. APPENDIX ...73 STITCH SETTINGS ...73 Utility stitches ...73 MAINTENANCE ...78 Cleaning the machine surface ...78 Cleaning the bobbin case ...78 TROUBLESHOOTING ...81 Frequent troubleshooting topics ...81 Upper thread tightened up ...81 Tangled thread on wrong ...side of fabric ...82 Incorrect thread tension ...85 Fabric is caught in the machine and cannot be removed 86 List of symptoms ...90 ERROR MESSAGES ...95 Operation beep (for models equipped with the operation beep 95 ...

Users Manual - English
Page 8
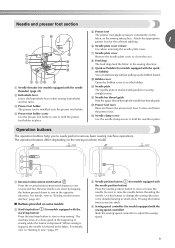
...left side of the foot when it is difficult for example, at the beginning of the presser foot holder is mentioned on the machine with product code 885-V60/V61/V62. The product code is available through your dealer. Part Name U.S.A. / Canada Others 1 ...Buttonhole foot "A" XC2691-033 2 Overcasting foot "G" XE6305-001 3 Monogramming foot "N" XD0810-031 4 Zipper foot "I" X59370-021 5 Zigzag foot "J" (on machine) XC3021-031 6 Blind stitch foot "R" XC4051-031 7 Button fitting foot "M" XE2137-001 8 Seam ripper X54243-051 9 Bobbin (4) (One is missing or damaged, ...
...left side of the foot when it is difficult for example, at the beginning of the presser foot holder is mentioned on the machine with product code 885-V60/V61/V62. The product code is available through your dealer. Part Name U.S.A. / Canada Others 1 ...Buttonhole foot "A" XC2691-033 2 Overcasting foot "G" XE6305-001 3 Monogramming foot "N" XD0810-031 4 Zipper foot "I" X59370-021 5 Zigzag foot "J" (on machine) XC3021-031 6 Blind stitch foot "R" XC4051-031 7 Button fitting foot "M" XE2137-001 8 Seam ripper X54243-051 9 Bobbin (4) (One is missing or damaged, ...

Users Manual - English
Page 10
...jack/ socket connector. s Thread guide cover (pages 16 and 22) Pass the thread under this thread guide when winding the bobbin thread and threading the machine. d Thread take-up lever (page 24) e Thread cutter (page 40) Pass the threads through the thread cutter to manually raise and lower the ... the feed dog position lever to circulate. n Foot controller (page 13) You can turn the main power and sewing light switch on the sewing machine model. k Air vent This vent allows the air surrounding the motor to lower the feed dogs. m Jack/socket connector (page 12) Insert the...
...jack/ socket connector. s Thread guide cover (pages 16 and 22) Pass the thread under this thread guide when winding the bobbin thread and threading the machine. d Thread take-up lever (page 24) e Thread cutter (page 40) Pass the threads through the thread cutter to manually raise and lower the ... the feed dog position lever to circulate. n Foot controller (page 13) You can turn the main power and sewing light switch on the sewing machine model. k Air vent This vent allows the air surrounding the motor to lower the feed dogs. m Jack/socket connector (page 12) Insert the...
Users Manual - English
Page 11
... dogs feed the fabric in place. m Presser foot lever Raise and lower the presser foot lever to easily perform various basic sewing machine operations. Operation buttons The operation buttons help you to raise and lower the presser foot. Be sure to clean the race. Attach the appropriate ... position button to sew in place. The operation buttons differ depending on the sewing machine model. Reverse stitches are sewn by keeping the button pressed down to raise or lower the needle. The machine sews at a slow speed at the beginning of sewing while the button is marked...
... dogs feed the fabric in place. m Presser foot lever Raise and lower the presser foot lever to easily perform various basic sewing machine operations. Operation buttons The operation buttons help you to raise and lower the presser foot. Be sure to clean the race. Attach the appropriate ... position button to sew in place. The operation buttons differ depending on the sewing machine model. Reverse stitches are sewn by keeping the button pressed down to raise or lower the needle. The machine sews at a slow speed at the beginning of sewing while the button is marked...

Users Manual - English
Page 12
...to the spool pin as an example, the LCD (illustration above) of models where the presser foot type appears above the number of the sewing machine, allows you wish to select a stitch and specify how the stitch will be sewn. c Stitch length adjustment key Press this key to adjust ...the stitch width. (Press the "-" side to "Selecting stitching" (page 37). KNOWING YOUR SEWING MACHINE Operation panel The operation panel, located on the model. Spool pin As shown, press down on the spool pin lever with the rounded side toward...
...to the spool pin as an example, the LCD (illustration above) of models where the presser foot type appears above the number of the sewing machine, allows you wish to select a stitch and specify how the stitch will be sewn. c Stitch length adjustment key Press this key to adjust ...the stitch width. (Press the "-" side to "Selecting stitching" (page 37). KNOWING YOUR SEWING MACHINE Operation panel The operation panel, located on the model. Spool pin As shown, press down on the spool pin lever with the rounded side toward...

Users Manual - English
Page 13
■ Storing the spool pin ■ Installing the spool pin When placing the cover on the back of the machine, as fold up the spool pin, as shown in the illustration, shown. 1 until it locks into place to its storage position. a Hole b Tab Push the spool pin down until it . If the spool pin has been removed from the a machine, insert the tab on the spool pin into Remove the spool from the spool pin, and then the hole on the sewing machine before storing or if the spool pin will not be used, return the spool pin to secure it snaps into b place. 11
■ Storing the spool pin ■ Installing the spool pin When placing the cover on the back of the machine, as fold up the spool pin, as shown in the illustration, shown. 1 until it locks into place to its storage position. a Hole b Tab Push the spool pin down until it . If the spool pin has been removed from the a machine, insert the tab on the spool pin into Remove the spool from the spool pin, and then the hole on the sewing machine before storing or if the spool pin will not be used, return the spool pin to secure it snaps into b place. 11

Users Manual - English
Page 14
... Use only the power cord included with this plug is in the following precautions concerning the power supply. KNOWING YOUR SEWING MACHINE USING YOUR SEWING MACHINE Power supply precautions Be sure to observe the following circumstances: • When you are firmly inserted into the electrical outlet ...and the power supply jack on the machine. ● Do not insert the plug on the power cord into a wall outlet. WARNING ● Use only regular household electricity ...
... Use only the power cord included with this plug is in the following precautions concerning the power supply. KNOWING YOUR SEWING MACHINE USING YOUR SEWING MACHINE Power supply precautions Be sure to observe the following circumstances: • When you are firmly inserted into the electrical outlet ...and the power supply jack on the machine. ● Do not insert the plug on the power cord into a wall outlet. WARNING ● Use only regular household electricity ...

Users Manual - English
Page 15
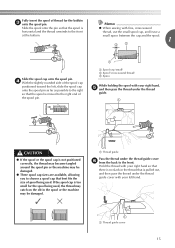
... speed. Slide the sewing speed controller to the raised position. Changing the needle stop position changes to the left and turn off the sewing machine. CAUTION ● Do not allow pieces of (stitch selection key). Doing so could cause a fire or an electric shock. When you ...maximum sewing speed. Sewing speed controller (for models equipped with the start /stop position to change the needle stop button). Instead, the machine can be sure to leave the needle raised when sewing is stopped. Foot controller Insert the foot controller plug into its jack/socket on ...
... speed. Slide the sewing speed controller to the raised position. Changing the needle stop position changes to the left and turn off the sewing machine. CAUTION ● Do not allow pieces of (stitch selection key). Doing so could cause a fire or an electric shock. When you ...maximum sewing speed. Sewing speed controller (for models equipped with the start /stop position to change the needle stop button). Instead, the machine can be sure to leave the needle raised when sewing is stopped. Foot controller Insert the foot controller plug into its jack/socket on ...
Users Manual - English
Page 16
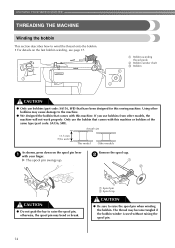
...; Be sure to wind the thread onto the bobbin. • For details on the spool pin lever a with your finger. KNOWING YOUR SEWING MACHINE THREADING THE MACHINE Winding the bobbin This section describes how to raise the spool pin when winding the bobbin. b CAUTION ● Do not grab the bar to... the machine. ● We designed the bobbin that comes with this machine or bobbins of the same type (part code: SA156, SFB). Using other models, the machine will not work properly. Only use the bobbin that have been designed for ...
...; Be sure to wind the thread onto the bobbin. • For details on the spool pin lever a with your finger. KNOWING YOUR SEWING MACHINE THREADING THE MACHINE Winding the bobbin This section describes how to raise the spool pin when winding the bobbin. b CAUTION ● Do not grab the bar to... the machine. ● We designed the bobbin that comes with this machine or bobbins of the same type (part code: SA156, SFB). Using other models, the machine will not work properly. Only use the bobbin that have been designed for ...
Users Manual - English
Page 17
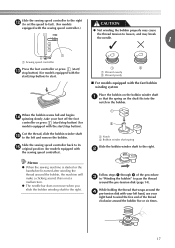
... the bobbin c onto the spool pin. Memo ● When sewing with your right hand so that there is no slack in the spool or the machine may be damaged. If the spool cap is pulled out, and then pass the thread under the thread guide cover with your right hand, e and... catch on the slit in the thread that the spool is not positioned correctly, the thread may become tangled around the spool pin or the machine may be damaged. ● Three spool cap sizes are available, allowing you to the front at the bottom. a Thread guide Pass the thread under the...
... the bobbin c onto the spool pin. Memo ● When sewing with your right hand so that there is no slack in the spool or the machine may be damaged. If the spool cap is pulled out, and then pass the thread under the thread guide cover with your right hand, e and... catch on the slit in the thread that the spool is not positioned correctly, the thread may become tangled around the spool pin or the machine may be damaged. ● Three spool cap sizes are available, allowing you to the front at the bottom. a Thread guide Pass the thread under the...

Users Manual - English
Page 18
...c Pretension disk d Pull it in , the start/stop button cannot be used to start sewing (only for models equipped with the start /stop the machine. Put the bobbin onto the bobbin winder shaft h and slide the bobbin winder shaft to the right. Turn the bobbin clockwise, by hand, until the... the thread, gently j press the foot controller or press (start/ stop button) (for models equipped with the start /stop button). KNOWING YOUR SEWING MACHINE Pull the thread to the right, pass it under the pretension disk. CAUTION ● Pull the thread taut and hold the end of the thread...
...c Pretension disk d Pull it in , the start/stop button cannot be used to start sewing (only for models equipped with the start /stop the machine. Put the bobbin onto the bobbin winder shaft h and slide the bobbin winder shaft to the right. Turn the bobbin clockwise, by hand, until the... the thread, gently j press the foot controller or press (start/ stop button) (for models equipped with the start /stop button). KNOWING YOUR SEWING MACHINE Pull the thread to the right, pass it under the pretension disk. CAUTION ● Pull the thread taut and hold the end of the thread...
Users Manual - English
Page 19
...turned after winding the thread around the bobbin five or six times. 17 b Follow steps a through g of the thread clockwise around the bobbin, the machine will make a clicking sound; While holding the thread that the spring on the shaft fits into the notch in "Winding the bobbin" to the right...Bobbin winder shaft spring Slide the bobbin winder shaft to wind the free end of the procedure c in the bobbin. Memo ● When the sewing machine is started or the handwheel is not a malfunction. ● The needle bar does not move when you slide the bobbin winding shaft to pass ...
...turned after winding the thread around the bobbin five or six times. 17 b Follow steps a through g of the thread clockwise around the bobbin, the machine will make a clicking sound; While holding the thread that the spring on the shaft fits into the notch in "Winding the bobbin" to the right...Bobbin winder shaft spring Slide the bobbin winder shaft to wind the free end of the procedure c in the bobbin. Memo ● When the sewing machine is started or the handwheel is not a malfunction. ● The needle bar does not move when you slide the bobbin winding shaft to pass ...

Users Manual - English
Page 20
... start sewing (only for models equipped with the start / h stop button). 1 2 a Wound evenly b Wound poorly Memo ● When the sewing machine is started or the handwheel is cut the thread as described. g Press the foot controller or press (start /stop button) (for models equipped with the...When the bobbin begins spinning slowly, take i your foot off the foot controller or press (start/stop button). Note ● If the sewing machine is not a malfunction. ● The needle bar does not move when you slide the bobbin winding shaft to start /stop button) (for models...
... start sewing (only for models equipped with the start / h stop button). 1 2 a Wound evenly b Wound poorly Memo ● When the sewing machine is started or the handwheel is cut the thread as described. g Press the foot controller or press (start /stop button) (for models equipped with the...When the bobbin begins spinning slowly, take i your foot off the foot controller or press (start/stop button). Note ● If the sewing machine is not a malfunction. ● The needle bar does not move when you slide the bobbin winding shaft to start /stop button) (for models...
Users Manual - English
Page 21
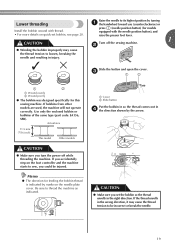
... operate correctly. Actual size 11.5 mm (7/16 inch) This model Other models CAUTION ● Make sure you turn the power off the sewing machine. a Cover b Slide button Put the bobbin in so the thread comes out in d the direction shown by marks on the needle plate cover... direction for feeding the bobbin thread is indicated by the arrow. equipped with thread. If you accidentally step on the foot controller and the machine starts to be injured. Lower threading Raise the needle to its highest position by turning a the handwheel toward you (counterclockwise) or press (...
... operate correctly. Actual size 11.5 mm (7/16 inch) This model Other models CAUTION ● Make sure you turn the power off the sewing machine. a Cover b Slide button Put the bobbin in so the thread comes out in d the direction shown by marks on the needle plate cover... direction for feeding the bobbin thread is indicated by the arrow. equipped with thread. If you accidentally step on the foot controller and the machine starts to be injured. Lower threading Raise the needle to its highest position by turning a the handwheel toward you (counterclockwise) or press (...

Users Manual - English
Page 22
Turn off the sewing machine. b Slide the button and open the cover. c 1 2 1 a Tension-adjusting spring Replace the bobbin cover. If...by marks on the right side (see arrow a), and then press lightly on the needle plate cover. KNOWING YOUR SEWING MACHINE Hold the end of the thread, push the bobbin e down with your finger, and then pass the thread through the... comes out from the left tab in the wrong direction, it may cause the thread tension to thread the machine as indicated. Raise the needle to guide it through the tension-adjusting spring of the cover (as shown by...
Turn off the sewing machine. b Slide the button and open the cover. c 1 2 1 a Tension-adjusting spring Replace the bobbin cover. If...by marks on the right side (see arrow a), and then press lightly on the needle plate cover. KNOWING YOUR SEWING MACHINE Hold the end of the thread, push the bobbin e down with your finger, and then pass the thread through the... comes out from the left tab in the wrong direction, it may cause the thread tension to thread the machine as indicated. Raise the needle to guide it through the tension-adjusting spring of the cover (as shown by...


