
SAPr Device Types for Brother Label Printers
Page 1
SAP® Device Types for Brother Label Printers © 2020 Brother Industries, Ltd. All Rights Reserved. Version 05
SAP® Device Types for Brother Label Printers © 2020 Brother Industries, Ltd. All Rights Reserved. Version 05
SAPr Device Types for Brother Label Printers
Page 4
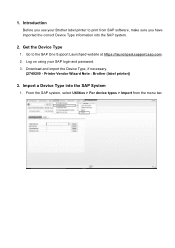
Log on using your Brother label printer to the SAP One Support Launchpad website at https://launchpad.support.sap.com. 2. Printer Vendor Wizard Note : Brother (label printer)) 3. Introduction Before you use your SAP login and password. 3. From the SAP system, select Utilities > For device types > Import from SAP software, make sure you have imported the correct Device Type information into the SAP System 1. Import a Device Type into the SAP system. 2. Get the Device Type 1. Go to print from the menu bar. Download and import the Device Type, if necessary. (2749209 - 1.
Log on using your Brother label printer to the SAP One Support Launchpad website at https://launchpad.support.sap.com. 2. Printer Vendor Wizard Note : Brother (label printer)) 3. Introduction Before you use your SAP login and password. 3. From the SAP system, select Utilities > For device types > Import from SAP software, make sure you have imported the correct Device Type information into the SAP System 1. Import a Device Type into the SAP system. 2. Get the Device Type 1. Go to print from the menu bar. Download and import the Device Type, if necessary. (2749209 - 1.

SAPr Device Types for Brother Label Printers
Page 8
Click the Device Type Selection ( ) button to select the Device Type, or use the Device Type drop-down menu. 5. Click the Continue with Language Selection button. 5 Select "Brother" from the Manufacturer drop-down menu, and the applicable printer from the Printer Model drop-down menu. 6.
Click the Device Type Selection ( ) button to select the Device Type, or use the Device Type drop-down menu. 5. Click the Continue with Language Selection button. 5 Select "Brother" from the Manufacturer drop-down menu, and the applicable printer from the Printer Model drop-down menu. 6.

SAPr Device Types for Brother Label Printers
Page 10
9. Click the Save ( ) button to the Access Method tab, and then select G:Fronted print with control technologie from the Host Spool Access Method drop-down menu. 10. Go to finish. 7 Go to the Host Printer field, and then type _DEFAULT. 11.
9. Click the Save ( ) button to the Access Method tab, and then select G:Fronted print with control technologie from the Host Spool Access Method drop-down menu. 10. Go to finish. 7 Go to the Host Printer field, and then type _DEFAULT. 11.

SAPr Device Types for Brother Label Printers
Page 26
3. Click the Continue ( ) button to the Output Options tab. Click Form Attributes and go to open the Smart Form Editor. 4. You need to set the media settings of the main printer in advance. 23
3. Click the Continue ( ) button to the Output Options tab. Click Form Attributes and go to open the Smart Form Editor. 4. You need to set the media settings of the main printer in advance. 23

SAPr Device Types for Brother Label Printers
Page 40
... Non-Unicode: Label Printer Model TD-2020 TD-2120N TD-2130N TD-2130NSA RJ-2030 RJ-2050 RJ-2140 RJ-2150 RJ-3050 RJ-3050Ai RJ-3150 RJ-3150Ai RJ-4230B RJ-4250WB TD-4410D TD-4510D TD-4420DN TD-4520DN TD-4550DNWB TD-4420TN TD-4520TN TD-4650TNWB TD-4750TNWB TD-4650TNWBR TD-4750TNWBR RJ-2035B RJ-3035B RJ-2055WB RJ-3055WB TJ-4020TN TJ...
... Non-Unicode: Label Printer Model TD-2020 TD-2120N TD-2130N TD-2130NSA RJ-2030 RJ-2050 RJ-2140 RJ-2150 RJ-3050 RJ-3050Ai RJ-3150 RJ-3150Ai RJ-4230B RJ-4250WB TD-4410D TD-4510D TD-4420DN TD-4520DN TD-4550DNWB TD-4420TN TD-4520TN TD-4650TNWB TD-4750TNWB TD-4650TNWBR TD-4750TNWBR RJ-2035B RJ-3035B RJ-2055WB RJ-3055WB TJ-4020TN TJ...

Users Guide
Page 1
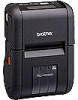
We suggest that you keep this User's Guide. Version A US ENG User's Guide RJ-2030/RJ-2050/RJ-2140/RJ-2150 RJ-2030 RJ-2050 RJ-2140 RJ-2150 Before using this printer, be sure to read this manual in a handy place for future reference.
We suggest that you keep this User's Guide. Version A US ENG User's Guide RJ-2030/RJ-2050/RJ-2140/RJ-2150 RJ-2030 RJ-2050 RJ-2140 RJ-2150 Before using this printer, be sure to read this manual in a handy place for future reference.
Users Guide
Page 2
...printer directly. 1 Printed manual in the box. 2 PDF manual on the Brother Solutions Center website. This guide provides basic information about using your printer along with the printer... Brother Solutions Center at support.brother....com Product Safety Guide 1, 2 Quick Setup Guide 1, 2 User's Guide 2 AirPrint Guide 2 P-touch Template Manual 2 Raster Command Reference 2 This guide provides safety information; Illustrations for RJ-2030/2050 may differ depending on your computer's operating system. Before using the printer...printer control commands for controlling your printer...
...printer directly. 1 Printed manual in the box. 2 PDF manual on the Brother Solutions Center website. This guide provides basic information about using your printer along with the printer... Brother Solutions Center at support.brother....com Product Safety Guide 1, 2 Quick Setup Guide 1, 2 User's Guide 2 AirPrint Guide 2 P-touch Template Manual 2 Raster Command Reference 2 This guide provides safety information; Illustrations for RJ-2030/2050 may differ depending on your computer's operating system. Before using the printer...printer control commands for controlling your printer...

Users Guide
Page 3
... or mini-USB port. Ignoring them may change or fade if exposed to other objects. These labels provide operational information and indicate the printer's model number. DO NOT push the power switch with the plastic cover. This could be transferred to sunlight or heat. ...and the printing may unpeel or become permanently affixed, and the color of the intended surface. Important safety instructions WARNING DO NOT use the printer where its use thermal paper, therefore the color of injury. When using outdoors and when durability is prohibited, such as a pen. ...
... or mini-USB port. Ignoring them may change or fade if exposed to other objects. These labels provide operational information and indicate the printer's model number. DO NOT push the power switch with the plastic cover. This could be transferred to sunlight or heat. ...and the printing may unpeel or become permanently affixed, and the color of the intended surface. Important safety instructions WARNING DO NOT use the printer where its use thermal paper, therefore the color of injury. When using outdoors and when durability is prohibited, such as a pen. ...

Users Guide
Page 4
...can cause the color to change or fade. DO NOT affix labels to remove the label. RD Roll Use only genuine Brother accessories and supplies (indicated by water, sweat, or medicated cream, etc., can use isopropyl alcohol or ethanol only when cleaning the print head or...or metal objects, or touching the printed surface with hands dampened by the mark). If the label is affixed to dry. General Precautions Printer If the Bluetooth and wireless LAN functions are not using optional accessories, use them as alcohol, ketones, or esters, adhesive tape, erasers...
...can cause the color to change or fade. DO NOT affix labels to remove the label. RD Roll Use only genuine Brother accessories and supplies (indicated by water, sweat, or medicated cream, etc., can use isopropyl alcohol or ethanol only when cleaning the print head or...or metal objects, or touching the printed surface with hands dampened by the mark). If the label is affixed to dry. General Precautions Printer If the Bluetooth and wireless LAN functions are not using optional accessories, use them as alcohol, ketones, or esters, adhesive tape, erasers...
Users Guide
Page 6
...Available Software...21 Installing the Printer Driver and Software (When Using a Computer 23 Connecting the Printer to a Computer or Mobile Device 24 Connecting Using USB...24 Connecting Using Bluetooth (RJ-2030/2050/2150 Only 25 Connecting Using Wi-Fi® (RJ-2050/2140/2150 Only 26 LCD ...30 ...LCD Settings ...30 2 Using the Printer 32 Printing from Computers...32 Printing with the Printer Driver...32 Setting Printer Driver Options...32 Printing from Mobile...
...Available Software...21 Installing the Printer Driver and Software (When Using a Computer 23 Connecting the Printer to a Computer or Mobile Device 24 Connecting Using USB...24 Connecting Using Bluetooth (RJ-2030/2050/2150 Only 25 Connecting Using Wi-Fi® (RJ-2050/2140/2150 Only 26 LCD ...30 ...LCD Settings ...30 2 Using the Printer 32 Printing from Computers...32 Printing with the Printer Driver...32 Setting Printer Driver Options...32 Printing from Mobile...

Users Guide
Page 7
......37 Settings Dialog Box ...37 Menu Bar ...39 General Tab...42 Wireless LAN Tab (RJ-2050/2140/2150 Only 45 Wireless Direct Tab (RJ-2050/2140/2150 Only 49 Bluetooth Tab (RJ-2030/2050/2150 Only 50 Applying Setting Changes to Multiple Printers 51 Device Settings...52 Settings Dialog Box ...52 Menu Bar ...54 Basic Tab...56...
......37 Settings Dialog Box ...37 Menu Bar ...39 General Tab...42 Wireless LAN Tab (RJ-2050/2140/2150 Only 45 Wireless Direct Tab (RJ-2050/2140/2150 Only 49 Bluetooth Tab (RJ-2030/2050/2150 Only 50 Applying Setting Changes to Multiple Printers 51 Device Settings...52 Settings Dialog Box ...52 Menu Bar ...54 Basic Tab...56...

Users Guide
Page 8
...Template to P-Touch Transfer Manager 88 Transferring Templates or Other Data from the Computer to the Printer 91 Backing up Templates or Other Data Saved in the Printer 96 Deleting All the Printer Data ...97 Creating a BLF File or a PDZ File...98 Using P-touch Library ...99...111 Updating P-touch Editor...111 Updating the Firmware ...113 Section III Wireless network (RJ-2050/2140/2150 Only) 10 Introduction 116 Network Features ...116 11 Changing Your Printer's Network Settings 117 Changing Your Printer's Network Settings (IP Address, Subnet Mask and Gateway 117 Using the BRAdmin Light...
...Template to P-Touch Transfer Manager 88 Transferring Templates or Other Data from the Computer to the Printer 91 Backing up Templates or Other Data Saved in the Printer 96 Deleting All the Printer Data ...97 Creating a BLF File or a PDZ File...98 Using P-touch Library ...99...111 Updating P-touch Editor...111 Updating the Firmware ...113 Section III Wireless network (RJ-2050/2140/2150 Only) 10 Introduction 116 Network Features ...116 11 Changing Your Printer's Network Settings 117 Changing Your Printer's Network Settings (IP Address, Subnet Mask and Gateway 117 Using the BRAdmin Light...

Users Guide
Page 9
...Specifications 123 14 Troubleshooting 125 Overview...125 Printing Problems ...125 Printed Image Problems ...127 Printer Problems...128 Network Setup Problems...130 Cannot Print over the Network Printer Is Not Found on the Network Even after Successful Installation 131 Security Software Problems ...131... Checking the Operation of Network Devices 132 Error Messages from the Printer ...132 15 Supported Protocols and Security Features 134 16 Network Terms and Information 135 Types of Network Connections and Protocols...
...Specifications 123 14 Troubleshooting 125 Overview...125 Printing Problems ...125 Printed Image Problems ...127 Printer Problems...128 Network Setup Problems...130 Cannot Print over the Network Printer Is Not Found on the Network Even after Successful Installation 131 Security Software Problems ...131... Checking the Operation of Network Devices 132 Error Messages from the Printer ...132 15 Supported Protocols and Security Features 134 16 Network Terms and Information 135 Types of Network Connections and Protocols...

Users Guide
Page 10
Section I Basic Operations I Setting Up the Printer 2 Using the Printer 32 Changing the Printer Settings 34 Other Functions 71 Maintaining the Printer 74
Section I Basic Operations I Setting Up the Printer 2 Using the Printer 32 Changing the Printer Settings 34 Other Functions 71 Maintaining the Printer 74

Users Guide
Page 11
1 Setting Up the Printer General Description 2 1 3 4 14 5 13 12 6 11 10 9 8 7 1 LCD 2 Paper exit slot 3 Media roll compartment cover 4 Media roll cover open lever 5 Interface cover 6 Battery cover 7 Battery latch 8 DC connector 9 Mini-USB port 10 Battery compartment 11 (Feed) button/OK button To feed the paper or print your printer settings 12 Menu button/ button 13 (Power) button/ (Back) button To turn your printer on/off 14 LED indicator 1 1 1 2
1 Setting Up the Printer General Description 2 1 3 4 14 5 13 12 6 11 10 9 8 7 1 LCD 2 Paper exit slot 3 Media roll compartment cover 4 Media roll cover open lever 5 Interface cover 6 Battery cover 7 Battery latch 8 DC connector 9 Mini-USB port 10 Battery compartment 11 (Feed) button/OK button To feed the paper or print your printer settings 12 Menu button/ button 13 (Power) button/ (Back) button To turn your printer on/off 14 LED indicator 1 1 1 2

Users Guide
Page 12
...): Update of the data failed. (flashing): Cannot communicate with the server. 2 Wireless Direct icon (RJ-2050/2140/2150 only) 3 WLAN icon (RJ-2050/2140/2150 only) : The network is connected correctly. : Your printer is searching for the network. 4 Bluetooth icon (RJ-2030/2050/2150 only) 5 Battery level Indicates the remaining battery level. Full: Half: ...
...): Update of the data failed. (flashing): Cannot communicate with the server. 2 Wireless Direct icon (RJ-2050/2140/2150 only) 3 WLAN icon (RJ-2050/2140/2150 only) : The network is connected correctly. : Your printer is searching for the network. 4 Bluetooth icon (RJ-2030/2050/2150 only) 5 Battery level Indicates the remaining battery level. Full: Half: ...

Users Guide
Page 13
... Indicators 1 The indicator lights and flashes to indicate your printer's status. The symbols used in this section explain the 1 meaning of the different indicator colors and patterns: or or or or Indicator is lit in ...
... Indicators 1 The indicator lights and flashes to indicate your printer's status. The symbols used in this section explain the 1 meaning of the different indicator colors and patterns: or or or or Indicator is lit in ...

Users Guide
Page 14
...hold the (Feed) button. Enable or disable the function for the selected item Press the [OK] button to activate the selected menu option. Print the printer information Make sure that a roll is set to [Continuous Length Tape]: Press the (Feed) button to feed the paper. If you press this button while... Storage Mode on page 72). (Feed) button/ OK button function Operation Feed the paper When the paper type is set to [Die-cut Label] (RJ-2140/2150 only) or [Media With Marks]: Press the position. (Feed) button to automatically feed the paper to the print When the paper type is set , ...
...hold the (Feed) button. Enable or disable the function for the selected item Press the [OK] button to activate the selected menu option. Print the printer information Make sure that a roll is set to [Continuous Length Tape]: Press the (Feed) button to feed the paper. If you press this button while... Storage Mode on page 72). (Feed) button/ OK button function Operation Feed the paper When the paper type is set to [Die-cut Label] (RJ-2140/2150 only) or [Media With Marks]: Press the position. (Feed) button to automatically feed the paper to the print When the paper type is set , ...

Users Guide
Page 15
Make sure that the terminal end of the battery is facing inwards and oriented correctly as shown. Do NOT use excessive force to install the battery. 1 1 Battery latch 3 Close the battery cover, and then move the battery cover lock to the unlock position, and then open the battery cover. 1 1 1 2 Insert the battery into the battery compartment until the battery latch locks into place. Setting Up the Printer Battery Installation/Removal Installing the Battery 1 Move the battery cover lock to the lock position. 6
Make sure that the terminal end of the battery is facing inwards and oriented correctly as shown. Do NOT use excessive force to install the battery. 1 1 Battery latch 3 Close the battery cover, and then move the battery cover lock to the unlock position, and then open the battery cover. 1 1 1 2 Insert the battery into the battery compartment until the battery latch locks into place. Setting Up the Printer Battery Installation/Removal Installing the Battery 1 Move the battery cover lock to the lock position. 6


