
Accessory Catalog
Page 23
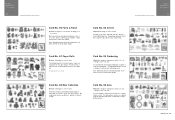
... packed with beautiful images of bears made in a variety of styles, sizes and occasions. Card No. 55 Gardening SA355: 3 designs for a multiple hoop (12" x 5") , 30 designs for a 4" x 4" area This Bear Collection is limited to embellish on hand. Note: Embroidery machine models with... designs for a 4" x 4" area A design for a 4"x 4" area Our Fairy and Floral embroidery card displays a mix of today's Brother machines. Brother Embroidery Accessories 43 Brother Embroidery Card Collection Card No. 50 Fairy & Floral SA350: 3 designs for a 7"x 5" area, 32 designs for any bed, bath or...
... packed with beautiful images of bears made in a variety of styles, sizes and occasions. Card No. 55 Gardening SA355: 3 designs for a multiple hoop (12" x 5") , 30 designs for a 4" x 4" area This Bear Collection is limited to embellish on hand. Note: Embroidery machine models with... designs for a 4" x 4" area A design for a 4"x 4" area Our Fairy and Floral embroidery card displays a mix of today's Brother machines. Brother Embroidery Accessories 43 Brother Embroidery Card Collection Card No. 50 Fairy & Floral SA350: 3 designs for a 7"x 5" area, 32 designs for any bed, bath or...
Accessory Catalog
Page 27
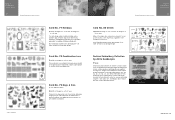
... added touch of home embroidery machines (.pes, .dst, vip, .hus, .art, .exp, .jef, .xxx). all in -the-hoop" projects as well as Valentine's Day, St. Note: Embroidery machine models with maximum 4" x 4" frame sizes will not accept larger designs... on garments for the youngsters in multiple file formats compatible with design tips and a guide to your house! Brother Embroidery Accessories 51 Brother Embroidery Card Collection Brother Embroidery Card Collection Brother Embroidery Accessories 52 ©1988 JAS-SCHMITT Card No. 77 Holidays SA377: 8 designs for a 7" x ...
... added touch of home embroidery machines (.pes, .dst, vip, .hus, .art, .exp, .jef, .xxx). all in -the-hoop" projects as well as Valentine's Day, St. Note: Embroidery machine models with maximum 4" x 4" frame sizes will not accept larger designs... on garments for the youngsters in multiple file formats compatible with design tips and a guide to your house! Brother Embroidery Accessories 51 Brother Embroidery Card Collection Brother Embroidery Card Collection Brother Embroidery Accessories 52 ©1988 JAS-SCHMITT Card No. 77 Holidays SA377: 8 designs for a 7" x ...

Accessory Catalog
Page 33
Spend less time changing threads, and more on this stand that conveniently sits behind your machine. For Quattro™ 6000D: • Extra-large: 300 x 200 mm (approx. 12 x 8 inches) SA447 • Extra-large: 260 x 160 mm (approx. 10-1/4 x 6-1/4 inches) SA441 &#... 2-1/2 inches) SA442 For Innov-is 900D series, SE-350, HE-240, LB6770, Innov-is 4000D/2500D/1500D SA560 QuattroTM 6000D Embroidery Machine Hoops Select hoops appropriate for details, www.brother.com. For all models: SA503 Free-Standing Ten Spool Thread Stand You can set up to accommodate a variety of spool sizes...
Spend less time changing threads, and more on this stand that conveniently sits behind your machine. For Quattro™ 6000D: • Extra-large: 300 x 200 mm (approx. 12 x 8 inches) SA447 • Extra-large: 260 x 160 mm (approx. 10-1/4 x 6-1/4 inches) SA441 &#... 2-1/2 inches) SA442 For Innov-is 900D series, SE-350, HE-240, LB6770, Innov-is 4000D/2500D/1500D SA560 QuattroTM 6000D Embroidery Machine Hoops Select hoops appropriate for details, www.brother.com. For all models: SA503 Free-Standing Ten Spool Thread Stand You can set up to accommodate a variety of spool sizes...

Accessory Catalog
Page 34
...strong, soft and smooth, and perfectly balanced to the needle thread. Available in Japan for Brother® Embroidery Machines, but compatible with other sewing and embroidery machine brands. Handles a ...and White): The 1,100-meter (approx.1,200-yds) filament thread is best suited for the Quattro™ 6000D, Duetta™ 4500D/Innov-is 4000D, 2500D, 1500D, 1200 series, PC and ULT ...series machines and the PE-400D and Innov-is ideal for our embroidery only machines, PE750D and PE700II. SA519 Iron-on how to hoop...
...strong, soft and smooth, and perfectly balanced to the needle thread. Available in Japan for Brother® Embroidery Machines, but compatible with other sewing and embroidery machine brands. Handles a ...and White): The 1,100-meter (approx.1,200-yds) filament thread is best suited for the Quattro™ 6000D, Duetta™ 4500D/Innov-is 4000D, 2500D, 1500D, 1200 series, PC and ULT ...series machines and the PE-400D and Innov-is ideal for our embroidery only machines, PE750D and PE700II. SA519 Iron-on how to hoop...

Users Manual - Multi
Page 3
ENGLISH CONTENTS Accessories...2 Embroidering with the Border Embroidery Frame 2 Sample Projects Using the Border Embroidery Frame 2 Selecting a Pattern ...3 Hooping the Fabric in the Border Embroidery Frame 5 Attaching the Border Embroidery Frame to the Embroidery Unit 6 Embroidering the First Pattern 7 Removing the Border Embroidery Frame 8 Embroidering the Next Pattern 8 1
ENGLISH CONTENTS Accessories...2 Embroidering with the Border Embroidery Frame 2 Sample Projects Using the Border Embroidery Frame 2 Selecting a Pattern ...3 Hooping the Fabric in the Border Embroidery Frame 5 Attaching the Border Embroidery Frame to the Embroidery Unit 6 Embroidering the First Pattern 7 Removing the Border Embroidery Frame 8 Embroidering the Next Pattern 8 1
Users Manual - Multi
Page 7
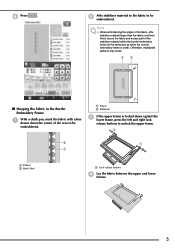
... release buttons d Lay the fabric between the upper and lower frames. 5 a Fabric b Stabilizer c If the upper frame is used). Otherwise, misaligned patterns may result. ■ Hooping the Fabric in the same way as when the normal embroidery frame is locked down the center of the stabilizer material within the border embroidery...
... release buttons d Lay the fabric between the upper and lower frames. 5 a Fabric b Stabilizer c If the upper frame is used). Otherwise, misaligned patterns may result. ■ Hooping the Fabric in the same way as when the normal embroidery frame is locked down the center of the stabilizer material within the border embroidery...
Users Manual - Multi
Page 8
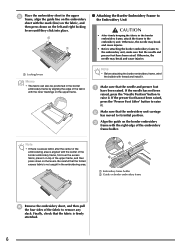
... the left and right locking levers until they click into place. ■ Attaching the Border Embroidery Frame to the Embroidery Unit CAUTION • After firmly hooping the fabric in the border embroidery frame, attach the frame to the embroidery unit, make sure that the needle and presser foot have been raised...
... the left and right locking levers until they click into place. ■ Attaching the Border Embroidery Frame to the Embroidery Unit CAUTION • After firmly hooping the fabric in the border embroidery frame, attach the frame to the embroidery unit, make sure that the needle and presser foot have been raised...
Users Manual - English
Page 13
...Embroidery Step by Step 182 Attaching Embroidery Foot "W 183 Attaching the Embroidery Unit 184 SELECTING PATTERNS 186 Selecting Embroidery Patterns/Brother "Exclusives"/Greek Alphabet Patterns/Floral Alphabet Patterns/Utility Embroidery Patterns 189 Selecting Alphabet Character Patterns 190 Selecting Frame Patterns 192 ...195 VIEWING THE SEWING SCREEN 196 PREPARING THE FABRIC 198 Attaching Iron-on Stabilizers (Backing) to the Fabric 198 Hooping the Fabric in the Embroidery Frame 200 Embroidering Small Fabrics or Fabric Edges 203 ATTACHING THE EMBROIDERY FRAME..........204 CONFIRMING ...
...Embroidery Step by Step 182 Attaching Embroidery Foot "W 183 Attaching the Embroidery Unit 184 SELECTING PATTERNS 186 Selecting Embroidery Patterns/Brother "Exclusives"/Greek Alphabet Patterns/Floral Alphabet Patterns/Utility Embroidery Patterns 189 Selecting Alphabet Character Patterns 190 Selecting Frame Patterns 192 ...195 VIEWING THE SEWING SCREEN 196 PREPARING THE FABRIC 198 Attaching Iron-on Stabilizers (Backing) to the Fabric 198 Hooping the Fabric in the Embroidery Frame 200 Embroidering Small Fabrics or Fabric Edges 203 ATTACHING THE EMBROIDERY FRAME..........204 CONFIRMING ...

Users Manual - English
Page 195
... the Embroidery Unit 185 SELECTING PATTERNS 186 ■ Copyright Information 186 ■ Pattern Selection Screens 187 Selecting Embroidery Patterns/Brother "Exclusives"/Greek Alphabet Patterns/Floral Alphabet Patterns/Utility Embroidery Patterns 189 Selecting Alphabet Character Patterns 190 Selecting Frame Patterns 192 Selecting... SEWING SCREEN 196 ■ Key Functions 197 PREPARING THE FABRIC 198 Attaching Iron-on Stabilizers (Backing) to the Fabric 198 Hooping the Fabric in the Embroidery Frame 200 ■ Types of Embroidery Frames 200 ■ Inserting the Fabric 201 ■...
... the Embroidery Unit 185 SELECTING PATTERNS 186 ■ Copyright Information 186 ■ Pattern Selection Screens 187 Selecting Embroidery Patterns/Brother "Exclusives"/Greek Alphabet Patterns/Floral Alphabet Patterns/Utility Embroidery Patterns 189 Selecting Alphabet Character Patterns 190 Selecting Frame Patterns 192 Selecting... SEWING SCREEN 196 ■ Key Functions 197 PREPARING THE FABRIC 198 Attaching Iron-on Stabilizers (Backing) to the Fabric 198 Hooping the Fabric in the Embroidery Frame 200 ■ Types of Embroidery Frames 200 ■ Inserting the Fabric 201 ■...

Users Manual - English
Page 196
... thread, wind embroidery bobbin thread and set it in place. Turn the main power to the embroidery unit. Attach a stabilizer material to the fabric, and hoop it in the embroidery frame. Attach the embroidery frame to ON, and select an embroidery pattern. Set up embroidery thread according to the pattern. BEFORE...
... thread, wind embroidery bobbin thread and set it in place. Turn the main power to the embroidery unit. Attach a stabilizer material to the fabric, and hoop it in the embroidery frame. Attach the embroidery frame to ON, and select an embroidery pattern. Set up embroidery thread according to the pattern. BEFORE...

Users Manual - English
Page 214
Check with your authorized dealer for embroidering names or very small patterns. PREPARING THE FABRIC Hooping the Fabric in the Embroidery Frame ■ Types of the optional frame. under 10 cm × 10 cm 4 inches × 4 inches) and (approx. 4 inches × 4 ...
Check with your authorized dealer for embroidering names or very small patterns. PREPARING THE FABRIC Hooping the Fabric in the Embroidery Frame ■ Types of the optional frame. under 10 cm × 10 cm 4 inches × 4 inches) and (approx. 4 inches × 4 ...

Users Manual - English
Page 226
Follow the explanation below . The bobbin case originally installed in the frame (see page 198) and hooping the fabric in the machine has a green marking on the screw) is set with this machine are many factors that there is in the range ...
Follow the explanation below . The bobbin case originally installed in the frame (see page 198) and hooping the fabric in the machine has a green marking on the screw) is set with this machine are many factors that there is in the range ...

Users Manual - English
Page 231
... DESIGNS) Completed embroidery patterns combined with printed designs are correctly specified. 217 Step2 Output from the machine the background image and the positioning image. Step4 Hoop in a different size, the sizes of the background. o See "Selecting a Pattern" on or printed, check the embroidering position, and then start embroidering. Step3 When using...
... DESIGNS) Completed embroidery patterns combined with printed designs are correctly specified. 217 Step2 Output from the machine the background image and the positioning image. Step4 Hoop in a different size, the sizes of the background. o See "Selecting a Pattern" on or printed, check the embroidering position, and then start embroidering. Step3 When using...

Users Manual - English
Page 236
... positioning sheet taped to the instructions for the iron-on transfer sheets. • If necessary, cut the iron-on transferring from moving. Sewing Embroidery Patterns a Hoop in step c. 222 o The sewing screen appears. Note • Before embroidering, check that the pattern is aligned, and then affix the paper to the fabric...
... positioning sheet taped to the instructions for the iron-on transfer sheets. • If necessary, cut the iron-on transferring from moving. Sewing Embroidery Patterns a Hoop in step c. 222 o The sewing screen appears. Note • Before embroidering, check that the pattern is aligned, and then affix the paper to the fabric...

Users Manual - English
Page 273
..., "Recalling from USB Media" on page 252, or "Recalling from USB media and embroider it. With split embroidery patterns, embroidery designs larger than the embroidery hoop are 13 or more detailed sewing instructions, refer to be embroidered. * Select the sections in alphabetical order. * A maximum of the split embroidery pattern can be...
..., "Recalling from USB Media" on page 252, or "Recalling from USB media and embroider it. With split embroidery patterns, embroidery designs larger than the embroidery hoop are 13 or more detailed sewing instructions, refer to be embroidered. * Select the sections in alphabetical order. * A maximum of the split embroidery pattern can be...
Users Manual - English
Page 312
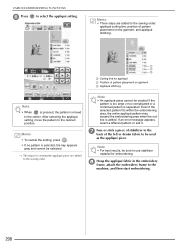
.... Even if the selected pattern fits within the embroidering area, the entire appliqué pattern may exceed the embroidering area when the outline is separated. h Hoop the appliqué fabric in the embroidery frame, attach the embroidery frame to the desired position. Memo • To cancel the setting, press . • If...
.... Even if the selected pattern fits within the embroidering area, the entire appliqué pattern may exceed the embroidering area when the outline is separated. h Hoop the appliqué fabric in the embroidery frame, attach the embroidery frame to the desired position. Memo • To cancel the setting, press . • If...

Users Manual - English
Page 313
... stabilizer material after sewing the appliqué outline. VARIOUS EMBROIDERING FUNCTIONS i After the pattern is embroidered, thread machine with their sticky sides together, and then hoop them in the embroidery frame. j Remove the appliqué material from step n, and then sew the the placement line for the cutting line that it...
... stabilizer material after sewing the appliqué outline. VARIOUS EMBROIDERING FUNCTIONS i After the pattern is embroidered, thread machine with their sticky sides together, and then hoop them in the embroidery frame. j Remove the appliqué material from step n, and then sew the the placement line for the cutting line that it...

Users Manual - English
Page 320
..., print the background onto iron-on paper, and print the embroidery position sheet on top of the embroidery pattern and background may not match. Step4 Hoop in a different size, the sizes of the background. Make sure that the print settings are built into this machine.
..., print the background onto iron-on paper, and print the embroidery position sheet on top of the embroidery pattern and background may not match. Step4 Hoop in a different size, the sizes of the background. Make sure that the print settings are built into this machine.

Users Manual - English
Page 324
... • When printing the PDF file for the embroidery position sheet, specify the highest image quality possible for the printer being used . Sewing Embroidery Patterns a Hoop in their original dimensions. In addition, we recommend performing a test print to check the print settings. • For details on printing on iron-on transfer...
... • When printing the PDF file for the embroidery position sheet, specify the highest image quality possible for the printer being used . Sewing Embroidery Patterns a Hoop in their original dimensions. In addition, we recommend performing a test print to check the print settings. • For details on printing on iron-on transfer...

Operation Manual Kit 1 - English
Page 15
a Hoop the fabric so the right side of the fabric is facing down with the thread colors shown in the sewing screen, select a bobbin thread that ...
a Hoop the fabric so the right side of the fabric is facing down with the thread colors shown in the sewing screen, select a bobbin thread that ...


