
Users Manual - English
Page 2
BEFORE YOU START Thank you for sewing bobbin work. For specific details on operating the machine, refer to the Operation Manual provided with your machine. This kit cannot be used for sewing (utility stitches, decorative stitches or free-motion sewing). The images and patterns used in this manual ...ACCESSORIES ...2 PREPARING FOR BOBBIN WORK ...3 Required Materials ...3 Upper Threading ...4 Preparing the Bobbin Thread...4 CREATING BOBBIN WORK ...8 Positioning the Fabric and Sewing...8 Finishing the thread ends...10 Bobbin Work Free-Motion Sewing ...11 Templates for machine embroidering.
BEFORE YOU START Thank you for sewing bobbin work. For specific details on operating the machine, refer to the Operation Manual provided with your machine. This kit cannot be used for sewing (utility stitches, decorative stitches or free-motion sewing). The images and patterns used in this manual ...ACCESSORIES ...2 PREPARING FOR BOBBIN WORK ...3 Required Materials ...3 Upper Threading ...4 Preparing the Bobbin Thread...4 CREATING BOBBIN WORK ...8 Positioning the Fabric and Sewing...8 Finishing the thread ends...10 Bobbin Work Free-Motion Sewing ...11 Templates for machine embroidering.
Users Manual - Multi
Page 5
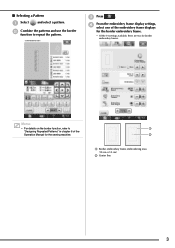
... frame displays for the border embroidery frame. * Of the 14 settings available, there are two for the sewing machine. c Press . Memo • For details on the border function, refer to repeat the pattern. a b a Border embroidery frame embroidering area (18 cm × 10 cm) b Center line 3 d From the embroidery frame display settings, select one...
... frame displays for the border embroidery frame. * Of the 14 settings available, there are two for the sewing machine. c Press . Memo • For details on the border function, refer to repeat the pattern. a b a Border embroidery frame embroidering area (18 cm × 10 cm) b Center line 3 d From the embroidery frame display settings, select one...
Users Manual - Multi
Page 12
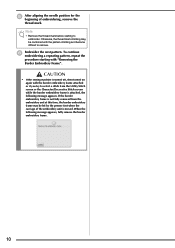
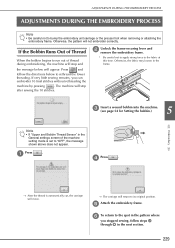
... embroidering a repeating pattern, repeat the procedure starting to embroider. f Embroider the next pattern. If the border embroidery frame is not fully removed from the Utility Stitch screen or the Character/Decorative Stitch screen while the border embroidery frame is moved. CAUTION • If the sewing machine... the embroidery unit at this time, the border embroidery frame may be hit by the presser foot when the carriage of embroidering, remove the thread mark. e After aligning the needle position for the beginning of the embroidery unit is attached, the following...
... embroidering a repeating pattern, repeat the procedure starting to embroider. f Embroider the next pattern. If the border embroidery frame is not fully removed from the Utility Stitch screen or the Character/Decorative Stitch screen while the border embroidery frame is moved. CAUTION • If the sewing machine... the embroidery unit at this time, the border embroidery frame may be hit by the presser foot when the carriage of embroidering, remove the thread mark. e After aligning the needle position for the beginning of the embroidery unit is attached, the following...
Users Manual - English
Page 8
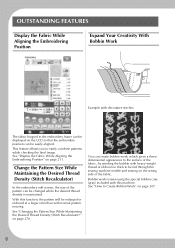
... on page 211. See "Display the Fabric While Aligning the Embroidering Position" on page 270. This feature allows you to easily combine patterns while checking the final image. You can be fed through the sewing machine needle and sewing on the wrong side of the fabric. See "How to ... stitches The fabric hooped in the embroidery frame can be displayed on page 307. 6 OUTSTANDING FEATURES Display the Fabric While Aligning the Embroidering Position Expand Your Creativity With Bobbin Work Example with this function, the pattern will be enlarged or reduced at a larger ratio than with...
... on page 211. See "Display the Fabric While Aligning the Embroidering Position" on page 270. This feature allows you to easily combine patterns while checking the final image. You can be fed through the sewing machine needle and sewing on the wrong side of the fabric. See "How to ... stitches The fabric hooped in the embroidery frame can be displayed on page 307. 6 OUTSTANDING FEATURES Display the Fabric While Aligning the Embroidering Position Expand Your Creativity With Bobbin Work Example with this function, the pattern will be enlarged or reduced at a larger ratio than with...

Users Manual - English
Page 13
... Patterns from the Machine's Memory........ 180 Recalling from USB Media 181 Recalling from the Computer 182 Chapter 5 Embroidery 185 BEFORE EMBROIDERING 186 Embroidery Step ...; (2 259 Sewing Split Embroidery Patterns 261 Chapter 6 Embroidery Edit 263 EXPLANATION OF FUNCTIONS 264 SELECTING PATTERNS TO EDIT 265 Selecting Embroidery Patterns/Brother "Exclusives"/Greek Alphabet... 294 COMBINING PATTERNS 295 Editing Combined Patterns 295 Sewing Combined Patterns 298 VARIOUS EMBROIDERING FUNCTIONS ........ 299 Uninterrupted Embroidering (Using a Single Color 299 Basting Embroidery 299...
... Patterns from the Machine's Memory........ 180 Recalling from USB Media 181 Recalling from the Computer 182 Chapter 5 Embroidery 185 BEFORE EMBROIDERING 186 Embroidery Step ...; (2 259 Sewing Split Embroidery Patterns 261 Chapter 6 Embroidery Edit 263 EXPLANATION OF FUNCTIONS 264 SELECTING PATTERNS TO EDIT 265 Selecting Embroidery Patterns/Brother "Exclusives"/Greek Alphabet... 294 COMBINING PATTERNS 295 Editing Combined Patterns 295 Sewing Combined Patterns 298 VARIOUS EMBROIDERING FUNCTIONS ........ 299 Uninterrupted Embroidering (Using a Single Color 299 Basting Embroidery 299...
Users Manual - English
Page 17
... this button when changing sewing direction or for detailed sewing in to sew at the machine's slowest speed. Move the slide to the right to sew at higher speeds. Hold the button in small areas. Press this button and the machine will sew reverse stitches at the speed... are sewn in the frame holder, be sure the frame-securing lever is sewing. Embroidery Unit NAMES OF MACHINE PARTS AND THEIR FUNCTIONS Operation Buttons a Carriage The carriage moves the embroidery frame automatically when embroidering. (page 188) b Release button (located under the embroidery unit) Press...
... this button when changing sewing direction or for detailed sewing in to sew at the machine's slowest speed. Move the slide to the right to sew at higher speeds. Hold the button in small areas. Press this button and the machine will sew reverse stitches at the speed... are sewn in the frame holder, be sure the frame-securing lever is sewing. Embroidery Unit NAMES OF MACHINE PARTS AND THEIR FUNCTIONS Operation Buttons a Carriage The carriage moves the embroidery frame automatically when embroidering. (page 188) b Release button (located under the embroidery unit) Press...
Users Manual - English
Page 30
... SCREEN LCD SCREEN When the machine is turned on the screen for the home page screen to combine embroidery patterns. Display Key Name Explanation Page a Sewing key Press this key to ... Touch the LCD screen or a key with your finger or the included touch pen to sew utility stitches or character or decorative stitch See the "Key patterns. Do not use a sharp...When the straight stitch needle plate is played. Touch anywhere on , the opening movie is on the machine, the needle will automatically move to press hard on the screen. Functions" table. 30 b Embroidery key...
... SCREEN LCD SCREEN When the machine is turned on the screen for the home page screen to combine embroidery patterns. Display Key Name Explanation Page a Sewing key Press this key to ... Touch the LCD screen or a key with your finger or the included touch pen to sew utility stitches or character or decorative stitch See the "Key patterns. Do not use a sharp...When the straight stitch needle plate is played. Touch anywhere on , the opening movie is on the machine, the needle will automatically move to press hard on the screen. Functions" table. 30 b Embroidery key...
Users Manual - English
Page 39
... Display the service count which is the internal machine number for embroidering (see page 200). d e f 37 b e Adjust the upper thread tension for the embroidery and sewing machine. q Display the program version. is a reminder to take your machine in your authorized dealer for available updates ..."W" during embroidering (see page 233). LCD SCREEN m Use to certify your local authorized Brother dealer or at " http://solutions.brother.com " for details.) o Display the total number of stitches sewn on the embroidery screen; Check with your sewing machine when you...
... Display the service count which is the internal machine number for embroidering (see page 200). d e f 37 b e Adjust the upper thread tension for the embroidery and sewing machine. q Display the program version. is a reminder to take your machine in your authorized dealer for available updates ..."W" during embroidering (see page 233). LCD SCREEN m Use to certify your local authorized Brother dealer or at " http://solutions.brother.com " for details.) o Display the total number of stitches sewn on the embroidery screen; Check with your sewing machine when you...
Users Manual - English
Page 46
a b c a Press this key to use or how to open the sewing machine help screen. LCD SCREEN Using the Sewing Machine Help Key Press to sew the stitch (see page 47). c Press this key to see explanation for upper threading, winding the bobbin, changing the presser foot, preparing to embroider a pattern, and how to see an explanation of the stitch selected (see page 46). 44 b Press this key to select utility stitches when you are available from the screen shown below. Three functions are not sure which stitch to use the machine (see page 45).
a b c a Press this key to use or how to open the sewing machine help screen. LCD SCREEN Using the Sewing Machine Help Key Press to sew the stitch (see page 47). c Press this key to see explanation for upper threading, winding the bobbin, changing the presser foot, preparing to embroider a pattern, and how to see an explanation of the stitch selected (see page 46). 44 b Press this key to select utility stitches when you are available from the screen shown below. Three functions are not sure which stitch to use the machine (see page 45).
Users Manual - English
Page 71
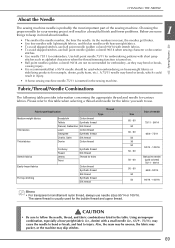
... finish and fewer problems. Below are not recommended for embroidery. CHANGING THE NEEDLE About the Needle The sewing machine needle is inserted in the sewing machine. Fabric type/Application Thread Type Medium weight fabrics Thin fabrics Thick fabrics Broadcloth Cotton thread Taffeta Synthetic thread... fabric (i.e., denim) with a small needle (i.e., 65/9 - 75/11), may skip stitches. 69 Use ball point needle 75/11 for embroidering patterns with stretch fabrics. • To avoid skipped stitches, use . The same thread is recommended that a 90/14 needle should be uneven...
... finish and fewer problems. Below are not recommended for embroidery. CHANGING THE NEEDLE About the Needle The sewing machine needle is inserted in the sewing machine. Fabric type/Application Thread Type Medium weight fabrics Thin fabrics Thick fabrics Broadcloth Cotton thread Taffeta Synthetic thread... fabric (i.e., denim) with a small needle (i.e., 65/9 - 75/11), may skip stitches. 69 Use ball point needle 75/11 for embroidering patterns with stretch fabrics. • To avoid skipped stitches, use . The same thread is recommended that a 90/14 needle should be uneven...
Users Manual - English
Page 75
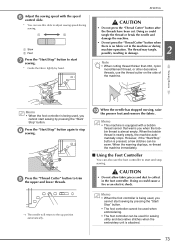
... controller to adjust sewing speed during machine operation. Doing so could tangle the thread or break the needle and damage the machine. • Do not press the "Thread Cutter" button when there is attached. 73 Memo • When the foot controller is being used when embroidering. • The...with a bobbin thread sensor that warns you when the bobbin thread is being used for sewing utility and decorative stitches when the embroidery unit is no fabric set in the machine or during sewing. SEWING CAUTION • Do not press the "Thread Cutter" button after the threads have ...
... controller to adjust sewing speed during machine operation. Doing so could tangle the thread or break the needle and damage the machine. • Do not press the "Thread Cutter" button when there is attached. 73 Memo • When the foot controller is being used when embroidering. • The...with a bobbin thread sensor that warns you when the bobbin thread is being used for sewing utility and decorative stitches when the embroidery unit is no fabric set in the machine or during sewing. SEWING CAUTION • Do not press the "Thread Cutter" button after the threads have ...
Users Manual - English
Page 187
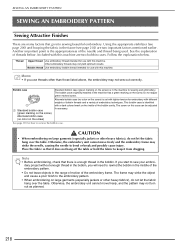
...EMBROIDERING 186 Embroidery Step by Step 186 Attaching Embroidery Foot "W 187 Attaching the Embroidery Unit 188 ■ About the Embroidery Unit 188 ■ Removing the Embroidery Unit 189 SELECTING PATTERNS 190 ■ Copyright Information 190 ■ Pattern Selection Screens 191 Selecting Embroidery Patterns/Brother...Embroidering Position........ 213 Checking the Pattern Position 216 Previewing the Completed Pattern 217 SEWING AN EMBROIDERY PATTERN 218 Sewing Attractive Finishes 218 ■ Embroidery Needle Plate Cover 219 Sewing Embroidery Patterns 219 Sewing...the Machine's ...
...EMBROIDERING 186 Embroidery Step by Step 186 Attaching Embroidery Foot "W 187 Attaching the Embroidery Unit 188 ■ About the Embroidery Unit 188 ■ Removing the Embroidery Unit 189 SELECTING PATTERNS 190 ■ Copyright Information 190 ■ Pattern Selection Screens 191 Selecting Embroidery Patterns/Brother...Embroidering Position........ 213 Checking the Pattern Position 216 Previewing the Completed Pattern 217 SEWING AN EMBROIDERY PATTERN 218 Sewing Attractive Finishes 218 ■ Embroidery Needle Plate Cover 219 Sewing Embroidery Patterns 219 Sewing...the Machine's ...
Users Manual - English
Page 190
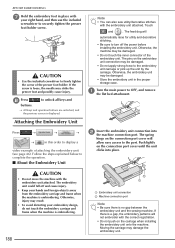
... unit and the sewing machine. h Press buttons. Touch and . The feed dog will automatically raise for utility and decorative stitching. • Be sure to turn off and cause injury. • Keep your embroidery design, do not touch the embroidery carriage and frame when the machine is embroidering. 188 a Embroidery unit connection b Machine connection port Note...
... unit and the sewing machine. h Press buttons. Touch and . The feed dog will automatically raise for utility and decorative stitching. • Be sure to turn off and cause injury. • Keep your embroidery design, do not touch the embroidery carriage and frame when the machine is embroidering. 188 a Embroidery unit connection b Machine connection port Note...

Users Manual - English
Page 201
...m Fabric scan key Press this key to move the needle forward or back in the machine's memory, USB media or a 251-253 computer. n Image key Press this key to...the pattern, rotate the pattern, etc. Q Embroidery Press this key to align the embroidering position using the built-in camera. 213 positioning key R Uninterrupted Press this key to...single color. 248 embroidery key 199 t s o r q Q p R v u wxy z No. VIEWING THE SEWING SCREEN ■ Key Functions Using these functions are not avail- m Note n • Some operations or functions are ...
...m Fabric scan key Press this key to move the needle forward or back in the machine's memory, USB media or a 251-253 computer. n Image key Press this key to...the pattern, rotate the pattern, etc. Q Embroidery Press this key to align the embroidering position using the built-in camera. 213 positioning key R Uninterrupted Press this key to...single color. 248 embroidery key 199 t s o r q Q p R v u wxy z No. VIEWING THE SEWING SCREEN ■ Key Functions Using these functions are not avail- m Note n • Some operations or functions are ...
Users Manual - English
Page 217
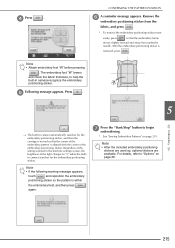
... The embroidery foot "W" lowers and check the fabric thickness, to begin * See "Sewing Embroidery Patterns" on page 20. 215 e Following message appears. g Press the "Start/Stop" embroidering. button to help the built-in camera recognize the embroidery positioning sticker. After the ...embroidery positioning sticker is within the embroidery field, and then press again. Press . 5 Embroidery → The built-in the machine settings screen, the ...
... The embroidery foot "W" lowers and check the fabric thickness, to begin * See "Sewing Embroidery Patterns" on page 20. 215 e Following message appears. g Press the "Start/Stop" embroidering. button to help the built-in camera recognize the embroidery positioning sticker. After the ...embroidery positioning sticker is within the embroidery field, and then press again. Press . 5 Embroidery → The built-in the machine settings screen, the ...
Users Manual - English
Page 220
...thread Use embroidery thread intended for sewing and embroidery. Memo • If you use threads other than those listed above, the embroidery may strike the needle, causing the needle to the embroidery pattern. • When embroidering on this machine. Do not adjust green marked... screw. See page 338 for use with this machine. Included with this machine are two important factors mentioned earlier. Bobbin thread Use embroidery bobbin thread intended for how to sew your embroi- The screw...
...thread Use embroidery thread intended for sewing and embroidery. Memo • If you use threads other than those listed above, the embroidery may strike the needle, causing the needle to the embroidery pattern. • When embroidering on this machine. Do not adjust green marked... screw. See page 338 for use with this machine. Included with this machine are two important factors mentioned earlier. Bobbin thread Use embroidery bobbin thread intended for how to sew your embroi- The screw...
Users Manual - English
Page 222
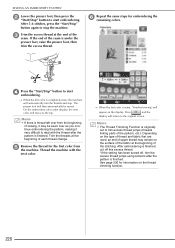
...of the stitching. c Trim the excess thread seam. On the embroidery color order display, the next color will move to stop . After embroidering is finished, cut off this excess thread. *If the setting has been turned off, trim the excess thread jumps using scissors after the ...color. → When the last color is sewn, "Finished sewing" will appear on the surface of the fabric at the beginning of the pattern, etc.). e Remove the thread for embroidering the d Press the "Start/Stop" embroidering. Thread the machine with the thread after the pattern is finished. See page ...
...of the stitching. c Trim the excess thread seam. On the embroidery color order display, the next color will move to stop . After embroidering is finished, cut off this excess thread. *If the setting has been turned off, trim the excess thread jumps using scissors after the ...color. → When the last color is sewn, "Finished sewing" will appear on the surface of the fabric at the beginning of the pattern, etc.). e Remove the thread for embroidering the d Press the "Start/Stop" embroidering. Thread the machine with the thread after the pattern is finished. See page ...
Users Manual - English
Page 225
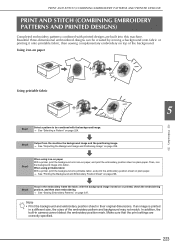
...image is printed in the embroidery frame the fabric with the background image ironed on or printed, check the embroidering position, and then start embroidering. → See "Sewing Embroidery Patterns" on page 225. PRINT AND STITCH (COMBINING EMBROIDERY PATTERNS AND PRINTED DESIGNS) PRINT AND STITCH... a Pattern" on page 226. Make sure that the print settings are built into this machine. Step4 Hoop in a different size, the sizes of the background. Step2 Output from the machine the background image and the positioning image. → See "Outputting the Background Image and ...
...image is printed in the embroidery frame the fabric with the background image ironed on or printed, check the embroidering position, and then start embroidering. → See "Sewing Embroidery Patterns" on page 225. PRINT AND STITCH (COMBINING EMBROIDERY PATTERNS AND PRINTED DESIGNS) PRINT AND STITCH... a Pattern" on page 226. Make sure that the print settings are built into this machine. Step4 Hoop in a different size, the sizes of the background. Step2 Output from the machine the background image and the positioning image. → See "Outputting the Background Image and ...
Users Manual - English
Page 231
Otherwise, the pattern will appear. If very little sewing remains, you stopped sewing, follow the directions below will not embroider correctly. Otherwise, the fabric may loosen in the General settings screen of thread during embroidering, the machine will stop after sewing the 10 stitches. bobbin.) 5 Embroidery Note • If "Upper and Bobbin Thread Sensor" in the frame...
Otherwise, the pattern will appear. If very little sewing remains, you stopped sewing, follow the directions below will not embroider correctly. Otherwise, the fabric may loosen in the General settings screen of thread during embroidering, the machine will stop after sewing the 10 stitches. bobbin.) 5 Embroidery Note • If "Upper and Bobbin Thread Sensor" in the frame...
Users Manual - English
Page 348
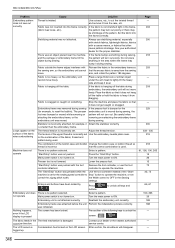
...Embroidery frame was removed during embroidery, the embroidery unit will not turn out. Turn the main power to operate the machine, or set for the sewing speed controller to Stop" button to ON. "Start/Stop" button was pressed while the Use the foot controller instead ... it Attach the stabilizer correctly. Select a pattern. TROUBLESHOOTING Problem Embroidery pattern does not sew out correctly Loops appear on the surface of the fabric when embroidering Machine does not operate Embroidery unit does not operate Nothing happens, even if the LCD display is pressed Cause ...
...Embroidery frame was removed during embroidery, the embroidery unit will not turn out. Turn the main power to operate the machine, or set for the sewing speed controller to Stop" button to ON. "Start/Stop" button was pressed while the Use the foot controller instead ... it Attach the stabilizer correctly. Select a pattern. TROUBLESHOOTING Problem Embroidery pattern does not sew out correctly Loops appear on the surface of the fabric when embroidering Machine does not operate Embroidery unit does not operate Nothing happens, even if the LCD display is pressed Cause ...


