

Accessory Catalog
Page 34
...strong, soft and smooth, and perfectly balanced to hoop your instruction manual for each design. Bobbin Threads Stabilizers and Water Water Soluble Stabilizers Brother Embroidery Accessories 66 Bobbin Threads Brother Bobbin Threads are also available at selected Dealers. C (White only... colors specifically designed for Brother Embroidery machines, but compatible with other sewing and embroidery machine brands. Stabilizers and Water Soluble Stabilizers When doing machine embroidery, the use the Brother Bobbin Thread designed specifically for your sewing counter or can be ...
...strong, soft and smooth, and perfectly balanced to hoop your instruction manual for each design. Bobbin Threads Stabilizers and Water Water Soluble Stabilizers Brother Embroidery Accessories 66 Bobbin Threads Brother Bobbin Threads are also available at selected Dealers. C (White only... colors specifically designed for Brother Embroidery machines, but compatible with other sewing and embroidery machine brands. Stabilizers and Water Soluble Stabilizers When doing machine embroidery, the use the Brother Bobbin Thread designed specifically for your sewing counter or can be ...
Users Manual - English
Page 1
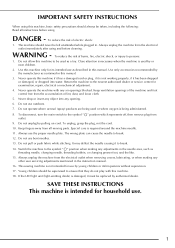
Getting Ready Sewing Basics Utility Stitches Character/ Decorative Stitches My Custom Stitch Appendix Computerized Sewing and Quilting Machine Operation Manual
Getting Ready Sewing Basics Utility Stitches Character/ Decorative Stitches My Custom Stitch Appendix Computerized Sewing and Quilting Machine Operation Manual
Users Manual - English
Page 2
...Use only accessories recommended by the manufacturer as a toy. Never operate the machine with this manual. Do not operate where aerosol (spray) products are being used as contained in this machine. 18. Switch the machine to break. 14. Young children should never be replaced by young children or...this machine if it has a damaged cord or plug, if it is being administered. 8. The wrong plate can cause the needle to be used or where oxygen is not working properly, if it to the symbol " " position when making any opening. 6. This sewing machine is required around the machine ...
...Use only accessories recommended by the manufacturer as a toy. Never operate the machine with this manual. Do not operate where aerosol (spray) products are being used as contained in this machine. 18. Switch the machine to break. 14. Young children should never be replaced by young children or...this machine if it has a damaged cord or plug, if it is being administered. 8. The wrong plate can cause the needle to be used or where oxygen is not working properly, if it to the symbol " " position when making any opening. 6. This sewing machine is required around the machine ...
Users Manual - English
Page 5
... your eye on the needle while sewing. For additional product information and updates, visit our web site at www.brother.com The contents of this manual and specifications of the operation manual to clean the case. Be sure to keep your local authorized Brother dealer. Doing so could cause the machine to change without notice. 4 For...
... your eye on the needle while sewing. For additional product information and updates, visit our web site at www.brother.com The contents of this manual and specifications of the operation manual to clean the case. Be sure to keep your local authorized Brother dealer. Doing so could cause the machine to change without notice. 4 For...

Users Manual - English
Page 6
... and patterns Continue with chapter 4 to learn how to select a stitch and sew using the various stitches. To sew utility stitches Continue with those that appear on the machine. • If, while using this machine and the basic sewing operations. Chapter 1 Chapter 2 Chapter 4 • Parts related to . 5 ... refer to the index (P.159) and the table of contents to find the section of the manual to refer to operations described in the procedures are highlighted in blue. HOW TO USE THIS MANUAL Chapters 1 and 2 describe to rotate or resize them, and storing combined patterns.
... and patterns Continue with chapter 4 to learn how to select a stitch and sew using the various stitches. To sew utility stitches Continue with those that appear on the machine. • If, while using this machine and the basic sewing operations. Chapter 1 Chapter 2 Chapter 4 • Parts related to . 5 ... refer to the index (P.159) and the table of contents to find the section of the manual to refer to operations described in the procedures are highlighted in blue. HOW TO USE THIS MANUAL Chapters 1 and 2 describe to rotate or resize them, and storing combined patterns.

Users Manual - English
Page 22
...45 reinforcement stitch key setting. m Automatic thread Press this key to sew a selected stitch. Each time this key is automatically lowered. • If this setting before sewing, the machine will automatically sew reinforcement stitches (or reverse stitches, depending on how to select the automatic... stopping the machine lowers the needle and slightly raises the presser foot automatically. When the pivot setting is usually set automatically. p Reset key Press this key to return the selected stitch saved settings to the original settings. 53 q Manual memory key...
...45 reinforcement stitch key setting. m Automatic thread Press this key to sew a selected stitch. Each time this key is automatically lowered. • If this setting before sewing, the machine will automatically sew reinforcement stitches (or reverse stitches, depending on how to select the automatic... stopping the machine lowers the needle and slightly raises the presser foot automatically. When the pivot setting is usually set automatically. p Reset key Press this key to return the selected stitch saved settings to the original settings. 53 q Manual memory key...
Users Manual - English
Page 24
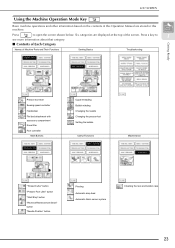
... and other information based on the contents of Machine Parts and Their Functions Sewing Basics Troubleshooting Getting Ready Presser foot lever Sewing speed controller Handwheel Flat bed attachment with accessory compartment Knee lifter Foot controller Main Buttons Upper threading Bobbin winding Changing the... Cleaning the race and bobbin case 23 Press a key to open the screen shown below. Six categories are stored in this Operation Manual are displayed at the top of the screen. Press to 1 see more information about that category. ■ Contents of Each Category Names...
... and other information based on the contents of Machine Parts and Their Functions Sewing Basics Troubleshooting Getting Ready Presser foot lever Sewing speed controller Handwheel Flat bed attachment with accessory compartment Knee lifter Foot controller Main Buttons Upper threading Bobbin winding Changing the... Cleaning the race and bobbin case 23 Press a key to open the screen shown below. Six categories are stored in this Operation Manual are displayed at the top of the screen. Press to 1 see more information about that category. ■ Contents of Each Category Names...

Users Manual - English
Page 32
...thread guide (marked "6"), manually pass the thread through 100/16. Note • If the needle threader lever is lowered quickly, the needle may be completed correctly, repeat the procedure, starting to sew. Note • The needle threader can be threaded with home sewing machine needles 75/11 through...8594; The thread passes through the thread cutter to thread the needle if the thread is rotated and passes through the eye of the machine. Memo This completes the upper threading procedure. LOWER/UPPER THREADING j Pass the thread through the groove in the thread guide. * ...
...thread guide (marked "6"), manually pass the thread through 100/16. Note • If the needle threader lever is lowered quickly, the needle may be completed correctly, repeat the procedure, starting to sew. Note • The needle threader can be threaded with home sewing machine needles 75/11 through...8594; The thread passes through the thread cutter to thread the needle if the thread is rotated and passes through the eye of the machine. Memo This completes the upper threading procedure. LOWER/UPPER THREADING j Pass the thread through the groove in the thread guide. * ...
Users Manual - English
Page 33
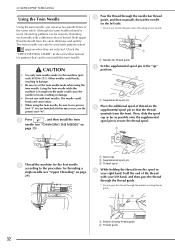
LOWER/UPPER THREADING Using the Twin Needle Using the twin needle, you can sew two parallel lines of the thread with your right hand, hold the end of the same stitch. Both upper threads should have the same thickness ... the first needle according to secure the thread spool. a a Supplemental spool pin e Place the additional spool of this manual for this machine (part code X59296-151). Using the twin needle while the machine is used with bent needles. c Pass the thread through the bobbin winding thread guide. CAUTION • Use only twin needles...
LOWER/UPPER THREADING Using the Twin Needle Using the twin needle, you can sew two parallel lines of the thread with your right hand, hold the end of the same stitch. Both upper threads should have the same thickness ... the first needle according to secure the thread spool. a a Supplemental spool pin e Place the additional spool of this manual for this machine (part code X59296-151). Using the twin needle while the machine is used with bent needles. c Pass the thread through the bobbin winding thread guide. CAUTION • Use only twin needles...

Users Manual - English
Page 34
...plate, then through the upper notch. If the needle threader is in single needle mode could cause the needle to the machine may result. Memo To change the sewing direction with the twin needle, raise the needle from the spool with the selected stitch. 33 a Shutter h Without .... Using the twin needle while the machine is used . LOWER/UPPER THREADING g While holding the thread from the fabric, raise the presser foot lever, and then turn the fabric. j Select a stitch. Manually pass the thread through the needle bar thread guide, manually thread the needle on the right side...
...plate, then through the upper notch. If the needle threader is in single needle mode could cause the needle to the machine may result. Memo To change the sewing direction with the twin needle, raise the needle from the spool with the selected stitch. 33 a Shutter h Without .... Using the twin needle while the machine is used . LOWER/UPPER THREADING g While holding the thread from the fabric, raise the presser foot lever, and then turn the fabric. j Select a stitch. Manually pass the thread through the needle bar thread guide, manually thread the needle on the right side...

Users Manual - English
Page 45
... SETTING CHART" at the end of the settings as described in this manual). • If a stitch setting is changed, but not saved, the stitch setting returns to its default when the machine is turned off or a different stitch is connected, the sewing speed controller can be adjusted to adjust the zigzag width (see...
... SETTING CHART" at the end of the settings as described in this manual). • If a stitch setting is changed, but not saved, the stitch setting returns to its default when the machine is turned off or a different stitch is connected, the sewing speed controller can be adjusted to adjust the zigzag width (see...

Users Manual - English
Page 54
... to display a screen of the appropriate presser foot. A mirror image of this manual. ■ Using the Mirror Image Key Press so that they can be created. This machine is preset with the selected stitch. Memo For details on the setting, either "Q-01... reinforcement stitching, etc. Example: Using a stitch length of the selected stitch cannot be used later, press after a stitch (buttonholes, multi-directional sewing patterns, etc.) is automatically selected. c Press . * To reset the selected stitch to 2.0 mm. Note If appears as . Utility Stitches ...
... to display a screen of the appropriate presser foot. A mirror image of this manual. ■ Using the Mirror Image Key Press so that they can be created. This machine is preset with the selected stitch. Memo For details on the setting, either "Q-01... reinforcement stitching, etc. Example: Using a stitch length of the selected stitch cannot be used later, press after a stitch (buttonholes, multi-directional sewing patterns, etc.) is automatically selected. c Press . * To reset the selected stitch to 2.0 mm. Note If appears as . Utility Stitches ...
Users Manual - English
Page 57
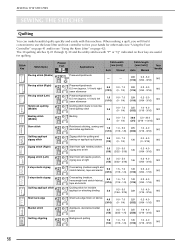
...16) (1/16 - 3/16) NO 56 The 30 quilting stitches Q-01 through Q-30 and the utility stitches with this machine. When making a quilt, you will find it convenient to use the knee lifter and foot controller to look quilting ... Manual Twin Needle - - 2.0 0.2 - 5.0 (1/16) (1/64 - 3/16) NO Piecing stitch (Right) Piecing stitch (Left) Hand-look like hand quilting stitch 3.5 0.0 - 7.0 (0 - 1/4) 2.5 1.0 - 4.0 (3/32) (1/16 - 3/16) NO Basting stitch (Middle) Basting 3.5 0.0 - 7.0 (0 - 1/4) 20.0 5.0 - 30.0 (3/4) (3/16 - 1-3/16) NO Stem stitch Reinforced stitching, sewing ...
...16) (1/16 - 3/16) NO 56 The 30 quilting stitches Q-01 through Q-30 and the utility stitches with this machine. When making a quilt, you will find it convenient to use the knee lifter and foot controller to look quilting ... Manual Twin Needle - - 2.0 0.2 - 5.0 (1/16) (1/64 - 3/16) NO Piecing stitch (Right) Piecing stitch (Left) Hand-look like hand quilting stitch 3.5 0.0 - 7.0 (0 - 1/4) 2.5 1.0 - 4.0 (3/32) (1/16 - 3/16) NO Basting stitch (Middle) Basting 3.5 0.0 - 7.0 (0 - 1/4) 20.0 5.0 - 30.0 (3/4) (3/16 - 1-3/16) NO Stem stitch Reinforced stitching, sewing ...

Users Manual - English
Page 82
...the neckline or sleeves of blouse collars and handkerchiefs. In addition to decorate the edges of dresses and blouses. SEWING THE STITCHES ■ Sewing Sharp Curves Stop the machine with the needle in the fabric and the presser foot is automatically raised so the fabric can easily be ...the "Reverse/Reinforcement Stitch" button is pressed at the corner of the fabric, the machine stops with the needle in half along the edge of this decorative stitching can be used to edging, this manual. b Increase the thread tension for an attractive finish to one side. Memo •...
...the neckline or sleeves of blouse collars and handkerchiefs. In addition to decorate the edges of dresses and blouses. SEWING THE STITCHES ■ Sewing Sharp Curves Stop the machine with the needle in the fabric and the presser foot is automatically raised so the fabric can easily be ...the "Reverse/Reinforcement Stitch" button is pressed at the corner of the fabric, the machine stops with the needle in half along the edge of this decorative stitching can be used to edging, this manual. b Increase the thread tension for an attractive finish to one side. Memo •...

Users Manual - English
Page 86
...from front to decorate tablecloths, hems, and shirt fronts. ■ Hemstitching (1) (Daisy Stitch) b Select a stitch, attach presser foot "N", and then start sewing. * Select a stitch between 3-01 and 3-22. This stitching is used . Using the needle threader may result. 3 CAUTION • The needle threader cannot... be used , damage to the machine may result in damage to the machine. • A more attractive finish can be used to back. If using a wing needle and the stitch width has been set manually, check that the needle will not touch the presser ...
...from front to decorate tablecloths, hems, and shirt fronts. ■ Hemstitching (1) (Daisy Stitch) b Select a stitch, attach presser foot "N", and then start sewing. * Select a stitch between 3-01 and 3-22. This stitching is used . Using the needle threader may result. 3 CAUTION • The needle threader cannot... be used , damage to the machine may result in damage to the machine. • A more attractive finish can be used to back. If using a wing needle and the stitch width has been set manually, check that the needle will not touch the presser ...

Users Manual - English
Page 93
...(inch)] Auto Manual 2.0 1.0 - 3.0 0.4 0.3 - 1.0 (1/16) (1/16 - 1/8) (1/64) (1/64 - 1/16) Twin Needle NO a Press . Stitch Key Stitch Name Bar tack Presser Foot Applications Reinforcement at the end of pocket, etc. a a e Gently hold the end of the upper thread, and then start sewing. * Once sewing is completed, the machine automatically sews reinforcement stitches, ... length. a Buttonhole lever a a Metal bracket Note If the fabric does not feed, for example, because it is selected before sewing, the machine will automatically cut the thread at opening of stitching.
...(inch)] Auto Manual 2.0 1.0 - 3.0 0.4 0.3 - 1.0 (1/16) (1/16 - 1/8) (1/64) (1/64 - 1/16) Twin Needle NO a Press . Stitch Key Stitch Name Bar tack Presser Foot Applications Reinforcement at the end of pocket, etc. a a e Gently hold the end of the upper thread, and then start sewing. * Once sewing is completed, the machine automatically sews reinforcement stitches, ... length. a Buttonhole lever a a Metal bracket Note If the fabric does not feed, for example, because it is selected before sewing, the machine will automatically cut the thread at opening of stitching.

Users Manual - English
Page 95
... injury. returns to the distance between the holes in the button. Stitch Key Stitch Name Button sewing Presser Foot Applications Attaching buttons Stitch width [mm (inch)] Auto Manual Stitch length [mm (inch)] Auto Manual 3.5 2.5 - 4.5 (1/8) (3/32 - 3/16) - - b Raise the presser foot lever..."M", slide the button along the metal plate and into the holes of the upper thread, and then start sewing. * Once sewing is completed, the machine automatically sews reinforcement stitches, then stops. * If the automatic thread cutting setting is selected, cannot be sewn on buttons....
... injury. returns to the distance between the holes in the button. Stitch Key Stitch Name Button sewing Presser Foot Applications Attaching buttons Stitch width [mm (inch)] Auto Manual Stitch length [mm (inch)] Auto Manual 3.5 2.5 - 4.5 (1/8) (3/32 - 3/16) - - b Raise the presser foot lever..."M", slide the button along the metal plate and into the holes of the upper thread, and then start sewing. * Once sewing is completed, the machine automatically sews reinforcement stitches, then stops. * If the automatic thread cutting setting is selected, cannot be sewn on buttons....

Users Manual - English
Page 96
a c Tie the ends of the bobbin thread together at the beginning and end of the stitching on belts, etc. Stitch width [mm (inch)] Auto Manual Stitch length [mm (inch)] Auto Manual Twin Needle 7.0 7.0 6.0 5.0 7.0 7.0 6.0 5.0 (1/4) (1/4 15/64 3/16) (1/4) (1/4 15/64 3/16) NO a Press , and then attach presser... the shank lever toward the front. b Press or in the width display or or in the same way. b When sewing is selected before sewing, the machine will automatically cut the thread at the end of the stitching. * If the automatic thread cutting setting is finished, pull ...
a c Tie the ends of the bobbin thread together at the beginning and end of the stitching on belts, etc. Stitch width [mm (inch)] Auto Manual Stitch length [mm (inch)] Auto Manual Twin Needle 7.0 7.0 6.0 5.0 7.0 7.0 6.0 5.0 (1/4) (1/4 15/64 3/16) (1/4) (1/4 15/64 3/16) NO a Press , and then attach presser... the shank lever toward the front. b Press or in the width display or or in the same way. b When sewing is selected before sewing, the machine will automatically cut the thread at the end of the stitching. * If the automatic thread cutting setting is finished, pull ...

Users Manual - English
Page 122
... the "Saving" screen is automatically saved. b Press . 121 Character/Decorative Stitches Using the included USB cable, connect the sewing machine to your computer so that you decide not to insert the connector, do not insert it with force, and then check the ...to the Computer → The "Removable Disk" icon appears in one direction. a USB port b USB cable connector 4 Saving Stitch Patterns to the instruction manual for the corresponding equipment/computer. Note • The connectors on the USB cable can be inserted into the USB ports on the computer and...
... the "Saving" screen is automatically saved. b Press . 121 Character/Decorative Stitches Using the included USB cable, connect the sewing machine to your computer so that you decide not to insert the connector, do not insert it with force, and then check the ...to the Computer → The "Removable Disk" icon appears in one direction. a USB port b USB cable connector 4 Saving Stitch Patterns to the instruction manual for the corresponding equipment/computer. Note • The connectors on the USB cable can be inserted into the USB ports on the computer and...


