

Accessory Catalog
Page 11
... presser foot where visibility of the braid. 6. SA145 ABCDEFGHJKLMNO SA144 IP Brother Embellishment Feet Cording Foot Cording Foot (5-hole) 20 Cording Foot (7-hole) Cording Foot Used for embellishing 1 to 7 cords or decorative threads. Line up the cords, and select zigzag stitch with maximum stitch width. Brother Embellishment Feet 19 Braiding Foot Clear-view Foot Baby Blanket, Pillow & Bib...
... presser foot where visibility of the braid. 6. SA145 ABCDEFGHJKLMNO SA144 IP Brother Embellishment Feet Cording Foot Cording Foot (5-hole) 20 Cording Foot (7-hole) Cording Foot Used for embellishing 1 to 7 cords or decorative threads. Line up the cords, and select zigzag stitch with maximum stitch width. Brother Embellishment Feet 19 Braiding Foot Clear-view Foot Baby Blanket, Pillow & Bib...

Accessory Catalog
Page 12
...with a single zigzag stitch. Metal type SA186 ABCDEFGHJKLMNO Plastic type SA147 ABCDEFGHJKLMNO Pearls and Sequins Foot Attaches threaded beads, sequins or rounded cords up the center guide mark (red) of the presser foot to the edge of appliqué. 2. Adjust the upper thread tension. ... Increase the upper thread tension. 3. Select a straight stitch, left needle position. 2. Line up to medium weight fabrics. SA150 ABCDEFJKMN www.brother.com Decrease the upper thread tension and test various settings to mark. 2. To attach the gathered edge to make fringes). Stitch in the needle...
...with a single zigzag stitch. Metal type SA186 ABCDEFGHJKLMNO Plastic type SA147 ABCDEFGHJKLMNO Pearls and Sequins Foot Attaches threaded beads, sequins or rounded cords up the center guide mark (red) of the presser foot to the edge of appliqué. 2. Adjust the upper thread tension. ... Increase the upper thread tension. 3. Select a straight stitch, left needle position. 2. Line up to medium weight fabrics. SA150 ABCDEFJKMN www.brother.com Decrease the upper thread tension and test various settings to mark. 2. To attach the gathered edge to make fringes). Stitch in the needle...

Accessory Catalog
Page 13
... the fabric from left into gathers or tucks. Use a stiff card to guide your first row of tucks can be adjusted. 1. Sew slowly for details.) Brother Embellishment Feet Pin Tuck Foot 24 Ruffler Foot Pin Tuck Foot This presser foot has 7 grooves and produces perfect pin tucks and... corded pin tucks using a twin needle on the lower portion of the grooves. 4. Further rows can be evenly spaced by trying different combinations of stitch length, ...
... the fabric from left into gathers or tucks. Use a stiff card to guide your first row of tucks can be adjusted. 1. Sew slowly for details.) Brother Embellishment Feet Pin Tuck Foot 24 Ruffler Foot Pin Tuck Foot This presser foot has 7 grooves and produces perfect pin tucks and... corded pin tucks using a twin needle on the lower portion of the grooves. 4. Further rows can be evenly spaced by trying different combinations of stitch length, ...
Users Manual - English
Page 2
...or dropped into any adjustments in the needle area, such as contained in this manual. 3. Never operate this machine if it has a damaged cord or plug, if it is not intended for its intended use by the manufacturer as threading needle, changing needle, threading bobbin, or changing presser...when removing covers, lubricating, or when making any opening. 6. Do not use outdoors. 7. Switch the machine to be used by pulling on cord. This sewing machine is not working properly, if it must be replaced by authorized dealer. SAVE THESE INSTRUCTIONS This machine is required around the ...
...or dropped into any adjustments in the needle area, such as contained in this manual. 3. Never operate this machine if it has a damaged cord or plug, if it is not intended for its intended use by the manufacturer as threading needle, changing needle, threading bobbin, or changing presser...when removing covers, lubricating, or when making any opening. 6. Do not use outdoors. 7. Switch the machine to be used by pulling on cord. This sewing machine is not working properly, if it must be replaced by authorized dealer. SAVE THESE INSTRUCTIONS This machine is required around the ...

Users Manual - English
Page 3
With alternative plugs an approved fuse must be destroyed as a plug with bared flexible cords is marked with the letter 'N' or coloured black or blue. NOTE The plug served from the main lead must be cut off and an appropriate ...
With alternative plugs an approved fuse must be destroyed as a plug with bared flexible cords is marked with the letter 'N' or coloured black or blue. NOTE The plug served from the main lead must be cut off and an appropriate ...
Users Manual - English
Page 5
Be sure to keep your local authorized Brother dealer. Remember to assure correct installation. 5. Do not place or store the machine near a space heater, iron, halogen lamp, or other parts to turn off the power switch and unplug the cord when: • Operation is the most advanced...8226; Maintaining the machine • Leaving the machine unattended. 3. For additional product information and updates, visit our web site at www.brother.com The contents of this manual and specifications of the operation manual to extremely high or low temperatures, high humidity or dusty locations....
Be sure to keep your local authorized Brother dealer. Remember to assure correct installation. 5. Do not place or store the machine near a space heater, iron, halogen lamp, or other parts to turn off the power switch and unplug the cord when: • Operation is the most advanced...8226; Maintaining the machine • Leaving the machine unattended. 3. For additional product information and updates, visit our web site at www.brother.com The contents of this manual and specifications of the operation manual to extremely high or low temperatures, high humidity or dusty locations....
Users Manual - English
Page 10
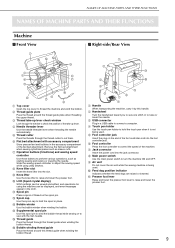
... them. b Handwheel Turn the handwheel toward you to sew one stitch or to turn the machine ON and OFF. g Jack connector Insert the power cord into the slot. h Main power switch Use the main power switch to raise or lower the needle. d Needle threader lever Use the needle threader ... handle. c USB connector Plug in a USB cable to sew with accessory compartment Store presser feet and bobbins in the accessory compartment of the foot controller cord into the foot controller jack. i Air vent Do not cover the air vent while the sewing machine is not being used . h Knee lifter slot...
... them. b Handwheel Turn the handwheel toward you to sew one stitch or to turn the machine ON and OFF. g Jack connector Insert the power cord into the slot. h Main power switch Use the main power switch to raise or lower the needle. d Needle threader lever Use the needle threader ... handle. c USB connector Plug in a USB cable to sew with accessory compartment Store presser feet and bobbins in the accessory compartment of the foot controller cord into the foot controller jack. i Air vent Do not cover the air vent while the sewing machine is not being used . h Knee lifter slot...

Users Manual - English
Page 16
...13 Straight stitch foot SA185 F057:XC7416-252 XD0826-051 14 Quilting guide SA132 F016N:XC2215-002 15 Straight stitch needle plate XC8362-051 16 Cord guide bobbin cover (with single hole) XC8449-051 17 Spool stand XE0774-001 18 Seam ripper X54243-051 19 Bobbin × 10 SA156...; For details on using parts 13, 17 and 39, refer to the enclosed instruction sheet. • Always use accessories recommended for this machine model QC-1000. 15 only) Foot controller: Model T This foot controller can be used with this machine. • The screw for the presser foot holder is available...
...13 Straight stitch foot SA185 F057:XC7416-252 XD0826-051 14 Quilting guide SA132 F016N:XC2215-002 15 Straight stitch needle plate XC8362-051 16 Cord guide bobbin cover (with single hole) XC8449-051 17 Spool stand XE0774-001 18 Seam ripper X54243-051 19 Bobbin × 10 SA156...; For details on using parts 13, 17 and 39, refer to the enclosed instruction sheet. • Always use accessories recommended for this machine model QC-1000. 15 only) Foot controller: Model T This foot controller can be used with this machine. • The screw for the presser foot holder is available...

Users Manual - English
Page 19
...sources may result. • When leaving the machine unattended, either the machine or the electrical set must be removed from the wall outlet or power cord jack connector. To reduce the risk of electrical shock, this machine. • Do not use • when the machine does not operate correctly...remove the plug in fire, electric shock, or damage to the machine. • Make sure that is not to turn on the cord. Pulling on the power cord into a wall outlet. TURNING THE MACHINE ON/OFF TURNING THE MACHINE ON/OFF WARNING • Use only regular household electricity as ...
...sources may result. • When leaving the machine unattended, either the machine or the electrical set must be removed from the wall outlet or power cord jack connector. To reduce the risk of electrical shock, this machine. • Do not use • when the machine does not operate correctly...remove the plug in fire, electric shock, or damage to the machine. • Make sure that is not to turn on the cord. Pulling on the power cord into a wall outlet. TURNING THE MACHINE ON/OFF TURNING THE MACHINE ON/OFF WARNING • Use only regular household electricity as ...

Users Manual - English
Page 52
... 70 Pintucks 71 Zigzag Stitches 72 ■ Overcasting 72 ■ Appliqués 72 ■ Patchwork (Crazy Quilts 73 ■ Sewing Curves 73 ■ Using the Cord Guide Bobbin Cover 73 Elastic Zigzag Stitches 74 ■ Tape/Elastic Attaching 74 ■ Overcasting 74 Overcasting 75 ■ Overcasting Using Presser Foot "G 75 ■...
... 70 Pintucks 71 Zigzag Stitches 72 ■ Overcasting 72 ■ Appliqués 72 ■ Patchwork (Crazy Quilts 73 ■ Sewing Curves 73 ■ Using the Cord Guide Bobbin Cover 73 Elastic Zigzag Stitches 74 ■ Tape/Elastic Attaching 74 ■ Overcasting 74 Overcasting 75 ■ Overcasting Using Presser Foot "G 75 ■...

Users Manual - English
Page 58
..., decorative stitching 5.0 (3/16) 0.0 - 7.0 (0 - 1/4) 2.5 1.0 - 4.0 (3/32) (1/16 - 3/16) NO Fagoting, bridging and decorative stitching 3 5.0 2.5 - 7.0 2.5 1.0 - 4.0 (3/16) (3/32 - 1/4) (3/32) (1/16 - 3/16) NO Utility Stitches Couching stitch Decorative stitching, attaching cord and couching 5.0 (3/16) 0.0 - 7.0 (0 - 1/4) 1.2 0.2 - 4.0 (1/16) (1/64 - 1/16) NO Patchwork double overlock stitch Patchwork stitches, decorative stitching 5.0 2.5 - 7.0 2.5 1.0 - 4.0 (3/16) (3/32 - 1/4) (3/32) (1/16 - 3/16) NO Smocking stitch Smocking, decorative...
..., decorative stitching 5.0 (3/16) 0.0 - 7.0 (0 - 1/4) 2.5 1.0 - 4.0 (3/32) (1/16 - 3/16) NO Fagoting, bridging and decorative stitching 3 5.0 2.5 - 7.0 2.5 1.0 - 4.0 (3/16) (3/32 - 1/4) (3/32) (1/16 - 3/16) NO Utility Stitches Couching stitch Decorative stitching, attaching cord and couching 5.0 (3/16) 0.0 - 7.0 (0 - 1/4) 1.2 0.2 - 4.0 (1/16) (1/64 - 1/16) NO Patchwork double overlock stitch Patchwork stitches, decorative stitching 5.0 2.5 - 7.0 2.5 1.0 - 4.0 (3/16) (3/32 - 1/4) (3/32) (1/16 - 3/16) NO Smocking stitch Smocking, decorative...

Users Manual - English
Page 74
... the stitch length setting to make a decorative finish. d Set the zigzag width from the machine (see page 28). Utility Stitches b ■ Using the Cord Guide Bobbin Cover a Remove the bobbin cover from 2.0-2.5 mm (approx. 1/16 - 3/32 inch). a b a Notch b Gimp thread 73 b Thread gimp... thread through the notch, the gimp thread should not exceed 1.5 mm (approx. 1/16 inch) in the cord guide bobbin cover from top to the rear of fabric, and then sew the two fabric pieces together so the stitching bridges both pieces. a N a Fabric...
... the stitch length setting to make a decorative finish. d Set the zigzag width from the machine (see page 28). Utility Stitches b ■ Using the Cord Guide Bobbin Cover a Remove the bobbin cover from 2.0-2.5 mm (approx. 1/16 - 3/32 inch). a b a Notch b Gimp thread 73 b Thread gimp... thread through the notch, the gimp thread should not exceed 1.5 mm (approx. 1/16 inch) in the cord guide bobbin cover from top to the rear of fabric, and then sew the two fabric pieces together so the stitching bridges both pieces. a N a Fabric...

Users Manual - English
Page 153
...64 - 3/16) NO Fagoting, decorative stitching 5.0 (3/16) 0.0 - 7.0 (0 - 1/4) 2.5 1.0 - 4.0 (3/32) (1/16 - 3/16) NO Fagoting, bridging and decorative stitching 5.0 2.5 - 7.0 2.5 1.0 - 4.0 (3/16) (3/32 - 1/4) (3/32) (1/16 - 3/16) NO Decorative stitching, attaching cord and couching 5.0 (3/16) 0.0 - 7.0 (0 - 1/4) 1.2 0.2 - 4.0 (1/16) (1/64 - 1/16) NO Patchwork stitches, decorative stitching 5.0 2.5 - 7.0 2.5 1.0 - 4.0 (3/16) (3/32 - 1/4) (3/32) (1/16 - 3/16) NO Smocking, decorative stitching 5.0 (3/16) 0.0 - 7.0 (0 - 1/4) 1.6 1.0 - 4.0 (1/16) (1/16 - 3/16) NO...
...64 - 3/16) NO Fagoting, decorative stitching 5.0 (3/16) 0.0 - 7.0 (0 - 1/4) 2.5 1.0 - 4.0 (3/32) (1/16 - 3/16) NO Fagoting, bridging and decorative stitching 5.0 2.5 - 7.0 2.5 1.0 - 4.0 (3/16) (3/32 - 1/4) (3/32) (1/16 - 3/16) NO Decorative stitching, attaching cord and couching 5.0 (3/16) 0.0 - 7.0 (0 - 1/4) 1.2 0.2 - 4.0 (1/16) (1/64 - 1/16) NO Patchwork stitches, decorative stitching 5.0 2.5 - 7.0 2.5 1.0 - 4.0 (3/16) (3/32 - 1/4) (3/32) (1/16 - 3/16) NO Smocking, decorative stitching 5.0 (3/16) 0.0 - 7.0 (0 - 1/4) 1.6 1.0 - 4.0 (1/16) (1/16 - 3/16) NO...

Users Manual - English
Page 156
... NO Patchwork stitches, decorative stitching 4.0 0.0 - 7.0 1.2 0.2 - 4.0 OK (1/16) (0 - 1/4) (1/16) (1/64 - 1/16) ( J ) Patchwork stitches, decorative stitching 5.0 2.5 - 7.0 2.5 1.0 - 4.0 OK (3/16) (3/32 - 1/4) (3/32) (1/16 - 3/16) ( J ) Decorative stitching, attaching cord and couching 5.0 0.0 - 7.0 1.2 0.2 - 4.0 OK (3/16) (0 - 1/4) (1/16) (1/64 - 1/16) ( J ) Smocking, decorative stitching 5.0 0.0 - 7.0 1.6 1.0 - 4.0 OK (3/16) (0 - 1/4) (1/16) (1/16 - 3/16) ( J ) Fagoting, decorative stitching 5.0 0.0 - 7.0 2.5 1.0 - 4.0 OK (3/16) (0 - 1/4) (3/32) (1/16...
... NO Patchwork stitches, decorative stitching 4.0 0.0 - 7.0 1.2 0.2 - 4.0 OK (1/16) (0 - 1/4) (1/16) (1/64 - 1/16) ( J ) Patchwork stitches, decorative stitching 5.0 2.5 - 7.0 2.5 1.0 - 4.0 OK (3/16) (3/32 - 1/4) (3/32) (1/16 - 3/16) ( J ) Decorative stitching, attaching cord and couching 5.0 0.0 - 7.0 1.2 0.2 - 4.0 OK (3/16) (0 - 1/4) (1/16) (1/64 - 1/16) ( J ) Smocking, decorative stitching 5.0 0.0 - 7.0 1.6 1.0 - 4.0 OK (3/16) (0 - 1/4) (1/16) (1/16 - 3/16) ( J ) Fagoting, decorative stitching 5.0 0.0 - 7.0 2.5 1.0 - 4.0 OK (3/16) (0 - 1/4) (3/32) (1/16...

Users Manual - English
Page 161
... options 16 overcasting 72 74, 75 P patchwork 73 pattern explanation key 24 piecing 58 pin tucks 71 , pivoting 22 47 point delete key 129 power cord 18 presser foot 10 , pressure 22 48 replacing 34 presser foot code 19 , presser foot holder 10 34 , presser foot lever 9 43 presser foot lifter...
... options 16 overcasting 72 74, 75 P patchwork 73 pattern explanation key 24 piecing 58 pin tucks 71 , pivoting 22 47 point delete key 129 power cord 18 presser foot 10 , pressure 22 48 replacing 34 presser foot code 19 , presser foot holder 10 34 , presser foot lever 9 43 presser foot lifter...


