
Master Command Reference
Page 4
... A: USB Specifications 46 Appendix B: Introducing the Brother Developer Center 47 - Flow Charts 39 5.1 Concurrent printing normal flow for USB connection 40 5.2 Concurrent printing error flow for USB connection (when feeding at the end of the page)41 5.3 Concurrent printing error flow for the test page 10 2.3 Page data details 13 2.3.1 Resolution ...13 2.3.2 Page size...14 2.3.3 Feed amount ...17 2.3.4 Maximum and minimum lengths 18 2.3.5 Raster line ...19 3. Printing...
... A: USB Specifications 46 Appendix B: Introducing the Brother Developer Center 47 - Flow Charts 39 5.1 Concurrent printing normal flow for USB connection 40 5.2 Concurrent printing error flow for USB connection (when feeding at the end of the page)41 5.3 Concurrent printing error flow for the test page 10 2.3 Page data details 13 2.3.1 Resolution ...13 2.3.2 Page size...14 2.3.3 Feed amount ...17 2.3.4 Maximum and minimum lengths 18 2.3.5 Raster line ...19 3. Printing...

Master Command Reference
Page 8
... the operating environment. Note: No command can be sent during printing. (4) Print the data (5) Confirm that no error has occurred, the print data is used to send uncompressed raster data, the Brother PT-XXXX starts printing when it starts to receive print data, instead of "status", refer to the printer after the print data is transmitted and until the completion of the printer is finished, close the USB port. Printing Using Raster...
... the operating environment. Note: No command can be sent during printing. (4) Print the data (5) Confirm that no error has occurred, the print data is used to send uncompressed raster data, the Brother PT-XXXX starts printing when it starts to receive print data, instead of "status", refer to the printer after the print data is transmitted and until the completion of the printer is finished, close the USB port. Printing Using Raster...

Master Command Reference
Page 9
... model: 1Bh, 69h, 64h, 0Eh, 00h 6 Select compression mode Selects the compression mode for printing. 1Bh, 40h (Fixed) (2) Control codes Added at the beginning of the following: (1) initialization commands, (2) control codes, (3) raster data, and (4) print commands. Sequence Command Name Description/Example 1 Invalidate Sends a 100-byte invalidate command, and then resets the printer to TIFF format: 4Dh, 02h - 5 2. For 2 mm margins on 24-mm-wide tape...
... model: 1Bh, 69h, 64h, 0Eh, 00h 6 Select compression mode Selects the compression mode for printing. 1Bh, 40h (Fixed) (2) Control codes Added at the beginning of the following: (1) initialization commands, (2) control codes, (3) raster data, and (4) print commands. Sequence Command Name Description/Example 1 Invalidate Sends a 100-byte invalidate command, and then resets the printer to TIFF format: 4Dh, 02h - 5 2. For 2 mm margins on 24-mm-wide tape...

Master Command Reference
Page 24
... Total number of pins: PT-H500/P700/E500 128pin Number of pins for right margin Raster line First byte Left and right margins Number of print area pins Total number of pins Print area Last byte 0 pin Number of pins for left margin Pins on print head Feeding direction TZe tape: Tape Type 3.5 mm 6 mm 9 mm 12 mm 18 mm 24 mm Number of pins for left margin 52 48 39 29 8 0 Number of print area...
... Total number of pins: PT-H500/P700/E500 128pin Number of pins for right margin Raster line First byte Left and right margins Number of print area pins Total number of pins Print area Last byte 0 pin Number of pins for left margin Pins on print head Feeding direction TZe tape: Tape Type 3.5 mm 6 mm 9 mm 12 mm 18 mm 24 mm Number of pins for left margin 52 48 39 29 8 0 Number of print area...
Master Command Reference
Page 28
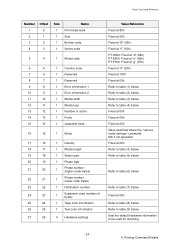
... mode settings" command 00h if not specified Fixed at 00h Refer to table (1) below. Refer to table (6) below . Refer to table (7) below . Raster Command Reference Number Offset 1 0 2 1 3 2 4 3 Size 1 1 1 1 Name Print head mark Size Brother code Series code 5 4 1 Model code 6 5 1 Country code 7 6 1 Reserved 8 7 1 Reserved 9 8 1 Error information 1 10 9 1 Error information 2 11 10 1 Media width 12 11 1 Media type 13 12 1 Number of colors 14 13 1 Fonts 15 14 1 Japanese fonts 16 15 1 Mode...
... mode settings" command 00h if not specified Fixed at 00h Refer to table (1) below. Refer to table (6) below . Refer to table (7) below . Raster Command Reference Number Offset 1 0 2 1 3 2 4 3 Size 1 1 1 1 Name Print head mark Size Brother code Series code 5 4 1 Model code 6 5 1 Country code 7 6 1 Reserved 8 7 1 Reserved 9 8 1 Error information 1 10 9 1 Error information 2 11 10 1 Media width 12 11 1 Media type 13 12 1 Number of colors 14 13 1 Fonts 15 14 1 Japanese fonts 16 15 1 Mode...

Master Command Reference
Page 37
... the print data), printing is possible only if a print command is sent with the "no cutting) OFF 5 ~ 6bit:Not used 7bit:No buffer clearing when printing The expansion buffer of the machine is not cleared with the second or later label. 1.No buffer clearing when printing ON 0.No buffer clearing when printing OFF - 33 - 4. Printing Command Details No mirror printing Raster Command Reference ESC i K Advanced mode settings...
... the print data), printing is possible only if a print command is sent with the "no cutting) OFF 5 ~ 6bit:Not used 7bit:No buffer clearing when printing The expansion buffer of the machine is not cleared with the second or later label. 1.No buffer clearing when printing ON 0.No buffer clearing when printing OFF - 33 - 4. Printing Command Details No mirror printing Raster Command Reference ESC i K Advanced mode settings...
Master Command Reference
Page 40
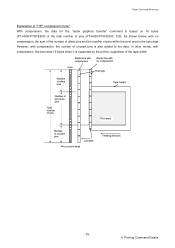
..., the sum of the number of offset pins and the number of pins within the print area is expanded by the printer, regardless of the tape width. Raster line with compression Raster line with compression, the number of unused pins is based on print head Feeding direction - 36 - 4. Raster Command Reference Explanation of "TIFF compression mode" With compression, the data for the "raster graphics...
..., the sum of the number of offset pins and the number of pins within the print area is expanded by the printer, regardless of the tape width. Raster line with compression Raster line with compression, the number of unused pins is based on print head Feeding direction - 36 - 4. Raster Command Reference Explanation of "TIFF compression mode" With compression, the data for the "raster graphics...
Users Guide
Page 1
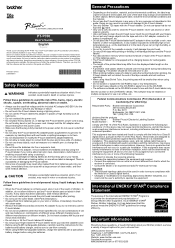
... or anything unusual while using the batteries. This equipment generates, uses, and can be removed prior to use any object has been swallowed, seek medical attention. • Do not touch metal parts around the print head immediately after printing. • Do not touch the cutter blade. (See Parts Description.) • If leaked fluid from the displayed label length on , or damage the P-touch labeler, power cord or plug. International ENERGY STAR®...
... or anything unusual while using the batteries. This equipment generates, uses, and can be removed prior to use any object has been swallowed, seek medical attention. • Do not touch metal parts around the print head immediately after printing. • Do not touch the cutter blade. (See Parts Description.) • If leaked fluid from the displayed label length on , or damage the P-touch labeler, power cord or plug. International ENERGY STAR®...
Users Guide
Page 2
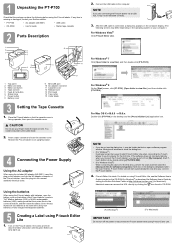
...; PT-P700 • AC adapter (AD-E001) • USB cable • CD-ROM • User's Guide • Starter tape cassette 2 Parts Description 1 15 2 5 3 6 7 4 9 11 8 10 14 12 13 1 Top panel 2 Editor Lite lamp 3 Editor Lite button 4 Tape exit slot 5 Feed & Cut button 6 Status lamp 7 Power button 8 Battery cover 9 Mini-USB port 10 AC adapter connector 11 Cassette cover 12 Release lever 13 Print head 14 Tape cutter 15 Cutter blade 3 Setting the Tape Cassette 1. P-touch Editor Lite starts. Insert the plug into the AC adapter connector of the P-touch labeler, insert...
...; PT-P700 • AC adapter (AD-E001) • USB cable • CD-ROM • User's Guide • Starter tape cassette 2 Parts Description 1 15 2 5 3 6 7 4 9 11 8 10 14 12 13 1 Top panel 2 Editor Lite lamp 3 Editor Lite button 4 Tape exit slot 5 Feed & Cut button 6 Status lamp 7 Power button 8 Battery cover 9 Mini-USB port 10 AC adapter connector 11 Cassette cover 12 Release lever 13 Print head 14 Tape cutter 15 Cutter blade 3 Setting the Tape Cassette 1. P-touch Editor Lite starts. Insert the plug into the AC adapter connector of the P-touch labeler, insert...
Users Guide
Page 3
... Center at http://solutions.brother.com/. Select [PT-P700] on the desktop. NOTE (For Windows® 8 only) Use Adobe® Reader® to the length of the printed label to correspond to open the files, change the settings. (The screen below is from Windows®.) 6 7 1 2 3 4 5 1 Power On when Plugged in Select whether or not the printer turns on the CD-ROM (for Windows®) or download the Software User's Guide by clicking the icon...
... Center at http://solutions.brother.com/. Select [PT-P700] on the desktop. NOTE (For Windows® 8 only) Use Adobe® Reader® to the length of the printed label to correspond to open the files, change the settings. (The screen below is from Windows®.) 6 7 1 2 3 4 5 1 Power On when Plugged in Select whether or not the printer turns on the CD-ROM (for Windows®) or download the Software User's Guide by clicking the icon...
Users Guide
Page 4
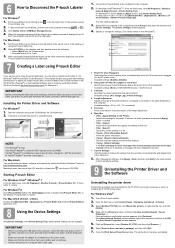
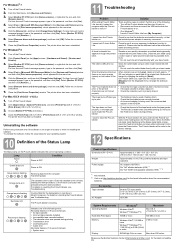
... tape cassette is empty, replace it . Solution There are being used while printing. Check to reset the P-touch labeler. Turn off the P-touch labeler. 2. If a User Account Control message appears, type in the password, and then click [Yes]. Clean the print head using a cotton swab moistened with alcohol. * Do not touch the cutter blade directly with your operating system. 10 Definition of the tape feeds under the tape guides. • The Feed & Cut button was opened during printing • Transmission error • Overheating error • Cutter error Red...
... tape cassette is empty, replace it . Solution There are being used while printing. Check to reset the P-touch labeler. Turn off the P-touch labeler. 2. If a User Account Control message appears, type in the password, and then click [Yes]. Clean the print head using a cotton swab moistened with alcohol. * Do not touch the cutter blade directly with your operating system. 10 Definition of the tape feeds under the tape guides. • The Feed & Cut button was opened during printing • Transmission error • Overheating error • Cutter error Red...
Software Users Guide
Page 3
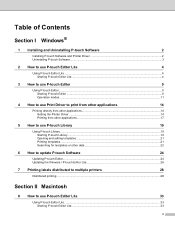
... Editor 9 Using P-touch Editor...9 Starting P-touch Editor ...9 Operation modes ...11 4 How to use Print Driver to print from other applications 14 Printing directly from other applications 14 Setting the Printer Driver ...14 Printing from other applications ...17 5 How to use P-touch Library 19 Using P-touch Library ...19 Starting P-touch Library...19 Opening and editing templates...21 Printing templates...21 Searching for templates or other data 22 6 How to update P-touch Software 24 Updating P-touch Editor...24 Updating the firmware / P-touch Editor Lite 26 7 Printing labels...
... Editor 9 Using P-touch Editor...9 Starting P-touch Editor ...9 Operation modes ...11 4 How to use Print Driver to print from other applications 14 Printing directly from other applications 14 Setting the Printer Driver ...14 Printing from other applications ...17 5 How to use P-touch Library 19 Using P-touch Library ...19 Starting P-touch Library...19 Opening and editing templates...21 Printing templates...21 Searching for templates or other data 22 6 How to update P-touch Software 24 Updating P-touch Editor...24 Updating the firmware / P-touch Editor Lite 26 7 Printing labels...

Software Users Guide
Page 6
... is not installed. b Click [Standard Installation]. For more information about installing the printer driver, refer to create templates with various kinds of designs. To download the latest driver and software, please visit the Brother Solutions Center website: http://solutions.brother.com Installing P-touch Software and Printer Driver a Insert the CD-ROM into your computer's CD-ROM drive. 1 Installing and Uninstalling P-touch Software P-touch Editor allows you to the User's Guide. 1 1 1 2 You can use P-touch Update Software to update P-touch Editor and the P-touch labeler's firmware.
... is not installed. b Click [Standard Installation]. For more information about installing the printer driver, refer to create templates with various kinds of designs. To download the latest driver and software, please visit the Brother Solutions Center website: http://solutions.brother.com Installing P-touch Software and Printer Driver a Insert the CD-ROM into your computer's CD-ROM drive. 1 Installing and Uninstalling P-touch Software P-touch Editor allows you to the User's Guide. 1 1 1 2 You can use P-touch Update Software to update P-touch Editor and the P-touch labeler's firmware.
Software Users Guide
Page 8
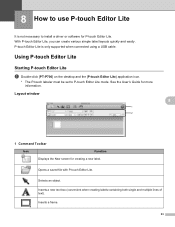
... [PTLITE10]. For Windows® 8, click [PT-P700], [Open folder to view files] then double-click [PTLITE10]. Inserts a new text box (convenient when creating labels containing both single and multiple lines of text). 4 2 How to use P-touch Editor Lite 2 It is not necessary to the P-touch labeler. Opens a saved file with P-touch Editor Lite. See the User's Guide for creating a new label. Saves the data to your PC, etc, but not to install a driver or software for P-touch Editor Lite. With P-touch Editor Lite, you...
... [PTLITE10]. For Windows® 8, click [PT-P700], [Open folder to view files] then double-click [PTLITE10]. Inserts a new text box (convenient when creating labels containing both single and multiple lines of text). 4 2 How to use P-touch Editor Lite 2 It is not necessary to the P-touch labeler. Opens a saved file with P-touch Editor Lite. See the User's Guide for creating a new label. Saves the data to your PC, etc, but not to install a driver or software for P-touch Editor Lite. With P-touch Editor Lite, you...

Software Users Guide
Page 9
... or to Enables/disables vertical label direction. Displays the menu. Exits P-touch Editor Lite. 2 Property Toolbar Icon Click to use P-touch Editor Lite Icon Function Inserts an image onto your label. [From file]: Inserts an image stored on your PC's built-in a text box. Sets the length of the tape. How to change the zoom factor by clicking or . Function Click to specify the font size. Sets the width and color...
... or to Enables/disables vertical label direction. Displays the menu. Exits P-touch Editor Lite. 2 Property Toolbar Icon Click to use P-touch Editor Lite Icon Function Inserts an image onto your label. [From file]: Inserts an image stored on your PC's built-in a text box. Sets the length of the tape. How to change the zoom factor by clicking or . Function Click to specify the font size. Sets the width and color...
Software Users Guide
Page 11
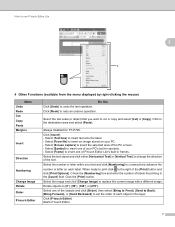
... the menu displayed by right-clicking the mouse) Menu Undo Redo Cut Copy Paste Margins Insert Direction Numbering Change Image Rotate Order P-touch Editor Do this Click [Undo] to consecutively advance the number or letter on your PC. - Click [Redo] to [0], [90], [180] or [270]. Rotate objects to redo an undone operation. Click the [Print] button. Select [From file] to insert one of...
... the menu displayed by right-clicking the mouse) Menu Undo Redo Cut Copy Paste Margins Insert Direction Numbering Change Image Rotate Order P-touch Editor Do this Click [Undo] to consecutively advance the number or letter on your PC. - Click [Redo] to [0], [90], [180] or [270]. Rotate objects to redo an undone operation. Click the [Print] button. Select [From file] to insert one of...
Software Users Guide
Page 18
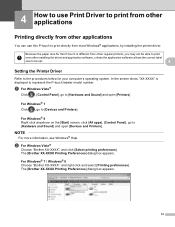
... displayed to represent the P-touch labeler model number. The [Brother XX-XXXX Printing Preferences] dialog box appears. For Windows® 7 / Windows® 8 Choose "Brother XX-XXXX", and right click and select [Printing preferences]. 4 How to use Print Driver to print from other applications 4 Printing directly from other regular printers, you may not be able to print even after installing the driver and application software, unless the application software allows the correct label size to be set. 4 Setting the Printer Driver...
... displayed to represent the P-touch labeler model number. The [Brother XX-XXXX Printing Preferences] dialog box appears. For Windows® 7 / Windows® 8 Choose "Brother XX-XXXX", and right click and select [Printing preferences]. 4 How to use Print Driver to print from other applications 4 Printing directly from other regular printers, you may not be able to print even after installing the driver and application software, unless the application software allows the correct label size to be set. 4 Setting the Printer Driver...
Software Users Guide
Page 37
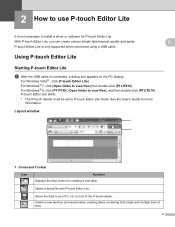
... the User's Guide for creating a new label. Layout window 1 2 8 8 8 8 1 Command Toolbar Icon Function Displays the New screen for more information. Using P-touch Editor Lite Starting P-touch Editor Lite a Double-click [PT-P700] on the desktop and the [P-touch Editor Lite] application icon. * The P-touch labeler must be set to P-touch Editor Lite mode. P-touch Editor Lite is not necessary to install a driver or software for P-touch Editor Lite. Inserts a frame. 33 Opens a saved file with P-touch Editor Lite. Inserts a new text box (convenient when creating labels containing...
... the User's Guide for creating a new label. Layout window 1 2 8 8 8 8 1 Command Toolbar Icon Function Displays the New screen for more information. Using P-touch Editor Lite Starting P-touch Editor Lite a Double-click [PT-P700] on the desktop and the [P-touch Editor Lite] application icon. * The P-touch labeler must be set to P-touch Editor Lite mode. P-touch Editor Lite is not necessary to install a driver or software for P-touch Editor Lite. Inserts a frame. 33 Opens a saved file with P-touch Editor Lite. Inserts a new text box (convenient when creating labels containing...

Software Users Guide
Page 38
... length of the tape. Sets the width of the label. Click to vertical or horizontal. to automatically adjust the length of the inserted tape. You can adjust the font size up or down one of text in symbols. You can also change the font. Click to automatically detect the width of the label to Sets the label direction to vertical or horizontal. Click to specify the font size. Click accommodate the entered text. How to use P-touch Editor Lite Icon Inserts...
... length of the tape. Sets the width of the label. Click to vertical or horizontal. to automatically adjust the length of the inserted tape. You can adjust the font size up or down one of text in symbols. You can also change the font. Click to automatically detect the width of the label to Sets the label direction to vertical or horizontal. Click to specify the font size. Click accommodate the entered text. How to use P-touch Editor Lite Icon Inserts...

Software Users Guide
Page 40
... Print... Undo Redo Cut Copy Paste Clear Select All Direction Numbering Horizontal Text Vertical Text Function Displays the version information of the text in the Label View, the display will be gray). Closes the active file. 8 Saves the active file. Sets the direction of the application. Undoes the last operation. Hides the application. Copies the selected area and moves it to use P-touch Editor Lite 4 Menu bar Menu P-touch Editor Lite About P-touch Editor Lite Preferences... Displays a new layout window...
... Print... Undo Redo Cut Copy Paste Clear Select All Direction Numbering Horizontal Text Vertical Text Function Displays the version information of the text in the Label View, the display will be gray). Closes the active file. 8 Saves the active file. Sets the direction of the application. Undoes the last operation. Hides the application. Copies the selected area and moves it to use P-touch Editor Lite 4 Menu bar Menu P-touch Editor Lite About P-touch Editor Lite Preferences... Displays a new layout window...


