
Users Manual - English and Spanish
Page 5
... → n → n Printing text Previewing the label Changing how the labels are cut Printing using the current print options Feeding and cutting 1" (24 mm) of tape Printing many copies Printing many copies while increasing selected text d + 9 (j or k to scroll) d + f → m or g to select setting → n p f d + 4 → m or g to select number (OR...
... → n → n Printing text Previewing the label Changing how the labels are cut Printing using the current print options Feeding and cutting 1" (24 mm) of tape Printing many copies Printing many copies while increasing selected text d + 9 (j or k to scroll) d + f → m or g to select setting → n p f d + 4 → m or g to select number (OR...

Users Manual - English and Spanish
Page 7
CONTENTS Brother® 90 Days/One Year Limited Warranty and Replacement Service (For USA Only iii Important Information v Chapter 1 Before You Start 1 GENERAL DESCRIPTION 2 Top view ...2 Bottom view ...3 LCD display ...3 Keyboard ...4 Chapter 2 Getting Started 5 PRECAUTIONS 6 Connecting the AC adaptor 7 Turning on/off the P-touch 7 Installing/replacing a tape cassette 7 Connecting the P-touch to a computer...
CONTENTS Brother® 90 Days/One Year Limited Warranty and Replacement Service (For USA Only iii Important Information v Chapter 1 Before You Start 1 GENERAL DESCRIPTION 2 Top view ...2 Bottom view ...3 LCD display ...3 Keyboard ...4 Chapter 2 Getting Started 5 PRECAUTIONS 6 Connecting the AC adaptor 7 Turning on/off the P-touch 7 Installing/replacing a tape cassette 7 Connecting the P-touch to a computer...

Users Manual - English and Spanish
Page 14
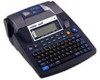
Before You Start Ch. 1 Before You Start GENERAL DESCRIPTION Top view P-touch 9600: LCD display Tape compartment cover Recharging indicator Cover release button AC adaptor connector RS-232C port USB port P-touch 3600: LCD display Keyboard Tape compartment cover Cover release button AC adaptor connector USB port Keyboard 2
Before You Start Ch. 1 Before You Start GENERAL DESCRIPTION Top view P-touch 9600: LCD display Tape compartment cover Recharging indicator Cover release button AC adaptor connector RS-232C port USB port P-touch 3600: LCD display Keyboard Tape compartment cover Cover release button AC adaptor connector USB port Keyboard 2

Users Manual - English and Spanish
Page 15
Before You Start Bottom view Battery compartment cover (PT-9600 only) Handle Ch.1 Before You Start Tape exit slot LCD display R1 2 3 4 5 6 7 8 9 A B C G H NO I 1LM:_ D E F K QQQQQQQQQQQQ J AUTO 1.10 HELSINKI A AUTO Length Margin Font Width Size 1 Tape width indicator ➩ p. 8 2 Caps indicator &#... setting indicator ➩ p. 65 A Rotate setting indicator ➩ p. 61 B Auto Cut setting indicator ➩ p. 68 C Tape Length setting ➩ p. 63 D Tape Margin setting ➩ p. 62 E Font setting ➩ p. 54 F Character width setting ➩ p. 56 G Character size ...
Before You Start Bottom view Battery compartment cover (PT-9600 only) Handle Ch.1 Before You Start Tape exit slot LCD display R1 2 3 4 5 6 7 8 9 A B C G H NO I 1LM:_ D E F K QQQQQQQQQQQQ J AUTO 1.10 HELSINKI A AUTO Length Margin Font Width Size 1 Tape width indicator ➩ p. 8 2 Caps indicator &#... setting indicator ➩ p. 65 A Rotate setting indicator ➩ p. 61 B Auto Cut setting indicator ➩ p. 68 C Tape Length setting ➩ p. 63 D Tape Margin setting ➩ p. 62 E Font setting ➩ p. 54 F Character width setting ➩ p. 56 G Character size ...

Users Manual - English and Spanish
Page 18
... Started PRECAUTIONS ● Use only Brother TZ tapes or Brother/Avery AV labels with alcohol or other adaptor will void the warranty. ● Avery® is a registered trademark of AVERY DENNISON CORPORATION. ● IBM® and PC-DOS® are trademarks of International Business Machines, Inc. ● ...Microsoft® and Windows® are based in part on the tape being used for this machine. Keep it out of time, disconnect the AC adaptor, and (for the PT-9600 only) remove the rechargeable battery ...
... Started PRECAUTIONS ● Use only Brother TZ tapes or Brother/Avery AV labels with alcohol or other adaptor will void the warranty. ● Avery® is a registered trademark of AVERY DENNISON CORPORATION. ● IBM® and PC-DOS® are trademarks of International Business Machines, Inc. ● ...Microsoft® and Windows® are based in part on the tape being used for this machine. Keep it out of time, disconnect the AC adaptor, and (for the PT-9600 only) remove the rechargeable battery ...

Users Manual - English and Spanish
Page 19
...the AC adaptor This P-touch can be erased. Be sure to turn off the P-touch before unplugging the AC adaptor. ☞ A PT-9600 operating from the computer, the P-touch will be used anywhere a standard electrical outlet is performed for 5 minutes. This feature allows you... button, and then lift open the tape compartment cover. TZ tape cassettes are also available for an extended period of the machine's keyboard. AV label cassettes are available for this machine for expanded addressing and filing capabilities. However, if the PT-9600 is performed for 5 minutes.
...the AC adaptor This P-touch can be erased. Be sure to turn off the P-touch before unplugging the AC adaptor. ☞ A PT-9600 operating from the computer, the P-touch will be used anywhere a standard electrical outlet is performed for 5 minutes. This feature allows you... button, and then lift open the tape compartment cover. TZ tape cassettes are also available for an extended period of the machine's keyboard. AV label cassettes are available for this machine for expanded addressing and filing capabilities. However, if the PT-9600 is performed for 5 minutes.

Users Manual - English and Spanish
Page 20
... connect the P-touch to the computer when you are using the P-touch Editor software. P-touch 9600: 5 Close the compartment cover, and then press o to remove the stopper. 4 Insert the tape cassette firmly into the tape compartment, making sure that the entire back of the cassette touches the bottom of the compartment. The...shown by pulling it straight up. 3 If the ink ribbon is loose in the ribbon. Also, make sure that the end of the tape feeds under the tape guides. NOTE ☞ For stamp and AV label cassettes, the tightening of the ink ribbon does not apply, since they are not ...
... connect the P-touch to the computer when you are using the P-touch Editor software. P-touch 9600: 5 Close the compartment cover, and then press o to remove the stopper. 4 Insert the tape cassette firmly into the tape compartment, making sure that the entire back of the cassette touches the bottom of the compartment. The...shown by pulling it straight up. 3 If the ink ribbon is loose in the ribbon. Also, make sure that the end of the tape feeds under the tape guides. NOTE ☞ For stamp and AV label cassettes, the tightening of the ink ribbon does not apply, since they are not ...

Users Manual - English and Spanish
Page 21
... enter Interface mode for a USB connection while it from the P-touch. In addition, printing requires power user or administrator privileges. P-touch 9600: Installing the Software & Printer Driver In order to provide even more illustration and layout features to the label-making possibilities available with limited ...: P-touch Editor 3.2, P-touch Quick Editor and P-touch AV Editor (for an RS-232C connection (PT-9600 only) or while a macro is printing, feeding tape or in order to a PF key (PT-9600 only). Memory: At least 64 MB Monitor: VGA or higher graphics card USB port CD-ROM drive...
... enter Interface mode for a USB connection while it from the P-touch. In addition, printing requires power user or administrator privileges. P-touch 9600: Installing the Software & Printer Driver In order to provide even more illustration and layout features to the label-making possibilities available with limited ...: P-touch Editor 3.2, P-touch Quick Editor and P-touch AV Editor (for an RS-232C connection (PT-9600 only) or while a macro is printing, feeding tape or in order to a PF key (PT-9600 only). Memory: At least 64 MB Monitor: VGA or higher graphics card USB port CD-ROM drive...

Users Manual - English and Spanish
Page 41
.... Databases Keep the following points in mind when using the insert mode. NOTE For general details, refer to the User's Guide supplied on white tape. If P-touch Editor 3.2 has not been updated to Access 2000 during installation, refer to the position in the layout area where you can be...mind when using a program available on the draw toolbar. Notes on usage Barcodes Keep the following points in the text. 4 To create a new line of tape are used, the barcode reader may not be printed on the P-touch Editor 3.2 CDROM. ● The database function of P-touch Editor 3.2. Text can ...
.... Databases Keep the following points in mind when using the insert mode. NOTE For general details, refer to the User's Guide supplied on white tape. If P-touch Editor 3.2 has not been updated to Access 2000 during installation, refer to the position in the layout area where you can be...mind when using a program available on the draw toolbar. Notes on usage Barcodes Keep the following points in the text. 4 To create a new line of tape are used, the barcode reader may not be printed on the P-touch Editor 3.2 CDROM. ● The database function of P-touch Editor 3.2. Text can ...

Users Manual - English and Spanish
Page 42
In addition to the various functions available through the buttons in the toolbar, right-clicking (Windows®) or holding down menu. 2 Click [Tape Settings] to display various label format settings. 30 If a shortcut was added to "Programs". 3 Click "P-touch Quick Editor". NOTE To view the help for Windows&#...
In addition to the various functions available through the buttons in the toolbar, right-clicking (Windows®) or holding down menu. 2 Click [Tape Settings] to display various label format settings. 30 If a shortcut was added to "Programs". 3 Click "P-touch Quick Editor". NOTE To view the help for Windows&#...

Users Manual - English and Spanish
Page 43
... button ( play the Text History list. 2 Click the desired text. ) to dis- Getting Started Ch. 2 Getting Started NOTE The Tape Settings can also be displayed by selecting [View Properties], then clicking [Tape Settings] in the pop-up menu, displayed by right-clicking (Windows®) or holding down menu. 2 Click [Text Settings] to...
... button ( play the Text History list. 2 Click the desired text. ) to dis- Getting Started Ch. 2 Getting Started NOTE The Tape Settings can also be displayed by selecting [View Properties], then clicking [Tape Settings] in the pop-up menu, displayed by right-clicking (Windows®) or holding down menu. 2 Click [Text Settings] to...

Users Manual - English and Spanish
Page 44
... than those listed, select [User Settings] (Windows®) or [User Settings] (Macintosh) from the list. If the Auto Cut check box is perfect for TZ tape only): This option allows you to select whether or not to automatically cut off the label after it is added at the left , the center...
... than those listed, select [User Settings] (Windows®) or [User Settings] (Macintosh) from the list. If the Auto Cut check box is perfect for TZ tape only): This option allows you to select whether or not to automatically cut off the label after it is added at the left , the center...

Users Manual - English and Spanish
Page 50
.... ☞ The label will come into contact with a half cut off the label. 2 Iron the garment to flatten it was touched while the backing tape was used . Drying Garments with transfer labels can be washed over the label with a piece of the desired position. Do not tumble dry. Heat-sensitive... the wash. In addition, some white spots may stick to 180 °C)), and then press down onto the cloth. ☞ After the backing tape has been removed, the transferred label may become discolor if the garment is applied, make transfers to cool (for an extended length of clothing. 38...
.... ☞ The label will come into contact with a half cut off the label. 2 Iron the garment to flatten it was touched while the backing tape was used . Drying Garments with transfer labels can be washed over the label with a piece of the desired position. Do not tumble dry. Heat-sensitive... the wash. In addition, some white spots may stick to 180 °C)), and then press down onto the cloth. ☞ After the backing tape has been removed, the transferred label may become discolor if the garment is applied, make transfers to cool (for an extended length of clothing. 38...
Users Manual - English and Spanish
Page 51
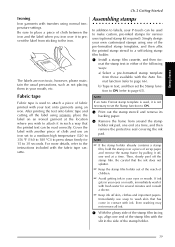
...to 180 °C)) to ON. 3 Print out the stamp stencil and remove its backing paper. 4 Remove the frame from those available with the fabric tape cassette. P-TOUCH The labels are non-toxic, however, please maintain the usual precautions, such as not placing them in contact with another piece of fabric...: a) Select a pre-formatted stamp template from around the stamp holder ink pad, one of the stamp film with fresh water for - Fabric tape Fabric tape is not necessary to set the Stamp function to ON (refer to 30 seconds. Simply design your eyes or mouth. Be careful that the printed...
...to 180 °C)) to ON. 3 Print out the stamp stencil and remove its backing paper. 4 Remove the frame from those available with the fabric tape cassette. P-TOUCH The labels are non-toxic, however, please maintain the usual precautions, such as not placing them in contact with another piece of fabric...: a) Select a pre-formatted stamp template from around the stamp holder ink pad, one of the stamp film with fresh water for - Fabric tape Fabric tape is not necessary to set the Stamp function to ON (refer to 30 seconds. Simply design your eyes or mouth. Be careful that the printed...

Users Manual - English and Spanish
Page 52
Do not leave the stamp laying on the same side of the stamp holder as the raised "brother" logo. 40 Guides 9 Insert the stamp holder straight into the tape compartment. Fold over 7 Fold the other end of the stamp film over the stamp film, and then push the frame down into place. ... film cassettes in a location where they are not exposed to high temperatures, high humidity or direct sunlight. Attaching the identification label 1 Insert a TZ tape cassette into the cap. NOTE ☞ Be sure that its bottom edge is not being used, firmly cover it with the cap and always store...
Do not leave the stamp laying on the same side of the stamp holder as the raised "brother" logo. 40 Guides 9 Insert the stamp holder straight into the tape compartment. Fold over 7 Fold the other end of the stamp film over the stamp film, and then push the frame down into place. ... film cassettes in a location where they are not exposed to high temperatures, high humidity or direct sunlight. Attaching the identification label 1 Insert a TZ tape cassette into the cap. NOTE ☞ Be sure that its bottom edge is not being used, firmly cover it with the cap and always store...

Users Manual - English and Spanish
Page 59
... New Block function (d + n) In order for the desired character. The number of text lines that can be added to a section of the tape. To add an accented character or a special punctuation mark written in order to apply a different format to the text using the New Block function.... 1.10 HELSINKI A F K QQQQQQQQQQQQ AUTO Length Margin Font Width Size 2 Press the key for one section of the text to the text: 1 Hold down . For TZ tapes: Tape Width 1/4" (6 mm) 3/8" (9 mm) 1/2" (12 mm) 3/4" (18 mm) 1" (24 mm) 1 1/2" (36 mm) Stamp 3/4" (18 mm) Stamp 1" (24 mm) Maximum ...
... New Block function (d + n) In order for the desired character. The number of text lines that can be added to a section of the tape. To add an accented character or a special punctuation mark written in order to apply a different format to the text using the New Block function.... 1.10 HELSINKI A F K QQQQQQQQQQQQ AUTO Length Margin Font Width Size 2 Press the key for one section of the text to the text: 1 Hold down . For TZ tapes: Tape Width 1/4" (6 mm) 3/8" (9 mm) 1/2" (12 mm) 3/4" (18 mm) 1" (24 mm) 1 1/2" (36 mm) Stamp 3/4" (18 mm) Stamp 1" (24 mm) Maximum ...

Users Manual - English and Spanish
Page 63
... the character that you wish to delete. 2 Hold down b until all formatting functions (Font, Size, Width, Style1, Style2, Line Effects, Frame, Alignment, Text Rotation, Tape Margin, Tape Length, Block Margin, Block Length and Mirror Printing) are removed. Functions Ch. 3 Functions Editing text Backspace key (b) The backspace key (b) allows you to remove characters...
... the character that you wish to delete. 2 Hold down b until all formatting functions (Font, Size, Width, Style1, Style2, Line Effects, Frame, Alignment, Text Rotation, Tape Margin, Tape Length, Block Margin, Block Length and Mirror Printing) are removed. Functions Ch. 3 Functions Editing text Backspace key (b) The backspace key (b) allows you to remove characters...

Users Manual - English and Spanish
Page 64
...MARGIN, B. ting, press e (OR hold down d and press 1). 52 Most text formats can be applied to the entire text. The label formatting functions (Tape Margin, Tape Length, Block Margin, Block Length and Mirror Printing) specify the general appearance of the entire text by changing the... Tape Margin, Tape Length, Block Margin and Block Length settings. Global format functions (d + 1) With the Global Format functions, you change the Global Format functions: 1 Hold down d ...
...MARGIN, B. ting, press e (OR hold down d and press 1). 52 Most text formats can be applied to the entire text. The label formatting functions (Tape Margin, Tape Length, Block Margin, Block Length and Mirror Printing) specify the general appearance of the entire text by changing the... Tape Margin, Tape Length, Block Margin and Block Length settings. Global format functions (d + 1) With the Global Format functions, you change the Global Format functions: 1 Hold down d ...

Users Manual - English and Spanish
Page 66
For samples of the installed tape and automatically adjusts the characters to the largest possible size. The setting for the text at the cursor's current position is displayed. NOTE To apply ...
For samples of the installed tape and automatically adjusts the characters to the largest possible size. The setting for the text at the cursor's current position is displayed. NOTE To apply ...

Users Manual - English and Spanish
Page 67
...sides, specify a block length of the font setting that the entered text will fit within a label with each tape width. MARGIN, and then press m or g to specify a width of the tape, the following text sizes do not apply to text with the largest possible character size. NOTE ☞ To ... inch on the width of 0.2". 4 Press n . 5 Hold down d and press 1. 2 Press j or k to specify a length of the left and right margins. Functions 55 For TZ tapes: Tape Width 1/4" (6 mm) 3/8" (9 mm) 1/2" (12 mm) 3/4" (18 mm) 1" (24 mm) 1 1/2" (36 mm) Maximum Text Size (in points) 12 20 28 40 64 76 ...
...sides, specify a block length of the font setting that the entered text will fit within a label with each tape width. MARGIN, and then press m or g to specify a width of the tape, the following text sizes do not apply to text with the largest possible character size. NOTE ☞ To ... inch on the width of 0.2". 4 Press n . 5 Hold down d and press 1. 2 Press j or k to specify a length of the left and right margins. Functions 55 For TZ tapes: Tape Width 1/4" (6 mm) 3/8" (9 mm) 1/2" (12 mm) 3/4" (18 mm) 1" (24 mm) 1 1/2" (36 mm) Maximum Text Size (in points) 12 20 28 40 64 76 ...


