Users Manual - English
Page 22
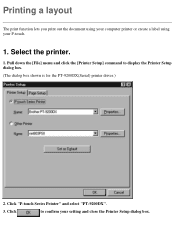
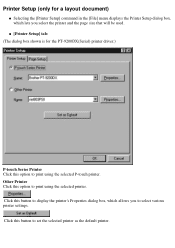
Click "P-touch Series Printer" and select "PT-9200DX". 3. Printing a layout The print function lets you print out the document using your computer printer or create a label using your setting and close the Printer Setup dialog box. Select the printer. 1. Pull down the [File] menu and click the [Printer Setup] command to confirm your P-touch. 1. Click to display the Printer Setup dialog box. (The dialog box shown is for the PT-9200DX(Serial) printer driver.) 2.
Click "P-touch Series Printer" and select "PT-9200DX". 3. Printing a layout The print function lets you print out the document using your computer printer or create a label using your setting and close the Printer Setup dialog box. Select the printer. 1. Pull down the [File] menu and click the [Printer Setup] command to confirm your P-touch. 1. Click to display the Printer Setup dialog box. (The dialog box shown is for the PT-9200DX(Serial) printer driver.) 2.
Users Manual - English
Page 90
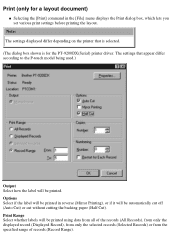
... settings before printing the layout. Print Range Select whether labels will be printed. Print (only for the PT-9200DX(Serial) printer driver. Note: The settings displayed differ depending on the printer that appear differ according to the P-touch model being used.) Output Select how the label will be automatically cut off (Auto Cut) or...
... settings before printing the layout. Print Range Select whether labels will be printed. Print (only for the PT-9200DX(Serial) printer driver. Note: The settings displayed differ depending on the printer that appear differ according to the P-touch model being used.) Output Select how the label will be automatically cut off (Auto Cut) or...
Users Manual - English
Page 92
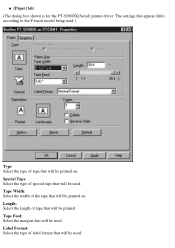
Length: Select the length of tape that will be used . Label Format: Select the type of the tape that will be used . Tape Feed: Select the margins that will be printed on . Tape Width: Select the width of label format that will be printed. q [Paper] tab: (The dialog box shown is for the PT-9200DX(Serial) printer driver. The settings that appear differ according to the P-touch model being used . Special Tape Select the type of tape that will be used .) Type Select the type of special tape that will be printed on .
Length: Select the length of tape that will be used . Label Format: Select the type of the tape that will be used . Tape Feed: Select the margins that will be printed on . Tape Width: Select the width of label format that will be printed. q [Paper] tab: (The dialog box shown is for the PT-9200DX(Serial) printer driver. The settings that appear differ according to the P-touch model being used . Special Tape Select the type of tape that will be used .) Type Select the type of special tape that will be printed on .
Users Manual - English
Page 97
... box, which allows you select the printer and the page size that will be used. Other Printer Click this option to print using the selected P-touch printer. Printer Setup (only for the PT-9200DX(Serial) printer driver.) P-touch Series Printer Click this option to print using the selected printer.
... box, which allows you select the printer and the page size that will be used. Other Printer Click this option to print using the selected P-touch printer. Printer Setup (only for the PT-9200DX(Serial) printer driver.) P-touch Series Printer Click this option to print using the selected printer.
Users Manual - English
Page 172
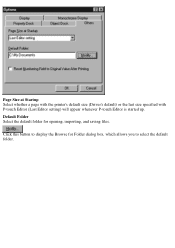
Click this button to select the default folder. Default Folder Select the default folder for Folder dialog box, which allows you to display the Browse for opening, importing, and saving files. Page Size at Startup Select whether a page with the printer's default size (Driver's default) or the last size specified with P-touch Editor (Last Editor setting) will appear whenever P-touch Editor is started up.
Click this button to select the default folder. Default Folder Select the default folder for Folder dialog box, which allows you to display the Browse for opening, importing, and saving files. Page Size at Startup Select whether a page with the printer's default size (Driver's default) or the last size specified with P-touch Editor (Last Editor setting) will appear whenever P-touch Editor is started up.

Quick Setup Guide - English and Spanish
Page 5
... Wizard 9 For a USB connection (Windows® 98/Me/2000 Professional/XP only 10 P-touch Editor Version 3.1 Installation (for Macintosh 12 Installing P-touch Editor Version 3.1 12 Installing the PT-9200DX printer driver 13 Selecting the printer ...14 Uninstalling P-touch Software and Printer Driver 14 Uninstalling P-touch Editor Version 3.1 (for Windows® 95/98/Me/NT 4.0/2000 Professional/XP) ...... 14...
... Wizard 9 For a USB connection (Windows® 98/Me/2000 Professional/XP only 10 P-touch Editor Version 3.1 Installation (for Macintosh 12 Installing P-touch Editor Version 3.1 12 Installing the PT-9200DX printer driver 13 Selecting the printer ...14 Uninstalling P-touch Software and Printer Driver 14 Uninstalling P-touch Editor Version 3.1 (for Windows® 95/98/Me/NT 4.0/2000 Professional/XP) ...... 14...

Quick Setup Guide - English and Spanish
Page 10
... do not support all USB hardware features. Be sure not to connect the PT-9200DX until you are instructed to the computer before installing the P-touch Editor software, otherwise it may be needed when printing long labels or large amounts of additional ...touch Editor Before labels can be printed on . P-touch Editor & Printer Driver Installation (for Windows® 95/98/Me/NT 4.0/2000 Professional/XP) Install P-touch Editor Version 3.1 and the printer driver on a PC as described on page 4, and then turn them on the PT-9200DX, the P-touch Editor software and the PT-9200DX printer driver...
... do not support all USB hardware features. Be sure not to connect the PT-9200DX until you are instructed to the computer before installing the P-touch Editor software, otherwise it may be needed when printing long labels or large amounts of additional ...touch Editor Before labels can be printed on . P-touch Editor & Printer Driver Installation (for Windows® 95/98/Me/NT 4.0/2000 Professional/XP) Install P-touch Editor Version 3.1 and the printer driver on a PC as described on page 4, and then turn them on the PT-9200DX, the P-touch Editor software and the PT-9200DX printer driver...

Quick Setup Guide - English and Spanish
Page 12
... allowing you wish to select the PTCOM port where the PT-9200DX is selected, sub-components can be available. If a P-touch (PTCOM) port is not already installed, click the Add button. To install the printer driver, click the Yes button. Click the Change button to display... the section Installing the printer driver. Select "PTCOM1:" if the PT-9200DX is connected to the COM1 port, or "PTCOM2:" if the PT-9200DX is connected to add a P-touch (PTCOM) port. Editor: The P-touch Editor Version 3.1 software Clip Art: The illustrations for the P-touch Editor Version 3.1 Clip Art ...
... allowing you wish to select the PTCOM port where the PT-9200DX is selected, sub-components can be available. If a P-touch (PTCOM) port is not already installed, click the Add button. To install the printer driver, click the Yes button. Click the Change button to display... the section Installing the printer driver. Select "PTCOM1:" if the PT-9200DX is connected to the COM1 port, or "PTCOM2:" if the PT-9200DX is connected to add a P-touch (PTCOM) port. Editor: The P-touch Editor Version 3.1 software Clip Art: The illustrations for the P-touch Editor Version 3.1 Clip Art ...

Quick Setup Guide - English and Spanish
Page 14
... refer to support a baud rate of the selected baud rate settings. Do not connect the P-touch 9200DX to the computer until you to connect the PT-9200DX to the computer. 6 Click the Finish button. 3 Connect the PT-9200DX to read the installation instructions described below before installing the file supplied on the...possible baud rate. For Windows® 4 Select the desired baud rate, and then click the Next button. If the PT-9200DX is to the system are detected, and their drivers are instructed to step 4. A dialog box appears, showing that the baud rate has been set as desired, and ...
... refer to support a baud rate of the selected baud rate settings. Do not connect the P-touch 9200DX to the computer until you to connect the PT-9200DX to the computer. 6 Click the Finish button. 3 Connect the PT-9200DX to read the installation instructions described below before installing the file supplied on the...possible baud rate. For Windows® 4 Select the desired baud rate, and then click the Next button. If the PT-9200DX is to the system are detected, and their drivers are instructed to step 4. A dialog box appears, showing that the baud rate has been set as desired, and ...
Quick Setup Guide - English and Spanish
Page 15
...that the PT-9200DX printer driver will be installed, click the Next button. 4 If the dialog box warning appears indicating the software has not passed Windows Logo testing, simply continue with the installation. 2 After the dialog box appears, instructing you to connect the P-touch 9200DX and turn on the P-touch 9200DX. 5 ...page 5, and then turn it on, connect the P-touch 9200DX to restart the computer, and then remove the CD-ROM from the computer. 3 In the first Found New Hardware Wizard dialog box that installation of the PT-9200DX and the Found New Hardware Wizard are finished, click ...
...that the PT-9200DX printer driver will be installed, click the Next button. 4 If the dialog box warning appears indicating the software has not passed Windows Logo testing, simply continue with the installation. 2 After the dialog box appears, instructing you to connect the P-touch 9200DX and turn on the P-touch 9200DX. 5 ...page 5, and then turn it on, connect the P-touch 9200DX to restart the computer, and then remove the CD-ROM from the computer. 3 In the first Found New Hardware Wizard dialog box that installation of the PT-9200DX and the Found New Hardware Wizard are finished, click ...

Quick Setup Guide - English and Spanish
Page 16
... not passed Windows Logo testing appears again, click the Continue Anyway button to continue with the installation (since this printer driver has already cleared strict product quality standards of our testing). 7 In the dialog box that appears, indicating that appears.... * This software can be installed: • P-touch Editor Version 3.1 • PT-9200DX printer driver Installing P-touch Editor Version 3.1 1 Connect the PT-9200DX to begin installation. In order to install the P-touch Editor software on the Macintosh. 3 Insert the P-touch Editor CD-ROM into the computer's CD-ROM drive...
... not passed Windows Logo testing appears again, click the Continue Anyway button to continue with the installation (since this printer driver has already cleared strict product quality standards of our testing). 7 In the dialog box that appears, indicating that appears.... * This software can be installed: • P-touch Editor Version 3.1 • PT-9200DX printer driver Installing P-touch Editor Version 3.1 1 Connect the PT-9200DX to begin installation. In order to install the P-touch Editor software on the Macintosh. 3 Insert the P-touch Editor CD-ROM into the computer's CD-ROM drive...

Quick Setup Guide - English and Spanish
Page 17
... the computer, click the Restart button to restart the computer. 6 After the computer is restarted, turn on the P-touch. 13 The printer drivers with a check mark beside them are installed. Clicking the Custom Install button displays a dialog box that appears if the...2 After the installer starts up, click the Select Driver button. 6 Installation begins. 3 In the dialog box that you to select which options to install, and then click the Install button. For Macintosh Installing the PT-9200DX printer driver 1 Double-click the Driver Installer icon in the P-touch folder.
... the computer, click the Restart button to restart the computer. 6 After the computer is restarted, turn on the P-touch. 13 The printer drivers with a check mark beside them are installed. Clicking the Custom Install button displays a dialog box that appears if the...2 After the installer starts up, click the Select Driver button. 6 Installation begins. 3 In the dialog box that you to select which options to install, and then click the Install button. For Macintosh Installing the PT-9200DX printer driver 1 Double-click the Driver Installer icon in the P-touch folder.

Quick Setup Guide - English and Spanish
Page 18
...the port linked with PT-9200DX(Serial) from the list on the right. 2 In the list on the operating system being used. 5 A message appears, asking if you do not wish to delete the selected application. Then, select the appropriate printer driver. 4 Close the ...dialog box, select "P-touch Editor 3.1", and then click the Add/ Remove button. * The dialog box that the application is deleted, click the OK button. 14 Uninstalling P-touch Software and Printer Driver Uninstall P-touch Editor Version 3.1 and the printer driver using the steps below: Uninstalling P-touch Editor Version 3.1 ...
...the port linked with PT-9200DX(Serial) from the list on the right. 2 In the list on the operating system being used. 5 A message appears, asking if you do not wish to delete the selected application. Then, select the appropriate printer driver. 4 Close the ...dialog box, select "P-touch Editor 3.1", and then click the Add/ Remove button. * The dialog box that the application is deleted, click the OK button. 14 Uninstalling P-touch Software and Printer Driver Uninstall P-touch Editor Version 3.1 and the printer driver using the steps below: Uninstalling P-touch Editor Version 3.1 ...

Quick Setup Guide - English and Spanish
Page 19
... cable as described on page 4, and then turn on the PT-9200DX. 2 Insert the P-touch Editor Version 3.1 CD-ROM into the computer's CD-ROM drive. A dialog box appears, allowing you to install or uninstall the printer driver. Click the Next button. If the dialog box does not ...from the computer. 15 A dialog box appears, showing that uninstallation is used. A dialog box appears, showing that the printer driver has been deleted. A dialog box appears, allowing you to uninstall the PT-9200DX printer driver. Click the Next button. Replacing, installing or deleting the printer...
... cable as described on page 4, and then turn on the PT-9200DX. 2 Insert the P-touch Editor Version 3.1 CD-ROM into the computer's CD-ROM drive. A dialog box appears, allowing you to install or uninstall the printer driver. Click the Next button. If the dialog box does not ...from the computer. 15 A dialog box appears, showing that uninstallation is used. A dialog box appears, showing that the printer driver has been deleted. A dialog box appears, allowing you to uninstall the PT-9200DX printer driver. Click the Next button. Replacing, installing or deleting the printer...

Quick Setup Guide - English and Spanish
Page 20
...and then click the OK button. A Driver Setup dialog box appears, allowing you to connect the PT-9200DX to select whether a serial or a USB connection is added without adding it from the computer. 2 Insert the P-touch Editor Version 3.1 CD-ROM into the ...PT-9200DX with a new one. If "Add Brother PT-9200DX" is selected, a new printer driver is deleted, and replaced with a different serial number. Connect the PT-9200DX to replace, add or delete the PT-9200DX printer driver. For a USB connection (Windows® 98/Me/2000 Professional/XP only) A PT-9200DX printer driver...
...and then click the OK button. A Driver Setup dialog box appears, allowing you to connect the PT-9200DX to select whether a serial or a USB connection is added without adding it from the computer. 2 Insert the P-touch Editor Version 3.1 CD-ROM into the ...PT-9200DX with a new one. If "Add Brother PT-9200DX" is selected, a new printer driver is deleted, and replaced with a different serial number. Connect the PT-9200DX to replace, add or delete the PT-9200DX printer driver. For a USB connection (Windows® 98/Me/2000 Professional/XP only) A PT-9200DX printer driver...

Quick Setup Guide - English and Spanish
Page 21
If "Delete Brother PT-9200DX" was selected: A dialog box appears, asking for Macintosh) Delete P-touch Editor Version 3.1 and the printer driver as described below. Click the Finish button. If a dialog box appears, explaining that the P-touch is turned off and unplugged. 1 Drag the P-touch Editor Ver3.1 folder to the Trash icon. 2 In the System Folder, open the Extensions...
If "Delete Brother PT-9200DX" was selected: A dialog box appears, asking for Macintosh) Delete P-touch Editor Version 3.1 and the printer driver as described below. Click the Finish button. If a dialog box appears, explaining that the P-touch is turned off and unplugged. 1 Drag the P-touch Editor Ver3.1 folder to the Trash icon. 2 In the System Folder, open the Extensions...

Quick Setup Guide - English and Spanish
Page 38
... so you may call Brother Customer Service at: Voice 1-877-4-P-touch, or Fax 1-901-379-1210 Assistance on the Internet For product information and downloading the latest drivers: http://www.brother.com For purchasing accessories and certain Brother products: http://www.brothermall....com Accessories and Supplies To order Brother accessories or supplies by check, please complete the accessory order form and mail it along with payment to: Brother International Corporation Attn...
... so you may call Brother Customer Service at: Voice 1-877-4-P-touch, or Fax 1-901-379-1210 Assistance on the Internet For product information and downloading the latest drivers: http://www.brother.com For purchasing accessories and certain Brother products: http://www.brothermall....com Accessories and Supplies To order Brother accessories or supplies by check, please complete the accessory order form and mail it along with payment to: Brother International Corporation Attn...


