Users Manual - English
Page 2
...) Responsible Party : Brother International Corporation 100 Somerset Corporate Boulevard Bridgewater, NJ 08807-0911 USA TEL : (908) 704-1700 declares that interference will not occur in accordance with Part 15 of the following two conditions: (1) this device may cause harmful interference to ensure compliance with the limits for purchasing the P-touch labeler PT-2730. Read this...
...) Responsible Party : Brother International Corporation 100 Somerset Corporate Boulevard Bridgewater, NJ 08807-0911 USA TEL : (908) 704-1700 declares that interference will not occur in accordance with Part 15 of the following two conditions: (1) this device may cause harmful interference to ensure compliance with the limits for purchasing the P-touch labeler PT-2730. Read this...
Users Manual - English
Page 4
... the machine was used outside the United States). You are not limited to label cassettes, cutters, stamps, power adapters, cases and batteries. • Except as "this Product"). • If you purchased a product from someone other than an authorized Brother reseller in the United States or if the product was purchased within the...
... the machine was used outside the United States). You are not limited to label cassettes, cutters, stamps, power adapters, cases and batteries. • Except as "this Product"). • If you purchased a product from someone other than an authorized Brother reseller in the United States or if the product was purchased within the...
Users Manual - English
Page 8
... Precautions ...6 General Precautions ...9 Symbols Used in this Guide 10 GETTING STARTED 11 Unpacking Your P-touch labeler 11 General Description ...12 LCD Display & Keyboard 13 LCD Display...13 Key Names and Functions 14 Power Supply ...16 Battery ...16 AC Adapter ...17 Inserting a ... Feed Only ...20 LCD Display ...21 LCD Contrast ...21 Display Mode ...21 Back Light ...22 Setting Language and Unit 22 Language ...22 Unit ...22 EDITING A LABEL 23 Entering and Editing Text 23 Entering Text from the Keyboard 23 Using Text Reminder 23 Adding a New Line 24 Adding a New Block 24 Moving...
... Precautions ...6 General Precautions ...9 Symbols Used in this Guide 10 GETTING STARTED 11 Unpacking Your P-touch labeler 11 General Description ...12 LCD Display & Keyboard 13 LCD Display...13 Key Names and Functions 14 Power Supply ...16 Battery ...16 AC Adapter ...17 Inserting a ... Feed Only ...20 LCD Display ...21 LCD Contrast ...21 Display Mode ...21 Back Light ...22 Setting Language and Unit 22 Language ...22 Unit ...22 EDITING A LABEL 23 Entering and Editing Text 23 Entering Text from the Keyboard 23 Using Text Reminder 23 Adding a New Line 24 Adding a New Block 24 Moving...
Users Manual - English
Page 9
... Printing ...56 1 Tape Cutting Options 57 Adjusting the Label Length 58 2 Attaching Labels...59 Printing from the Label Collection 59 3 Printing a label from the Label Collection Stored in the Machine 59 Downloading a new Label Collection Category 4 (Windows® only ) ...63 Downloading a Label Collection Category to your Labeler 63 5 Downloading a New Label Collecstion Category to P-touch Editor / 6 Updating P-touch Editor...
... Printing ...56 1 Tape Cutting Options 57 Adjusting the Label Length 58 2 Attaching Labels...59 Printing from the Label Collection 59 3 Printing a label from the Label Collection Stored in the Machine 59 Downloading a new Label Collection Category 4 (Windows® only ) ...63 Downloading a Label Collection Category to your Labeler 63 5 Downloading a New Label Collecstion Category to P-touch Editor / 6 Updating P-touch Editor...
Users Manual - English
Page 10
INTRODUCTION USING THE FILE MEMORY 68 Storing a Label into Memory 68 Opening a Stored Label File 68 Printing a Stored Label File 69 Deleting a Stored Label File 69 MAINTAINING YOUR P-TOUCH LABELER 70 Resetting the P-touch Labeler 70 Resetting data to factory settings (Downloaded data is not reset 70 Resetting data to factory settings (Downloaded data is reset 70 Maintenance...70 Cleaning the Unit 70 Cleaning the Print Head 70 Cleaning the Tape Cutter 71 TROUBLESHOOTING 72 What to do when...72 Error Messages...74 APPENDIX 78 Specifications ...78 INDEX...79 3
INTRODUCTION USING THE FILE MEMORY 68 Storing a Label into Memory 68 Opening a Stored Label File 68 Printing a Stored Label File 69 Deleting a Stored Label File 69 MAINTAINING YOUR P-TOUCH LABELER 70 Resetting the P-touch Labeler 70 Resetting data to factory settings (Downloaded data is not reset 70 Resetting data to factory settings (Downloaded data is reset 70 Maintenance...70 Cleaning the Unit 70 Cleaning the Print Head 70 Cleaning the Tape Cutter 71 TROUBLESHOOTING 72 What to do when...72 Error Messages...74 APPENDIX 78 Specifications ...78 INDEX...79 3
Users Manual - English
Page 11
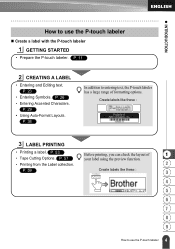
... Editing text. P. 23 • Entering Symbols. Create labels like these : 3 LABEL PRINTING • Printing a label. P. 57 your label using the preview function. • Printing from the Label collection. 2 P. 59 Create labels like these : 3 4 5 6 7 8 9 4 How to use the P-touch labeler „ Create a label with the P-touch labeler 1 GETTING STARTED • Prepare the P-touch labeler. P. 29 • Using Auto-Format Layouts. P. 53...
... Editing text. P. 23 • Entering Symbols. Create labels like these : 3 LABEL PRINTING • Printing a label. P. 57 your label using the preview function. • Printing from the Label collection. 2 P. 59 Create labels like these : 3 4 5 6 7 8 9 4 How to use the P-touch labeler „ Create a label with the P-touch labeler 1 GETTING STARTED • Prepare the P-touch labeler. P. 29 • Using Auto-Format Layouts. P. 53...
Users Manual - English
Page 12
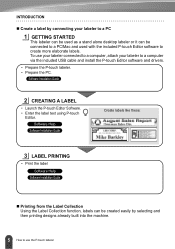
... selecting and then printing designs already built into the machine. 5 How to use your labeler connected to a computer, attach your labeler to a PC 1 GETTING STARTED This labeler can be used as a stand alone desktop labeler or it can be connected to a PC/Mac and used with the included P-touch Editor software to create more...
... selecting and then printing designs already built into the machine. 5 How to use your labeler connected to a computer, attach your labeler to a PC 1 GETTING STARTED This labeler can be used as a stand alone desktop labeler or it can be connected to a PC/Mac and used with the included P-touch Editor software to create more...
Users Manual - English
Page 13
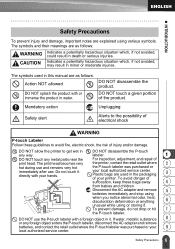
... manual are used in it. DO NOT disassemble the product. Mandatory action Unplugging Safety alert Alerts to the possibility of electrical shock WARNING P-touch Labeler Follow these bags away 4 from babies and children. your printer. To avoid danger of suffocation, keep these guidelines to get wet in minor ... not avoided, could result in water. The print head becomes very the printer, contact the retail outlet where 2 hot during use the P-touch labeler with a foreign object in the packaging 3 of injury and/or damage. DO NOT use and remains very hot the P-touch...
... manual are used in it. DO NOT disassemble the product. Mandatory action Unplugging Safety alert Alerts to the possibility of electrical shock WARNING P-touch Labeler Follow these bags away 4 from babies and children. your printer. To avoid danger of suffocation, keep these guidelines to get wet in minor ... not avoided, could result in water. The print head becomes very the printer, contact the retail outlet where 2 hot during use the P-touch labeler with a foreign object in the packaging 3 of injury and/or damage. DO NOT use and remains very hot the P-touch...
Users Manual - English
Page 14
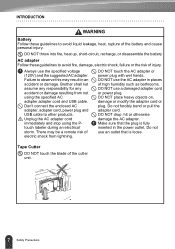
... plug and USB cable to avoid liquid leakage, heat, rupture of electric shock from not using the Ptouch labeler during an electrical storm. DO NOT drop, hit or otherwise damage the AC adapter. Brother shall not assume any responsibility for any accident or damage resulting from lightning. DO NOT touch the AC...
... plug and USB cable to avoid liquid leakage, heat, rupture of electric shock from not using the Ptouch labeler during an electrical storm. DO NOT drop, hit or otherwise damage the AC adapter. Brother shall not assume any responsibility for any accident or damage resulting from lightning. DO NOT touch the AC...
Users Manual - English
Page 15
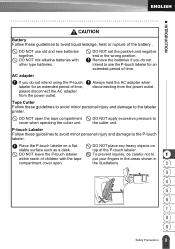
... and negative end in the illustrations. 2 3 4 5 6 7 8 9 8 Safety Precautions Remove the batteries if you do not intend to the labeler printer. Tape Cutter Follow these guidelines to avoid minor personal injury and damage to 1 put your fingers in the areas shown in the wrong position.... To prevent injuries, be careful not to the P-touch labeler. Place the P-touch labeler on top of time, please disconnect the AC adapter from the power outlet. DO NOT place any heavy objects on a ...
... and negative end in the illustrations. 2 3 4 5 6 7 8 9 8 Safety Precautions Remove the batteries if you do not intend to the labeler printer. Tape Cutter Follow these guidelines to avoid minor personal injury and damage to 1 put your fingers in the areas shown in the wrong position.... To prevent injuries, be careful not to the P-touch labeler. Place the P-touch labeler on top of time, please disconnect the AC adapter from the power outlet. DO NOT place any heavy objects on a ...
Users Manual - English
Page 16
...for future reference. • Depending on the location, material, and environmental conditions, the label may unpeel or become irremovable, the color of the label may be cleared. • Note that Brother Industries, Ltd does not assume responsibility for any purpose not described in this guide. Do ... on more than one PC. • We strongly recommend that you read . • Use only Brother TZ tapes with this machine. Any text files stored in the P-touch labeler. arising from failure to direct sunlight, high temperatures, high humidity, or dust. To hide the markings,...
...for future reference. • Depending on the location, material, and environmental conditions, the label may unpeel or become irremovable, the color of the label may be cleared. • Note that Brother Industries, Ltd does not assume responsibility for any purpose not described in this guide. Do ... on more than one PC. • We strongly recommend that you read . • Use only Brother TZ tapes with this machine. Any text files stored in the P-touch labeler. arising from failure to direct sunlight, high temperatures, high humidity, or dust. To hide the markings,...
Users Manual - English
Page 17
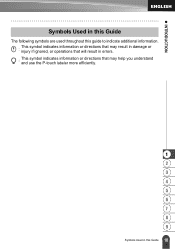
result in that will result in damage or : This symbol and use the indicates information or directions P-touch labeler more efficiently. z INTRODUCTION Symbols Used in this Guide The following symbols are used throughout this Guide that may help you understand 1 2 3 4 5 6 7 8 9 10 Symbols Used in this guide to indicate additional information. : This symbol indicates information or directions injury if ignored, or operations that may errors.
result in that will result in damage or : This symbol and use the indicates information or directions P-touch labeler more efficiently. z INTRODUCTION Symbols Used in this Guide The following symbols are used throughout this Guide that may help you understand 1 2 3 4 5 6 7 8 9 10 Symbols Used in this guide to indicate additional information. : This symbol indicates information or directions injury if ignored, or operations that may errors.
Users Manual - English
Page 18
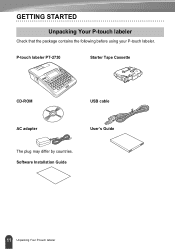
P-touch labeler PT-2730 Starter Tape Cassette CD-ROM USB cable AC adapter User's Guide The plug may differ by countries. Software Installation Guide 11 Unpacking Your P-touch labeler GETTING STARTED Unpacking Your P-touch labeler Check that the package contains the following before using your P-touch labeler.
P-touch labeler PT-2730 Starter Tape Cassette CD-ROM USB cable AC adapter User's Guide The plug may differ by countries. Software Installation Guide 11 Unpacking Your P-touch labeler GETTING STARTED Unpacking Your P-touch labeler Check that the package contains the following before using your P-touch labeler.
Users Manual - English
Page 20
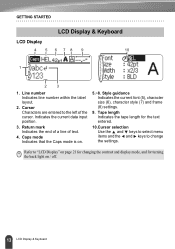
... of text. 4. Indicates the current data input position. 3. GETTING STARTED LCD Display 45 LCD Display & Keyboard 6 78 9 10 1 2 3 1. Line number Indicates line number within the label layout. 2. Cursor Characters are entered to change the settings. Style guidance Indicates the current font (5), character size (6), character style (7) and frame (8) settings. 9. Tape length Indicates...
... of text. 4. Indicates the current data input position. 3. GETTING STARTED LCD Display 45 LCD Display & Keyboard 6 78 9 10 1 2 3 1. Line number Indicates line number within the label layout. 2. Cursor Characters are entered to change the settings. Style guidance Indicates the current font (5), character size (6), character style (7) and frame (8) settings. 9. Tape length Indicates...

Users Manual - English
Page 21
... 4. Preview 2 3. Escape Cancels the current command and returns the display to be selected and printed. • Displays a preview of the label. 3 • Feeds 0.92" (23 mm) of text entry screen and clock display. 9. key. 7. Print Turns the P-touch... labeler on and off. • Prints the current label design onto 2. Display Use this to change clock settings. Label Collection Enables label collections to the data entry screen or the previous step. 5. z GETTING STARTED Key Names and...
... 4. Preview 2 3. Escape Cancels the current command and returns the display to be selected and printed. • Displays a preview of the label. 3 • Feeds 0.92" (23 mm) of text entry screen and clock display. 9. key. 7. Print Turns the P-touch... labeler on and off. • Prints the current label design onto 2. Display Use this to change clock settings. Label Collection Enables label collections to the data entry screen or the previous step. 5. z GETTING STARTED Key Names and...

Users Manual - English
Page 22
... a setting to the left of the cursor in the text entry screen. 16. GETTING STARTED 10.Text • Enables character attributes for the label to be set. • Character attributes can be entered using predefined templates or block formats. 23. Clear Clears all text entered, or all text... and current label settings. 14. Backspace Deletes the character to the default value. 24. Accent Use this to be set . 12. Setup Enables operating preferences (Bar...
... a setting to the left of the cursor in the text entry screen. 16. GETTING STARTED 10.Text • Enables character attributes for the label to be set. • Character attributes can be entered using predefined templates or block formats. 23. Clear Clears all text entered, or all text... and current label settings. 14. Backspace Deletes the character to the default value. 24. Accent Use this to be set . 12. Setup Enables operating preferences (Bar...

Users Manual - English
Page 23
... on the machine, then pushing down firmly until it snaps into place. 1 2 3 • Remove the batteries if you do not intend to use the P-touch labeler for an extended period of time. 4 • When power is disconnected for more than two minutes, all text and format settings will also be cleared.
... on the machine, then pushing down firmly until it snaps into place. 1 2 3 • Remove the batteries if you do not intend to use the P-touch labeler for an extended period of time. 4 • When power is disconnected for more than two minutes, all text and format settings will also be cleared.
Users Manual - English
Page 24
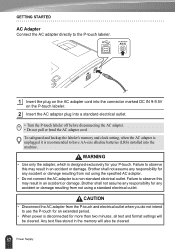
...a standard electrical outlet. • Turn the P-touch labeler off before disconnecting the AC adapter. • Do not pull or bend the AC adapter cord. Any text files stored in the memory will be cleared. 17 Power Supply Brother shall not assume any accident or damage resulting from not... using a standard electrical outlet. To safeguard and backup the labeler's memory and clock setting, when the AC adapter is unplugged it is recommended...
...a standard electrical outlet. • Turn the P-touch labeler off before disconnecting the AC adapter. • Do not pull or bend the AC adapter cord. Any text files stored in the memory will be cleared. 17 Power Supply Brother shall not assume any accident or damage resulting from not... using a standard electrical outlet. To safeguard and backup the labeler's memory and clock setting, when the AC adapter is unplugged it is recommended...
Users Manual - English
Page 25
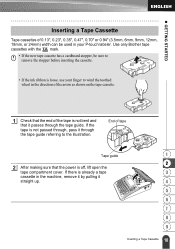
.... If there is already a tape 3 cassette in the machine, remove it by pulling it through , pass it straight up. 4 5 6 7 8 9 18 Inserting a Tape Cassette Use only Brother tape cassettes with the mark. • If the new tape cassette has a cardboard stopper, be used in the direction of the arrow as shown on..., 18mm, or 24mm) width can be sure to remove the stopper before inserting the cassette. • If the ink ribbon is loose, use your P-touch labeler.
.... If there is already a tape 3 cassette in the machine, remove it by pulling it through , pass it straight up. 4 5 6 7 8 9 18 Inserting a Tape Cassette Use only Brother tape cassettes with the mark. • If the new tape cassette has a cardboard stopper, be used in the direction of the arrow as shown on..., 18mm, or 24mm) width can be sure to remove the stopper before inserting the cassette. • If the ink ribbon is loose, use your P-touch labeler.

Users Manual - English
Page 26
... and high temperature, high humidity, or dusty locations. Refer to the Auto PowerOff Time table below for 1 hour after connection to turn the P-touch labeler off if no key is turned on. Tape exit slot 4 Close the tape compartment cover. When inserting the tape cassette, make sure that the tape... and ink ribbon do not catch on . Make sure that automatically turns itself off . • Your P-touch labeler has a power saving function that the release lever is pressed down the Shift key and pressing the Preview key. • Do not pull the...
... and high temperature, high humidity, or dusty locations. Refer to the Auto PowerOff Time table below for 1 hour after connection to turn the P-touch labeler off if no key is turned on. Tape exit slot 4 Close the tape compartment cover. When inserting the tape cassette, make sure that the tape... and ink ribbon do not catch on . Make sure that automatically turns itself off . • Your P-touch labeler has a power saving function that the release lever is pressed down the Shift key and pressing the Preview key. • Do not pull the...


