
Users Manual - Multi
Page 5
...main plug from the main leads must be connected to the main supply. If none the less the main plug is not suitable for the power point in your plug, proceed as originally fitted and to reach a power point, then obtain an appropriate safety approved extension lead or consult ...the letter 'L' or coloured red or brown. Connecting Plugs and Main Power / Sewing Light Switch ( Model PS-2470, PS-3100 ) 1 2 FOR USERS IN UK, EIRE, MALTA AND CYPRUS ONLY. If the plug fitted is not suitable for the plug supplied with an identical approved type, as follows: The wire which is coloured...
...main plug from the main leads must be connected to the main supply. If none the less the main plug is not suitable for the power point in your plug, proceed as originally fitted and to reach a power point, then obtain an appropriate safety approved extension lead or consult ...the letter 'L' or coloured red or brown. Connecting Plugs and Main Power / Sewing Light Switch ( Model PS-2470, PS-3100 ) 1 2 FOR USERS IN UK, EIRE, MALTA AND CYPRUS ONLY. If the plug fitted is not suitable for the plug supplied with an identical approved type, as follows: The wire which is coloured...

Users Manual - Multi
Page 6
Connect the electrical supply plug into the machine. 2. Turn on or off the switch for the main power and sew-light. 1 Turn on 2 Turn off or the plug must unplugged. Connect the power cord or three-prong plug into a wall outlet. - When servicing the machine, or when removing covers or changing bulbs, the machine or the electrical set must be removed from the socket outlet. When leaving the machine unattended, the main switch of the machine should be switched off - (Model PS-2360, PS-2250) 1 2 1.
Connect the electrical supply plug into the machine. 2. Turn on or off the switch for the main power and sew-light. 1 Turn on 2 Turn off or the plug must unplugged. Connect the power cord or three-prong plug into a wall outlet. - When servicing the machine, or when removing covers or changing bulbs, the machine or the electrical set must be removed from the socket outlet. When leaving the machine unattended, the main switch of the machine should be switched off - (Model PS-2360, PS-2250) 1 2 1.

Users Manual - Multi
Page 13
...upper thread. 6 BUTTONHOLE LEVER (Page 63) 7 NEEDLE THREADER (Page 41) 8 FLAT BED ATTACHMENT WITH ACCESSORY COMPART- I J PRINCIPAL PARTS (Model PS-2470, PS-3100) 1 BOBBIN WINDER (Page 33) Winds the thread onto the bobbin to control sewing speed/start or stop . K BUTTONHOLE FINE ADJUSTMENT SCREW (Page ...Touch to select the desired stitch. D PATTERN INDICATION WINDOW (Page 15) Shows the stitch number to power supply. H MAIN POWER/SEWING LIGHT SWITCH (Page 9) Turn on/off the main power/sewing light switch. J CORD JACK (Page 7) Connect machine to be used for stitching in either...
...upper thread. 6 BUTTONHOLE LEVER (Page 63) 7 NEEDLE THREADER (Page 41) 8 FLAT BED ATTACHMENT WITH ACCESSORY COMPART- I J PRINCIPAL PARTS (Model PS-2470, PS-3100) 1 BOBBIN WINDER (Page 33) Winds the thread onto the bobbin to control sewing speed/start or stop . K BUTTONHOLE FINE ADJUSTMENT SCREW (Page ...Touch to select the desired stitch. D PATTERN INDICATION WINDOW (Page 15) Shows the stitch number to power supply. H MAIN POWER/SEWING LIGHT SWITCH (Page 9) Turn on/off the main power/sewing light switch. J CORD JACK (Page 7) Connect machine to be used for stitching in either...

Users Manual - Multi
Page 15
... SCREW (Page 69) I PRINCIPAL PARTS (Model PS-2360, PS-2250) 1 BOBBIN WINDER (Page 33) Winds the thread onto the bobbin to the power supply. F MAIN POWER/SEWING LIGHT SWITCH (Page 9) Turn on/off the main power/sewing light switch. G FOOT CONTROLLER JACK (Page...PRESSER FOOT LEVER (Page 39) J FOOT CONTROLLER (Page 10) Used to hold a second spool of the upper thread. 6 BUTTONHOLE LEVER (Page 63) *PS-2360 only 7 NEEDLE THREADER (Page 41) *PS-2360 only 8 FLAT BED ATTACHMENT WITH ACCESSORY COMPARTMENT (Page 14, 32) 9 ZIGZAG PRESSER FOOT (Page 5, 13) : REVERSE SEWING LEVER (Page 29) Push...
... SCREW (Page 69) I PRINCIPAL PARTS (Model PS-2360, PS-2250) 1 BOBBIN WINDER (Page 33) Winds the thread onto the bobbin to the power supply. F MAIN POWER/SEWING LIGHT SWITCH (Page 9) Turn on/off the main power/sewing light switch. G FOOT CONTROLLER JACK (Page...PRESSER FOOT LEVER (Page 39) J FOOT CONTROLLER (Page 10) Used to hold a second spool of the upper thread. 6 BUTTONHOLE LEVER (Page 63) *PS-2360 only 7 NEEDLE THREADER (Page 41) *PS-2360 only 8 FLAT BED ATTACHMENT WITH ACCESSORY COMPARTMENT (Page 14, 32) 9 ZIGZAG PRESSER FOOT (Page 5, 13) : REVERSE SEWING LEVER (Page 29) Push...

Users Manual - Multi
Page 19
Connect the power supply plug into the machine. 2. For U.S.A. If the plug does not fit ... forcefully bent, pulled, twisted, or bundled. To reduce the risk of the machine should be switched off the main power first. When you are away from the socket-outlet. 2. Pulling on the cord. When leaving the machine unattended,...set must be used for the power source. Connect the power cord plug into a wall outlet. KNOWING YOUR SEWING MACHINE CONNAITRE SA MACHINE A COUDRE CONOZCA SU MÁQUINA DE COSER (Model PS-2470, PS-3100) (Model PS-2360, PS-2250) OPERATING YOUR SEWING MACHINE ...
Connect the power supply plug into the machine. 2. For U.S.A. If the plug does not fit ... forcefully bent, pulled, twisted, or bundled. To reduce the risk of the machine should be switched off the main power first. When you are away from the socket-outlet. 2. Pulling on the cord. When leaving the machine unattended,...set must be used for the power source. Connect the power cord plug into a wall outlet. KNOWING YOUR SEWING MACHINE CONNAITRE SA MACHINE A COUDRE CONOZCA SU MÁQUINA DE COSER (Model PS-2470, PS-3100) (Model PS-2360, PS-2250) OPERATING YOUR SEWING MACHINE ...
Users Manual - Multi
Page 23
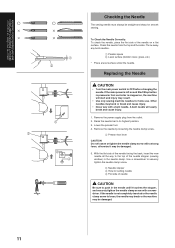
... MACHINE CONNAITRE SA MACHINE A COUDRE CONOZCA SU MÁQUINA DE COSER Checking the Needle The sewing needle must always be damaged. 11 Remove the power supply plug from the top and the sides. Throw away any bent needles. 1 Parallel space 2 Level surface (bobbin cover, glass, etc.) *... Place a level surface under the needle. Replacing the Needle CAUTION • Turn the main power switch to its highest position. 3. If the needle is not completely inserted or the needle clamp screw is stepped on a flat surface. A bent ...
... MACHINE CONNAITRE SA MACHINE A COUDRE CONOZCA SU MÁQUINA DE COSER Checking the Needle The sewing needle must always be damaged. 11 Remove the power supply plug from the top and the sides. Throw away any bent needles. 1 Parallel space 2 Level surface (bobbin cover, glass, etc.) *... Place a level surface under the needle. Replacing the Needle CAUTION • Turn the main power switch to its highest position. 3. If the needle is not completely inserted or the needle clamp screw is stepped on a flat surface. A bent ...

Users Manual - Multi
Page 91
... foot only for sewing materials such as vinyl cloth, synthetic leather, thin leather, etc. The walking foot prevents such materials from the outlet. 2. Remove the power supply plug from crumpling, slipping or sticking between presser foot and material due to low speeds. 79 If the screw is very useful for straight sewing...
... foot only for sewing materials such as vinyl cloth, synthetic leather, thin leather, etc. The walking foot prevents such materials from the outlet. 2. Remove the power supply plug from crumpling, slipping or sticking between presser foot and material due to low speeds. 79 If the screw is very useful for straight sewing...

Users Manual - Multi
Page 93
... slowly and move the fabric to touch the needle during this time, otherwise injury may result. 5. D) (Model PS-2470, PS-3100) 81 Remove the power supply plug from the outlet. 2. If the screw is loose, the needle may strike the presser foot and cause injury.... 7. USING ATTACHMENTS AND APPLICATIONS UTILISATION DES ACCESSOIRES ET LEURS APPLICATIONS USO DE ACCESORIOS Y APLICACIONES A 1 B A 2 3 C B (Model PS-2470, PS-3100) D OPTIONAL ACCESSORIES Using the Spring-action Quilting Foot Pattern Stitch Length Stitch Width Feed Dog (Straight Stitch) Any 3.5 (center) Down position The...
... slowly and move the fabric to touch the needle during this time, otherwise injury may result. 5. D) (Model PS-2470, PS-3100) 81 Remove the power supply plug from the outlet. 2. If the screw is loose, the needle may strike the presser foot and cause injury.... 7. USING ATTACHMENTS AND APPLICATIONS UTILISATION DES ACCESSOIRES ET LEURS APPLICATIONS USO DE ACCESORIOS Y APLICACIONES A 1 B A 2 3 C B (Model PS-2470, PS-3100) D OPTIONAL ACCESSORIES Using the Spring-action Quilting Foot Pattern Stitch Length Stitch Width Feed Dog (Straight Stitch) Any 3.5 (center) Down position The...

Users Manual - Multi
Page 97
... illustrated in fig. MAINTENANCE ENTRETIEN MANTENIMIENTO A (Model PS-2470, PS-3100) B 1 21 (Model PS-2360, PS-2250) B 1 1 2 C 85 Changing the Light Bulb CAUTION • Turn off the main power switch and unplug the machine before changing it. 1. If the main power switch is stepped on, injuries may result. Replace ... button is pressed or foot controller is on the reverse side of sewing head as shown in (Model PS-2360, PS-2250) 4. B) 1 Bulb 1 Loosen 2 Tighten 5. C. A. (Model PS-2470, PS-3100) 4. Remove the power supply plug from the machine as shown in fig. A. 3.
... illustrated in fig. MAINTENANCE ENTRETIEN MANTENIMIENTO A (Model PS-2470, PS-3100) B 1 21 (Model PS-2360, PS-2250) B 1 1 2 C 85 Changing the Light Bulb CAUTION • Turn off the main power switch and unplug the machine before changing it. 1. If the main power switch is stepped on, injuries may result. Replace ... button is pressed or foot controller is on the reverse side of sewing head as shown in (Model PS-2360, PS-2250) 4. B) 1 Bulb 1 Loosen 2 Tighten 5. C. A. (Model PS-2470, PS-3100) 4. Remove the power supply plug from the machine as shown in fig. A. 3.

Users Manual - Multi
Page 99
... screw and the needle clamp screw to insert the race in the correct position. CAUTION • Do not use a damaged race or shuttle. Remove the power supply plug from your authorized dealer. • Be sure to remove the presser foot holder and the needle. (See fig.
... screw and the needle clamp screw to insert the race in the correct position. CAUTION • Do not use a damaged race or shuttle. Remove the power supply plug from your authorized dealer. • Be sure to remove the presser foot holder and the needle. (See fig.

Users Manual - Multi
Page 102
...Lint is pushed toward the back of the needle plate. Page 11 No Inferior needle is plugged into machine. Page 10 No (Model PS-2470, PS-3100) Start/Stop button will not work when foot controller is used. Page 33 No Foot controller is pulled excessively. Page 47 No Fabric ... of the machine. Power supply plug is turned off. Page 87 No Page 7 No Main power switch is removed from outlet. Page 47 No Inferior needle is tangled. Page 11 No Thread is used correctly. Do not pull the fabric. Page 30 No (Model PS-2470, PS-2360, PS-3100) The buttonhole lever ...
...Lint is pushed toward the back of the needle plate. Page 11 No Inferior needle is plugged into machine. Page 10 No (Model PS-2470, PS-3100) Start/Stop button will not work when foot controller is used. Page 33 No Foot controller is pulled excessively. Page 47 No Fabric ... of the machine. Power supply plug is turned off. Page 87 No Page 7 No Main power switch is removed from outlet. Page 47 No Inferior needle is tangled. Page 11 No Thread is used correctly. Do not pull the fabric. Page 30 No (Model PS-2470, PS-2360, PS-3100) The buttonhole lever ...


