
Users Manual - Multi
Page 3
... using the sewing machine, basic safety precautions should never be left unattended when plugged in. To reduce the risk of lint, dust, and loose cloth. 5. Replace bulb with any of burns, fire, electric shock, or injury to the OFF position, symbol "0" position when making any air openings blocked. Do not operate...
... using the sewing machine, basic safety precautions should never be left unattended when plugged in. To reduce the risk of lint, dust, and loose cloth. 5. Replace bulb with any of burns, fire, electric shock, or injury to the OFF position, symbol "0" position when making any air openings blocked. Do not operate...

Users Manual - Multi
Page 5
... YELLOW. Connecting Plugs and Main Power / Sewing Light Switch co 1- -I HT? 0 1. When leaving the sewing machine unattended, the main switch of replacing the plug fuse, use plugs with the coloured markings identifying the terminals in accordance with the letter 'N' or coloured black or blue. carrying the mark...must be cut off ensure to remove the fuse and dispose cf the plug immediately, to avoid a possible shock hazard by inadvertent connection to replace the fuse cover. Never use a fuse approved by removing the plug from the socket outlet. FOR USERS IN UK, EIRE, MALTA AND ...
... YELLOW. Connecting Plugs and Main Power / Sewing Light Switch co 1- -I HT? 0 1. When leaving the sewing machine unattended, the main switch of replacing the plug fuse, use plugs with the coloured markings identifying the terminals in accordance with the letter 'N' or coloured black or blue. carrying the mark...must be cut off ensure to remove the fuse and dispose cf the plug immediately, to avoid a possible shock hazard by inadvertent connection to replace the fuse cover. Never use a fuse approved by removing the plug from the socket outlet. FOR USERS IN UK, EIRE, MALTA AND ...

Users Manual - Multi
Page 6
TABLE OF CONTENTS KNOWING YOUR SEWING MACHINE Principal parts 1 Accessories 3 OPERATING YOUR SEWING MACHINE 4 Connecting Plugs 4 Main Power and Sewing Light Switches ....5 Foot Controller 5 Replacing the Needle 6 Checking the Needle 6 Changing the Presser Foot 7 Extension Table(Accessories) 7 VARIOUS CONTROLS 8 Pattern Selection Dial 8 RECOMMENDED WIDTHS AND LENGTHS FOR STITCHES 9 Stitch Length ...
TABLE OF CONTENTS KNOWING YOUR SEWING MACHINE Principal parts 1 Accessories 3 OPERATING YOUR SEWING MACHINE 4 Connecting Plugs 4 Main Power and Sewing Light Switches ....5 Foot Controller 5 Replacing the Needle 6 Checking the Needle 6 Changing the Presser Foot 7 Extension Table(Accessories) 7 VARIOUS CONTROLS 8 Pattern Selection Dial 8 RECOMMENDED WIDTHS AND LENGTHS FOR STITCHES 9 Stitch Length ...
Users Manual - Multi
Page 13
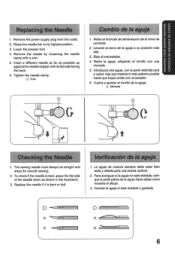
... illustration. 3. Hay que meterla lo mas adentro posible hasta que toque arriba con elpasador. 6. Vuelva a apretar el tomillo de la aguja. .;!) Monocle 1 Checking the Needle 1. Replace the needle if it is bent, place the flat side of the needle down as possible up against the needle stopper with a coin. 5. Lower the... /a aguja hacia abajo come muestra el dibujo. 3. Introduzca otra aguja, con la parte redonda cara a usted. KNOWING YOUR SEWING MACHINE CONOZCA SU MAQUINA DE COSER Replacing the Needle 1. Cambie is aguja si esta doblada o gastada.
... illustration. 3. Hay que meterla lo mas adentro posible hasta que toque arriba con elpasador. 6. Vuelva a apretar el tomillo de la aguja. .;!) Monocle 1 Checking the Needle 1. Replace the needle if it is bent, place the flat side of the needle down as possible up against the needle stopper with a coin. 5. Lower the... /a aguja hacia abajo come muestra el dibujo. 3. Introduzca otra aguja, con la parte redonda cara a usted. KNOWING YOUR SEWING MACHINE CONOZCA SU MAQUINA DE COSER Replacing the Needle 1. Cambie is aguja si esta doblada o gastada.

Users Manual - Multi
Page 59
.... B. D. 0 4. D. Reattach the face plate and fasten the screw as shown in fig. B. Retire la cubierta de la maquina tal como se indica en la fig. Replace the sewing light bulb. Remove the power supply plug from the machine as shown in fig. Loosen the face plate screw as illustrated in fig...
.... B. D. 0 4. D. Reattach the face plate and fasten the screw as shown in fig. B. Retire la cubierta de la maquina tal como se indica en la fig. Replace the sewing light bulb. Remove the power supply plug from the machine as shown in fig. Loosen the face plate screw as illustrated in fig...
Users Manual - Multi
Page 68
... Principa Parts 1 R Relative Chart of Sewing Fabrics, Needles and Threads 25 Repacking 59 Reverse Sewing Button 13 S Scallop Stitch 34 Sewing Light Switch 5 Light Bulb Replacement 52 Shell Tuck Stitch 32 Shuttle Hook Removal 53 Shuttle Race Cleaning 53 Slant Overlock Stitch 37 Stitch Length Dial 11 Stitch Width Dial 12...
... Principa Parts 1 R Relative Chart of Sewing Fabrics, Needles and Threads 25 Repacking 59 Reverse Sewing Button 13 S Scallop Stitch 34 Sewing Light Switch 5 Light Bulb Replacement 52 Shell Tuck Stitch 32 Shuttle Hook Removal 53 Shuttle Race Cleaning 53 Slant Overlock Stitch 37 Stitch Length Dial 11 Stitch Width Dial 12...


