

Accessory Catalog
Page 4
... Low Shank Adapter for ULT series, PC-6500, PC-8200 and PC-8500 sewing machines. Brother General Sewing Accessories 05 Sew as you like. Screw on the edge of zipper/piping, avoiding the non-flat parts of the presser foot and slide the presser foot so that the needle fits on the opening on either left...
... Low Shank Adapter for ULT series, PC-6500, PC-8200 and PC-8500 sewing machines. Brother General Sewing Accessories 05 Sew as you like. Screw on the edge of zipper/piping, avoiding the non-flat parts of the presser foot and slide the presser foot so that the needle fits on the opening on either left...

Accessory Catalog
Page 6
Overlock Foot For vertical bobbin machines only. Lower the needle into the fabric approximately 1/8" from the edge and sew 2-3 stitches. 3. Slowly sew 2-3 stitches, making sure the fabric is rolling around the curled part of the fabric behind the needle and lower the presser foot. 7. SA164 ...foot. 6. Select an overlock stitch. 2. Position the edge of the foot. 8. Brother General Sewing Accessories 09 Narrow Hemmer Foot Non Stick Foot Overlock Foot Picot Foot Brother General Sewing Accessories 10 SA126 ABCDEFJKMN SA127 GHILOP Skirt Innov-is Project Book (See page 50 for ...
Overlock Foot For vertical bobbin machines only. Lower the needle into the fabric approximately 1/8" from the edge and sew 2-3 stitches. 3. Slowly sew 2-3 stitches, making sure the fabric is rolling around the curled part of the fabric behind the needle and lower the presser foot. 7. SA164 ...foot. 6. Select an overlock stitch. 2. Position the edge of the foot. 8. Brother General Sewing Accessories 09 Narrow Hemmer Foot Non Stick Foot Overlock Foot Picot Foot Brother General Sewing Accessories 10 SA126 ABCDEFJKMN SA127 GHILOP Skirt Innov-is Project Book (See page 50 for ...
Operation Manual
Page 2
... manual. Never drop or insert any object into water. Always unplug the sewing machine from the accumulation of the user service adjustments mentioned in . The sewing machine should always be followed, including the following: "Read all moving parts. Do not allow this sewing machine if it to be left unattended when plugged in the instruction manual. Use...
... manual. Never drop or insert any object into water. Always unplug the sewing machine from the accumulation of the user service adjustments mentioned in . The sewing machine should always be followed, including the following: "Read all moving parts. Do not allow this sewing machine if it to be left unattended when plugged in the instruction manual. Use...
Operation Manual
Page 7
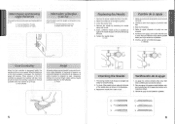
... (hacia la marca "I ) Pedal 5 Checking the Needle 1. i • rwnSr r Main Power and Sewing Light Switches This switch turns the main power and sewing light on or off. (7) Turn on the foot controller when the machine is bent, place the flat side of the needle down as possible up against the...its flat side facing the back. 6. Remove the needle by loosening the needle clamp with its highest position: 3. lntroduzca otra aguja, con la parte redonda cara a usted. Hay que meterla lo Ines adentro posible hasta que toque arriba con el pasador. 6. Cambie la aguja si esta doblada ...
... (hacia la marca "I ) Pedal 5 Checking the Needle 1. i • rwnSr r Main Power and Sewing Light Switches This switch turns the main power and sewing light on or off. (7) Turn on the foot controller when the machine is bent, place the flat side of the needle down as possible up against the...its flat side facing the back. 6. Remove the needle by loosening the needle clamp with its highest position: 3. lntroduzca otra aguja, con la parte redonda cara a usted. Hay que meterla lo Ines adentro posible hasta que toque arriba con el pasador. 6. Cambie la aguja si esta doblada ...

Operation Manual
Page 15
...salga por el ojo de la aguja. 4. Drawing Up Lower Thread 1. Pull out about 5 cm (2") of the machine straight behind the presser foot. Levante el prensatelas y la aguja a sus posiciones mas elevadas. 2. Con la mano izquierda...lever. The upper thread should have caught the lower thread in a large loop. 4. KN• WING Y • U - SEWING M CHINE C•N•ZC•1 aNIHOVIA1 aNINGS Elf10A ONIMONN I * - • Using Needle Threader The needle threader can be used... y paselos entre los salientes del prensatelas, a la derecha, hacia la parte posterior de la maquina.
...salga por el ojo de la aguja. 4. Drawing Up Lower Thread 1. Pull out about 5 cm (2") of the machine straight behind the presser foot. Levante el prensatelas y la aguja a sus posiciones mas elevadas. 2. Con la mano izquierda...lever. The upper thread should have caught the lower thread in a large loop. 4. KN• WING Y • U - SEWING M CHINE C•N•ZC•1 aNIHOVIA1 aNINGS Elf10A ONIMONN I * - • Using Needle Threader The needle threader can be used... y paselos entre los salientes del prensatelas, a la derecha, hacia la parte posterior de la maquina.

Operation Manual
Page 19
... se usa para los tejidos elasticos. 29 30 To prepare the machine for stretch fabrics. Top Stitching and Stretch Materials Straight Stitch is used for top stitching and sewing lightweight fabrics. Levante la aguja a suposicion mas alta y asegarese ...machine. 2. C) Thread cutter 5. Para retirar el tejido de la maquina 1. Levante el prensatelas y saque suavemente el tejido por la izquierda. 4. Then, select the Stitch Length and the Stitch Width. It is recommended to sew using the Pattern Selection Dial. Puntada de realce Cuando se define el largo de la puntada en la parte...
... se usa para los tejidos elasticos. 29 30 To prepare the machine for stretch fabrics. Top Stitching and Stretch Materials Straight Stitch is used for top stitching and sewing lightweight fabrics. Levante la aguja a suposicion mas alta y asegarese ...machine. 2. C) Thread cutter 5. Para retirar el tejido de la maquina 1. Levante el prensatelas y saque suavemente el tejido por la izquierda. 4. Then, select the Stitch Length and the Stitch Width. It is recommended to sew using the Pattern Selection Dial. Puntada de realce Cuando se define el largo de la puntada en la parte...


