Table Set Installation Manual PRWT1
Page 2
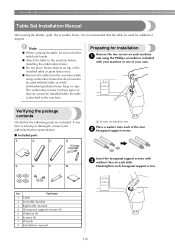
... contact your own. Part Name 1 Table 2 Left table bracket 3 Right table bracket 4 Hexagonal support screws (4) 5 Washers (4) 6 Screws (4) 7 Wrench 8 Installation manual 1/4 Preparing for installation Remove the two screws on machine arm Place a washer onto each of objects cannot be used with the table or while embroidering... frame. ● Do not place heavy objects on top of the installed table or press down on each side). Table Set Installation Manual When using the border, quilt, flat or jumbo frame, it . ● Remove the table from the machine while using the Phillips...
... contact your own. Part Name 1 Table 2 Left table bracket 3 Right table bracket 4 Hexagonal support screws (4) 5 Washers (4) 6 Screws (4) 7 Wrench 8 Installation manual 1/4 Preparing for installation Remove the two screws on machine arm Place a washer onto each of objects cannot be used with the table or while embroidering... frame. ● Do not place heavy objects on top of the installed table or press down on each side). Table Set Installation Manual When using the border, quilt, flat or jumbo frame, it . ● Remove the table from the machine while using the Phillips...

Installation Guide for KIT CW PRCW1
Page 5
... subject to the machine. Product Support Contact Product Support if you have a problem. Please check the company web site (http://www.brother.com/) to the manuals downloaded using this kit, carefully read this guide is the Upgrade KIT for markings such as ® and ™ are either registered..., PR-600II and PR-620). This is current at " www.brother.com ". Please be used with multi-needle embroidery machines (except PR-600, PR600II and PR-620). In addition, after you have finished reading the manuals, store them where they can be aware that some contents of their...
... subject to the machine. Product Support Contact Product Support if you have a problem. Please check the company web site (http://www.brother.com/) to the manuals downloaded using this kit, carefully read this guide is the Upgrade KIT for markings such as ® and ™ are either registered..., PR-600II and PR-620). This is current at " www.brother.com ". Please be used with multi-needle embroidery machines (except PR-600, PR600II and PR-620). In addition, after you have finished reading the manuals, store them where they can be aware that some contents of their...

Installation Guide for KIT CW PRCW1
Page 6
When using fabric that cannot be viewed by clicking "Preparation" in the machine's Operation Manual. Video Tutorials Video tutorials are available for basic cutwork embroidery can be viewed by clicking "Basic Cutwork Embroidery" in this Installation Guide. z When creating cutwork, ...
When using fabric that cannot be viewed by clicking "Preparation" in the machine's Operation Manual. Video Tutorials Video tutorials are available for basic cutwork embroidery can be viewed by clicking "Basic Cutwork Embroidery" in this Installation Guide. z When creating cutwork, ...

Installation Guide for KIT CW PRCW1
Page 7
ENGLISH CONTENTS GETTING STARTED...4 Using the Manuals ...4 Included Accessories ...5 Optional Accessories ...6 INSTALLING THE UPGRADE KIT CW...6 Installation Procedure ...6 [Step 1]Obtaining the Certification Key ...7 [Step 2]Upgrading the Machine ...9 [Step 2-1] Using USB media ...9 [Step 2-2]...
ENGLISH CONTENTS GETTING STARTED...4 Using the Manuals ...4 Included Accessories ...5 Optional Accessories ...6 INSTALLING THE UPGRADE KIT CW...6 Installation Procedure ...6 [Step 1]Obtaining the Certification Key ...7 [Step 2]Upgrading the Machine ...9 [Step 2-1] Using USB media ...9 [Step 2-2]...
Installation Guide for KIT CW PRCW1
Page 8
...differ slightly. • The procedures in the upper right hand corner of the machine. In addition, this guide first. This manual also provides cutwork precautions and information on installing the cutwork needles. This guide contains descriptions of the accessories, procedures for upgrading the... machine as well as details on the care and maintenance of the Layout & Editing screen, then proceed to the "Instruction Manual", or click "Start" on using the machine with the added cutwork functions. In addition, practical application of functions other than the...
...differ slightly. • The procedures in the upper right hand corner of the machine. In addition, this guide first. This manual also provides cutwork precautions and information on installing the cutwork needles. This guide contains descriptions of the accessories, procedures for upgrading the... machine as well as details on the care and maintenance of the Layout & Editing screen, then proceed to the "Instruction Manual", or click "Start" on using the machine with the added cutwork functions. In addition, practical application of functions other than the...
Installation Guide for KIT CW PRCW1
Page 9
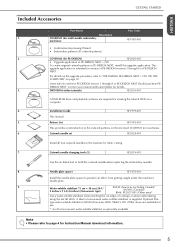
... details on a computer. 4. DVD-ROM (video tutorials) XF2036-001 A DVD-ROM drive and playback software are available for Instruction Manual download information. 5 Pattern List XF1981-001 This provides an introduction to hold the cutwork needle when replacing the embroidery needles. 8. Cutwork...) XF1985-001 • Certification Key Issuing Wizard • Embroidery patterns (30 cutwork patterns) 2. Installation Guide XF1979-001 This manual 5. Needle plate spacer XF1978-001 Install the needle plate spacer to PE-DESIGN NEXT + CW To create original cutwork patterns in...
... details on a computer. 4. DVD-ROM (video tutorials) XF2036-001 A DVD-ROM drive and playback software are available for Instruction Manual download information. 5 Pattern List XF1981-001 This provides an introduction to hold the cutwork needle when replacing the embroidery needles. 8. Cutwork...) XF1985-001 • Certification Key Issuing Wizard • Embroidery patterns (30 cutwork patterns) 2. Installation Guide XF1979-001 This manual 5. Needle plate spacer XF1978-001 Install the needle plate spacer to PE-DESIGN NEXT + CW To create original cutwork patterns in...

Installation Guide for KIT CW PRCW1
Page 12
...already been installed in the machine (see step a on page 7), click "Next" to the CDROM case for PE-DESIGN cannot be used. g Download the manual. To close the message, click "OK". 8 If an error message appears Check that appears, and then click "Next". INSTALLING THE UPGRADE KIT CW e Carefully... letter "O" and "I " been entered in place of the number "1"? • Has the uppercase letter "O" been entered in the CD Key. i Type in the internal machine identification number (No.) written down in the 15-digit CD key found on the label attached to the CD-ROM envelope for possible entry...
...already been installed in the machine (see step a on page 7), click "Next" to the CDROM case for PE-DESIGN cannot be used. g Download the manual. To close the message, click "OK". 8 If an error message appears Check that appears, and then click "Next". INSTALLING THE UPGRADE KIT CW e Carefully... letter "O" and "I " been entered in place of the number "1"? • Has the uppercase letter "O" been entered in the CD Key. i Type in the internal machine identification number (No.) written down in the 15-digit CD key found on the label attached to the CD-ROM envelope for possible entry...
Installation Guide for KIT CW PRCW1
Page 18
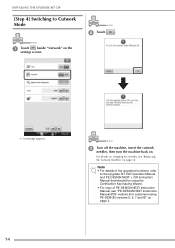
... version) (For customers using PE-DESIGN versions 5, 6, 7 and 8)" on page 16. Note • For details of PE-DESIGN NEXT Instruction Manual, see "Replacing the Cutwork Needles" on page 4. a Touch beside "Cutwork" on the settings screen. → A message appears. 14 c Turn off... needles, then turn the machine back on. INSTALLING THE UPGRADE KIT CW [Step 4] Switching to the Upgrade KIT CW Operation Manual and PE-DESIGN NEXT + CW Instruction Manual downloaded by using the Certification Key Issuing Wizard. • For copy of the upgraded functions, refer to Cutwork Mode b Touch...
... version) (For customers using PE-DESIGN versions 5, 6, 7 and 8)" on page 16. Note • For details of PE-DESIGN NEXT Instruction Manual, see "Replacing the Cutwork Needles" on page 4. a Touch beside "Cutwork" on the settings screen. → A message appears. 14 c Turn off... needles, then turn the machine back on. INSTALLING THE UPGRADE KIT CW [Step 4] Switching to the Upgrade KIT CW Operation Manual and PE-DESIGN NEXT + CW Instruction Manual downloaded by using the Certification Key Issuing Wizard. • For copy of the upgraded functions, refer to Cutwork Mode b Touch...
Installation Guide for KIT CW PRCW1
Page 22
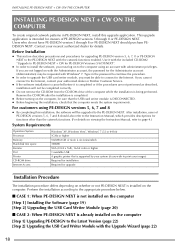
...2] Upgrading the USB Card Writer Module (page 20) ■ CASE 2: When PE-DESIGN NEXT is supported by your authorized dealer or Brother Customer Service. INSTALLING PE-DESIGN NEXT + CW ON THE COMPUTER INSTALLING PE-DESIGN NEXT + CW ON THE COMPUTER To create original cutwork patterns..., be requested with the Administrator account, the password for functions other than the cutwork functions. (For details on viewing the Instruction Manual, refer to page 4.) System Requirements Operation System Processor Memory Hard disk free space Monitor Port Printer CD-ROM drive Internet Access Windows...
...2] Upgrading the USB Card Writer Module (page 20) ■ CASE 2: When PE-DESIGN NEXT is supported by your authorized dealer or Brother Customer Service. INSTALLING PE-DESIGN NEXT + CW ON THE COMPUTER INSTALLING PE-DESIGN NEXT + CW ON THE COMPUTER To create original cutwork patterns..., be requested with the Administrator account, the password for functions other than the cutwork functions. (For details on viewing the Instruction Manual, refer to page 4.) System Requirements Operation System Processor Memory Hard disk free space Monitor Port Printer CD-ROM drive Internet Access Windows...
Upgrade KIT CW Operation Manual PRCW1
Page 1
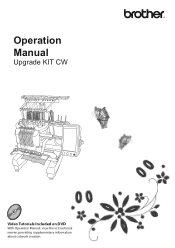
Operation Manual Upgrade KIT CW Video Tutorials Included on DVD With Operation Manual, view the instructional movies providing supplementary information about cutwork creation.
Operation Manual Upgrade KIT CW Video Tutorials Included on DVD With Operation Manual, view the instructional movies providing supplementary information about cutwork creation.

Upgrade KIT CW Operation Manual PRCW1
Page 3
... cut out. (page 24) 2 Use the machine after checking that it will be cut if cutwork needles are installed in this Operation Manual carefully before you for upgrade. The machine can be used as outlined in the Installation Guide for choosing our product. The settings and operations...certifying KIT CW, refer to ensure safe and correct operation, please read this Operation Manual show the screens for upgrade. This allows embroidering and cutting to the procedure outlined in this upgrade Operation Manual. BEFORE YOU START BEFORE YOU START Thank you start. To obtain the best ...
... cut out. (page 24) 2 Use the machine after checking that it will be cut if cutwork needles are installed in this Operation Manual carefully before you for upgrade. The machine can be used as outlined in the Installation Guide for choosing our product. The settings and operations...certifying KIT CW, refer to ensure safe and correct operation, please read this Operation Manual show the screens for upgrade. This allows embroidering and cutting to the procedure outlined in this upgrade Operation Manual. BEFORE YOU START BEFORE YOU START Thank you start. To obtain the best ...

Upgrade KIT CW Operation Manual PRCW1
Page 5
... bars 1 through 4 with the corresponding cutwork needles which have been created with the cutwork needles, including cutout patterns, in order to the machine in this manual. 4 Memo • "Cutwork pattern" is Cutwork? Import a cutwork pattern from the enclosed CD-ROM1 (for machines) to create cutwork. In addition, the cutwork pattern can...
... bars 1 through 4 with the corresponding cutwork needles which have been created with the cutwork needles, including cutout patterns, in order to the machine in this manual. 4 Memo • "Cutwork pattern" is Cutwork? Import a cutwork pattern from the enclosed CD-ROM1 (for machines) to create cutwork. In addition, the cutwork pattern can...

Upgrade KIT CW Operation Manual PRCW1
Page 13
... (top) USB port on this feature will resume the stopped operation when it will be disabled. b Check the information in chapter 3 of your machine's Operation Manual. For details on the machine. → The machine enters Cutwork mode. 12 b Insert the USB media into the computer's CD-ROM drive. Copy the "patterns...
... (top) USB port on this feature will resume the stopped operation when it will be disabled. b Check the information in chapter 3 of your machine's Operation Manual. For details on the machine. → The machine enters Cutwork mode. 12 b Insert the USB media into the computer's CD-ROM drive. Copy the "patterns...

Upgrade KIT CW Operation Manual PRCW1
Page 14
... the enclosed CD-ROM to the machine, use USB media, or directly connect a computer to "Selecting an Embroidery Pattern" in chapter 5 of your machine's Operation Manual. CREATING CUTWORK Memo • For details on importing patterns, refer to the machine and transfer the data. → The embroidering screen appears. 13 b Touch . →...
... the enclosed CD-ROM to the machine, use USB media, or directly connect a computer to "Selecting an Embroidery Pattern" in chapter 5 of your machine's Operation Manual. CREATING CUTWORK Memo • For details on importing patterns, refer to the machine and transfer the data. → The embroidering screen appears. 13 b Touch . →...

Upgrade KIT CW Operation Manual PRCW1
Page 15
... cutting) function is now prepared for the stabilizer being used . Water-soluble stabilizers dissolve when washed, allowing you to the back of your machine's Operation Manual. 14 a Adhesive side of iron-on using fabric that cannot be changed. → The machine is preformed. Attaching Stabilizer 2 In order to prevent the pattern...
... cutting) function is now prepared for the stabilizer being used . Water-soluble stabilizers dissolve when washed, allowing you to the back of your machine's Operation Manual. 14 a Adhesive side of iron-on using fabric that cannot be changed. → The machine is preformed. Attaching Stabilizer 2 In order to prevent the pattern...

Upgrade KIT CW Operation Manual PRCW1
Page 18
... sure to use the brush to protect it from the frame. b Soak the fabric in warm water to "Maintenance" in chapter 7 of your machine's Operation Manual. 17 b Remove the needle plate and then use the right iron temperature for the type of the embroidery pattern. Cleaning 2 When fabric and stabilizers are...
... sure to use the brush to protect it from the frame. b Soak the fabric in warm water to "Maintenance" in chapter 7 of your machine's Operation Manual. 17 b Remove the needle plate and then use the right iron temperature for the type of the embroidery pattern. Cleaning 2 When fabric and stabilizers are...

Upgrade KIT CW Operation Manual PRCW1
Page 21
... this operation. c Touch , and make sure is described below. in chapter 7 of the Settings screen. Available keys vary depending on page 2 of your machine's Operation Manual. Turn the machine back on making an appliqué, refer to "Appliqué Sewing" in the → The pattern settings screen appears. 20 a Appliqué...
... this operation. c Touch , and make sure is described below. in chapter 7 of the Settings screen. Available keys vary depending on page 2 of your machine's Operation Manual. Turn the machine back on making an appliqué, refer to "Appliqué Sewing" in the → The pattern settings screen appears. 20 a Appliqué...

Upgrade KIT CW Operation Manual PRCW1
Page 22
USING THE MACHINE TO POSITION EMBROIDERY PATTERNS FOR CREATING CUTWORK d Press . → The following screen to display an enlarged view of your machine's Operation Manual. 21 Note • If necessary, touch on the top right side of the screen to display a preview image, and then touch on making an appliqu&#...
USING THE MACHINE TO POSITION EMBROIDERY PATTERNS FOR CREATING CUTWORK d Press . → The following screen to display an enlarged view of your machine's Operation Manual. 21 Note • If necessary, touch on the top right side of the screen to display a preview image, and then touch on making an appliqu&#...

Upgrade KIT CW Operation Manual PRCW1
Page 23
..., check the thread colors and sewing order. h Touch , and then press the start embroidering. If desired, change the size and position of your machine's Operation Manual. ■ Creating an appliqué with the outline around a pattern" on page 29. a Follow steps a and b in chapter 7 of the frame. Next, touch until the...
..., check the thread colors and sewing order. h Touch , and then press the start embroidering. If desired, change the size and position of your machine's Operation Manual. ■ Creating an appliqué with the outline around a pattern" on page 29. a Follow steps a and b in chapter 7 of the frame. Next, touch until the...

Upgrade KIT CW Operation Manual PRCW1
Page 28
... deleting keys c Spacing keys d Pattern spacing Note • For details on the border function, refer to "Designing repeated patterns" in chapter 5 of your machine's Operation Manual. • We recommend spacing of the repeated pattern. c Touch USING THE MACHINE TO POSITION EMBROIDERY PATTERNS FOR CREATING CUTWORK . d a b c d Touch in which the pattern will...
... deleting keys c Spacing keys d Pattern spacing Note • For details on the border function, refer to "Designing repeated patterns" in chapter 5 of your machine's Operation Manual. • We recommend spacing of the repeated pattern. c Touch USING THE MACHINE TO POSITION EMBROIDERY PATTERNS FOR CREATING CUTWORK . d a b c d Touch in which the pattern will...


