
Installation Guide for KIT CW PRCW1
Page 5
... Before using the Certification Key Issuing Wizard. z "Adobe" and "Adobe Reader" are registered trademarks of models compatible with multi-needle embroidery machines (except PR-600, PR600II and PR-620). Product Support Contact Product Support if you have finished reading the manuals, store them where... whose software title is the Upgrade KIT for Windows® on their respective companies. Please be used with upgraded Brother multi-needle embroidery machines (except PR-600, PR-600II and PR-620). This kit includes the upgrade application for information on your area...
... Before using the Certification Key Issuing Wizard. z "Adobe" and "Adobe Reader" are registered trademarks of models compatible with multi-needle embroidery machines (except PR-600, PR600II and PR-620). Product Support Contact Product Support if you have finished reading the manuals, store them where... whose software title is the Upgrade KIT for Windows® on their respective companies. Please be used with upgraded Brother multi-needle embroidery machines (except PR-600, PR-600II and PR-620). This kit includes the upgrade application for information on your area...
Installation Guide for KIT CW PRCW1
Page 9
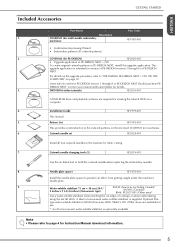
... stitching the cut fabric from getting caught under the machine's needle plate. 9. This upgrade application is intended for PE-DESIGN) XF2020-001 • Upgrade application to hold the cutwork needle when replacing the embroidery needles. 8. Note • Please refer to "...of non-woven water-soluble stabilizer is supplied. Contact your nearest authorized dealer for multi-needle embroidery machines) XF1985-001 • Certification Key Issuing Wizard • Embroidery patterns (30 cutwork patterns) 2. Cutwork needle set XF2024-001 Install all four cutwork needles ...
... stitching the cut fabric from getting caught under the machine's needle plate. 9. This upgrade application is intended for PE-DESIGN) XF2020-001 • Upgrade application to hold the cutwork needle when replacing the embroidery needles. 8. Note • Please refer to "...of non-woven water-soluble stabilizer is supplied. Contact your nearest authorized dealer for multi-needle embroidery machines) XF1985-001 • Certification Key Issuing Wizard • Embroidery patterns (30 cutwork patterns) 2. Cutwork needle set XF2024-001 Install all four cutwork needles ...
Installation Guide for KIT CW PRCW1
Page 10
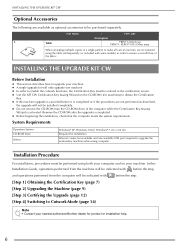
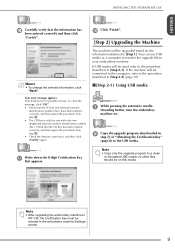
... step. [Step 1] Obtaining the Certification Key (page 7) [Step 2] Upgrading the Machine (page 9) [Step 3] Certifying the Upgrade (page 12) [Step 4] Switching to upgrade the embroidery machine) when using both your machine. z Do not remove the CD-ROM from the computer will be indicated with before...Others Windows® XP, Windows Vista®, Windows® 7 (32 or 64 bit) Required for machines) to be entered in order to upgrade your nearest authorized Brother dealer for product or installation help. 6 z Before beginning the installation, check that the computer meets the ...
... step. [Step 1] Obtaining the Certification Key (page 7) [Step 2] Upgrading the Machine (page 9) [Step 3] Certifying the Upgrade (page 12) [Step 4] Switching to upgrade the embroidery machine) when using both your machine. z Do not remove the CD-ROM from the computer will be indicated with before...Others Windows® XP, Windows Vista®, Windows® 7 (32 or 64 bit) Required for machines) to be entered in order to upgrade your nearest authorized Brother dealer for product or installation help. 6 z Before beginning the installation, check that the computer meets the ...
Installation Guide for KIT CW PRCW1
Page 11
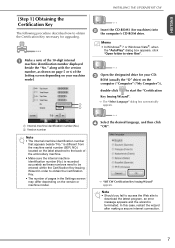
...download the latest program, an error message appears and the wizard is different from the machine serial number (SER. a Internal machine identification number (No.) b Version number Note • The internal machine identification number that appears beside "No." In this case, restart the wizard after ... upgrading. is terminated. c Open the designated drive for machines) into the computer's CD-ROM drive. NO.) located on the label attached to the back of the embroidery machine. • Make sure the internal machine identification number (No.) is recorded accurately as shown on ...
...download the latest program, an error message appears and the wizard is different from the machine serial number (SER. a Internal machine identification number (No.) b Version number Note • The internal machine identification number that appears beside "No." In this case, restart the wizard after ... upgrading. is terminated. c Open the designated drive for machines) into the computer's CD-ROM drive. NO.) located on the label attached to the back of the embroidery machine. • Make sure the internal machine identification number (No.) is recorded accurately as shown on ...
Installation Guide for KIT CW PRCW1
Page 13
... • To change the entered information, click "Back". You can use with only one designated internal machine identification number (No.). If USB media will be used, refer to your embroidery machine. To close the message, click "OK". • Verify that the CD key has been entered correctly, and then repeat the procedure from step...
... • To change the entered information, click "Back". You can use with only one designated internal machine identification number (No.). If USB media will be used, refer to your embroidery machine. To close the message, click "OK". • Verify that the CD key has been entered correctly, and then repeat the procedure from step...

Installation Guide for KIT CW PRCW1
Page 14
d Insert the USB media into the primary (top) USB port connector on . 10 appears, installation of the machine screen. INSTALLING THE UPGRADE KIT CW c Press . Continue with [Step 3] (page 12). ■ [Step 2-2] Connecting to the computer a While pressing the automatic needlethreading button, turn the embroidery machine on the right side of the upgrade application has been completed. (If an error occurs, a message will appear in red.) f Remove the USB media. Note • When the message "Upgrade complete." e Press .
d Insert the USB media into the primary (top) USB port connector on . 10 appears, installation of the machine screen. INSTALLING THE UPGRADE KIT CW c Press . Continue with [Step 3] (page 12). ■ [Step 2-2] Connecting to the computer a While pressing the automatic needlethreading button, turn the embroidery machine on the right side of the upgrade application has been completed. (If an error occurs, a message will appear in red.) f Remove the USB media. Note • When the message "Upgrade complete." e Press .

Installation Guide for KIT CW PRCW1
Page 15
message appears on the embroidery machine LCD screen. 11 INSTALLING THE UPGRADE KIT CW e Press . c Plug the USB cable connectors into the corresponding USB port connectors for the computer and for the machine. → "Removable Disk" appears in step f of "[Step 1] Obtaining the Certification Key" (page 8) to PC. Note • When the message "Upgrade...
message appears on the embroidery machine LCD screen. 11 INSTALLING THE UPGRADE KIT CW e Press . c Plug the USB cable connectors into the corresponding USB port connectors for the computer and for the machine. → "Removable Disk" appears in step f of "[Step 1] Obtaining the Certification Key" (page 8) to PC. Note • When the message "Upgrade...

Installation Guide for KIT CW PRCW1
Page 16
a Turn the embroidery machine off, then on the version or machine model. Note • The screen may differ depending on the machine model. d Press in the following procedure describes how to certify the upgraded program. INSTALLING THE UPGRADE KIT CW [Step 3] Certifying the Upgrade The following screen. 12 b Display the certification screen of pages in the Settings screen. c Press in the Settings screen may differ depending on again. Note • The number of the Settings screen.
a Turn the embroidery machine off, then on the version or machine model. Note • The screen may differ depending on the machine model. d Press in the following procedure describes how to certify the upgraded program. INSTALLING THE UPGRADE KIT CW [Step 3] Certifying the Upgrade The following screen. 12 b Display the certification screen of pages in the Settings screen. c Press in the Settings screen may differ depending on again. Note • The number of the Settings screen.

Installation Guide for KIT CW PRCW1
Page 17
... Certification Key written down in step c), and then repeat steps b through l of "Obtaining the Certification Key" (page 7-9) to attain the Certification Key. Turn off the embroidery machine and then turn on again. f Certification has been completed when the following screen appears, type in the Settings screen. 13 g Confirm that there is lost...
... Certification Key written down in step c), and then repeat steps b through l of "Obtaining the Certification Key" (page 7-9) to attain the Certification Key. Turn off the embroidery machine and then turn on again. f Certification has been completed when the following screen appears, type in the Settings screen. 13 g Confirm that there is lost...

Installation Guide for KIT CW PRCW1
Page 19
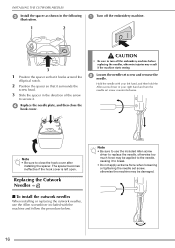
...spacer prevents the fabric that this number is in the same position as the machine's needle bar number. 2 The needle is being cut fabric automatically. a Turn off the embroidery machine. ENGLISH INSTALLING THE CUTWORK NEEDLES INSTALLING THE CUTWORK NEEDLES About the Cutwork Needles ...The four cutwork needles (multi-needle machine needles No. 1 through No. 4 with blades in different orientations) can...
...spacer prevents the fabric that this number is in the same position as the machine's needle bar number. 2 The needle is being cut fabric automatically. a Turn off the embroidery machine. ENGLISH INSTALLING THE CUTWORK NEEDLES INSTALLING THE CUTWORK NEEDLES About the Cutwork Needles ...The four cutwork needles (multi-needle machine needles No. 1 through No. 4 with blades in different orientations) can...
Installation Guide for KIT CW PRCW1
Page 20
... plate, and then close the hook cover after installing the spacer. b Loosen the needle set screw, otherwise the machine may be applied to the needle, causing it . Note • Be sure to break. • Do not... Note • Be sure to use the Allen screwdriver included with your right hand and turn off the embroidery machine. 3 1 Position the spacer so that it hooks around the elliptical notch. 2 Position the spacer so ...the spacer as shown in the following illustration. 1 2 a Turn off the embroidery machine before replacing the needles, otherwise injuries may result if the...
... plate, and then close the hook cover after installing the spacer. b Loosen the needle set screw, otherwise the machine may be applied to the needle, causing it . Note • Be sure to break. • Do not... Note • Be sure to use the Allen screwdriver included with your right hand and turn off the embroidery machine. 3 1 Position the spacer so that it hooks around the elliptical notch. 2 Position the spacer so ...the spacer as shown in the following illustration. 1 2 a Turn off the embroidery machine before replacing the needles, otherwise injuries may result if the...

Installation Guide for KIT CW PRCW1
Page 21
...insert the needle in place with the Allen screw driver, otherwise the needle may break or the machine may be damaged. ■ Recommended time for embroidery machines. z Nicks can be replaced if any of the machine, insert the needle into the mounting hole. a Mounting hole b Notch c Needle base d Mounting... As compared to immediately after the needle has been replaced, there are prominent uncut areas (the cut edges are shorter than traditional embroidery needles, be sure to turn the needle set screw with your nearest authorized dealer. 17 Hold the cutwork needle-changing tool with ...
...insert the needle in place with the Allen screw driver, otherwise the needle may break or the machine may be damaged. ■ Recommended time for embroidery machines. z Nicks can be replaced if any of the machine, insert the needle into the mounting hole. a Mounting hole b Notch c Needle base d Mounting... As compared to immediately after the needle has been replaced, there are prominent uncut areas (the cut edges are shorter than traditional embroidery needles, be sure to turn the needle set screw with your nearest authorized dealer. 17 Hold the cutwork needle-changing tool with ...

Installation Guide for KIT CW PRCW1
Page 27
Memo • Set "Machine Type" (on page 22. a Click the button in CASE 1. → After the upgrade is described for the latest version of the Upgrade Wizard appears. The ... "Programs and Features" window, select this software, and then click "Remove". 23 Note • The uninstalling of the "Design Settings" dialog box) to a multi-needle embroidery machine before using the cutwork functions. Uninstalling PE-DESIGN Software → The first dialog box of the program and upgrade it. For details on upgrading the...
Memo • Set "Machine Type" (on page 22. a Click the button in CASE 1. → After the upgrade is described for the latest version of the Upgrade Wizard appears. The ... "Programs and Features" window, select this software, and then click "Remove". 23 Note • The uninstalling of the "Design Settings" dialog box) to a multi-needle embroidery machine before using the cutwork functions. Uninstalling PE-DESIGN Software → The first dialog box of the program and upgrade it. For details on upgrading the...

Upgrade KIT CW Operation Manual PRCW1
Page 12
...the settings screen (described in step a). b Touch . ■ Finishing Cutwork mode Be sure to turn the machine on again. Switching to Cutwork Mode 2 The machine needs to be turned off after the "Cutwork" setting is set to on installing the cutwork needles, refer to... result if the machine starts sewing. As directed in the message that appears, turn off the machine. → A message appears. a Touch to turn off the embroidery machine before you perform embroidery operation with the embroidery needles, and then turn Cutwork mode off the machine, replace the cutwork...
...the settings screen (described in step a). b Touch . ■ Finishing Cutwork mode Be sure to turn the machine on again. Switching to Cutwork Mode 2 The machine needs to be turned off after the "Cutwork" setting is set to on installing the cutwork needles, refer to... result if the machine starts sewing. As directed in the message that appears, turn off the machine. → A message appears. a Touch to turn off the embroidery machine before you perform embroidery operation with the embroidery needles, and then turn Cutwork mode off the machine, replace the cutwork...

Upgrade KIT CW Operation Manual PRCW1
Page 18
... cleaning them, refer to melt away the remaining water-soluble stabilizer. b Soak the fabric in warm water to "Maintenance" in chapter 7 of your machine's Operation Manual. 17 a Turn off the embroidery machine. Note • When ironing, be sure to use the right iron temperature for the type of the... embroidery pattern. Clean the needle plate, hook and bobbin case at least once a day or after each project which ever comes first. Use scissors ...
... cleaning them, refer to melt away the remaining water-soluble stabilizer. b Soak the fabric in warm water to "Maintenance" in chapter 7 of your machine's Operation Manual. 17 a Turn off the embroidery machine. Note • When ironing, be sure to use the right iron temperature for the type of the... embroidery pattern. Clean the needle plate, hook and bobbin case at least once a day or after each project which ever comes first. Use scissors ...

Upgrade KIT CW Operation Manual PRCW1
Page 21
... 3 The procedure for use in chapter 7 of the appliqué outline from the embroidery pattern. ■ Creating an appliqué with the b outline around a pattern a c a Set the embroidery machine to Cutwork mode and turn it off. c Touch , and make sure is described below. Memo • "Appliqué Distance" can also be specified on...
... 3 The procedure for use in chapter 7 of the appliqué outline from the embroidery pattern. ■ Creating an appliqué with the b outline around a pattern a c a Set the embroidery machine to Cutwork mode and turn it off. c Touch , and make sure is described below. Memo • "Appliqué Distance" can also be specified on...

PE-DESIGN NEXT CW Instruction Manual PRCW1
Page 5
...not upgraded yet. a Note: If "Upgrade" is not displayed in the menu list on left side of the window. In the "Machine Type", select multi-needle embroidery machine. 3 Basic Requirements for Cutwork Functions ■ Authenticate the upgrade 4 Click on "Design Settings" in the "Design Page" tab. If ...the cutwork functions are available. Refer to the Installation Guide to install the PE-DESIGN NEXT + CW. ■ Set the "Machine Type" to multi-needle embroidery machine 4 For the Cutwork functions to display the "Options" window as shown below. Select "Upgrade" from the menu to be ...
...not upgraded yet. a Note: If "Upgrade" is not displayed in the menu list on left side of the window. In the "Machine Type", select multi-needle embroidery machine. 3 Basic Requirements for Cutwork Functions ■ Authenticate the upgrade 4 Click on "Design Settings" in the "Design Page" tab. If ...the cutwork functions are available. Refer to the Installation Guide to install the PE-DESIGN NEXT + CW. ■ Set the "Machine Type" to multi-needle embroidery machine 4 For the Cutwork functions to display the "Options" window as shown below. Select "Upgrade" from the menu to be ...

PE-DESIGN NEXT CW Instruction Manual PRCW1
Page 6
■ Only outline shapes can be used to create a cutwork pattern • Outline shapes that have been drawn by the • Patterns in "Outline Shapes 1" and tools below "Outline Shapes 2" in Design Library • Text converted to outline shape ■ Use the multi-needle machine that has been upgraded to work with cutwork functions 2 The embroidery machine should be set to cutwork mode in the settings screen before starting to the included Operation Manual for the details of embroidery machine operation. 4 Refer to embroider.
■ Only outline shapes can be used to create a cutwork pattern • Outline shapes that have been drawn by the • Patterns in "Outline Shapes 1" and tools below "Outline Shapes 2" in Design Library • Text converted to outline shape ■ Use the multi-needle machine that has been upgraded to work with cutwork functions 2 The embroidery machine should be set to cutwork mode in the settings screen before starting to the included Operation Manual for the details of embroidery machine operation. 4 Refer to embroider.
PE-DESIGN NEXT CW Instruction Manual PRCW1
Page 8
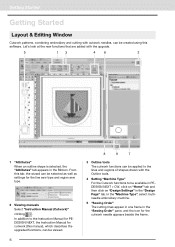
...then click on "Design Settings" in the Ribbon. Getting Started Getting Started Layout & Editing Window Cutwork patterns, combining embroidery and cutting with the Outline tools. 4 Setting "Machine Type" For the Cutwork functions to the lines and regions of shapes drawn with cutwork needles, can be created ...the wizard can be selected as well as settings for the cutwork needle appears beside the frame. From this software. In the "Machine Type", select multineedle embroidery machine. 5 "Sewing Order" The cutting lines appear in one frame in the "Sewing Order" pane, and the icon for the...
...then click on "Design Settings" in the Ribbon. Getting Started Getting Started Layout & Editing Window Cutwork patterns, combining embroidery and cutting with the Outline tools. 4 Setting "Machine Type" For the Cutwork functions to the lines and regions of shapes drawn with cutwork needles, can be created ...the wizard can be selected as well as settings for the cutwork needle appears beside the frame. From this software. In the "Machine Type", select multineedle embroidery machine. 5 "Sewing Order" The cutting lines appear in one frame in the "Sewing Order" pane, and the icon for the...

PE-DESIGN NEXT CW Instruction Manual PRCW1
Page 9
...be also viewed in the "Design Property" screen in Design Center. 7 To set to a singleneedle embroidery machine • Cutwork pattern cannot be transferred to a machine by using an embroidery card or the Link function. • Cutwork pattern cannot be specified for cutwork. • With... created in four different shades of the "Design Settings" dialog box) is changed from a multi-needle embroidery machine to a single-needle embroidery machine • When a cutwork pattern is imported while "Machine Type" (on the "Design Page" tab) is selected. 7 "Sewing Attributes" In the "Sewing...
...be also viewed in the "Design Property" screen in Design Center. 7 To set to a singleneedle embroidery machine • Cutwork pattern cannot be transferred to a machine by using an embroidery card or the Link function. • Cutwork pattern cannot be specified for cutwork. • With... created in four different shades of the "Design Settings" dialog box) is changed from a multi-needle embroidery machine to a single-needle embroidery machine • When a cutwork pattern is imported while "Machine Type" (on the "Design Page" tab) is selected. 7 "Sewing Attributes" In the "Sewing...


