
Installation Guide for KIT CW PRCW1
Page 5
... guide has a Software License Agreement specific to the machine. Refer to the manuals downloaded using this kit, carefully read this guide are not exhibited clearly within the text. Note • This Installation Guide does not contain operating instructions for Windows® on your computer or for information on their respective companies. Product Support Contact Product Support if you have a problem. For additional product information and updates...
... guide has a Software License Agreement specific to the machine. Refer to the manuals downloaded using this kit, carefully read this guide are not exhibited clearly within the text. Note • This Installation Guide does not contain operating instructions for Windows® on your computer or for information on their respective companies. Product Support Contact Product Support if you have a problem. For additional product information and updates...
Installation Guide for KIT CW PRCW1
Page 9
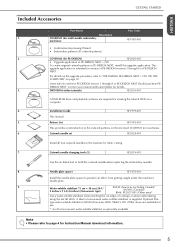
.... Installation Guide XF1979-001 This manual 5. Pattern List XF1981-001 This provides an introduction to the cutwork patterns on the upgrade procedure, refer to hold the cutwork needle when replacing the embroidery needles. 8. A sheet of a design or when embroidering using the net fill stitch. CD-ROM2 (for Instruction Manual download information. 5 Users who do not have PE-DESIGN version 5 through 8 or PE-DESIGN NEXT. Needle plate spacer XF1978-001 Install the needle plate spacer to PE-DESIGN...
.... Installation Guide XF1979-001 This manual 5. Pattern List XF1981-001 This provides an introduction to the cutwork patterns on the upgrade procedure, refer to hold the cutwork needle when replacing the embroidery needles. 8. A sheet of a design or when embroidering using the net fill stitch. CD-ROM2 (for Instruction Manual download information. 5 Users who do not have PE-DESIGN version 5 through 8 or PE-DESIGN NEXT. Needle plate spacer XF1978-001 Install the needle plate spacer to PE-DESIGN...
Installation Guide for KIT CW PRCW1
Page 20
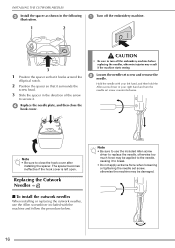
d Replace the needle plate, and then close the hook cover after installing the spacer. b Loosen the needle set screw counterclockwise. Note • Be sure to turn the needle set screw and remove the needle. CAUTION • Be sure to close the hook cover. INSTALLING THE CUTWORK NEEDLES c Install the spacer as shown in the following illustration. 1 2 a Turn off the embroidery machine before replacing the needles, otherwise injuries may result if the machine starts sewing. Hold the needle with...
d Replace the needle plate, and then close the hook cover after installing the spacer. b Loosen the needle set screw counterclockwise. Note • Be sure to turn the needle set screw and remove the needle. CAUTION • Be sure to close the hook cover. INSTALLING THE CUTWORK NEEDLES c Install the spacer as shown in the following illustration. 1 2 a Turn off the embroidery machine before replacing the needles, otherwise injuries may result if the machine starts sewing. Hold the needle with...
Installation Guide for KIT CW PRCW1
Page 22
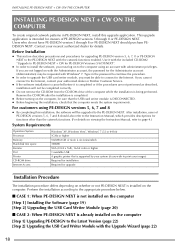
... Version (page 22) [Step 2] Upgrading the USB Card Writer Module with administrator privileges. Before Installation z This section describes precautions and procedures for upgrading PE-DESIGN version 5, 6, 7, 8 or PE-DESIGN NEXT to the PE-DESIGN NEXT with the included CD-ROM2 "Upgrade to the PE-DESIGN NEXT. Contact your authorized dealer or Brother Customer Service. z In order to install the software, you must log on...
... Version (page 22) [Step 2] Upgrading the USB Card Writer Module with administrator privileges. Before Installation z This section describes precautions and procedures for upgrading PE-DESIGN version 5, 6, 7, 8 or PE-DESIGN NEXT to the PE-DESIGN NEXT with the included CD-ROM2 "Upgrade to the PE-DESIGN NEXT. Contact your authorized dealer or Brother Customer Service. z In order to install the software, you must log on...

Operation Manual
Page 11
... automatically. ■ Automatic sewing reduces sewing time Except to change the thread spool or rethread the machine with patterns containing seven or more than 7 times, machine will stop when it is moved to determine the embroidering position, making it continues to operate automatically, from the fabric at the time of a color, and pulls the upper thread from lowering the presser foot to performing the specified operations at all six needles can be used to sew at the embroidering position The needle...
... automatically. ■ Automatic sewing reduces sewing time Except to change the thread spool or rethread the machine with patterns containing seven or more than 7 times, machine will stop when it is moved to determine the embroidering position, making it continues to operate automatically, from the fabric at the time of a color, and pulls the upper thread from lowering the presser foot to performing the specified operations at all six needles can be used to sew at the embroidering position The needle...

Operation Manual
Page 15
...Setup location...25 Setting up the machine ...26 Adjusting the operation panel position...27 Preparing the thread guide assembly...28 Positioning the spool stand ...29 Attaching the embroidery frame holder...29 EMBROIDERING TUTORIAL 31 Operating Precautions...32 Power supply precautions ...32 Needle precautions...33 Checking the needle ...33 Bobbin precautions...33 Upper thread recommendations ...34 Fabric recommendations ...34 Display recommendations ...34 Basic Procedures ...35 Installing the Bobbin ...36 Removing the bobbin case...36 Installing the bobbin ...36 Installing the bobbin case...
...Setup location...25 Setting up the machine ...26 Adjusting the operation panel position...27 Preparing the thread guide assembly...28 Positioning the spool stand ...29 Attaching the embroidery frame holder...29 EMBROIDERING TUTORIAL 31 Operating Precautions...32 Power supply precautions ...32 Needle precautions...33 Checking the needle ...33 Bobbin precautions...33 Upper thread recommendations ...34 Fabric recommendations ...34 Display recommendations ...34 Basic Procedures ...35 Installing the Bobbin ...36 Removing the bobbin case...36 Installing the bobbin ...36 Installing the bobbin case...

Operation Manual
Page 16
... 53 Upper threading ...55 Threading the needle ...59 Sewing the Embroidery 63 Starting embroidering ...63 Stopping embroidering ...65 Checking the Thread Tension 67 Removing the Embroidery Frame and Fabric 68 Removing the embroidery frame ...68 Removing the fabric ...68 Turning OFF the Machine 69 Screen Quick Reference Guide 70 Key displays ...70 Common screen controls ...70 Understanding the pattern type selection screen 71 Understanding the pattern list screen ...72 Understanding the pattern editing screen ...73 Understanding the embroidering settings...
... 53 Upper threading ...55 Threading the needle ...59 Sewing the Embroidery 63 Starting embroidering ...63 Stopping embroidering ...65 Checking the Thread Tension 67 Removing the Embroidery Frame and Fabric 68 Removing the embroidery frame ...68 Removing the fabric ...68 Turning OFF the Machine 69 Screen Quick Reference Guide 70 Key displays ...70 Common screen controls ...70 Understanding the pattern type selection screen 71 Understanding the pattern list screen ...72 Understanding the pattern editing screen ...73 Understanding the embroidering settings...

Operation Manual
Page 18
... Sewing Large-size (Split) Embroidery Patterns 214 Helpful Tips for the Operation of the Machine 217 Checking the thread tension of built-in patterns 217 Sewing a pattern aligned with a mark on the fabric 218 Color thread table ...220 Colors of Tajima (.dst) embroidery data ...220 Creating Beautiful Embroidery 221 Threads ...221 Stabilizers (backing) ...221 Hooping techniques...222 Fabric/stabilizer compatibility chart ...223 OPTIONAL ACCESSORIES 224 Attaching an optional embroidery frame for industrial embroidery machines 224 Using the...
... Sewing Large-size (Split) Embroidery Patterns 214 Helpful Tips for the Operation of the Machine 217 Checking the thread tension of built-in patterns 217 Sewing a pattern aligned with a mark on the fabric 218 Color thread table ...220 Colors of Tajima (.dst) embroidery data ...220 Creating Beautiful Embroidery 221 Threads ...221 Stabilizers (backing) ...221 Hooping techniques...222 Fabric/stabilizer compatibility chart ...223 OPTIONAL ACCESSORIES 224 Attaching an optional embroidery frame for industrial embroidery machines 224 Using the...

Operation Manual
Page 49
... to work on page 88.) Hooping the Fabric in the embroidery frame so that you wish to the user. Be sure to page 49.) ■ Embroidery frame types There are used, the embroidery frame may pucker. Memo ● If the embroidery frame holder is not loose. For details on page 90.) For precautions concerning the fabric, refer to be embroidered, check which the embroidery pattern can...
... to work on page 88.) Hooping the Fabric in the embroidery frame so that you wish to the user. Be sure to page 49.) ■ Embroidery frame types There are used, the embroidery frame may pucker. Memo ● If the embroidery frame holder is not loose. For details on page 90.) For precautions concerning the fabric, refer to be embroidered, check which the embroidery pattern can...

Operation Manual
Page 66
... around the thread information box of the needle bar currently being selected. • While the embroidery machine is sewing, the point being used for sewing or will soon be used for sewing appears at the end of stitching are listed in red. • No thread trimming operations at the beginning of stitching and at the top of stitches and the time count up in the sewing order, starting from...
... around the thread information box of the needle bar currently being selected. • While the embroidery machine is sewing, the point being used for sewing or will soon be used for sewing appears at the end of stitching are listed in red. • No thread trimming operations at the beginning of stitching and at the top of stitches and the time count up in the sewing order, starting from...

Operation Manual
Page 80
... thread color number for other brands. (Refer to stop button flashes in the following situations: ● If the thread breaks or runs out 7 Forward/ while embroidering p.105 Backward stitch key ● To restart sewing from the 3 screen without Switch spool key changing the thread spools on the set up display needle bar indicated p.53 on page 197.) 78 Use this key for Thread color the thread on the machine...
... thread color number for other brands. (Refer to stop button flashes in the following situations: ● If the thread breaks or runs out 7 Forward/ while embroidering p.105 Backward stitch key ● To restart sewing from the 3 screen without Switch spool key changing the thread spools on the set up display needle bar indicated p.53 on page 197.) 78 Use this key for Thread color the thread on the machine...

Operation Manual
Page 81
... the needle hole in the needle plate ■ Wiper This is the extension of embroidery - The machine remembers the pattern and the position even after embroidering unnecessary. (Refer to "Resume Embroidering After Turning Off the Machine" on page 110.) 1 Needle 2 Needle hole in the needle plate. Use the thread color function by selecting either 64 colors or 300 colors, or by digitizing software program - The far right needle is used. Use the "Temporary needle bar setting...
... the needle hole in the needle plate ■ Wiper This is the extension of embroidery - The machine remembers the pattern and the position even after embroidering unnecessary. (Refer to "Resume Embroidering After Turning Off the Machine" on page 110.) 1 Needle 2 Needle hole in the needle plate. Use the thread color function by selecting either 64 colors or 300 colors, or by digitizing software program - The far right needle is used. Use the "Temporary needle bar setting...

Operation Manual
Page 132
... for the needle bar threaded 3 with the thread that you wish to change to stop the machine, but, in that case, stop the machine after the threads are trimmed and the machine stops. • The start / 5 stop button can be sewn. Touch the key for temporary use. Touch . 2 Touch . 4 X The embroidering screen appears again. X Embroidering continues with . By substituting upper thread already threaded on a different needle bar, the time for sewing can...
... for the needle bar threaded 3 with the thread that you wish to change to stop the machine, but, in that case, stop the machine after the threads are trimmed and the machine stops. • The start / 5 stop button can be sewn. Touch the key for temporary use. Touch . 2 Touch . 4 X The embroidering screen appears again. X Embroidering continues with . By substituting upper thread already threaded on a different needle bar, the time for sewing can...
Operation Manual
Page 229
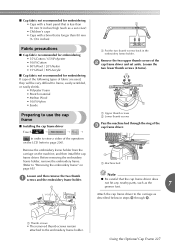
... the embroidery frame holder. Remove the two upper thumb screws of the operation on the machine, and then install the cap frame driver. Before removing the embroidery frame holder, remove the embroidery frame. (Refer to frame, easily wrinkled, or easily shrink. • Polyester Foam • Stretch material • Melton Wool • 100%Nylon • Suede 1 Put the two thumb screws back in the embroidery frame holder. ■ Cap fabric...
... the embroidery frame holder. Remove the two upper thumb screws of the operation on the machine, and then install the cap frame driver. Before removing the embroidery frame holder, remove the embroidery frame. (Refer to frame, easily wrinkled, or easily shrink. • Polyester Foam • Stretch material • Melton Wool • 100%Nylon • Suede 1 Put the two thumb screws back in the embroidery frame holder. ■ Cap fabric...

Operation Manual
Page 257
... The needle is touching the needle plate. The upper thread breaks. Consult your nearest authorized dealer. Use the Allen screw driver to tighten the needle set too high and not correctly positioned. The area around the hole in the needle plate is damaged. The area around the embroidery foot hole is damaged. Slow down the machine sewing speed. 7 p.127 Troubleshooting 255 The needle set screw is set screw. Consult your nearest authorized dealer. 1 Needle 2 Needle plate hole 3 Needle touching hole The presser foot is loose. Replace the presser foot.
... The needle is touching the needle plate. The upper thread breaks. Consult your nearest authorized dealer. Use the Allen screw driver to tighten the needle set too high and not correctly positioned. The area around the hole in the needle plate is damaged. The area around the embroidery foot hole is damaged. Slow down the machine sewing speed. 7 p.127 Troubleshooting 255 The needle set screw is set screw. Consult your nearest authorized dealer. 1 Needle 2 Needle plate hole 3 Needle touching hole The presser foot is loose. Replace the presser foot.

Operation Manual
Page 259
... Remedy Reference Page The automatic needle-threading Consult your nearest correctly passing each other. Replace the needle. The embroidery data contains stitches with a new one. Replace thread. p.201 The embroidery data contains many stitches with a zero pitch. Correctly thread the bobbin thread. The thread is broken. Remove the thread jammed and clean the hook. p.36 p.36 p.245 A bobbin designed specifically for example, the fabric is not used. Use the correct bobbin. Thread the upper thread correctly. The needle is misaligned. p.86...
... Remedy Reference Page The automatic needle-threading Consult your nearest correctly passing each other. Replace the needle. The embroidery data contains stitches with a new one. Replace thread. p.201 The embroidery data contains many stitches with a zero pitch. Correctly thread the bobbin thread. The thread is broken. Remove the thread jammed and clean the hook. p.36 p.36 p.245 A bobbin designed specifically for example, the fabric is not used. Use the correct bobbin. Thread the upper thread correctly. The needle is misaligned. p.86...

Operation Manual
Page 261
... bobbin thread. Set the remaining length of the settings screen. p.248 There are not used . Rethread and make sure tension disc rotates when pulling on this machine. Replace and use recommended needle. p.36 The lower thread tension is too short. p.36 embroidering bobbin is incorrect. Check the thread path, and then thread the upper thread again. Correctly thread the bobbin thread. Clean the thread tension guide plates. Consult your nearest authorized dealer. Adjust the tension of the needle when embroidering begins. Clean the hook. Correctly install...
... bobbin thread. Set the remaining length of the settings screen. p.248 There are not used . Rethread and make sure tension disc rotates when pulling on this machine. Replace and use recommended needle. p.36 The lower thread tension is too short. p.36 embroidering bobbin is incorrect. Check the thread path, and then thread the upper thread again. Correctly thread the bobbin thread. Clean the thread tension guide plates. Consult your nearest authorized dealer. Adjust the tension of the needle when embroidering begins. Clean the hook. Correctly install...

Operation Manual
Page 275
... removing 36 Bobbin winder 240 Changing character spacing 167 colors of the pattern 171 display guides 196 embroidering position 96 language 205 size 164 text arrangement of a character 167 thread color display 197 thread density 170 thread spools 103 units of measurements 205 Checking needle bars and thread colors 53 preview image 46 thread spool changes 101 thread tension 67 Cleaning around the needle plate 246 bobbin case 247 hook 245 LCD 245 machine surface 245 maintenance message 251 oiling machine...
... removing 36 Bobbin winder 240 Changing character spacing 167 colors of the pattern 171 display guides 196 embroidering position 96 language 205 size 164 text arrangement of a character 167 thread color display 197 thread density 170 thread spools 103 units of measurements 205 Checking needle bars and thread colors 53 preview image 46 thread spool changes 101 thread tension 67 Cleaning around the needle plate 246 bobbin case 247 hook 245 LCD 245 machine surface 245 maintenance message 251 oiling machine...

Operation Manual
Page 276
... Hook 245 Hook cover/Hook 20 Hooping 47, 91, 222 Horizontal mirror image key 164 I Industrial embroidery frame 224 J Jump code 199 Jumpstitch trimming 199 L Language 195, 205 LCD 21, 34, 70 Lingerie 223 Lock stitching key 76, 122 Locking mechanism 63 Locking the needle bar 97 Low Profile (Low fitting 226 Lower thread guide 20 M Machine operations guide key 206 Main power switch 21, 38, 69 Maintenance 206, 245 Manual needle bar settings 132 Maximum sewing speed...
... Hook 245 Hook cover/Hook 20 Hooping 47, 91, 222 Horizontal mirror image key 164 I Industrial embroidery frame 224 J Jump code 199 Jumpstitch trimming 199 L Language 195, 205 LCD 21, 34, 70 Lingerie 223 Lock stitching key 76, 122 Locking mechanism 63 Locking the needle bar 97 Low Profile (Low fitting 226 Lower thread guide 20 M Machine operations guide key 206 Main power switch 21, 38, 69 Maintenance 206, 245 Manual needle bar settings 132 Maximum sewing speed...

Operation Manual
Page 277
... fabric .......... 218 Sewing key 76 Sewing light 20, 203 Sewing order 77 Thread guide pins 20 Thread recommendations 34 Thread sensor 204 Thread spools 103 changing 103 easily changing 104 Thread tail length 201 Thread tension 112, 244 Thread tension disc 57 Thread tension knobs 20, 113 Thread trimming button 21, 66 Threading needle 59 upper thread 53, 55 Thumbnail size 198 Tips for machine operation 217 Touch panel 21 Trial sewing key 51, 76 Troubleshooting 206, 252 T-shirt 223 Sewing speed 127 Sewing the embroidery 63 U Sewing time...
... fabric .......... 218 Sewing key 76 Sewing light 20, 203 Sewing order 77 Thread guide pins 20 Thread recommendations 34 Thread sensor 204 Thread spools 103 changing 103 easily changing 104 Thread tail length 201 Thread tension 112, 244 Thread tension disc 57 Thread tension knobs 20, 113 Thread trimming button 21, 66 Threading needle 59 upper thread 53, 55 Thumbnail size 198 Tips for machine operation 217 Touch panel 21 Trial sewing key 51, 76 Troubleshooting 206, 252 T-shirt 223 Sewing speed 127 Sewing the embroidery 63 U Sewing time...


