
Users Manual - English
Page 1
SEWING MACHINE MACHINE À COUDRE PQ1500S OPERATION MANUAL MANUEL D'UTILISATION
SEWING MACHINE MACHINE À COUDRE PQ1500S OPERATION MANUAL MANUEL D'UTILISATION

Users Manual - English
Page 2
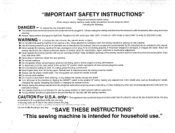
... for examination, repair, electrical or mechanical adjustment. To reduce the risk of burns, fire, electric shock, or injury: G Do not allow this sewing machine if it has a damaged cord or plug, if it has been dropped or damaged, or dropped into any air openings blocked. Close attention is necessary... always be used as threading the needle, changing the needle, threading the bobbin or changing the presser foot etc. G Never operate this sewing machine to be taken, DANGER - To unplug, grasp the plug, not the cord. WARNING - only- When using and before making any way. G Do not ...
... for examination, repair, electrical or mechanical adjustment. To reduce the risk of burns, fire, electric shock, or injury: G Do not allow this sewing machine if it has a damaged cord or plug, if it has been dropped or damaged, or dropped into any air openings blocked. Close attention is necessary... always be used as threading the needle, changing the needle, threading the bobbin or changing the presser foot etc. G Never operate this sewing machine to be taken, DANGER - To unplug, grasp the plug, not the cord. WARNING - only- When using and before making any way. G Do not ...

Users Manual - English
Page 3
... to the terminal which is hazardous if engaged in a live socket outlet. FOR USERS IN THE UK, EIRE, MALTA AND CYPRUS ONLY If your sewing machine is fitted with a three-pin non-rewireable BS plug then please read the following code: Blue Neutral Brown Live As the colours of the wiring...
... to the terminal which is hazardous if engaged in a live socket outlet. FOR USERS IN THE UK, EIRE, MALTA AND CYPRUS ONLY If your sewing machine is fitted with a three-pin non-rewireable BS plug then please read the following code: Blue Neutral Brown Live As the colours of the wiring...

Users Manual - English
Page 4
... in the back of the operation manual to inspect and adjust the machine yourself. CONGRATULATIONS ON CHOOSING A BROTHER SEWING MACHINE Your machine is one of the finest sewing machines available for your authorised Brother service center visit www.brother.com and use our convenient dealer locator. To fully enjoy all the... study this booklet. Do not touch moving parts such as the balance wheel, thread take-up or needle while the machine is required, first follow the troubleshooting table in relation to assure correct installation. For a longer service life G When storing your nearest...
... in the back of the operation manual to inspect and adjust the machine yourself. CONGRATULATIONS ON CHOOSING A BROTHER SEWING MACHINE Your machine is one of the finest sewing machines available for your authorised Brother service center visit www.brother.com and use our convenient dealer locator. To fully enjoy all the... study this booklet. Do not touch moving parts such as the balance wheel, thread take-up or needle while the machine is required, first follow the troubleshooting table in relation to assure correct installation. For a longer service life G When storing your nearest...

Users Manual - English
Page 5
CONTENTS Accessories 1 Machine Features 2 Before You Begin 3 Power Cord and Foot Controller 3 Power Switch 3 Thread Tension Dial 3 Hand Wheel 3 Stitch Length Regulator 3 Reverse Stitch Lever 3 Presser Foot Lift ... Zipper Foot 17 1/4" Foot 17 Quilting Foot 18 Walking Foot 18 Fabric Separator (for joining lining to fabric 19 Seam Guide 19 Caring for Your Machine 20 Cleaning the Machine 20 Lubrication Points 20 Trouble Shooting 21
CONTENTS Accessories 1 Machine Features 2 Before You Begin 3 Power Cord and Foot Controller 3 Power Switch 3 Thread Tension Dial 3 Hand Wheel 3 Stitch Length Regulator 3 Reverse Stitch Lever 3 Presser Foot Lift ... Zipper Foot 17 1/4" Foot 17 Quilting Foot 18 Walking Foot 18 Fabric Separator (for joining lining to fabric 19 Seam Guide 19 Caring for Your Machine 20 Cleaning the Machine 20 Lubrication Points 20 Trouble Shooting 21

Users Manual - English
Page 6
... 148475-001 XA7258-001 XA7255-201 XA7253-001 XA7256-001 XC1220-051 XC1387-051 Note Foot controller: Model P This foot controller is used for sewing machine model PQ1500S. 1
... 148475-001 XA7258-001 XA7255-201 XA7253-001 XA7256-001 XC1220-051 XC1387-051 Note Foot controller: Model P This foot controller is used for sewing machine model PQ1500S. 1

Users Manual - English
Page 7
Machine Features Presser Foot Pressure Three Holed Adjustment Dial (Page 4) Thread Guide (Page 10) Light Switch (Page 5) Thread Trimmer Sewing Area Light (Page 6) Automatic Needle Threader (...
Machine Features Presser Foot Pressure Three Holed Adjustment Dial (Page 4) Thread Guide (Page 10) Light Switch (Page 5) Thread Trimmer Sewing Area Light (Page 6) Automatic Needle Threader (...

Users Manual - English
Page 8
...= longer stitches 45 Reverse Stitch Lever G Sewing in reverse is possible when the reverse stitch lever is in cord. G Plug foot controller into machine. Power Cord Foot Controller Power Switch I " position to "O" position. Before You Begin (1) Power Cord and Foot Controller Note Please use common ...when reverse sewing is desired. ✽ When the feed adjustment dial is set between 5-7mm, the reverse stitch length is used for sewing machine model PQ1500S. G Plug in the lowered position. ✽ Make sure to the right. Hand Wheel Stitch Length Regulator G Adjust desired stitch...
...= longer stitches 45 Reverse Stitch Lever G Sewing in reverse is possible when the reverse stitch lever is in cord. G Plug foot controller into machine. Power Cord Foot Controller Power Switch I " position to "O" position. Before You Begin (1) Power Cord and Foot Controller Note Please use common ...when reverse sewing is desired. ✽ When the feed adjustment dial is set between 5-7mm, the reverse stitch length is used for sewing machine model PQ1500S. G Plug in the lowered position. ✽ Make sure to the right. Hand Wheel Stitch Length Regulator G Adjust desired stitch...
Users Manual - English
Page 10
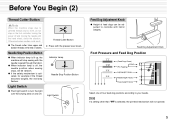
... G When indicator lamp is selected, the pin feed mechanism will be adjusted to your needs. Before You Begin (2) Thread Cutter Button Note When the machine stops due to turn the light over the sewing area on the foot controller, turning the power off and moving the needle with the hand... wheel, check the situation. Thread Cutter Button ✽ Press with fabric weights. Note If a setting other than is lit up, the machine will stop sewing with the needle lowered through the fabric. G The thread cutter trims upper and bobbin threads at the end of four feed dog...
... G When indicator lamp is selected, the pin feed mechanism will be adjusted to your needs. Before You Begin (2) Thread Cutter Button Note When the machine stops due to turn the light over the sewing area on the foot controller, turning the power off and moving the needle with the hand... wheel, check the situation. Thread Cutter Button ✽ Press with fabric weights. Note If a setting other than is lit up, the machine will stop sewing with the needle lowered through the fabric. G The thread cutter trims upper and bobbin threads at the end of four feed dog...
Users Manual - English
Page 11
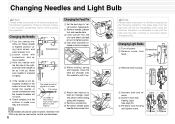
... 2 Remove screw from head. 3 Remove bulb housing. 4 Unscrew bulb and remove. 5 Screw in tightly. Changing the Needle 1 Turn the sewing machine off power. The needle should be hot immediately after using hand wheel, and lower presser foot. 2 Loosen screw with screwdriver, and remove needle. 3... until the light bulb has had a chance to cool down before carrying out the following operation. Raise needle to highest position using the machine, therefore it up. 6 Attach new feed pin to a surface. Changing Light Bulbs 1 Turn off . Note HLX5 needles should lay parallel...
... 2 Remove screw from head. 3 Remove bulb housing. 4 Unscrew bulb and remove. 5 Screw in tightly. Changing the Needle 1 Turn the sewing machine off power. The needle should be hot immediately after using hand wheel, and lower presser foot. 2 Loosen screw with screwdriver, and remove needle. 3... until the light bulb has had a chance to cool down before carrying out the following operation. Raise needle to highest position using the machine, therefore it up. 6 Attach new feed pin to a surface. Changing Light Bulbs 1 Turn off . Note HLX5 needles should lay parallel...
Users Manual - English
Page 12
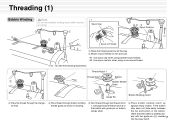
... Cap Spool of the bobbin with the guide pin (5) inserted into the lower notch. Threading (1) Bobbin Winding Note Do not move bobbin winding clutch while machine is seated prop- 7 erly with guide pin on the spool pin. ✽1 Use spool cap when using parallel-wound thread. ✽2 Use spool cushion when...
... Cap Spool of the bobbin with the guide pin (5) inserted into the lower notch. Threading (1) Bobbin Winding Note Do not move bobbin winding clutch while machine is seated prop- 7 erly with guide pin on the spool pin. ✽1 Use spool cap when using parallel-wound thread. ✽2 Use spool cushion when...
Users Manual - English
Page 14
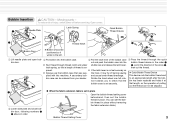
... bob- out and push the bobbin case into the bobbin case. 3 Pull the latch lever of injury, switch power off during sewing plied with this machine. the hook, it winds to the left. 3 2 1 Lift needle plate and open bob- 2 Put bobbin into the ✽ Run thread through the quick bobbin thread...
... bob- out and push the bobbin case into the bobbin case. 3 Pull the latch lever of injury, switch power off during sewing plied with this machine. the hook, it winds to the left. 3 2 1 Lift needle plate and open bob- 2 Put bobbin into the ✽ Run thread through the quick bobbin thread...
Users Manual - English
Page 15
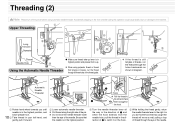
... highest position and presser foot is up. ✽ When using automatic needle threader. Automatic Needle Threader Thread 2 Pin 1 Hook ✽ Pull the thread to the machine. Accidentally stepping on the foot controller during this the hook that the needle is still tangles or breaks, run the thread through the eye of...
... highest position and presser foot is up. ✽ When using automatic needle threader. Automatic Needle Threader Thread 2 Pin 1 Hook ✽ Pull the thread to the machine. Accidentally stepping on the foot controller during this the hook that the needle is still tangles or breaks, run the thread through the eye of...

Users Manual - English
Page 17
ing to the chart on the sewing machine. ✽ When sewing on the foot controller to begin. 5 Turn the hand wheel towards you are working with knit fabrics. While needle is too tight ...
ing to the chart on the sewing machine. ✽ When sewing on the foot controller to begin. 5 Turn the hand wheel towards you are working with knit fabrics. While needle is too tight ...

Users Manual - English
Page 18
... stitching on back of the zipper foot to attach the other presser feet with all other than concealed fasteners. You can begin sewing with the PQ series machines may damage or break the pin feed mechanism. G 1/4" Foot For quilt and patchwork piecing with your PQ1500S. ✽ See page 18 for directions on... concealed fasteners. Use of other feet that come with 1/4" or 1/8" seam allowance. Changing Presser Feet Note Make sure the power is specially designed for this machine and has clearance for the pin at the rear of each foot.
... stitching on back of the zipper foot to attach the other presser feet with all other than concealed fasteners. You can begin sewing with the PQ series machines may damage or break the pin feed mechanism. G 1/4" Foot For quilt and patchwork piecing with your PQ1500S. ✽ See page 18 for directions on... concealed fasteners. Use of other feet that come with 1/4" or 1/8" seam allowance. Changing Presser Feet Note Make sure the power is specially designed for this machine and has clearance for the pin at the rear of each foot.

Users Manual - English
Page 22
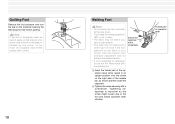
... sewing with the teeth to the right, the left side of the foot should line up with the left teeth of the zipper. 1/4" Foot G Sewing machine settings: Stitch length = 2 - 2.5 • Sew a consistent seam allowance (1/4", 6.4 mm) when piecing together a quilt. Basting Basting 8 Fit the zipper teeth into the presser foot groove, guide...
... sewing with the teeth to the right, the left side of the foot should line up with the left teeth of the zipper. 1/4" Foot G Sewing machine settings: Stitch length = 2 - 2.5 • Sew a consistent seam allowance (1/4", 6.4 mm) when piecing together a quilt. Basting Basting 8 Fit the zipper teeth into the presser foot groove, guide...
Users Manual - English
Page 23
.... 2 Tighten the screw securely with the walking foot. Forked part 1 of the operation lever while raised in an upright position onto the screw on the machine lowering the feed dogs for feeding the cloth may not move if the foot pressure on the fabric is not advisable or necessary to use...
.... 2 Tighten the screw securely with the walking foot. Forked part 1 of the operation lever while raised in an upright position onto the screw on the machine lowering the feed dogs for feeding the cloth may not move if the foot pressure on the fabric is not advisable or necessary to use...
Users Manual - English
Page 25
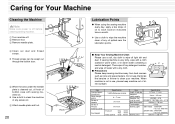
... the needle plate is cleaned out, oil hook of any oil spilled near the lubrication points. Caring for Your Machine Cleaning the Machine Note Make sure power is off before cleaning sewing machine. 1 Turn machine off. 2 Remove foot. 3 Remove needle plate. 4 Clean out dust and thread scraps. ✽ Thread ... code: X53061-050 220-240V model: 240V/15W Parts code: 205336-050 Sewing area 595 mm × 285 mm If sewing machine is not in warm water containing a neutral detergent. When machine is very dirty, wipe with a cloth soaked in warm water, or in use, please keep sewing...
... the needle plate is cleaned out, oil hook of any oil spilled near the lubrication points. Caring for Your Machine Cleaning the Machine Note Make sure power is off before cleaning sewing machine. 1 Turn machine off. 2 Remove foot. 3 Remove needle plate. 4 Clean out dust and thread scraps. ✽ Thread ... code: X53061-050 220-240V model: 240V/15W Parts code: 205336-050 Sewing area 595 mm × 285 mm If sewing machine is not in warm water containing a neutral detergent. When machine is very dirty, wipe with a cloth soaked in warm water, or in use, please keep sewing...

Users Manual - English
Page 26
... way up. Adjust feed dogs. 5 The automatic safety device has operated. Rethread. 10 If you still cannot find the problem, please take your sewing machine into the shop where you 're using . Clean bobbin case and under needle plate. 9-11.20 Wrong needle. Reinsert bobbin properly. 9 Needle is...Stitch length is not inserted correctly. Adjust feed dogs. 5 Loop in . Turn hand wheel to choose the needle that best fits your nearest Brother dealer for repair. 21 See chart on p.12 to raise needle. 3 Wrong needle for the right needle to choose the needle that best...
... way up. Adjust feed dogs. 5 The automatic safety device has operated. Rethread. 10 If you still cannot find the problem, please take your sewing machine into the shop where you 're using . Clean bobbin case and under needle plate. 9-11.20 Wrong needle. Reinsert bobbin properly. 9 Needle is...Stitch length is not inserted correctly. Adjust feed dogs. 5 Loop in . Turn hand wheel to choose the needle that best fits your nearest Brother dealer for repair. 21 See chart on p.12 to raise needle. 3 Wrong needle for the right needle to choose the needle that best...
User Manual - French
Page 2
... which represents off, then remove plug from the electrical outlet immediately after using and before cleaning. • Always unplug before using a sewing machine, basic safety precautions should always be taken, DANGER To reduce the risk of lint, dust, and loose cloth. • Never drop or...fit fully in a polarized outlet only one blade wider than the other user servicing adjustments mentioned in the instruction manual. • This sewing machine is being administered. • To disconnect, turn the main switch to the symbol "O" before making any other ) to reduce the risk ...
... which represents off, then remove plug from the electrical outlet immediately after using and before cleaning. • Always unplug before using a sewing machine, basic safety precautions should always be taken, DANGER To reduce the risk of lint, dust, and loose cloth. • Never drop or...fit fully in a polarized outlet only one blade wider than the other user servicing adjustments mentioned in the instruction manual. • This sewing machine is being administered. • To disconnect, turn the main switch to the symbol "O" before making any other ) to reduce the risk ...


