

Users Manual - English
Page 2
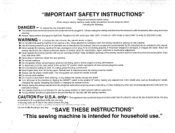
... authorized dealer or service center for examination, repair, electrical or mechanical adjustment. G Turn off , then remove plug from all instructions before making any opening. G Always unplug the sewing machine from the accumulation of electric shock, this sewing machine to break. When using and before changing the light bulb. G Do not use the proper needle plate. If it to be taken, DANGER - G Never operate this sewing machine if it has a damaged cord or plug...
... authorized dealer or service center for examination, repair, electrical or mechanical adjustment. G Turn off , then remove plug from all instructions before making any opening. G Always unplug the sewing machine from the accumulation of electric shock, this sewing machine to break. When using and before changing the light bulb. G Do not use the proper needle plate. If it to be taken, DANGER - G Never operate this sewing machine if it has a damaged cord or plug...

Users Manual - English
Page 4
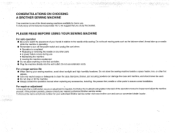
... of your nearest authorized Brother service center. G Always consult the operation manual when replacing any other parts G A power failure occurs during use extension cords. PLEASE READ BEFORE USING YOUR SEWING MACHINE For safe operation G Be sure to assure correct installation. Do not touch moving parts such as the balance wheel, thread take-up or needle while the machine is completed G Replacing or removing the needle or any accessories, including: the presser feet, needle or other hot...
... of your nearest authorized Brother service center. G Always consult the operation manual when replacing any other parts G A power failure occurs during use extension cords. PLEASE READ BEFORE USING YOUR SEWING MACHINE For safe operation G Be sure to assure correct installation. Do not touch moving parts such as the balance wheel, thread take-up or needle while the machine is completed G Replacing or removing the needle or any accessories, including: the presser feet, needle or other hot...

Users Manual - English
Page 5
...1 Machine Features 2 Before You Begin 3 Power Cord and Foot Controller 3 Power Switch 3 Thread Tension Dial 3 Hand Wheel 3 Stitch Length Regulator 3 Reverse Stitch Lever 3 Presser Foot Lift Lever 4 Knee Lift 4 Presser Foot Pressure Adjustment Dial 4 Fabric Extension Table 4 Thread Cutter Button 5 Needle Stop Position Button 5 Light Switch 5 Feed Dog Adjustment Knob 5 Changing Needles and Light Bulb 6 Changing the Needle 6 Changing the Feed Pin 6 Changing Light Bulbs 6 Threading 7 Bobbin Winding 7 Bobbin Insertion 9 Upper Threading 10 Using the Automatic Needle Threader...
...1 Machine Features 2 Before You Begin 3 Power Cord and Foot Controller 3 Power Switch 3 Thread Tension Dial 3 Hand Wheel 3 Stitch Length Regulator 3 Reverse Stitch Lever 3 Presser Foot Lift Lever 4 Knee Lift 4 Presser Foot Pressure Adjustment Dial 4 Fabric Extension Table 4 Thread Cutter Button 5 Needle Stop Position Button 5 Light Switch 5 Feed Dog Adjustment Knob 5 Changing Needles and Light Bulb 6 Changing the Needle 6 Changing the Feed Pin 6 Changing Light Bulbs 6 Threading 7 Bobbin Winding 7 Bobbin Insertion 9 Upper Threading 10 Using the Automatic Needle Threader...

Users Manual - English
Page 7
Machine Features Presser Foot Pressure Three Holed Adjustment Dial (Page 4) Thread Guide (Page 10) Light Switch (Page 5) Thread Trimmer Sewing Area Light (Page 6) Automatic Needle Threader (Page 10 and 11) Quick Bobbin Thread Device (Page 9) Thread Cutter Button (Page 5) Thread Tension Dial (Page 3 and 12) Feed Dogs (Page 5 and 14) Thread Guide Bar (Page 7) Stitch Length Regulator (Page 3) Bobbin Winder (Page 7) Hand Wheel (Page 3) Indicator Lamp Needle Stop Position Button (Page 5) Power Switch (Page 3) Reverse Stitch Lever (Page 3) Power Socket (Page 3) Feed Dog ...
Machine Features Presser Foot Pressure Three Holed Adjustment Dial (Page 4) Thread Guide (Page 10) Light Switch (Page 5) Thread Trimmer Sewing Area Light (Page 6) Automatic Needle Threader (Page 10 and 11) Quick Bobbin Thread Device (Page 9) Thread Cutter Button (Page 5) Thread Tension Dial (Page 3 and 12) Feed Dogs (Page 5 and 14) Thread Guide Bar (Page 7) Stitch Length Regulator (Page 3) Bobbin Winder (Page 7) Hand Wheel (Page 3) Indicator Lamp Needle Stop Position Button (Page 5) Power Switch (Page 3) Reverse Stitch Lever (Page 3) Power Socket (Page 3) Feed Dog ...

Users Manual - English
Page 9
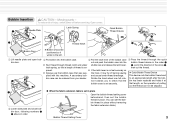
... Fabric Extension Table Knee Lift Presser Foot Pressure Adjustment Dial G Turning the pressure adjustment dial raises and lowers the pressure indicator needle as the amount of pressure on the presser foot changes. Setting up the knee lift. ✽ Push the knee lift bar all the way into the socket. ✽ When knee lift is not in the below diagram. 2 Hole Guide pin 2 1 Table legs 3 3 Stopper Hook See also: "Feed Dog Adjustment Knob" on page 12. Presser Foot Lift Lever G Lowering the presser foot lift lever lowers the sewing foot...
... Fabric Extension Table Knee Lift Presser Foot Pressure Adjustment Dial G Turning the pressure adjustment dial raises and lowers the pressure indicator needle as the amount of pressure on the presser foot changes. Setting up the knee lift. ✽ Push the knee lift bar all the way into the socket. ✽ When knee lift is not in the below diagram. 2 Hole Guide pin 2 1 Table legs 3 3 Stopper Hook See also: "Feed Dog Adjustment Knob" on page 12. Presser Foot Lift Lever G Lowering the presser foot lift lever lowers the sewing foot...
Users Manual - English
Page 14
... fabric extension table is set in place Open the bobbin thread setting cover beforehand, then set the bobbin thread in the direction of the arrow 3, then cut the thread. # Quick Bobbin Thread Device This device cuts the bobbin thread end to check that length, so the operation of thread is set the bob- bin thread in order. To reduce risk of the bobbin case bin door. latch spring, so that was sup- and cause lower thread breakage. Bobbin Thread Setting Cover 9 A secondary bob- Open covers. 1 Needle Plate...
... fabric extension table is set in place Open the bobbin thread setting cover beforehand, then set the bobbin thread in the direction of the arrow 3, then cut the thread. # Quick Bobbin Thread Device This device cuts the bobbin thread end to check that length, so the operation of thread is set the bob- bin thread in order. To reduce risk of the bobbin case bin door. latch spring, so that was sup- and cause lower thread breakage. Bobbin Thread Setting Cover 9 A secondary bob- Open covers. 1 Needle Plate...
Users Manual - English
Page 15
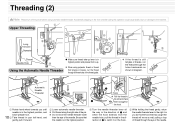
...-up lever is up. ✽ When using automatic needle threader. Threading (2) Note Please turn off the power before using polyester thread or thread that tangles or breaks, run the thread through the holes backwards as well, pulling a loop of thread through all the way in the direction of 1 and when the hook extends from the needle hole, pull the thread in diagram. As you until needle is in the highest position, and lower presser foot...
...-up lever is up. ✽ When using automatic needle threader. Threading (2) Note Please turn off the power before using polyester thread or thread that tangles or breaks, run the thread through the holes backwards as well, pulling a loop of thread through all the way in the direction of 1 and when the hook extends from the needle hole, pull the thread in diagram. As you until needle is in the highest position, and lower presser foot...

Users Manual - English
Page 17
...presser foot, remove fabric and then cut thread. ✽ When using thread cutter: 5 Press the thread cutter button while the presser foot lever in raised position, insert a test strip from the garment fabric under normal sewing conditions. ✽ Adjust the pressure adjustment dial and the feed dog adjustment knob accord- Correct thread tension Fabric Upper Thread Wrong side of fabric Right side of Fabric Lower Thread to reduce needle thread tension Incorrect thread tension can lead to such undesirable results as jersey or tricot, use a ballpoint needle or a needle designed...
...presser foot, remove fabric and then cut thread. ✽ When using thread cutter: 5 Press the thread cutter button while the presser foot lever in raised position, insert a test strip from the garment fabric under normal sewing conditions. ✽ Adjust the pressure adjustment dial and the feed dog adjustment knob accord- Correct thread tension Fabric Upper Thread Wrong side of fabric Right side of Fabric Lower Thread to reduce needle thread tension Incorrect thread tension can lead to such undesirable results as jersey or tricot, use a ballpoint needle or a needle designed...

Users Manual - English
Page 19
... the reverse stitch lever and backstitch about 15 cm of upper and bobbin thread under and behind foot, and position fabric under foot. 2 Lower presser foot lever to lower foot. 3 Turn the hand wheel forward you to lower the needle through fabric. 2 Lift presser foot, and turn fabric using thread trimmer: 4 Push thread trimmer button (this will cause the upper and bobbin threads to be joined evenly by activating the pin feed mechanism. 1 Move feed adjustment knob to pin feeding position. 2 Adjust pressure adjustment dial until feed pin catches fabric and sew. The feed pin passes...
... the reverse stitch lever and backstitch about 15 cm of upper and bobbin thread under and behind foot, and position fabric under foot. 2 Lower presser foot lever to lower foot. 3 Turn the hand wheel forward you to lower the needle through fabric. 2 Lift presser foot, and turn fabric using thread trimmer: 4 Push thread trimmer button (this will cause the upper and bobbin threads to be joined evenly by activating the pin feed mechanism. 1 Move feed adjustment knob to pin feeding position. 2 Adjust pressure adjustment dial until feed pin catches fabric and sew. The feed pin passes...

Users Manual - English
Page 26
.... Trouble Shooting ✽ Before taking your nearest Brother dealer for repair. 21 Rethread machine. Reinsert. 6 Thread is getting tangled. Rethread machine. 9-11 Stitch length is too high. See chart on . Reset bobbin case. 9 Wrong needle. Oil the machine. 20 Bobbin tension is too short. Clean and oil the machine. 20 Using the automatic needle threader incorrectly. Remove needle plate and check bobbin case. Rethread machine. Increase foot pressure. 4 Upper thread tension is not passing through eye of the auto- Change needles. 6 Improper fabric...
.... Trouble Shooting ✽ Before taking your nearest Brother dealer for repair. 21 Rethread machine. Reinsert. 6 Thread is getting tangled. Rethread machine. 9-11 Stitch length is too high. See chart on . Reset bobbin case. 9 Wrong needle. Oil the machine. 20 Bobbin tension is too short. Clean and oil the machine. 20 Using the automatic needle threader incorrectly. Remove needle plate and check bobbin case. Rethread machine. Increase foot pressure. 4 Upper thread tension is not passing through eye of the auto- Change needles. 6 Improper fabric...
User Manual - French
Page 2
... openings of the sewing machine and foot control free from the electrical outlet when removing covers, lubricating, or when making any opening. • Do not use outdoors. • Do not operate where aerosol (spray) products are being used as a toy. "This sewing machine is not working properly, if it has been dropped or damaged, or dropped into any adjustments in the needle area, such as threading the needle, changing the needle, threading the bobbin or changing the presser foot...
... openings of the sewing machine and foot control free from the electrical outlet when removing covers, lubricating, or when making any opening. • Do not use outdoors. • Do not operate where aerosol (spray) products are being used as a toy. "This sewing machine is not working properly, if it has been dropped or damaged, or dropped into any adjustments in the needle area, such as threading the needle, changing the needle, threading the bobbin or changing the presser foot...
User Manual - French
Page 4
... occurs or adjustment is one of the operation manual to the needle while sewing. Do not touch moving parts such as the balance wheel, thread take-up or needle while the machine is operating. • Remember to turn off the power switch and unplug the cord when: • Operation is completed • Replacing or removing the needle or any accessories, including: the presser feet, needle or other parts to clean the case. Benzene...
... occurs or adjustment is one of the operation manual to the needle while sewing. Do not touch moving parts such as the balance wheel, thread take-up or needle while the machine is operating. • Remember to turn off the power switch and unplug the cord when: • Operation is completed • Replacing or removing the needle or any accessories, including: the presser feet, needle or other parts to clean the case. Benzene...

User Manual - French
Page 5
Accessories 1 Machine Features 2 Before You Begin 3 Power Cord and Foot Controller 3 Power Switch 3 Thread Tension Dial 3 Hand Wheel 3 Stitch Length Regulator 3 Reverse Stitch Lever 3 Presser Foot Lift Lever 4 Knee Lift 4 Presser Foot Pressure Adjustment Dial 4 Fabric Extension Table 4 Thread Cutter Button 5 Needle Stop Position Button 5 Light Switch 5 Feed Dog Adjustment Knob 5 Changing Needles and Light Bulb 6 Changing the Needle 6 Changing the Feed Pin 6 Changing Light Bulbs 6 Threading 7 Bobbin Winding 7 Bobbin Insertion 9 Upper Threading 10...
Accessories 1 Machine Features 2 Before You Begin 3 Power Cord and Foot Controller 3 Power Switch 3 Thread Tension Dial 3 Hand Wheel 3 Stitch Length Regulator 3 Reverse Stitch Lever 3 Presser Foot Lift Lever 4 Knee Lift 4 Presser Foot Pressure Adjustment Dial 4 Fabric Extension Table 4 Thread Cutter Button 5 Needle Stop Position Button 5 Light Switch 5 Feed Dog Adjustment Knob 5 Changing Needles and Light Bulb 6 Changing the Needle 6 Changing the Feed Pin 6 Changing Light Bulbs 6 Threading 7 Bobbin Winding 7 Bobbin Insertion 9 Upper Threading 10...

User Manual - French
Page 7
r-e Presser Foot Pressure Three Holed Adjustment Dial (Page 4) Thread Guide (Page 10) Light Switch (Page 5) Thread Trimmer ; Sewing Area Light (Page 6) Automatic Needle Threader (Page 10 arid 11) Quick Bobbin / Thread Device (Page 9) Thread Cutter Button (Page 5) Thread Tension Dial (Page 3 and 12) Feed Dogs (Page 5 and 14) Thread Guide Bar (Page 7) Stitch Length Regulator (Page 3) Bobbin Winder (Page 7) Hand Wheel (Page 3) Indicator Lamp Needle Stop Position Button (Page 5) Power Switch (Page 3) Reverse Stitch Lever (Page 3) Power Socket (Page 3) Feed Dog Adjustment Knob ...
r-e Presser Foot Pressure Three Holed Adjustment Dial (Page 4) Thread Guide (Page 10) Light Switch (Page 5) Thread Trimmer ; Sewing Area Light (Page 6) Automatic Needle Threader (Page 10 arid 11) Quick Bobbin / Thread Device (Page 9) Thread Cutter Button (Page 5) Thread Tension Dial (Page 3 and 12) Feed Dogs (Page 5 and 14) Thread Guide Bar (Page 7) Stitch Length Regulator (Page 3) Bobbin Winder (Page 7) Hand Wheel (Page 3) Indicator Lamp Needle Stop Position Button (Page 5) Power Switch (Page 3) Reverse Stitch Lever (Page 3) Power Socket (Page 3) Feed Dog Adjustment Knob ...

User Manual - French
Page 10
... the sewing area on :he toot controller, turning the power off and moving the needle with fabric weights. Feed Dog Adjustment Knob Foot Pressure and Feed Dog Position =EMI -rst -.-(Feed Dogs Down) r-Velvet-••• -g--(Pin Feeding) -.I-Lightweight Fabrics I -i-r Middleweight Fabrics -I. Note If a setting other than Tit is acti- ≥ vated, for example if the thread Needle Stop Position Button becomes tangled, the red lamp flashes. L-Heavyweight Fabrics -D. • Push light switch to your needs. Light...
... the sewing area on :he toot controller, turning the power off and moving the needle with fabric weights. Feed Dog Adjustment Knob Foot Pressure and Feed Dog Position =EMI -rst -.-(Feed Dogs Down) r-Velvet-••• -g--(Pin Feeding) -.I-Lightweight Fabrics I -i-r Middleweight Fabrics -I. Note If a setting other than Tit is acti- ≥ vated, for example if the thread Needle Stop Position Button becomes tangled, the red lamp flashes. L-Heavyweight Fabrics -D. • Push light switch to your needs. Light...

User Manual - French
Page 14
... thread through thread notch and under shuttle race and release the latch lever. bin door, following numbers 0 0 above in place without removing the fabric extension table.) ® Lower slide plate and close bob- Needle Plate , Latch Spring Quick Bobbin Thread Device 0 Thread Notch 0 Bobbin Doo *Bobbin should be skipped. • When the fabric extension table is set securely on * Always use the bobbin case that a length of pulling out the thread can not be positioned so it winds to an appropriate length...
... thread through thread notch and under shuttle race and release the latch lever. bin door, following numbers 0 0 above in place without removing the fabric extension table.) ® Lower slide plate and close bob- Needle Plate , Latch Spring Quick Bobbin Thread Device 0 Thread Notch 0 Bobbin Doo *Bobbin should be skipped. • When the fabric extension table is set securely on * Always use the bobbin case that a length of pulling out the thread can not be positioned so it winds to an appropriate length...

User Manual - French
Page 17
...Upper bobbin messy stitches, puckered seams "- Knit '4--- lit-t - While needle is too tight it may also be used under the foot. © Lower presser foot. C) Lift presser foot, remove fabric and then cut thread. * When using thread cutter: © Press the thread cutter button while the presser foot lever in raised position, insert a test strip from the garment fabric under normal sewing conditions. * Adjust the pressure adjustment dial and the feed dog adjustment knob accord- Thread to increase needle thread tension to reduce bobbin tension Bobbin tension.. (0 Lower...
...Upper bobbin messy stitches, puckered seams "- Knit '4--- lit-t - While needle is too tight it may also be used under the foot. © Lower presser foot. C) Lift presser foot, remove fabric and then cut thread. * When using thread cutter: © Press the thread cutter button while the presser foot lever in raised position, insert a test strip from the garment fabric under normal sewing conditions. * Adjust the pressure adjustment dial and the feed dog adjustment knob accord- Thread to increase needle thread tension to reduce bobbin tension Bobbin tension.. (0 Lower...

User Manual - French
Page 19
... fabric and sew. . C) Make sure needle Is pierced all layers of fabric moving with the feed dog's motion to pin feeding position. (D Adjust pressure adjustment dial until indicator needle is raised. Feed Pin Fabric e a Feed Pin Feed Dog k The feed pin passes up through the fabric, then step gently on the foot controller to begin. * At the beginning and end of a seam, press down the reverse stitch lever and backstitch about 15 cm of upper and bobbin thread under and behind foot, and position fabric under foot. C) Lift presser foot and remove fabric...
... fabric and sew. . C) Make sure needle Is pierced all layers of fabric moving with the feed dog's motion to pin feeding position. (D Adjust pressure adjustment dial until indicator needle is raised. Feed Pin Fabric e a Feed Pin Feed Dog k The feed pin passes up through the fabric, then step gently on the foot controller to begin. * At the beginning and end of a seam, press down the reverse stitch lever and backstitch about 15 cm of upper and bobbin thread under and behind foot, and position fabric under foot. C) Lift presser foot and remove fabric...
User Manual - French
Page 25
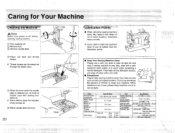
... Foot Lift Knee control One 6 mm Two 9 mm Over 10 mm _9tem Height of feed dog Specification 0.7 mm 1.1 mm Height of lower needle 3 mm - 3.5 mm Needles that may be swept ou through the bobbin door. 0 When the area under the needle plate is very dirty, wipe with a dry cloth. • Precautions Please keep machine out of direct sunlight. - If sewing machine is cleaned out, oil hook of bobbin case with sewing machine oil. * Use...
... Foot Lift Knee control One 6 mm Two 9 mm Over 10 mm _9tem Height of feed dog Specification 0.7 mm 1.1 mm Height of lower needle 3 mm - 3.5 mm Needles that may be swept ou through the bobbin door. 0 When the area under the needle plate is very dirty, wipe with a dry cloth. • Precautions Please keep machine out of direct sunlight. - If sewing machine is cleaned out, oil hook of bobbin case with sewing machine oil. * Use...

User Manual - French
Page 26
... auto- Adjust stitch length. Nil' 11:O1lean and oil the machine. I Automatic Needle 1Threader Doesn't Work Needle is not inserted orrectly. Trouble Shooting Before taking your sewing machine in Seam (itch length is too short. Reduce tension [mproper fabric/needle/ ,read is incorrect. Skipped Stitches Needle is not raised II the way up. Reduce tension. Reduce tension. he foot controller has o p. Clean feed dog and bobbin case. Re-thread machine prccerly. 010." al an ▪c3' 30 Fp' 2: F. 5. Change needles Area under needle plate deeds...
... auto- Adjust stitch length. Nil' 11:O1lean and oil the machine. I Automatic Needle 1Threader Doesn't Work Needle is not inserted orrectly. Trouble Shooting Before taking your sewing machine in Seam (itch length is too short. Reduce tension [mproper fabric/needle/ ,read is incorrect. Skipped Stitches Needle is not raised II the way up. Reduce tension. Reduce tension. he foot controller has o p. Clean feed dog and bobbin case. Re-thread machine prccerly. 010." al an ▪c3' 30 Fp' 2: F. 5. Change needles Area under needle plate deeds...


