
Users Manual - English
Page 1
SEWING MACHINE MACHINE À COUDRE PQ1500S OPERATION MANUAL MANUEL D'UTILISATION
SEWING MACHINE MACHINE À COUDRE PQ1500S OPERATION MANUAL MANUEL D'UTILISATION

Users Manual - English
Page 2
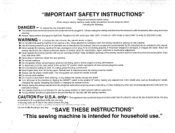
...the nearest authorized dealer or service center for examination, repair, electrical or mechanical adjustment. G Always unplug the sewing machine from the electrical outlet immediately after using a sewing machine, basic safety precautions should be taken, DANGER - CAUTION For U.S.A. If the plug does not fit fully... any other ) to fit in the instruction manual. G Use this manual. Use only accessories recommended by or near children. Return the sewing machine to break. G Never drop or insert any way. G Do not operate where aerosol (spray) products are being administered. G To...
...the nearest authorized dealer or service center for examination, repair, electrical or mechanical adjustment. G Always unplug the sewing machine from the electrical outlet immediately after using a sewing machine, basic safety precautions should be taken, DANGER - CAUTION For U.S.A. If the plug does not fit fully... any other ) to fit in the instruction manual. G Use this manual. Use only accessories recommended by or near children. Return the sewing machine to break. G Never drop or insert any way. G Do not operate where aerosol (spray) products are being administered. G To...

Users Manual - English
Page 3
... If your plug, proceed as marked on plug. carrying the mark, rating as follows. The wire which is coloured brown must be fitted in your sewing machine is fitted with the fuse cover omitted. Always replace the fuse cover, never use a fuse approved by ASTA to the terminal which is hazardous if...
... If your plug, proceed as marked on plug. carrying the mark, rating as follows. The wire which is coloured brown must be fitted in your sewing machine is fitted with the fuse cover omitted. Always replace the fuse cover, never use a fuse approved by ASTA to the terminal which is hazardous if...

Users Manual - English
Page 4
... only neutral soaps or detergents to assure correct installation. G Remember to inspect and adjust the machine yourself. If the problem persists, please consult your sewing machine, avoid direct sunlight and high humidity locations. CONGRATULATIONS ON CHOOSING A BROTHER SEWING MACHINE Your machine is one of the operation manual to turn off the power switch and unplug the cord...
... only neutral soaps or detergents to assure correct installation. G Remember to inspect and adjust the machine yourself. If the problem persists, please consult your sewing machine, avoid direct sunlight and high humidity locations. CONGRATULATIONS ON CHOOSING A BROTHER SEWING MACHINE Your machine is one of the operation manual to turn off the power switch and unplug the cord...

Users Manual - English
Page 6
...-001 148475-001 XA7258-001 XA7255-201 XA7253-001 XA7256-001 XC1220-051 XC1387-051 Note Foot controller: Model P This foot controller is used for sewing machine model PQ1500S. 1
...-001 148475-001 XA7258-001 XA7255-201 XA7253-001 XA7256-001 XC1220-051 XC1387-051 Note Foot controller: Model P This foot controller is used for sewing machine model PQ1500S. 1

Users Manual - English
Page 8
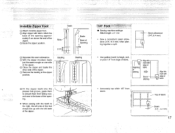
...Power Cord Foot Controller Power Switch I " position to turn tension dial to the left. Stitch Length Regulator Reverse Stitch Lever 3 G Plug foot controller into machine. G To switch power off, flip switch to the right. Upper Thread Tension Loosen Tighten Tension Block Hand Wheel G Position needle using stitch regulator dial.... G Adjust desired stitch length using hand wheel. ✽ Always turn the tension dial to "O" position. G When looser thread tension is used for sewing machine model PQ1500S. Upper and bobbin threads will then meet on wrong side of the fabric.
...Power Cord Foot Controller Power Switch I " position to turn tension dial to the left. Stitch Length Regulator Reverse Stitch Lever 3 G Plug foot controller into machine. G To switch power off, flip switch to the right. Upper Thread Tension Loosen Tighten Tension Block Hand Wheel G Position needle using stitch regulator dial.... G Adjust desired stitch length using hand wheel. ✽ Always turn the tension dial to "O" position. G When looser thread tension is used for sewing machine model PQ1500S. Upper and bobbin threads will then meet on wrong side of the fabric.
Users Manual - English
Page 11
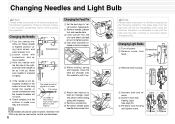
Changing Needles and Light Bulb Note Please make sure power is off . Changing the Needle 1 Turn the sewing machine off before carrying out the following operation. The needle should be used under normal circumstances. 6 Changing the Feed Pin 1 Set the feed dogs to "velvet" ... in diagram. 5 While holding spring with fingertip, lower the feed pin changer onto the needle to pick it is advisable to highest position using the machine, therefore it up. 6 Attach new feed pin to feed pin changer, lower and attach while holding spring with the flat side to a surface. Screwdriver &#...
Changing Needles and Light Bulb Note Please make sure power is off . Changing the Needle 1 Turn the sewing machine off before carrying out the following operation. The needle should be used under normal circumstances. 6 Changing the Feed Pin 1 Set the feed dogs to "velvet" ... in diagram. 5 While holding spring with fingertip, lower the feed pin changer onto the needle to pick it is advisable to highest position using the machine, therefore it up. 6 Attach new feed pin to feed pin changer, lower and attach while holding spring with the flat side to a surface. Screwdriver &#...

Users Manual - English
Page 17
...thread cutter: 5 Press the thread cutter button while the presser foot lever in raised position, insert a test strip from the garment fabric under normal sewing conditions. ✽ Adjust the pressure adjustment dial and the feed dog adjustment knob accord- Proper When it is in the down position. 6 Lift foot... then step gently on knit fabrics such as messy stitches, puckered seams Upper Thread and thread breakage. ing to the chart on the sewing machine. ✽ When sewing on the foot controller to begin. 5 Turn the hand wheel towards you are working with knit fabrics.
...thread cutter: 5 Press the thread cutter button while the presser foot lever in raised position, insert a test strip from the garment fabric under normal sewing conditions. ✽ Adjust the pressure adjustment dial and the feed dog adjustment knob accord- Proper When it is in the down position. 6 Lift foot... then step gently on knit fabrics such as messy stitches, puckered seams Upper Thread and thread breakage. ing to the chart on the sewing machine. ✽ When sewing on the foot controller to begin. 5 Turn the hand wheel towards you are working with knit fabrics.

Users Manual - English
Page 22
... Fit the zipper teeth into the presser foot groove, guide them to the right, the left teeth of the zipper. 1/4" Foot G Sewing machine settings: Stitch length = 2 - 2.5 • Sew a consistent seam allowance (1/4", 6.4 mm) when piecing together a quilt. Top of the zipper. 7 Remove the basting at the zipper ...position. Seam allowance (1/4", 6.4 mm) • Use guides (mark) to begin, end, or pivot 1/4" from falling over, and sew to the base of the opening approximately 2 cm above the end of the zipper. 3 Baste the zipper position. Invisible Zipper Foot 1 Attach...
... Fit the zipper teeth into the presser foot groove, guide them to the right, the left teeth of the zipper. 1/4" Foot G Sewing machine settings: Stitch length = 2 - 2.5 • Sew a consistent seam allowance (1/4", 6.4 mm) when piecing together a quilt. Top of the zipper. 7 Remove the basting at the zipper ...position. Seam allowance (1/4", 6.4 mm) • Use guides (mark) to begin, end, or pivot 1/4" from falling over, and sew to the base of the opening approximately 2 cm above the end of the zipper. 3 Baste the zipper position. Invisible Zipper Foot 1 Attach...
Users Manual - English
Page 25
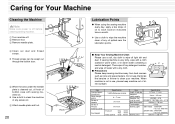
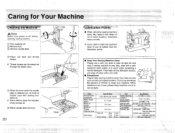
...the lubrication points. Then wipe off any detergent residue, and wipe off light dirt and dust. Caring for Your Machine Cleaning the Machine Note Make sure power is off before cleaning sewing machine. 1 Turn machine off. 2 Remove foot. 3 Remove needle plate. 4 Clean out dust and thread scraps. ✽ Thread ... needle plate is cleaned out, oil hook of bobbin case with sewing machine oil. ✽ Use a cloth to clean the machine of any excess oil. 6 Attach needle plate and foot. 20 Hook Lubrication Points G When using the sewing machine every day, apply a few drops of oil to each location ...
...the lubrication points. Then wipe off any detergent residue, and wipe off light dirt and dust. Caring for Your Machine Cleaning the Machine Note Make sure power is off before cleaning sewing machine. 1 Turn machine off. 2 Remove foot. 3 Remove needle plate. 4 Clean out dust and thread scraps. ✽ Thread ... needle plate is cleaned out, oil hook of bobbin case with sewing machine oil. ✽ Use a cloth to clean the machine of any excess oil. 6 Attach needle plate and foot. 20 Hook Lubrication Points G When using the sewing machine every day, apply a few drops of oil to each location ...

Users Manual - English
Page 26
.../needle/ thread combination. Rethread. 10 If you still cannot find the problem, please take your sewing machine into the shop where you purchased it, or your nearest Brother dealer for the right needle to make sure the machine's plugged in for the right needle to be cleaned. Reduce tension. 12 Needle is bent, or...
.../needle/ thread combination. Rethread. 10 If you still cannot find the problem, please take your sewing machine into the shop where you purchased it, or your nearest Brother dealer for the right needle to make sure the machine's plugged in for the right needle to be cleaned. Reduce tension. 12 Needle is bent, or...
User Manual - French
Page 2
...ho n " fl°t "SAVE THESE INSTRUCTIONS" Do not modify the plug in the outlet, reverse the plug. !f !: at:!! Always unplug the sewing machine from the accumulation of electric shock, this plug is not intended for 220-240V model. To unplug, grasp the plug, not the cord. • ...This appliance has a polarized plug (one way. "IMPORTANT SAFETY INSTRUCTIONS" "Read all moving parts. When using ." Close attention is necessary when the sewing machine is used as described in . CAUTION For U.S.A. If the plug does not fit fully in any opening. • Do not use outdoors. &#...
...ho n " fl°t "SAVE THESE INSTRUCTIONS" Do not modify the plug in the outlet, reverse the plug. !f !: at:!! Always unplug the sewing machine from the accumulation of electric shock, this plug is not intended for 220-240V model. To unplug, grasp the plug, not the cord. • ...This appliance has a polarized plug (one way. "IMPORTANT SAFETY INSTRUCTIONS" "Read all moving parts. When using ." Close attention is necessary when the sewing machine is used as described in . CAUTION For U.S.A. If the plug does not fit fully in any opening. • Do not use outdoors. &#...

User Manual - French
Page 3
.... In the event of replacing the plug fuse, use plugs with this appliance may not correspond with the coloured markings identifying the terminals in your sewing machine is fitted with a three-pin non-rewireable BS plug then please read the following code: Blue Neutral Brown Live As the colours of the wiring...
.... In the event of replacing the plug fuse, use plugs with this appliance may not correspond with the coloured markings identifying the terminals in your sewing machine is fitted with a three-pin non-rewireable BS plug then please read the following code: Blue Neutral Brown Live As the colours of the wiring...
User Manual - French
Page 4
... operation • Be sure to watch the placement of the finest sewing machines available for your sewing machine, avoid direct sunlight and high humidity locations. To find out the name and phone number for home use extension cords. • CONGRATULATIONS ON CHOOSING A BROTHER SEWING MACHINE Your machine is one of your hands in the back of the operation...
... operation • Be sure to watch the placement of the finest sewing machines available for your sewing machine, avoid direct sunlight and high humidity locations. To find out the name and phone number for home use extension cords. • CONGRATULATIONS ON CHOOSING A BROTHER SEWING MACHINE Your machine is one of your hands in the back of the operation...

User Manual - French
Page 6
... Seam Guide XA7256-001 21 Foot Controller XC1220-051 22 Fabric Extension Table XC1387-051 Note Foot controller: Model P This foot controller is used for sewing machine model PQ1500S. 1
... Seam Guide XA7256-001 21 Foot Controller XC1220-051 22 Fabric Extension Table XC1387-051 Note Foot controller: Model P This foot controller is used for sewing machine model PQ1500S. 1

User Manual - French
Page 8
...controller: Model P This foot controller is used for sewing machine model PO15005. - _ Power Switch • Flip power switch to "I ThreadTension Upper Thread Tension • When tighter thread tension is in cord. • Plug foot controller into machine. the fabric. • When looser thread tension ...is possible ; Reverse Stitch Lever 3 sired, turn hand wheel towards , you. the way down when reverse sew- Tension Block Tighten Hand Wheel • Position needle ...
...controller: Model P This foot controller is used for sewing machine model PO15005. - _ Power Switch • Flip power switch to "I ThreadTension Upper Thread Tension • When tighter thread tension is in cord. • Plug foot controller into machine. the fabric. • When looser thread tension ...is possible ; Reverse Stitch Lever 3 sired, turn hand wheel towards , you. the way down when reverse sew- Tension Block Tighten Hand Wheel • Position needle ...

User Manual - French
Page 17
... © Press the thread cutter button while the presser foot lever in raised position, insert a test strip from the garment fabric under normal sewing conditions. * Adjust the pressure adjustment dial and the feed dog adjustment knob accord- Adjust bobbin thread to match that of upper thread. (If...et Fats Lower Thread Upper \- ilet art C) Set stitch length regulator to their highest positions. ing to the chart on the sewing machine. * When sewing on the foot controller to raise the needle and thread take-up .) Correct thread tension Fabric Upper Threw one side of upper and...
... © Press the thread cutter button while the presser foot lever in raised position, insert a test strip from the garment fabric under normal sewing conditions. * Adjust the pressure adjustment dial and the feed dog adjustment knob accord- Adjust bobbin thread to match that of upper thread. (If...et Fats Lower Thread Upper \- ilet art C) Set stitch length regulator to their highest positions. ing to the chart on the sewing machine. * When sewing on the foot controller to raise the needle and thread take-up .) Correct thread tension Fabric Upper Threw one side of upper and...
User Manual - French
Page 22
... at , End of stitching Align this J mark with edge of Beginning fabric of stitching p--at the zipper I position. Basting Basting • Sewing machine settings: Stitch length = 2 - 2.5 • Sew a consistent seam allowance (1/4", 6.4 mm) when piecing together a quilt. " •11KOPOTIMAN:•••Ii•I Baste Base of 1...fabric ® Fit the zipper teeth into the presser foot groove, guide them 1 to prevent them from falling over, and sew to the base of the opening approximately 2 cm above the end of the zipper. it-Align this mark with the left teeth...
... at , End of stitching Align this J mark with edge of Beginning fabric of stitching p--at the zipper I position. Basting Basting • Sewing machine settings: Stitch length = 2 - 2.5 • Sew a consistent seam allowance (1/4", 6.4 mm) when piecing together a quilt. " •11KOPOTIMAN:•••Ii•I Baste Base of 1...fabric ® Fit the zipper teeth into the presser foot groove, guide them 1 to prevent them from falling over, and sew to the base of the opening approximately 2 cm above the end of the zipper. it-Align this mark with the left teeth...
User Manual - French
Page 25
... soaked in warm water, or in use a soft, dry cloth to clean your machine. Then wipe off any detergent residue, and wipe off water with sewing machine oil. * Use a cloth to clean the machine of any excess oil. ® Attach needle plate and foot. 20 tri Hook FLubrication...0 tr, * Use a cloth to wipe the machine clean of direct sunlight. - III Keep Your Sewing Machine Clean Please use , please keep sewing machine away from heat sources such as irons and space heaters. CaringAor ipur =bine ing the lilaehTne AO. If sewing machine is not in warm water containing a neutral detergent. ...
... soaked in warm water, or in use a soft, dry cloth to clean your machine. Then wipe off any detergent residue, and wipe off water with sewing machine oil. * Use a cloth to clean the machine of any excess oil. ® Attach needle plate and foot. 20 tri Hook FLubrication...0 tr, * Use a cloth to wipe the machine clean of direct sunlight. - III Keep Your Sewing Machine Clean Please use , please keep sewing machine away from heat sources such as irons and space heaters. CaringAor ipur =bine ing the lilaehTne AO. If sewing machine is not in warm water containing a neutral detergent. ...

User Manual - French
Page 26
.... read is PI' dulled. tread is out of oil. • Noisy Clean feed dog and bobbin case. rang needle. ISewing Machine Doesn't Run / n'e power isn't on p.12. -look of sewing foot is ncorrect. achine's not plugged in lightweight fabric Adjust feed dogs. Nil' 11:O1lean and oil the... Loop in for the thread you are using . See chart on p.12 to choose the Oil ' EP, needle that best fits your sewing machine in Seam (itch length is too high. Using the automatic needle gh... Thread Breakage Upper threading is not attached orrectl . Needle Needle is...
.... read is PI' dulled. tread is out of oil. • Noisy Clean feed dog and bobbin case. rang needle. ISewing Machine Doesn't Run / n'e power isn't on p.12. -look of sewing foot is ncorrect. achine's not plugged in lightweight fabric Adjust feed dogs. Nil' 11:O1lean and oil the... Loop in for the thread you are using . See chart on p.12 to choose the Oil ' EP, needle that best fits your sewing machine in Seam (itch length is too high. Using the automatic needle gh... Thread Breakage Upper threading is not attached orrectl . Needle Needle is...


