
Users Manual - English
Page 4
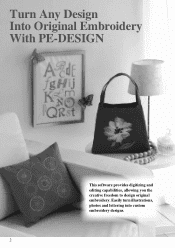
Easily turn illustrations, photos and lettering into custom embroidery designs. 2 Turn Any Design Into Original Embroidery With PE-DESIGN This software provides digitizing and editing capabilities, allowing you the creative freedom to design original embroidery.
Easily turn illustrations, photos and lettering into custom embroidery designs. 2 Turn Any Design Into Original Embroidery With PE-DESIGN This software provides digitizing and editing capabilities, allowing you the creative freedom to design original embroidery.
Users Manual - English
Page 14
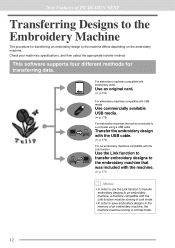
... was included with the machine. (☞ p. 177) b Memo: • In order to use the Link function to transfer embroidery designs to an embroidery machine, a machine compatible with the Link function must be running in Link mode. • In order to the machine... machine. New Features of an embroidery machine, the machine must be running in normal mode. 12 This software supports four different methods for transferring an embroidery design to save embroidery designs in the memory of PE-DESIGN NEXT Transferring Designs to the Embroidery Machine The procedure for transferring data.
... was included with the machine. (☞ p. 177) b Memo: • In order to use the Link function to transfer embroidery designs to an embroidery machine, a machine compatible with the Link function must be running in Link mode. • In order to the machine... machine. New Features of an embroidery machine, the machine must be running in normal mode. 12 This software supports four different methods for transferring an embroidery design to save embroidery designs in the memory of PE-DESIGN NEXT Transferring Designs to the Embroidery Machine The procedure for transferring data.
Users Manual - English
Page 15
...PE-DESIGN NEXT 9 Table of Contents 13 How To Use Manuals 15 Support/Service 16 Online Registration 16 Checking for the Latest Version of the Program 17 Starting Up/Exiting Applications 18 Starting Up Application 18 Exiting Applications 18 Understanding Windows 19 Layout & Editing Window 19 Specifying Basic Software... Settings 22 Getting Started 23 Tutorial 1: Getting Started 24 Basic Layout & Editing Operations 31 Tutorial 2: Drawing shapes to create an embroidery design 32 Drawing Shapes 39 Editing Embroidery Designs 50 Applying Sewing ...
...PE-DESIGN NEXT 9 Table of Contents 13 How To Use Manuals 15 Support/Service 16 Online Registration 16 Checking for the Latest Version of the Program 17 Starting Up/Exiting Applications 18 Starting Up Application 18 Exiting Applications 18 Understanding Windows 19 Layout & Editing Window 19 Specifying Basic Software... Settings 22 Getting Started 23 Tutorial 1: Getting Started 24 Basic Layout & Editing Operations 31 Tutorial 2: Drawing shapes to create an embroidery design 32 Drawing Shapes 39 Editing Embroidery Designs 50 Applying Sewing ...
Users Manual - English
Page 17
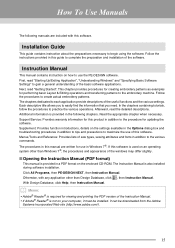
... instruction about the preparations necessary to use the PE-DESIGN software. Follow the instructions provided in this software. Next, read "Starting Up/Exiting Application", "Understanding Windows" and "Specifying Basic Software Settings" to complete the preparation and installation of the basic software applications. Additional information is also installed during software installation. Read the appropriate chapter when necessary. Otherwise...
... instruction about the preparations necessary to use the PE-DESIGN software. Follow the instructions provided in this software. Next, read "Starting Up/Exiting Application", "Understanding Windows" and "Specifying Basic Software Settings" to complete the preparation and installation of the basic software applications. Additional information is also installed during software installation. Read the appropriate chapter when necessary. Otherwise...
Users Manual - English
Page 18
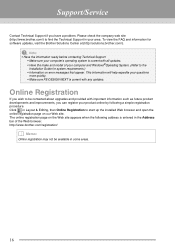
...will help expedite your questions more quickly. • Make sure PE-DESIGN NEXT is current with all updates. • Have the make and model of the Web browser. Please check the company web site (http://www.brother.com/) to find the Technical Support in your computer's operating ...entered in the Address bar of your computer and Windows®Operating System. (Refer to the Installation Guide for software updates, visit the Brother Solutions Center at (http://solutions.brother.com/). a Note: • Have the information ready before contacting Technical Support. • Make sure your area....
...will help expedite your questions more quickly. • Make sure PE-DESIGN NEXT is current with all updates. • Have the make and model of the Web browser. Please check the company web site (http://www.brother.com/) to find the Technical Support in your computer's operating ...entered in the Address bar of your computer and Windows®Operating System. (Refer to the Installation Guide for software updates, visit the Brother Solutions Center at (http://solutions.brother.com/). a Note: • Have the information ready before contacting Technical Support. • Make sure your area....

Users Manual - English
Page 83
...type of a previous software version, saved .pes files can be exported as a file of a different format (.dst, .hus, .exp, .pcs, .vip, .sew, .jef, .csd, .xxx, and .shv). 1. Click Save to stitch pattern. 3. Click 1, then 2 1 2 2. Select the drive and the folder, and then type in the Design Page can be opened... with a new name 1. however, all saved designs will be converted to save the data. The new file name appears in the title bar of the software; Basic Layout & Editing Operations Saving and Printing ...
...type of a previous software version, saved .pes files can be exported as a file of a different format (.dst, .hus, .exp, .pcs, .vip, .sew, .jef, .csd, .xxx, and .shv). 1. Click Save to stitch pattern. 3. Click 1, then 2 1 2 2. Select the drive and the folder, and then type in the Design Page can be opened... with a new name 1. however, all saved designs will be converted to save the data. The new file name appears in the title bar of the software; Basic Layout & Editing Operations Saving and Printing ...

Users Manual - English
Page 140
...will be pasted into the Design Page at : C:\Program Files (Program Files (x86)) \Brother\PE-DESIGN NEXT\ClipArt Importing image from a scanner (TWAIN Device) b Memo: TWAIN is an application interface (API) standardization for software that controls scanners and ... box appears. 5. a Note: For information on using the driver interface, refer to select it. First, install the driver software for importing an image, and then import the image. Creating a portrait image 1. Click 1, then 2, then 3. 1 2... the ClipArt folder (in the folder where PE-DESIGN was installed) at its original size.
...will be pasted into the Design Page at : C:\Program Files (Program Files (x86)) \Brother\PE-DESIGN NEXT\ClipArt Importing image from a scanner (TWAIN Device) b Memo: TWAIN is an application interface (API) standardization for software that controls scanners and ... box appears. 5. a Note: For information on using the driver interface, refer to select it. First, install the driver software for importing an image, and then import the image. Creating a portrait image 1. Click 1, then 2, then 3. 1 2... the ClipArt folder (in the folder where PE-DESIGN was installed) at its original size.
Users Manual - English
Page 157
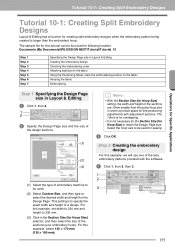
...to specify the exact width and height of a design. For this example, set width to 230 mm and height to provide space for fine positioning adjustments with the software. 1 Click 1, then 2, then 3. 1 2 3 155 Documents (My Documents)\PE-DESIGN NEXT\Tutorial\Tutorial_10 Step 1 Step 2 Step ...3 Step 4 Step 5 Step 6 Step 7 Specifying the Design Page size in Layout & Editing Creating the embroidery design Checking the embroidering ...
...to specify the exact width and height of a design. For this example, set width to 230 mm and height to provide space for fine positioning adjustments with the software. 1 Click 1, then 2, then 3. 1 2 3 155 Documents (My Documents)\PE-DESIGN NEXT\Tutorial\Tutorial_10 Step 1 Step 2 Step ...3 Step 4 Step 5 Step 6 Step 7 Specifying the Design Page size in Layout & Editing Creating the embroidery design Checking the embroidering ...

Users Manual - English
Page 169
.... 1 Click 1. 1 167 Documents (My Document)\PE-DESIGN NEXT\Tutorial\Tutorial_10 Then, select the file ChristmasTree.pes and import it is split. Operations for Specific Applications Tutorial 10-3: Embroidering With the Jumbo Frame 3 The Design Page appears on the screen as shown below . ...1 First, import a pattern. If the pattern arranged in the procedure described below . (1) (2) (1) Side 1 embroidering area: Area embroidered first (2) Side 2 embroidering area: Area embroidered second The embroidery pattern is split with this software...
.... 1 Click 1. 1 167 Documents (My Document)\PE-DESIGN NEXT\Tutorial\Tutorial_10 Then, select the file ChristmasTree.pes and import it is split. Operations for Specific Applications Tutorial 10-3: Embroidering With the Jumbo Frame 3 The Design Page appears on the screen as shown below . ...1 First, import a pattern. If the pattern arranged in the procedure described below . (1) (2) (1) Side 1 embroidering area: Area embroidered first (2) Side 2 embroidering area: Area embroidered second The embroidery pattern is split with this software...
Installation Guide English - English
Page 4
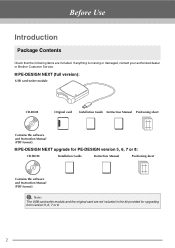
... following items are not included in the kit provided for PE-DESIGN version 5, 6, 7 or 8: CD-ROM Installation Guide Instruction Manual Positioning sheet Contains the software and Instruction Manual (PDF format). If anything is missing or damaged, contact your authorized dealer or Brother Customer Service. ■ PE-DESIGN NEXT (full version): USB card writer module CD-ROM...
... following items are not included in the kit provided for PE-DESIGN version 5, 6, 7 or 8: CD-ROM Installation Guide Instruction Manual Positioning sheet Contains the software and Instruction Manual (PDF format). If anything is missing or damaged, contact your authorized dealer or Brother Customer Service. ■ PE-DESIGN NEXT (full version): USB card writer module CD-ROM...
Installation Guide English - English
Page 6
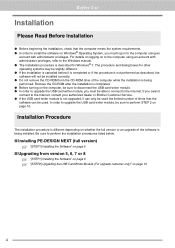
...listed below. ■ Installing PE-DESIGN NEXT (full version) c "[STEP1] Installing the Software" on page 6 ■ Upgrading from the CD-ROM drive of the computer while the installation is being installed. If you cannot connect to the Internet, contact your authorized dealer or Brother Customer Service. ● ...If the USB card writer module is not upgraded, it is completed or if the procedure is not performed as described, the software will not be installed correctly. ● Do not remove...
...listed below. ■ Installing PE-DESIGN NEXT (full version) c "[STEP1] Installing the Software" on page 6 ■ Upgrading from the CD-ROM drive of the computer while the installation is being installed. If you cannot connect to the Internet, contact your authorized dealer or Brother Customer Service. ● ...If the USB card writer module is not upgraded, it is completed or if the procedure is not performed as described, the software will not be installed correctly. ● Do not remove...

Installation Guide English - English
Page 11
The card writer may now be connected to complete the installation of the software. Click Install to install the application. → When the installation is necessary to restart the computer. 9 Make sure that PE-DESIGN NEXT starts up correctly. Before Use 7. Click Finish to your computer. a Note: This procedure also automatically installs the card writer driver. b Memo: If the dialog box calling for restarting the computer appears, it is completed, the following dialog box appears. 8.
The card writer may now be connected to complete the installation of the software. Click Install to install the application. → When the installation is necessary to restart the computer. 9 Make sure that PE-DESIGN NEXT starts up correctly. Before Use 7. Click Finish to your computer. a Note: This procedure also automatically installs the card writer driver. b Memo: If the dialog box calling for restarting the computer appears, it is completed, the following dialog box appears. 8.

