
Users Manual - English
Page 15
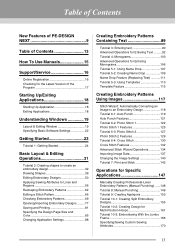
Table of Contents New Features of PE-DESIGN NEXT 9 Table of Contents 13 How To Use Manuals 15 Support/Service 16 Online Registration 16 Checking for the Latest Version of ... Operations for Specific Applications 147 Manually Creating Professional-Level Embroidery Patterns (Manual Punching).......148 Tutorial 8: Manual Punching 149 Tutorial 9: Creating Appliqués 153 Tutorial 10-1: Creating Split Embroidery Designs 155 Tutorial 10-2: Creating Design for Multi-Position Hoops 161 Tutorial 10-3: Embroidering With the Jumbo Frame 166 Specifying/Saving Custom Sewing Attributes 170 13
Table of Contents New Features of PE-DESIGN NEXT 9 Table of Contents 13 How To Use Manuals 15 Support/Service 16 Online Registration 16 Checking for the Latest Version of ... Operations for Specific Applications 147 Manually Creating Professional-Level Embroidery Patterns (Manual Punching).......148 Tutorial 8: Manual Punching 149 Tutorial 9: Creating Appliqués 153 Tutorial 10-1: Creating Split Embroidery Designs 155 Tutorial 10-2: Creating Design for Multi-Position Hoops 161 Tutorial 10-3: Embroidering With the Jumbo Frame 166 Specifying/Saving Custom Sewing Attributes 170 13
Users Manual - English
Page 17
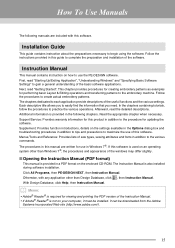
...If this software. Next, read the detailed descriptions. Menus/Tools and Reference: Provides lists of the software. Click All Programs, then PE-DESIGN NEXT, then Instruction Manual. Otherwise, with this software is provided in addition to begin using the software. How To Use Manuals The...computer, it must be downloaded from the Adobe Systems Incorporated Web site (http://www.adobe.com/). 15 In the chapters containing tutorials, follow the procedures to the embroidery machine. It can be installed. Instruction Manual This manual contains instruction on the settings available...
...If this software. Next, read the detailed descriptions. Menus/Tools and Reference: Provides lists of the software. Click All Programs, then PE-DESIGN NEXT, then Instruction Manual. Otherwise, with this software is provided in addition to begin using the software. How To Use Manuals The...computer, it must be downloaded from the Adobe Systems Incorporated Web site (http://www.adobe.com/). 15 In the chapters containing tutorials, follow the procedures to the embroidery machine. It can be installed. Instruction Manual This manual contains instruction on the settings available...
Users Manual - English
Page 20
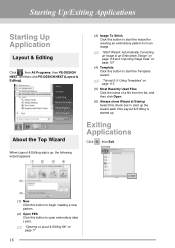
Starting Up/Exiting Applications Starting Up Application Layout & Editing Click , then All Programs, then PE-DESIGN NEXT, and then click PE-DESIGN NEXT (Layout & Editing). (3) Image To Stitch Click this button to start up the wizard each time Layout & Editing is started up , the following ... When Layout & Editing starts up . c "Opening a Layout & Editing file" on page 137 (4) Template Click this button to open embroidery data (.pes). c "Tutorial 5-3: Using Templates" on page 113 (5) Most Recently Used Files Click the name of a file from the list, and then click Open. (6) Always ...
Starting Up/Exiting Applications Starting Up Application Layout & Editing Click , then All Programs, then PE-DESIGN NEXT, and then click PE-DESIGN NEXT (Layout & Editing). (3) Image To Stitch Click this button to start up the wizard each time Layout & Editing is started up , the following ... When Layout & Editing starts up . c "Opening a Layout & Editing file" on page 137 (4) Template Click this button to open embroidery data (.pes). c "Tutorial 5-3: Using Templates" on page 113 (5) Most Recently Used Files Click the name of a file from the list, and then click Open. (6) Always ...
Users Manual - English
Page 26
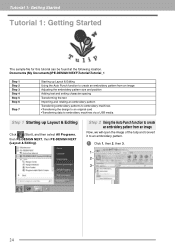
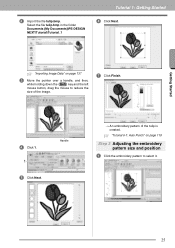
Documents (My Documents)\PE-DESIGN NEXT\Tutorial\Tutorial_1 Step 1 Step 2 Step 3 Step 4 Step 5 Step 6 Step 7 Starting up Layout & Editing Using the Auto Punch function to create an embroidery pattern from an image ... the tulip and convert it to embroidery machines via a USB media Step 1 Starting up Layout & Editing Click (Start), and then select All Programs, then PE-DESIGN NEXT, then PE-DESIGN NEXT (Layout & Editing). Step 2 Using the Auto Punch function to create an embroidery pattern from an image Adjusting the embroidery pattern size and position...
Documents (My Documents)\PE-DESIGN NEXT\Tutorial\Tutorial_1 Step 1 Step 2 Step 3 Step 4 Step 5 Step 6 Step 7 Starting up Layout & Editing Using the Auto Punch function to create an embroidery pattern from an image ... the tulip and convert it to embroidery machines via a USB media Step 1 Starting up Layout & Editing Click (Start), and then select All Programs, then PE-DESIGN NEXT, then PE-DESIGN NEXT (Layout & Editing). Step 2 Using the Auto Punch function to create an embroidery pattern from an image Adjusting the embroidery pattern size and position...
Users Manual - English
Page 27
... embroidery pattern to reduce the size of the tulip is created. Select the file tulip.bmp in the folder Documents (My Documents)\PE-DESIGN NEXT\Tutorial\Tutorial_1 Tutorial 1: Getting Started 6 Click Next. c "Tutorial 6-1: Auto Punch" on page 137 3 Move the pointer over a handle, and then, while holding down the Shift key and the left mouse...
... embroidery pattern to reduce the size of the tulip is created. Select the file tulip.bmp in the folder Documents (My Documents)\PE-DESIGN NEXT\Tutorial\Tutorial_1 Tutorial 1: Getting Started 6 Click Next. c "Tutorial 6-1: Auto Punch" on page 137 3 Move the pointer over a handle, and then, while holding down the Shift key and the left mouse...

Users Manual - English
Page 34
... to stitching Editing points and modifying shapes Step 1 Drawing and moving shapes We will draw the stem, leaves, flower and flower pot. Documents (My Documents)\PE-DESIGN NEXT\Tutorial\Tutorial_2 Step 1 Step 2 Step 3 Step 4 Step 5 Drawing and moving shapes Duplicating, flipping and moving shapes Specifying hole sewing Applying a pattern to draw various shapes...
... to stitching Editing points and modifying shapes Step 1 Drawing and moving shapes We will draw the stem, leaves, flower and flower pot. Documents (My Documents)\PE-DESIGN NEXT\Tutorial\Tutorial_2 Step 1 Step 2 Step 3 Step 4 Step 5 Drawing and moving shapes Duplicating, flipping and moving shapes Specifying hole sewing Applying a pattern to draw various shapes...

Users Manual - English
Page 92
Documents (My Documents)\PE-DESIGN NEXT\Tutorial\Tutorial_3 Step 1 Step 2 Entering Text Transforming text Step 1 Entering Text 123 From the keyboard, type in the Transform style with a fan shape. b Memo: Text can be entered by clicking characters in the character table (1) in the Text Attributes tab. 12 Click in the Design page. (1) A vertical dashed...
Documents (My Documents)\PE-DESIGN NEXT\Tutorial\Tutorial_3 Step 1 Step 2 Entering Text Transforming text Step 1 Entering Text 123 From the keyboard, type in the Transform style with a fan shape. b Memo: Text can be entered by clicking characters in the character table (1) in the Text Attributes tab. 12 Click in the Design page. (1) A vertical dashed...
Users Manual - English
Page 105
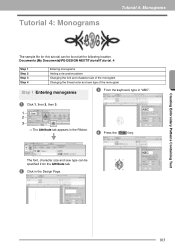
... be found at the following location. Creating Embroidery Patterns Containing Text 103 Documents (My Documents)\PE-DESIGN NEXT\Tutorial\Tutorial_4 Step 1 Step 2 Step 3 Step 4 Entering monograms Adding a decorative pattern Changing the font and character size of the monogram Changing the thread color and sew ...
... be found at the following location. Creating Embroidery Patterns Containing Text 103 Documents (My Documents)\PE-DESIGN NEXT\Tutorial\Tutorial_4 Step 1 Step 2 Step 3 Step 4 Entering monograms Adding a decorative pattern Changing the font and character size of the monogram Changing the thread color and sew ...
Users Manual - English
Page 109
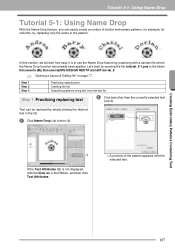
... text 2 Click text other than the currently selected text (row 2). Let's start by opening the file tutorial_5-1.pes in the pattern. Tutorial 5-1: Using Name Drop Tutorial 5-1: Using Name Drop With the Name Drop feature, you can be replaced by simply clicking the desired text in...A preview of similar embroidery patterns, for example, for uniforms, by replacing only the name in the folder Documents (My Documents)\PE-DESIGN NEXT\Tutorial\Tutorial_5. Creating Embroidery Patterns Containing Text 107 Text can easily create a number of the pattern appears with a sample file where the...
... text 2 Click text other than the currently selected text (row 2). Let's start by opening the file tutorial_5-1.pes in the pattern. Tutorial 5-1: Using Name Drop Tutorial 5-1: Using Name Drop With the Name Drop feature, you can be replaced by simply clicking the desired text in...A preview of similar embroidery patterns, for example, for uniforms, by replacing only the name in the folder Documents (My Documents)\PE-DESIGN NEXT\Tutorial\Tutorial_5. Creating Embroidery Patterns Containing Text 107 Text can easily create a number of the pattern appears with a sample file where the...
Users Manual - English
Page 111
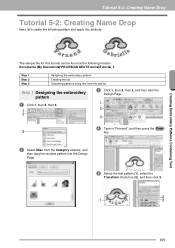
Documents (My Documents)\PE-DESIGN NEXT\Tutorial\Tutorial_5 Step 1 Step 2 Step 3 Designing the embroidery pattern Creating the list Outputting patterns using text from the text list Step 1 Designing the embroidery pattern 1 Click 1, then 2, then 3. 1 2 3 Click 1, then 2, then 3, and then click the Design Page. 1 2 3 4 Type in "Fernand", and then press the Enter 3 key. 2 Select Misc from the Category...
Documents (My Documents)\PE-DESIGN NEXT\Tutorial\Tutorial_5 Step 1 Step 2 Step 3 Designing the embroidery pattern Creating the list Outputting patterns using text from the text list Step 1 Designing the embroidery pattern 1 Click 1, then 2, then 3. 1 2 3 Click 1, then 2, then 3, and then click the Design Page. 1 2 3 4 Type in "Fernand", and then press the Enter 3 key. 2 Select Misc from the Category...
Users Manual - English
Page 121
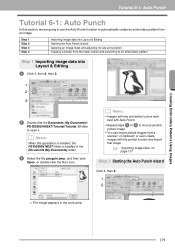
... 1 Importing image data into Layout & Editing 1 Click 1, then 2, then 3. 1 2 3 2 Double-click the Documents (My Documents)\ PE-DESIGN NEXT\Tutorial\Tutorial_6 folder to automatically create an embroidery pattern from a scanner, or clipboard, or even create images with the portrait function and import that image... are going to use the Auto Punch function to open it. Creating Embroidery Patterns Using Images Tutorial 6-1: Auto Punch Tutorial 6-1: Auto Punch In this application is installed, the PE-DESIGN NEXT folder is installed in the work best with Auto Punch. • Repeat steps 1...
... 1 Importing image data into Layout & Editing 1 Click 1, then 2, then 3. 1 2 3 2 Double-click the Documents (My Documents)\ PE-DESIGN NEXT\Tutorial\Tutorial_6 folder to automatically create an embroidery pattern from a scanner, or clipboard, or even create images with the portrait function and import that image... are going to use the Auto Punch function to open it. Creating Embroidery Patterns Using Images Tutorial 6-1: Auto Punch Tutorial 6-1: Auto Punch In this application is installed, the PE-DESIGN NEXT folder is installed in the work best with Auto Punch. • Repeat steps 1...
Users Manual - English
Page 144
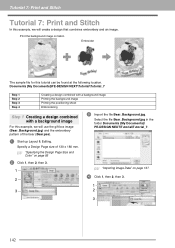
... the gift box image (Bear_Background.jpg) and the embroidery pattern of 130 x 180 mm. Select the file Bear_Background.jpg in the folder Documents (My Documents)\ PE-DESIGN NEXT\Tutorial\Tutorial_7. 1 Start up Layout & Editing. Print the background image on page 137. 4 Click 1, then 2, then 3. 1 2 3 142 Specify...
... the gift box image (Bear_Background.jpg) and the embroidery pattern of 130 x 180 mm. Select the file Bear_Background.jpg in the folder Documents (My Documents)\ PE-DESIGN NEXT\Tutorial\Tutorial_7. 1 Start up Layout & Editing. Print the background image on page 137. 4 Click 1, then 2, then 3. 1 2 3 142 Specify...
Users Manual - English
Page 145
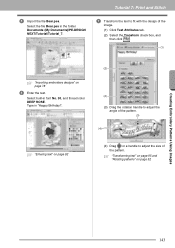
Type in the folder Documents (My Documents)\PE-DESIGN NEXT\Tutorial\Tutorial_7. c "Transforming text" on page 95 and "Rotating patterns" on page 78 6 Enter the text. Select the file Bear.pes in "Happy Birthday!". (2) (2) (3) Drag the rotation handle to adjust the angle of the pattern. (3) (4) c "Entering text" on... page 92 (4) Drag or a handle to fit with the design of the pattern. Select built-in font No. 30, and thread color DEEP ROSE. 5 Import the file Bear.pes. Tutorial 7: Print and Stitch 7 Transform the text to adjust the size of the image. (1)...
Type in the folder Documents (My Documents)\PE-DESIGN NEXT\Tutorial\Tutorial_7. c "Transforming text" on page 95 and "Rotating patterns" on page 78 6 Enter the text. Select the file Bear.pes in "Happy Birthday!". (2) (2) (3) Drag the rotation handle to adjust the angle of the pattern. (3) (4) c "Entering text" on... page 92 (4) Drag or a handle to fit with the design of the pattern. Select built-in font No. 30, and thread color DEEP ROSE. 5 Import the file Bear.pes. Tutorial 7: Print and Stitch 7 Transform the text to adjust the size of the image. (1)...
Users Manual - English
Page 148
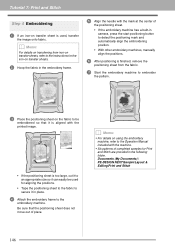
... be used for Print and Stitch are provided in place. 4 Attach the embroidery frame to the embroidery machine. Documents (My Documents)\ PE-DESIGN NEXT\Sample\Layout & Editing\Print and Stitch 146 Tutorial 7: Print and Stitch Step 4 Embroidering 1 If an iron-on using the embroidery machine, refer to the Operation Manual included with the...
... be used for Print and Stitch are provided in place. 4 Attach the embroidery frame to the embroidery machine. Documents (My Documents)\ PE-DESIGN NEXT\Sample\Layout & Editing\Print and Stitch 146 Tutorial 7: Print and Stitch Step 4 Embroidering 1 If an iron-on using the embroidery machine, refer to the Operation Manual included with the...
Users Manual - English
Page 151
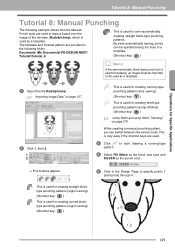
... Z ) : This is used as a template. 1 Import the file Rudolph.bmp. Operations for Specific Applications Tutorial 8: Manual Punching Tutorial 8: Manual Punching The following example shows how the Manual Punch tools are provided in the Design Page to specify points 1 (start drawing a running -type punching patterns (line sewing). (Shortcut key: V )...2 1 149 While creating a manual punching pattern, you can be used for semi-automatically creating straight block-type punching patterns. Documents (My Documents)\PE-DESIGN NEXT\ Tutorial\Tutorial_8 : This is used as a template.
... Z ) : This is used as a template. 1 Import the file Rudolph.bmp. Operations for Specific Applications Tutorial 8: Manual Punching Tutorial 8: Manual Punching The following example shows how the Manual Punch tools are provided in the Design Page to specify points 1 (start drawing a running -type punching patterns (line sewing). (Shortcut key: V )...2 1 149 While creating a manual punching pattern, you can be used for semi-automatically creating straight block-type punching patterns. Documents (My Documents)\PE-DESIGN NEXT\ Tutorial\Tutorial_8 : This is used as a template.
Users Manual - English
Page 155
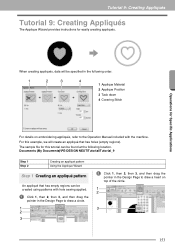
... Documents)\PE-DESIGN NEXT\Tutorial\Tutorial_9 Step 1 Step 2 Creating an appliqué pattern Using the Applique Wizard Step 1 Creating an appliqué pattern An appliqué that has holes (empty regions). Tutorial 9: Creating Appliqués Tutorial 9: Creating Appliqués The Applique Wizard provides instructions for this example, we will be specified in the Design Page to...
... Documents)\PE-DESIGN NEXT\Tutorial\Tutorial_9 Step 1 Step 2 Creating an appliqué pattern Using the Applique Wizard Step 1 Creating an appliqué pattern An appliqué that has holes (empty regions). Tutorial 9: Creating Appliqués Tutorial 9: Creating Appliqués The Applique Wizard provides instructions for this example, we will be specified in the Design Page to...
Users Manual - English
Page 157
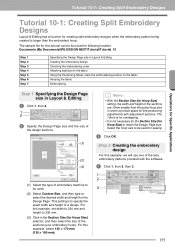
... size. The sample file for Hoop Size) selector, and then select the size of a design. Documents (My Documents)\PE-DESIGN NEXT\Tutorial\Tutorial_10 Step 1 Step 2 Step 3 Step 4 Step 5 Step 6 Step 7 Specifying the Design Page size in Layout & Editing Creating the embroidery design Checking the embroidering order Attaching stabilizer to the fabric Using the Positioning Sheet, mark...
... size. The sample file for Hoop Size) selector, and then select the size of a design. Documents (My Documents)\PE-DESIGN NEXT\Tutorial\Tutorial_10 Step 1 Step 2 Step 3 Step 4 Step 5 Step 6 Step 7 Specifying the Design Page size in Layout & Editing Creating the embroidery design Checking the embroidering order Attaching stabilizer to the fabric Using the Positioning Sheet, mark...
Users Manual - English
Page 158
... many types of stabilizer that are added at the edges of stabilizer for example, iron-on page 78. Tutorial 10-1: Creating Split Embroidery Designs 2 Click , and then select the Documents (My Documents)\PE-DESIGN NEXT\ Tutorial\Tutorial_10. The design sections are sewn in order from left to right, top to an original card, running stitches are...
... many types of stabilizer that are added at the edges of stabilizer for example, iron-on page 78. Tutorial 10-1: Creating Split Embroidery Designs 2 Click , and then select the Documents (My Documents)\PE-DESIGN NEXT\ Tutorial\Tutorial_10. The design sections are sewn in order from left to right, top to an original card, running stitches are...
Users Manual - English
Page 159
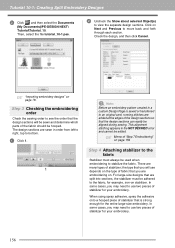
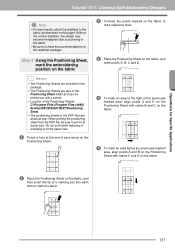
Without the correct stabilizer, the design may become misaligned due to draw reference lines. 4 Place the Positioning Sheet on the fabric, and mark points A, B, C and D. A B D C 5 To mark an area to the ... for Specific Applications Tutorial 10-1: Creating Split Embroidery Designs a Note: • For best results, attach the stabilizer to print it at actual size. Do not print while reducing or enlarging to fit the paper size. 1 Punch a hole at the end of the Positioning Sheets: C:\Program Files (Program Files (x86))\ Brother\PE-DESIGN NEXT\Positioning Sheet...
Without the correct stabilizer, the design may become misaligned due to draw reference lines. 4 Place the Positioning Sheet on the fabric, and mark points A, B, C and D. A B D C 5 To mark an area to the ... for Specific Applications Tutorial 10-1: Creating Split Embroidery Designs a Note: • For best results, attach the stabilizer to print it at actual size. Do not print while reducing or enlarging to fit the paper size. 1 Punch a hole at the end of the Positioning Sheets: C:\Program Files (Program Files (x86))\ Brother\PE-DESIGN NEXT\Positioning Sheet...
Users Manual - English
Page 163
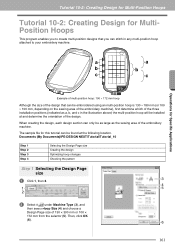
... Documents)\PE-DESIGN NEXT\Tutorial\Tutorial_10 Step 1 Step 2 Step 3 Step 4 Selecting the Design Page size Creating the design Optimizing hoop changes Checking the pattern Step 1 Selecting the Design Page size 1 Click 1, then 2. 3 4 1 5 2 2 Select under Machine Type (3), and then select Hoop Size (4) and choose a Design Page size of the design. Tutorial 10-2: Creating Design for Multi-Position Hoops Tutorial 10-2: Creating Design for...
... Documents)\PE-DESIGN NEXT\Tutorial\Tutorial_10 Step 1 Step 2 Step 3 Step 4 Selecting the Design Page size Creating the design Optimizing hoop changes Checking the pattern Step 1 Selecting the Design Page size 1 Click 1, then 2. 3 4 1 5 2 2 Select under Machine Type (3), and then select Hoop Size (4) and choose a Design Page size of the design. Tutorial 10-2: Creating Design for Multi-Position Hoops Tutorial 10-2: Creating Design for...


