
Users Manual - English
Page 12
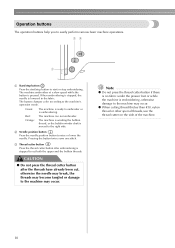
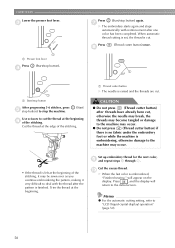
... otherwise the needle may break, the threads may become tangled or damage to embroider or is pressed. Pressing the button twice sews one stitch. Red: The machine can not embroider. c Thread cutter button Press the thread cutter button after the threads have already been cut both the upper... and the bobbin threads. Operation buttons The operation buttons help you to the machine's operation mode. a Start/stop button Press the start/stop button to raise or lower the needle. b Needle position button Press the...
... otherwise the needle may break, the threads may become tangled or damage to embroider or is pressed. Pressing the button twice sews one stitch. Red: The machine can not embroider. c Thread cutter button Press the thread cutter button after the threads have already been cut both the upper... and the bobbin threads. Operation buttons The operation buttons help you to the machine's operation mode. a Start/stop button Press the start/stop button to raise or lower the needle. b Needle position button Press the...
Users Manual - English
Page 34
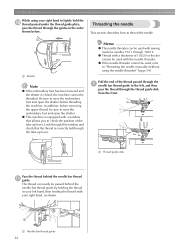
...be used with sewing machine needles 75/11 through the a needle bar thread guide to thread the needle. z Thread with a thickness of 130/20 or thicker cannot be passed behind the needle bar thread guide by holding the thread in the order shown below. 1 a Shutter Note z If the embroidery foot has ...check the position of the thread passed through 100/16. Pull the end of the take -up lever. z This machine is closed, the machine cannot be sure to raise the embroidery foot and open the shutter. Threading the needle This section describes how to the left hand, then feeding the thread ...
...be used with sewing machine needles 75/11 through the a needle bar thread guide to thread the needle. z Thread with a thickness of 130/20 or thicker cannot be passed behind the needle bar thread guide by holding the thread in the order shown below. 1 a Shutter Note z If the embroidery foot has ...check the position of the thread passed through 100/16. Pull the end of the take -up lever. z This machine is closed, the machine cannot be sure to raise the embroidery foot and open the shutter. Threading the needle This section describes how to the left hand, then feeding the thread ...
Users Manual - English
Page 37
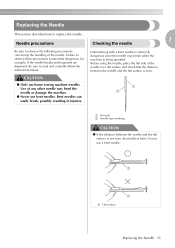
... Bent needles can easily break, possibly resulting in injuries. CAUTION ● Only use a bent needle. 1 1 a Flat surface Replacing the Needle 35 Do not use home sewing machine needles. Failure to observe the following precautions concerning the handling of the needle on a flat surface and check that the distance between the needle and.... Replacing the Needle This section describes how to read and carefully follow the instructions below. Use of any other needle may break while the machine is extremely dangerous, for example, if the needle breaks and fragments are dispersed.
... Bent needles can easily break, possibly resulting in injuries. CAUTION ● Only use a bent needle. 1 1 a Flat surface Replacing the Needle 35 Do not use home sewing machine needles. Failure to observe the following precautions concerning the handling of the needle on a flat surface and check that the distance between the needle and.... Replacing the Needle This section describes how to read and carefully follow the instructions below. Use of any other needle may break while the machine is extremely dangerous, for example, if the needle breaks and fragments are dispersed.
Users Manual - English
Page 43
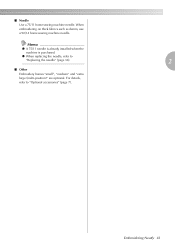
■ Needle Use a 75/11 home sewing machine needle. For details, refer to "Replacing the needle" (page 36). 2 ■ Other Embroidery frames "small", "medium" and "extra large (multi-position)" are optional. Memo z A 75/11 needle is already installed when the machine is purchased. z When replacing the needle, refer to "Optional accessories" (page 7). Embroidering Neatly 41 When embroidering on thick fabrics such as denim, use a 90/14 home sewing machine needle.
■ Needle Use a 75/11 home sewing machine needle. For details, refer to "Replacing the needle" (page 36). 2 ■ Other Embroidery frames "small", "medium" and "extra large (multi-position)" are optional. Memo z A 75/11 needle is already installed when the machine is purchased. z When replacing the needle, refer to "Optional accessories" (page 7). Embroidering Neatly 41 When embroidering on thick fabrics such as denim, use a 90/14 home sewing machine needle.

Users Manual - English
Page 58
... finishes There are done, you can try embroidering. Thread Upper thread Bobbin thread Use embroidery thread, or country embroidery thread intended for use with this machine. For details, refer to the embroidery pattern. Note z Before embroidering, check that go into sewing beautiful embroidery. If you use threads other heavy fabrics), do not let the fabric hang...
... finishes There are done, you can try embroidering. Thread Upper thread Bobbin thread Use embroidery thread, or country embroidery thread intended for use with this machine. For details, refer to the embroidery pattern. Note z Before embroidering, check that go into sewing beautiful embroidery. If you use threads other heavy fabrics), do not let the fabric hang...
Users Manual - English
Page 60
...left at the beginning f of the stitching, it may occur. • If the thread is embroidered, "Finished sewing." a Thread cutter button X The needle is cut . g X The embroidery starts again and stops automatically with the thread after one color has been completed. When automatic thread cutting is set... the threads may become tangled or damage to the machine may occur. ● Do not press (Thread cutter button) if there is no fabric under the embroidery foot or while the machine is embroidering, otherwise damage to the machine may be sewn over as you continue embroidering the ...
...left at the beginning f of the stitching, it may occur. • If the thread is embroidered, "Finished sewing." a Thread cutter button X The needle is cut . g X The embroidery starts again and stops automatically with the thread after one color has been completed. When automatic thread cutting is set... the threads may become tangled or damage to the machine may occur. ● Do not press (Thread cutter button) if there is no fabric under the embroidery foot or while the machine is embroidering, otherwise damage to the machine may be sewn over as you continue embroidering the ...
USB GUIDE - Multi
Page 3
... cm (W) (Approx. 7 inches (H) × 5 inches (W)) design field size. For details on the screen. Using the Memory Function Embroidery data precautions Observe the following precautions when using our data design systems or sewing machines may break when sewing with a stitch density that created and saved in a folder on Using the Computer To Create and Save...
... cm (W) (Approx. 7 inches (H) × 5 inches (W)) design field size. For details on the screen. Using the Memory Function Embroidery data precautions Observe the following precautions when using our data design systems or sewing machines may break when sewing with a stitch density that created and saved in a folder on Using the Computer To Create and Save...
USB GUIDE - Multi
Page 7
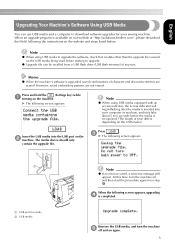
Note z When using USB media equipped with an access indicator, the access indicator will appear. However, saved embroidery patterns are erased. At this time, turn the machine e off , and then start the procedure again from a USB flash drive (USB flash memory) of any size....combinations of time differs depending on the USB media.) Insert the USB media into your sewing machine. When the following screen appears, upgrading d is available on our website at "http://solutions.brother.com", please download the file(s) following the instructions on the website and steps listed below...
Note z When using USB media equipped with an access indicator, the access indicator will appear. However, saved embroidery patterns are erased. At this time, turn the machine e off , and then start the procedure again from a USB flash drive (USB flash memory) of any size....combinations of time differs depending on the USB media.) Insert the USB media into your sewing machine. When the following screen appears, upgrading d is available on our website at "http://solutions.brother.com", please download the file(s) following the instructions on the website and steps listed below...


