
Users Manual - English
Page 2
...instruction manual. • To unplug the machine, switch the machine to the symbol "O" position to turn it off , then grasp the plug and pull it out of the machine free from all moving parts. Do not pull on the unit. Return the machine to the nearest authorized dealer or service ...center for examination, repair, electrical or mechanical adjustment. 4 Always keep your machine if the power is cut. 3 Never operate this...
...instruction manual. • To unplug the machine, switch the machine to the symbol "O" position to turn it off , then grasp the plug and pull it out of the machine free from all moving parts. Do not pull on the unit. Return the machine to the nearest authorized dealer or service ...center for examination, repair, electrical or mechanical adjustment. 4 Always keep your machine if the power is cut. 3 Never operate this...
Users Manual - English
Page 3
... persists, please consult your local authorized Brother dealer. The contents of this manual and specifications of the operation manual to inspect and adjust the machine yourself. 6 This machine is not a toy: • Your close attention is necessary when the machine is used . • Always consult...by or near a space heater, iron, halogen lamp, or other parts to change without notice. For additional product information and updates, visit our web site at www.brother.com SAVE THESE INSTRUCTIONS This machine is required, first follow the troubleshooting table in the back of this...
... persists, please consult your local authorized Brother dealer. The contents of this manual and specifications of the operation manual to inspect and adjust the machine yourself. 6 This machine is not a toy: • Your close attention is necessary when the machine is used . • Always consult...by or near a space heater, iron, halogen lamp, or other parts to change without notice. For additional product information and updates, visit our web site at www.brother.com SAVE THESE INSTRUCTIONS This machine is required, first follow the troubleshooting table in the back of this...

Users Manual - English
Page 5
... accessories ...7 Names of Machine Parts and Their Functions 8 Front view ...8 Needle and embroidery foot section ...9 Right-side/rear view ...9 Operation buttons ...10 Operation panel ...11 GETTING READY 13 Embroidery Step by Step 14 Attaching the Embroidery Unit 15 Embroidery unit precautions ...15 Attaching the embroidery unit ...15 Removing the embroidery unit ...16 Turning the Machine On/Off 18 Power...
... accessories ...7 Names of Machine Parts and Their Functions 8 Front view ...8 Needle and embroidery foot section ...9 Right-side/rear view ...9 Operation buttons ...10 Operation panel ...11 GETTING READY 13 Embroidery Step by Step 14 Attaching the Embroidery Unit 15 Embroidery unit precautions ...15 Attaching the embroidery unit ...15 Removing the embroidery unit ...16 Turning the Machine On/Off 18 Power...
Users Manual - English
Page 8
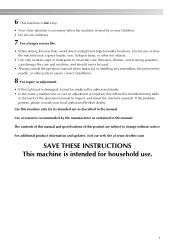
...XD1629-021 XD0474-151 SA444/EF84 EF84: XD0600- 002 XC1807-121 XZ5004-021 XC4487-021 6 Part Name 10 Spool net 11 Operation manual 12 Quick reference guide 13 Embroidery foot "Q" (on machine) Embroidery set 4 Cleaning brush 5 Screwdriver (large) 6 Screwdriver (small) 7 Spool cap (large) ...8 Spool cap (medium) 9 Spool cap (small) Part Code U.S.A. / Canada Others X54243-051 SA156 SFB: XA5539...
...XD1629-021 XD0474-151 SA444/EF84 EF84: XD0600- 002 XC1807-121 XZ5004-021 XC4487-021 6 Part Name 10 Spool net 11 Operation manual 12 Quick reference guide 13 Embroidery foot "Q" (on machine) Embroidery set 4 Cleaning brush 5 Screwdriver (large) 6 Screwdriver (small) 7 Spool cap (large) ...8 Spool cap (medium) 9 Spool cap (small) Part Code U.S.A. / Canada Others X54243-051 SA156 SFB: XA5539...
Users Manual - English
Page 9
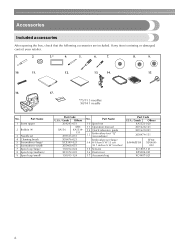
... X W 4 inches) EBT-CEN Embroidery set (small) 4 H 2 cm X W 6 cm (H 1 inch X W 2-1/2 inches) Part Code U.S.A. / Canada Other No. Optional accessories The following are correct at the time of optional accessories available for embroidery 3 Embroidery card Embroidery set (extra large BM3: X81175-001...parts, contact your machine. 7 z All specifications are available as optional accessories. 1. 2. 3. 4. 5. 6. z Visit your nearest authorized retailer for a complete listing of printing. The part codes are subject to change without notice. Part Name 1 Brother...
... X W 4 inches) EBT-CEN Embroidery set (small) 4 H 2 cm X W 6 cm (H 1 inch X W 2-1/2 inches) Part Code U.S.A. / Canada Other No. Optional accessories The following are correct at the time of optional accessories available for embroidery 3 Embroidery card Embroidery set (extra large BM3: X81175-001...parts, contact your machine. 7 z All specifications are available as optional accessories. 1. 2. 3. 4. 5. 6. z Visit your nearest authorized retailer for a complete listing of printing. The part codes are subject to change without notice. Part Name 1 Brother...

Users Manual - English
Page 10
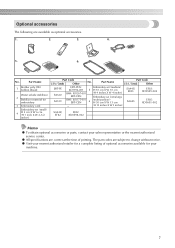
... to cut them. e Top cover Open the top cover to place the spool of the machine parts. g Operation panel From the operation panel, patterns can be displayed (page 11). 8 h Embroidery unit connector slot Plug in the connector for the embroidery unit. l Thread cutter Pass the threads through the window to learn the names of...
... to cut them. e Top cover Open the top cover to place the spool of the machine parts. g Operation panel From the operation panel, patterns can be displayed (page 11). 8 h Embroidery unit connector slot Plug in the connector for the embroidery unit. l Thread cutter Pass the threads through the window to learn the names of...
Users Manual - English
Page 26
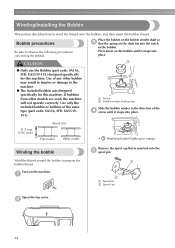
Turn on the bobbin until it snaps into place. 1 ● Only use the Bobbin (part code: SA156, SFB: XA5539-151) designed specifically for this machine. b 24 Press down on the machine. Winding the bobbin Wind the thread around the bobbin to observe the following precautions concerning the bobbin. Use of ...Other model • (Start/stop button) lights up in the bobbin. Use only the included bobbin or bobbins of the same type (part code: SA156, SFB: XA5539151). 2 a Notch b Bobbin winder shaft spring Slide the bobbin winder in the direction of any other models are used...
Turn on the bobbin until it snaps into place. 1 ● Only use the Bobbin (part code: SA156, SFB: XA5539-151) designed specifically for this machine. b 24 Press down on the machine. Winding the bobbin Wind the thread around the bobbin to observe the following precautions concerning the bobbin. Use of ...Other model • (Start/stop button) lights up in the bobbin. Use only the included bobbin or bobbins of the same type (part code: SA156, SFB: XA5539151). 2 a Notch b Bobbin winder shaft spring Slide the bobbin winder in the direction of any other models are used...
Users Manual - English
Page 30
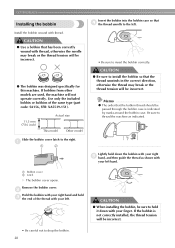
...; Use a bobbin that has been correctly wound with thread. CAUTION ● Be sure to thread the machine as shown with your left . Slide the bobbin cover latch to hold c the end of the same type (part code: SA156, SFB: XA5539-151). 11.5 mm (7/16 inch) Actual size This model Other model ... Insert the bobbin into the bobbin case so that d the thread unrolls to the left hand. If bobbins from other models are used, the machine will be passed through the bobbin case is not correctly installed, the thread tension will be incorrect. b Hold the bobbin with your right hand ...
...; Use a bobbin that has been correctly wound with thread. CAUTION ● Be sure to thread the machine as shown with your left . Slide the bobbin cover latch to hold c the end of the same type (part code: SA156, SFB: XA5539-151). 11.5 mm (7/16 inch) Actual size This model Other model ... Insert the bobbin into the bobbin case so that d the thread unrolls to the left hand. If bobbins from other models are used, the machine will be passed through the bobbin case is not correctly installed, the thread tension will be incorrect. b Hold the bobbin with your right hand ...
Users Manual - English
Page 38
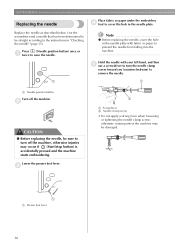
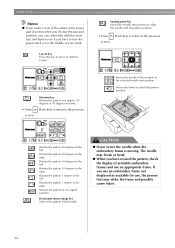
... straight according to turn the needle clamp screw toward you (counterclockwise) to remove the needle. 1 a Needle position button Turn off the machine, otherwise injuries may be sure to the instructions in "Checking the needle" (page 35). b CAUTION ● Before replacing the needle,...screw, otherwise certain parts of the machine may occur if (Start/stop button) is accidentally pressed and the machine starts embroidering. GETTING READY Replacing the needle Place fabric or paper under the embroidery d foot to prevent the needle from falling into the machine. Press (Needle ...
... straight according to turn the needle clamp screw toward you (counterclockwise) to remove the needle. 1 a Needle position button Turn off the machine, otherwise injuries may be sure to the instructions in "Checking the needle" (page 35). b CAUTION ● Before replacing the needle,...screw, otherwise certain parts of the machine may occur if (Start/stop button) is accidentally pressed and the machine starts embroidering. GETTING READY Replacing the needle Place fabric or paper under the embroidery d foot to prevent the needle from falling into the machine. Press (Needle ...
Users Manual - English
Page 59
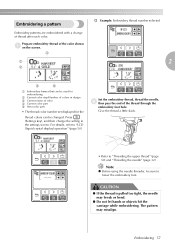
.... Note z Before using the needle threader, be sure to "LCD (liquid crystal display) operation" (page 50). Embroidering 57 Prepare embroidery thread of thread after each color. CAUTION ● If the thread is pulled too tight, the needle may misalign. Give the thread a little ... or bend. ● Do not let hands or objects hit the carriage while embroidering. Set the embroidery thread, thread the needle, b then pass the end of color d Current color part e Next color part • The thread color number set displayed for embroidering b Current color step/Number of colors in ...
.... Note z Before using the needle threader, be sure to "LCD (liquid crystal display) operation" (page 50). Embroidering 57 Prepare embroidery thread of thread after each color. CAUTION ● If the thread is pulled too tight, the needle may misalign. Give the thread a little ... or bend. ● Do not let hands or objects hit the carriage while embroidering. Set the embroidery thread, thread the needle, b then pass the end of color d Current color part e Next color part • The thread color number set displayed for embroidering b Current color step/Number of colors in ...
Users Manual - English
Page 64
... to the position of the selected needle start position to align the needle with the same size and layout even if you use an embroidery frame not displayed as available for use an appropriate frame. If you have revised the pattern, check the display of available..., the presser foot may strike the frame and possibly cause injury. 62 Starting point key Moves the needle start position. EMBROIDERY Memo z If you make a note of the values in the lower part of screen when you change the size and position, you can embroider with the pattern position. • Press (Back...
... to the position of the selected needle start position to align the needle with the same size and layout even if you use an embroidery frame not displayed as available for use an appropriate frame. If you have revised the pattern, check the display of available..., the presser foot may strike the frame and possibly cause injury. 62 Starting point key Moves the needle start position. EMBROIDERY Memo z If you make a note of the values in the lower part of screen when you change the size and position, you can embroider with the pattern position. • Press (Back...
Users Manual - English
Page 73
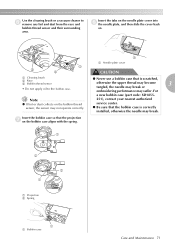
... or a vacuum cleaner to the bobbin case. ● Never use a bobbin case that is correctly installed, otherwise the needle may break. For a new bobbin case (part code: XD1855- If lint or dust collects on . Note ! a b 2 1 a Projection b Spring 1 a Bobbin case Care and Maintenance 71 a c b a Needle plate cover a CAUTION a Cleaning brush b Race c Bobbin...
... or a vacuum cleaner to the bobbin case. ● Never use a bobbin case that is correctly installed, otherwise the needle may break. For a new bobbin case (part code: XD1855- If lint or dust collects on . Note ! a b 2 1 a Projection b Spring 1 a Bobbin case Care and Maintenance 71 a c b a Needle plate cover a CAUTION a Cleaning brush b Race c Bobbin...


