

Users Manual - English
Page 5
... ...9 Operation buttons ...10 Operation panel ...11 GETTING READY 13 Embroidery Step by Step 14 Attaching the Embroidery Unit 15 Embroidery unit precautions ...15 Attaching the embroidery unit ...15 Removing the embroidery unit ...16 Turning the Machine On/Off 18 Power supply precautions ...18 Turning on the machine ...19 Turning off the machine ...19 LCD (Liquid Crystal Display) Operation 20 Viewing...
... ...9 Operation buttons ...10 Operation panel ...11 GETTING READY 13 Embroidery Step by Step 14 Attaching the Embroidery Unit 15 Embroidery unit precautions ...15 Attaching the embroidery unit ...15 Removing the embroidery unit ...16 Turning the Machine On/Off 18 Power supply precautions ...18 Turning on the machine ...19 Turning off the machine ...19 LCD (Liquid Crystal Display) Operation 20 Viewing...

Users Manual - English
Page 6
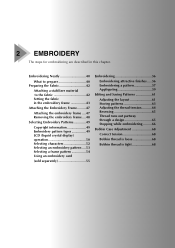
Using an embroidery card (sold separately) ...55 Embroidering ...56 Embroidering attractive finishes...56 Embroidering a pattern ...57 Appliquéing ...59 Editing and Saving Patterns 61 Adjusting the layout ...... tension...68 Bobbin thread is loose...68 Bobbin thread is tight ...68 APPENDIX 69 Care and Maintenance ...70 Cleaning the machine surface ...70 Cleaning the race ...70 Attaching the Embroidery Foot 72 Attaching the embroidery Foot "Q" ...72 Troubleshooting ...74 Error messages ...78 Adjusting the LCD ...81 Operation beep ...81 Canceling the operation beep ...82 Index...
Using an embroidery card (sold separately) ...55 Embroidering ...56 Embroidering attractive finishes...56 Embroidering a pattern ...57 Appliquéing ...59 Editing and Saving Patterns 61 Adjusting the layout ...... tension...68 Bobbin thread is loose...68 Bobbin thread is tight ...68 APPENDIX 69 Care and Maintenance ...70 Cleaning the machine surface ...70 Cleaning the race ...70 Attaching the Embroidery Foot 72 Attaching the embroidery Foot "Q" ...72 Troubleshooting ...74 Error messages ...78 Adjusting the LCD ...81 Operation beep ...81 Canceling the operation beep ...82 Index...

Users Manual - English
Page 10
... selected and edited, and operations for using the machine, carefully read these buttons to the machine, and then attach the embroidery frame. n Thread take -up lever. Before using the machine can be displayed (page 11). 8 h Embroidery unit connector slot Plug in the connector for the embroidery unit. Names of Machine Parts and Their Functions The names of the...
... selected and edited, and operations for using the machine, carefully read these buttons to the machine, and then attach the embroidery frame. n Thread take -up lever. Before using the machine can be displayed (page 11). 8 h Embroidery unit connector slot Plug in the connector for the embroidery unit. Names of Machine Parts and Their Functions The names of the...
Users Manual - English
Page 13
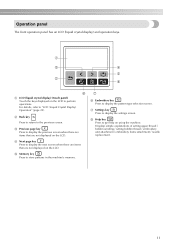
... screen. Displays simple explanations of setting upper thread / bobbin winding / setting bobbin thread / embroidery unit attachment / embroidery frame attachment / needle replacement. 11 c Previous page key Press to display the previous screen when there ...are items that are not displayed on the LCD to the previous screen. d Next page key Press to "LCD (Liquid Crystal Display) Operation" (page 20). g f Embroidery key Press to store patterns in the machine...
... screen. Displays simple explanations of setting upper thread / bobbin winding / setting bobbin thread / embroidery unit attachment / embroidery frame attachment / needle replacement. 11 c Previous page key Press to display the previous screen when there ...are items that are not displayed on the LCD to the previous screen. d Next page key Press to "LCD (Liquid Crystal Display) Operation" (page 20). g f Embroidery key Press to store patterns in the machine...

Users Manual - English
Page 15
... preparations to start embroidering are described in this chapter. Embroidery Step by Step 14 Attaching the Embroidery Unit 15 Embroidery unit precautions 15 Attaching the embroidery unit 15 Removing the embroidery unit 16 Turning the Machine On/Off 18 Power supply precautions 18 Turning on the machine 19 Turning off the machine 19 LCD (Liquid Crystal Display) Operation 20 Viewing...
... preparations to start embroidering are described in this chapter. Embroidery Step by Step 14 Attaching the Embroidery Unit 15 Embroidery unit precautions 15 Attaching the embroidery unit 15 Removing the embroidery unit 16 Turning the Machine On/Off 18 Power supply precautions 18 Turning on the machine 19 Turning off the machine 19 LCD (Liquid Crystal Display) Operation 20 Viewing...

Users Manual - English
Page 16
... layout Check and adjust the size and position of the embroidery pattern. GETTING READY Embroidery Step by Step The basic steps for embroidery are as follows. 1 Attaching the embroidery unit Attach the embroidery unit. (If the embroidery unit is not attached, the machine does not operate.) For details, refer to "Attaching the embroidery unit" (page 15). ↓ 2 Checking the needle Use a needle...
... layout Check and adjust the size and position of the embroidery pattern. GETTING READY Embroidery Step by Step The basic steps for embroidery are as follows. 1 Attaching the embroidery unit Attach the embroidery unit. (If the embroidery unit is not attached, the machine does not operate.) For details, refer to "Attaching the embroidery unit" (page 15). ↓ 2 Checking the needle Use a needle...
Users Manual - English
Page 17
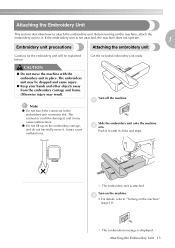
... hands and other objects away from the embroidery carriage and frame. It may result. a Slide the embroidery unit onto the machine b arm. c • For details, refer to attach the embroidery unit. Attaching the Embroidery Unit This section describes how to "Turning on the machine" (page 19). Before turning on the machine, attach the embroidery unit to it clicks and stops. The...
... hands and other objects away from the embroidery carriage and frame. It may result. a Slide the embroidery unit onto the machine b arm. c • For details, refer to attach the embroidery unit. Attaching the Embroidery Unit This section describes how to "Turning on the machine" (page 19). Before turning on the machine, attach the embroidery unit to it clicks and stops. The...
Users Manual - English
Page 19
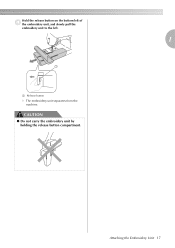
Attaching the Embroidery Unit 17 CAUTION ● Do not carry the embroidery unit by holding the release button compartment. Hold the release button on the bottom left of d the embroidery unit, and slowly pull the embroidery unit to the left. 1 a a Release button X The embroidery unit separates from the machine.
Attaching the Embroidery Unit 17 CAUTION ● Do not carry the embroidery unit by holding the release button compartment. Hold the release button on the bottom left of d the embroidery unit, and slowly pull the embroidery unit to the left. 1 a a Release button X The embroidery unit separates from the machine.
Users Manual - English
Page 21
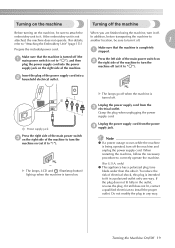
... side of electrical shock, this plug is not attached, the machine does not operate. (For details, In addition, before transporting the machine to another location, be sure to attach the When you are finished using the machine, turn it still does not fit, contact a qualified electrician to "Attaching the Embroidery Unit" (page 15).) Prepare the included power...
... side of electrical shock, this plug is not attached, the machine does not operate. (For details, In addition, before transporting the machine to another location, be sure to attach the When you are finished using the machine, turn it still does not fit, contact a qualified electrician to "Attaching the Embroidery Unit" (page 15).) Prepare the included power...
Users Manual - English
Page 25
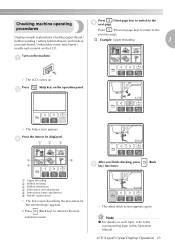
.... a X The LCD comes on the operation panel. Press b (Help key) on . Note z For details on the machine. c 1 2 3 4 6 After you finish checking, press (Back 5 e key) two times. a Upper threading b Bobbin winding c Bobbin installation d Embroidery unit attachment e Embroidery frame attachment f Needle replacement X The first screen describing the procedure for the selected topic appears. • Press (Back key...
.... a X The LCD comes on the operation panel. Press b (Help key) on . Note z For details on the machine. c 1 2 3 4 6 After you finish checking, press (Back 5 e key) two times. a Upper threading b Bobbin winding c Bobbin installation d Embroidery unit attachment e Embroidery frame attachment f Needle replacement X The first screen describing the procedure for the selected topic appears. • Press (Back key...
Users Manual - English
Page 41
... material to the fabric 42 Setting the fabric in this chapter. 2 EMBROIDERY The steps for embroidering are described in the embroidery frame 43 Attaching the Embroidery Frame.........47 Attaching the embroidery frame .... 47 Removing the embroidery frame .... 48 Selecting Embroidery Patterns 49 Copyright information 49 Embroidery pattern types 49 LCD (liquid crystal display) operation 50 Selecting characters 52 Selecting...
... material to the fabric 42 Setting the fabric in this chapter. 2 EMBROIDERY The steps for embroidering are described in the embroidery frame 43 Attaching the Embroidery Frame.........47 Attaching the embroidery frame .... 47 Removing the embroidery frame .... 48 Selecting Embroidery Patterns 49 Copyright information 49 Embroidery pattern types 49 LCD (liquid crystal display) operation 50 Selecting characters 52 Selecting...

Users Manual - English
Page 42
... fabrics with a nap like towels. To check the fabric thickness, attach the embroidery frame to embroider, be embroidered. The needle may result in injury. ● Be careful when embroidering overlapping patterns. z Before starting to the embroidery unit, and use embroidery thread designed for embroidery machines. EMBROIDERY Embroidering Neatly This section describes the preparations and basic procedures for...
... fabrics with a nap like towels. To check the fabric thickness, attach the embroidery frame to embroider, be embroidered. The needle may result in injury. ● Be careful when embroidering overlapping patterns. z Before starting to the embroidery unit, and use embroidery thread designed for embroidery machines. EMBROIDERY Embroidering Neatly This section describes the preparations and basic procedures for...
Users Manual - English
Page 44
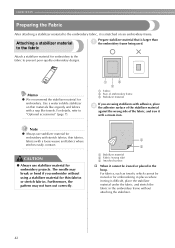
... stretch fabrics, thin fabrics, fabrics with a loose weave and fabrics where stitches easily contract. CAUTION ● Always use stabilizer material for embroidery projects. Attaching a stabilizer material to prevent poor quality embroidery designs. For details, refer to "Optional accessories" (page 7). 1 3 2 a Fabric b Size of the fabric, and iron it with a steam iron. Use a water soluble...
... stretch fabrics, thin fabrics, fabrics with a loose weave and fabrics where stitches easily contract. CAUTION ● Always use stabilizer material for embroidery projects. Attaching a stabilizer material to prevent poor quality embroidery designs. For details, refer to "Optional accessories" (page 7). 1 3 2 a Fabric b Size of the fabric, and iron it with a steam iron. Use a water soluble...
Users Manual - English
Page 45
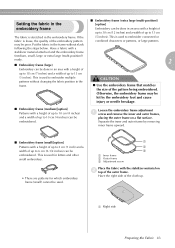
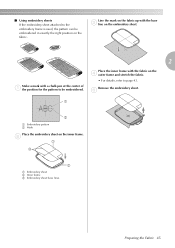
... with the stabilizer material on a flat surface. stabilizer material attached and the embroidery frame (medium, small, large or extra large (multi-position)) ready. 2 ■ Embroidery frame (large) Embroidery can be done in the frame without changing the fabric position in the embroidery frame. Loosen the embroidery frame adjustment a screw and remove the inner and outer frames...
... with the stabilizer material on a flat surface. stabilizer material attached and the embroidery frame (medium, small, large or extra large (multi-position)) ready. 2 ■ Embroidery frame (large) Embroidery can be done in the frame without changing the fabric position in the embroidery frame. Loosen the embroidery frame adjustment a screw and remove the inner and outer frames...
Users Manual - English
Page 47
... with a chalk pen at the center of a the position for the pattern to be embroidered in exactly the right position on the inner frame. b 1 3 2 a Embroidery sheet b Inner frame c Embroidery sheet base lines Preparing the Fabric 45 ■ Using embroidery sheets If the embroidery sheet attached to the embroidery frame is used, the pattern can be embroidered.
... with a chalk pen at the center of a the position for the pattern to be embroidered in exactly the right position on the inner frame. b 1 3 2 a Embroidery sheet b Inner frame c Embroidery sheet base lines Preparing the Fabric 45 ■ Using embroidery sheets If the embroidery sheet attached to the embroidery frame is used, the pattern can be embroidered.
Users Manual - English
Page 49
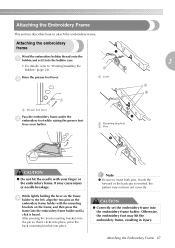
...case. • For details, refer to the left, align the two pins on the embroidery frame holder with your finger or the embroidery frame. Note z Be sure to attach the embroidery frame. Raise the presser foot lever. If only the forward or the back pin is... clicks into place, press the back mounting bracket into the embroidery frame holder. Attaching the Embroidery Frame This section describes how to insert both pins. Otherwise, the embroidery foot may cause injury or needle breakage. Attaching the embroidery frame Wind the embroidery bobbin thread onto the a bobbin and set the...
...case. • For details, refer to the left, align the two pins on the embroidery frame holder with your finger or the embroidery frame. Note z Be sure to attach the embroidery frame. Raise the presser foot lever. If only the forward or the back pin is... clicks into place, press the back mounting bracket into the embroidery frame holder. Attaching the Embroidery Frame This section describes how to insert both pins. Otherwise, the embroidery foot may cause injury or needle breakage. Attaching the embroidery frame Wind the embroidery bobbin thread onto the a bobbin and set the...
Users Manual - English
Page 61
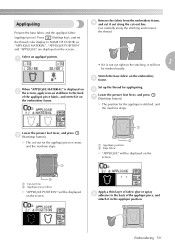
... fabric X "APPLIQUE POSITION" will not be displayed on the embroidery frame. X The position for the appliqué is displayed on b the screen, apply iron-on stabilizer to the back of the appliqué piece, and attach it is sewn, and the machine stops. 1 1 2 a Appliqué position b Base ...stretch it will be displayed on the screen. When "APPLIQUE MATERIAL" is stitched, and the machine stops. Lower the presser foot lever, and press c (Start/stop button). Remove the fabric from the embroidery frame, d and cut it out along the stitching and remove the thread. a 2 &#...
... fabric X "APPLIQUE POSITION" will not be displayed on the embroidery frame. X The position for the appliqué is displayed on b the screen, apply iron-on stabilizer to the back of the appliqué piece, and attach it is sewn, and the machine stops. 1 1 2 a Appliqué position b Base ...stretch it will be displayed on the screen. When "APPLIQUE MATERIAL" is stitched, and the machine stops. Lower the presser foot lever, and press c (Start/stop button). Remove the fabric from the embroidery frame, d and cut it out along the stitching and remove the thread. a 2 &#...

Users Manual - English
Page 71
Care and Maintenance 70 Cleaning the machine surface 70 Cleaning the race 70 Attaching the Embroidery Foot 72 Attaching the embroidery Foot "Q 72 Troubleshooting ...74 Error messages 78 Adjusting the LCD 81 Operation beep 81 Canceling the operation beep 82 Index ...83 3 APPENDIX The various maintenance and troubleshooting procedures are described in this chapter.
Care and Maintenance 70 Cleaning the machine surface 70 Cleaning the race 70 Attaching the Embroidery Foot 72 Attaching the embroidery Foot "Q 72 Troubleshooting ...74 Error messages 78 Adjusting the LCD 81 Operation beep 81 Canceling the operation beep 82 Index ...83 3 APPENDIX The various maintenance and troubleshooting procedures are described in this chapter.

Users Manual - English
Page 74
... occur if (Start/stop button) is accidentally pressed and the machine starts embroidering. a Lever While pressing in the lever with your finger, fit e the embroidery foot bar over the needle clamp screw to attach the embroidery foot to turn off the machine. APPENDIX Attaching the Embroidery Foot This section describes how to raise the needle. Hold the...
... occur if (Start/stop button) is accidentally pressed and the machine starts embroidering. a Lever While pressing in the lever with your finger, fit e the embroidery foot bar over the needle clamp screw to attach the embroidery foot to turn off the machine. APPENDIX Attaching the Embroidery Foot This section describes how to raise the needle. Hold the...
Users Manual - English
Page 79
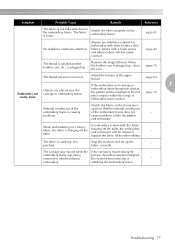
... are placed near the carriage or embroidery frame. page 16 Stretch the fabric on the embroidery frame. If embroidery is done with a loose weave and fabrics where stitches easily contract. Stop the machine and set up , clean the race. Be careful when removing or - The fabric is attached. page 43 No stabilizer material is loose...
... are placed near the carriage or embroidery frame. page 16 Stretch the fabric on the embroidery frame. If embroidery is done with a loose weave and fabrics where stitches easily contract. Stop the machine and set up , clean the race. Be careful when removing or - The fabric is attached. page 43 No stabilizer material is loose...


