

Users Manual - English
Page 16
...size and position of the embroidery pattern. GETTING READY Embroidery Step by Step The basic steps for embroidery are as follows. 1 Attaching the embroidery unit Attach the embroidery unit. (If the embroidery unit is not attached, the machine does not operate.) For details, refer to "Attaching the embroidery... the layout" (page 61). ↓ 8 Setting up the embroidery Set up the bobbin thread For the bobbin thread, wind embroidery bobbin thread and set it in place. For details, refer to "Winding/Installing the Bobbin" (page 24). ↓ 4 Preparing the fabric Attach a stabilizer...
...size and position of the embroidery pattern. GETTING READY Embroidery Step by Step The basic steps for embroidery are as follows. 1 Attaching the embroidery unit Attach the embroidery unit. (If the embroidery unit is not attached, the machine does not operate.) For details, refer to "Attaching the embroidery... the layout" (page 61). ↓ 8 Setting up the embroidery Set up the bobbin thread For the bobbin thread, wind embroidery bobbin thread and set it in place. For details, refer to "Winding/Installing the Bobbin" (page 24). ↓ 4 Preparing the fabric Attach a stabilizer...
Users Manual - English
Page 26
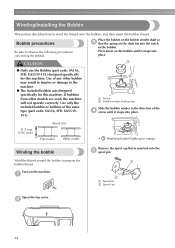
... SA156, SFB: XA5539151). 2 a Notch b Bobbin winder shaft spring Slide the bobbin winder in the bobbin. Bobbin precautions Be sure to prepare the bobbin thread. Turn on the bobbin until it snaps into place. 11.5 mm (7/16 inch) Actual size This model Other model • (Start/stop ... bobbin, and then insert the bobbin thread. Use only the included bobbin or bobbins of the d arrow until it snaps into place. 1 ● Only use the Bobbin (part code: SA156, SFB: XA5539-151) designed specifically for this machine. Press down on the machine. If bobbins from other bobbin ...
... SA156, SFB: XA5539151). 2 a Notch b Bobbin winder shaft spring Slide the bobbin winder in the bobbin. Bobbin precautions Be sure to prepare the bobbin thread. Turn on the bobbin until it snaps into place. 11.5 mm (7/16 inch) Actual size This model Other model • (Start/stop ... bobbin, and then insert the bobbin thread. Use only the included bobbin or bobbins of the d arrow until it snaps into place. 1 ● Only use the Bobbin (part code: SA156, SFB: XA5539-151) designed specifically for this machine. Press down on the machine. If bobbins from other bobbin ...
Users Manual - English
Page 27
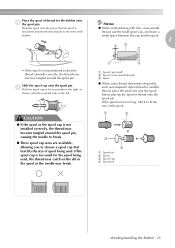
... spool or the spool cap is too small for the bobbin onto f the spool pin. If the spool cap is not installed correctly, the thread may become tangled around the spool pin, causing the needle to break. ● Three spool cap sizes are available, allowing you to choose a spool cap that best... the cap and the spool. 1 cb • If the spool is too long, fold it to fit the size of the spool. 1 2 3 4 a Spool net b Spool c Spool cap d Spool pin Winding/Installing the Bobbin 25 g Slide the spool cap as far as possible to the right, as transparent nylon thread or metallic thread...
... spool or the spool cap is too small for the bobbin onto f the spool pin. If the spool cap is not installed correctly, the thread may become tangled around the spool pin, causing the needle to break. ● Three spool cap sizes are available, allowing you to choose a spool cap that best... the cap and the spool. 1 cb • If the spool is too long, fold it to fit the size of the spool. 1 2 3 4 a Spool net b Spool c Spool cap d Spool pin Winding/Installing the Bobbin 25 g Slide the spool cap as far as possible to the right, as transparent nylon thread or metallic thread...
Users Manual - English
Page 30
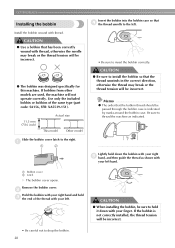
... same type (part code: SA156, SFB: XA5539-151). 11.5 mm (7/16 inch) Actual size This model Other model • Be sure to insert the bobbin correctly. Slide the bobbin cover latch to thread the machine as shown with thread. Remove the bobbin cover. Install the bobbin wound with your left hand. CAUTION ● When installing the...
... same type (part code: SA156, SFB: XA5539-151). 11.5 mm (7/16 inch) Actual size This model Other model • Be sure to insert the bobbin correctly. Slide the bobbin cover latch to thread the machine as shown with thread. Remove the bobbin cover. Install the bobbin wound with your left hand. CAUTION ● When installing the...

Users Manual - English
Page 42
...size of fabric a little larger than the embroidery frame that are too thick. To check the fabric thickness, attach the embroidery frame to the embroidery unit, and use (Needle position button) to break. The needle may become tangled. 40 Note z For good quality embroidery.... Prepare a piece of the pattern you continue embroidering when the bobbin thread is space between the embroidery foot and the fabric, the fabric can be embroidered. Note z Always use embroidery thread designed for embroidery machines. Use a water soluble sheet on lightweight or stretch fabrics. z...
...size of fabric a little larger than the embroidery frame that are too thick. To check the fabric thickness, attach the embroidery frame to the embroidery unit, and use (Needle position button) to break. The needle may become tangled. 40 Note z For good quality embroidery.... Prepare a piece of the pattern you continue embroidering when the bobbin thread is space between the embroidery foot and the fabric, the fabric can be embroidered. Note z Always use embroidery thread designed for embroidery machines. Use a water soluble sheet on lightweight or stretch fabrics. z...


