

Users Manual - English
Page 5
... the embroidery unit ...16 Turning the Machine On/Off 18 Power supply precautions ...18 Turning on the machine ...19 Turning off the machine ...19 LCD (Liquid Crystal Display) Operation 20 Viewing the LCD...20 Changing the machine settings ...21 Checking machine operating procedures ...23 Winding/Installing the Bobbin 24 Bobbin precautions ...24 Winding the bobbin ...24 Installing the bobbin ...28...
... the embroidery unit ...16 Turning the Machine On/Off 18 Power supply precautions ...18 Turning on the machine ...19 Turning off the machine ...19 LCD (Liquid Crystal Display) Operation 20 Viewing the LCD...20 Changing the machine settings ...21 Checking machine operating procedures ...23 Winding/Installing the Bobbin 24 Bobbin precautions ...24 Winding the bobbin ...24 Installing the bobbin ...28...

Users Manual - English
Page 6
... partway through a design...65 Stopping while embroidering ...66 Bobbin Case Adjustment 68 Correct tension...68 Bobbin thread is loose...68 Bobbin thread is tight ...68 APPENDIX 69 Care and Maintenance ...70 Cleaning the machine surface ...70 Cleaning the race ...70 Attaching the Embroidery Foot 72 Attaching the embroidery Foot "Q" ...72 Troubleshooting ...74 Error messages ...78 Adjusting...
... partway through a design...65 Stopping while embroidering ...66 Bobbin Case Adjustment 68 Correct tension...68 Bobbin thread is loose...68 Bobbin thread is tight ...68 APPENDIX 69 Care and Maintenance ...70 Cleaning the machine surface ...70 Cleaning the race ...70 Attaching the Embroidery Foot 72 Attaching the embroidery Foot "Q" ...72 Troubleshooting ...74 Error messages ...78 Adjusting...

Users Manual - English
Page 7
In addition, after embroidering (page 51). Introduction Thank you have finished reading this embroidery machine. d Embroidery You can start embroiderying without pulling up the bobbin thread (page 28). c Automatic thread cutting The thread can quickly be accessed for future reference. Before using the machine, carefully read the "IMPORTANT SAFETY INSTRUCTIONS", and then study this manual for purchasing...
In addition, after embroidering (page 51). Introduction Thank you have finished reading this embroidery machine. d Embroidery You can start embroiderying without pulling up the bobbin thread (page 28). c Automatic thread cutting The thread can quickly be accessed for future reference. Before using the machine, carefully read the "IMPORTANT SAFETY INSTRUCTIONS", and then study this manual for purchasing...
Users Manual - English
Page 8
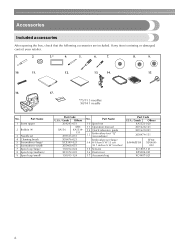
Part Name 1 Seam ripper 2 Bobbin (4) 3 Needle set (large) 14 H 18cm X W 13 cm (H 7 inches X W 5 inches) 15 Scissors 16 Dust cover 17 Accessory bag Part Code U.S.A. / Canada Others XA5523-020 XD1628-121 .... 14. 15. 16. 17. *75/11 3 needles 90/14 1 needle No. Part Name 10 Spool net 11 Operation manual 12 Quick reference guide 13 Embroidery foot "Q" (on machine) Embroidery set 4 Cleaning brush 5 Screwdriver (large) 6 Screwdriver (small) 7 Spool cap (large) 8 Spool cap (medium) 9 Spool cap (small) Part Code U.S.A. / Canada Others X54243-051 SA156 SFB...
Part Name 1 Seam ripper 2 Bobbin (4) 3 Needle set (large) 14 H 18cm X W 13 cm (H 7 inches X W 5 inches) 15 Scissors 16 Dust cover 17 Accessory bag Part Code U.S.A. / Canada Others XA5523-020 XD1628-121 .... 14. 15. 16. 17. *75/11 3 needles 90/14 1 needle No. Part Name 10 Spool net 11 Operation manual 12 Quick reference guide 13 Embroidery foot "Q" (on machine) Embroidery set 4 Cleaning brush 5 Screwdriver (large) 6 Screwdriver (small) 7 Spool cap (large) 8 Spool cap (medium) 9 Spool cap (small) Part Code U.S.A. / Canada Others X54243-051 SA156 SFB...
Users Manual - English
Page 9
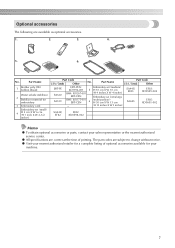
... 1 inch X W 2-1/2 inches) Part Code U.S.A. / Canada Other No. z All specifications are correct at the time of optional accessories available for embroidery 3 Embroidery card Embroidery set (extra large BM3: X81175-001 EBT-CEN 6 (multi-position)) H 30 cm X W 13 cm - (H 12 inches X W 5 inches...part codes are available as optional accessories. 1. 2. 3. 4. 5. 6. Part Name 1 Brother poly #90 bobbin thread Water solude stabilizer 2 Stabilizer material for your machine. 7 z Visit your sales representative or the nearest authorized service center. Optional accessories The...
... 1 inch X W 2-1/2 inches) Part Code U.S.A. / Canada Other No. z All specifications are correct at the time of optional accessories available for embroidery 3 Embroidery card Embroidery set (extra large BM3: X81175-001 EBT-CEN 6 (multi-position)) H 30 cm X W 13 cm - (H 12 inches X W 5 inches...part codes are available as optional accessories. 1. 2. 3. 4. 5. 6. Part Name 1 Brother poly #90 bobbin thread Water solude stabilizer 2 Stabilizer material for your machine. 7 z Visit your sales representative or the nearest authorized service center. Optional accessories The...

Users Manual - English
Page 10
..., patterns can be selected and edited, and operations for the embroidery unit. d Bobbin winding thread guide Pass the thread around this thread guide when winding the bobbin thread. f Bobbin winder Use the bobbin winder when winding the bobbin. Before using the machine can be displayed (page 11). 8 h Embroidery unit connector slot Plug in the connector for using the...
..., patterns can be selected and edited, and operations for the embroidery unit. d Bobbin winding thread guide Pass the thread around this thread guide when winding the bobbin thread. f Bobbin winder Use the bobbin winder when winding the bobbin. Before using the machine can be displayed (page 11). 8 h Embroidery unit connector slot Plug in the connector for using the...

Users Manual - English
Page 11
... cover to be exchanged. f Embroidery foot "Q" This presser foot is lowered, it enters the hole in the needle plate. f Main power switch Use the main power switch to turn the machine on the power supply cord into the bobbin case. a Handle Carry the machine by its handle when transporting the machine. e Power supply jack Insert...
... cover to be exchanged. f Embroidery foot "Q" This presser foot is lowered, it enters the hole in the needle plate. f Main power switch Use the main power switch to turn the machine on the power supply cord into the bobbin case. a Handle Carry the machine by its handle when transporting the machine. e Power supply jack Insert...
Users Manual - English
Page 12
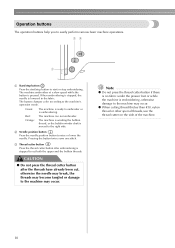
... Press the thread cutter button after the threads have already been cut both the upper and the bobbin threads. Orange: The machine is winding the bobbin thread, or the bobbin winder shaft is embroidering, otherwise damage to the machine may occur. b Needle position button Press the needle position button to start /stop embroidering. Note z Do...
... Press the thread cutter button after the threads have already been cut both the upper and the bobbin threads. Orange: The machine is winding the bobbin thread, or the bobbin winder shaft is embroidering, otherwise damage to the machine may occur. b Needle position button Press the needle position button to start /stop embroidering. Note z Do...
Users Manual - English
Page 13
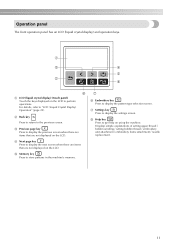
.... For details, refer to display the pattern type selection screen. g Settings key Press to perform operations. Displays simple explanations of setting upper thread / bobbin winding / setting bobbin thread / embroidery unit attachment / embroidery frame attachment / needle replacement. 11 a c d e b h f a LCD (liquid crystal display) (touch panel) Touch the keys displayed on the LCD. b Back...the previous screen. e Memory key Press to display the next screen when there are items that are not displayed on using the machine. d Next page key Press to store patterns in the...
.... For details, refer to display the pattern type selection screen. g Settings key Press to perform operations. Displays simple explanations of setting upper thread / bobbin winding / setting bobbin thread / embroidery unit attachment / embroidery frame attachment / needle replacement. 11 a c d e b h f a LCD (liquid crystal display) (touch panel) Touch the keys displayed on the LCD. b Back...the previous screen. e Memory key Press to display the next screen when there are items that are not displayed on using the machine. d Next page key Press to store patterns in the...

Users Manual - English
Page 15
... the embroidery unit 16 Turning the Machine On/Off 18 Power supply precautions 18 Turning on the machine 19 Turning off the machine 19 LCD (Liquid Crystal Display) Operation 20 Viewing the LCD 20 Changing the machine settings 21 Checking machine operating procedures 23 Winding/Installing the Bobbin 24 Bobbin precautions 24 Winding the bobbin 24 Installing the bobbin 28...
... the embroidery unit 16 Turning the Machine On/Off 18 Power supply precautions 18 Turning on the machine 19 Turning off the machine 19 LCD (Liquid Crystal Display) Operation 20 Viewing the LCD 20 Changing the machine settings 21 Checking machine operating procedures 23 Winding/Installing the Bobbin 24 Bobbin precautions 24 Winding the bobbin 24 Installing the bobbin 28...

Users Manual - English
Page 16
...Adjusting the layout" (page 61). ↓ 8 Setting up the embroidery Set up the bobbin thread For the bobbin thread, wind embroidery bobbin thread and set it in place. For details, refer to "Winding/Installing the Bobbin" (page 24). ↓ 4 Preparing the fabric Attach a stabilizer ...page 30). 14 GETTING READY Embroidery Step by Step The basic steps for embroidery are as follows. 1 Attaching the embroidery unit Attach the embroidery unit. (If the embroidery unit is not attached, the machine does not operate.) For details, refer to "Attaching the embroidery unit" (page 15). ...
...Adjusting the layout" (page 61). ↓ 8 Setting up the embroidery Set up the bobbin thread For the bobbin thread, wind embroidery bobbin thread and set it in place. For details, refer to "Winding/Installing the Bobbin" (page 24). ↓ 4 Preparing the fabric Attach a stabilizer ...page 30). 14 GETTING READY Embroidery Step by Step The basic steps for embroidery are as follows. 1 Attaching the embroidery unit Attach the embroidery unit. (If the embroidery unit is not attached, the machine does not operate.) For details, refer to "Attaching the embroidery unit" (page 15). ...
Users Manual - English
Page 25
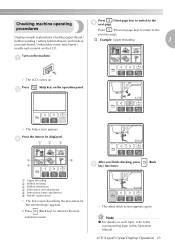
...comes on the LCD. Press b (Help key) on each topic, refer to the corresponding page in this Operation Manual. a Upper threading b Bobbin winding c Bobbin installation d Embroidery unit attachment e Embroidery frame attachment f Needle replacement X The first screen describing the procedure for the selected topic appears. • Press (Back key) to return ... appears. X The initial stitch screen appears again. procedures Press (Previous page key) to return to the d next page. Checking machine operating Press (Next page key) to switch to the previous page. Turn on the...
...comes on the LCD. Press b (Help key) on each topic, refer to the corresponding page in this Operation Manual. a Upper threading b Bobbin winding c Bobbin installation d Embroidery unit attachment e Embroidery frame attachment f Needle replacement X The first screen describing the procedure for the selected topic appears. • Press (Back key) to return ... appears. X The initial stitch screen appears again. procedures Press (Previous page key) to return to the d next page. Checking machine operating Press (Next page key) to switch to the previous page. Turn on the...
Users Manual - English
Page 26
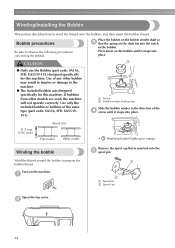
... cap Open the top cover. Winding the bobbin Wind the thread around the bobbin to the machine. ● The included bobbin was designed specifically for this machine. Use only the included bobbin or bobbins of the same type (part code: SA156, SFB: XA5539151). 2 a Notch b Bobbin winder shaft spring Slide the bobbin winder in the direction of any other models...
... cap Open the top cover. Winding the bobbin Wind the thread around the bobbin to the machine. ● The included bobbin was designed specifically for this machine. Use only the included bobbin or bobbins of the same type (part code: SA156, SFB: XA5539151). 2 a Notch b Bobbin winder shaft spring Slide the bobbin winder in the direction of any other models...
Users Manual - English
Page 27
... the thread unwinds to fit the size of the spool. 1 2 3 4 a Spool net b Spool c Spool cap d Spool pin Winding/Installing the Bobbin 25 If the spool cap is too small for the bobbin onto f the spool pin. Place the spool of thread for the spool being used , the thread may catch on the...
... the thread unwinds to fit the size of the spool. 1 2 3 4 a Spool net b Spool c Spool cap d Spool pin Winding/Installing the Bobbin 25 If the spool cap is too small for the bobbin onto f the spool pin. Place the spool of thread for the spool being used , the thread may catch on the...

Users Manual - English
Page 28
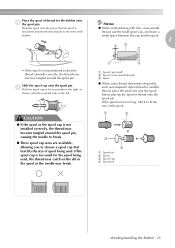
... guide cover Pass the thread under the thread guide plate, i and then pull it to wind the thread clockwise around the bobbin, otherwise the thread will become wrapped around the bobbin five or six times with your right hand. z Be sure to the right. 1 a Thread guide plate a Thread guide Note z Make sure... spool with h your right hand, as shown, pull the thread with your left hand, k wind the thread that the thread between the spool and the bobbin is pulled tight. Note z Make sure that was pulled out clockwise around the...
... guide cover Pass the thread under the thread guide plate, i and then pull it to wind the thread clockwise around the bobbin, otherwise the thread will become wrapped around the bobbin five or six times with your right hand. z Be sure to the right. 1 a Thread guide plate a Thread guide Note z Make sure... spool with h your right hand, as shown, pull the thread with your left hand, k wind the thread that the thread between the spool and the bobbin is pulled tight. Note z Make sure that was pulled out clockwise around the...
Users Manual - English
Page 29
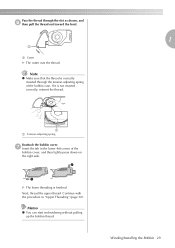
... the cutter built into the slit in the bobbin winder seat, the thread may become tangled in the bobbin or the needle may be damaged. If the bobbin is turned after winding the bobbin, the machine will make a clicking sound; Remove the spool for the bobbin thread from the shaft. this is not ... (Start/stop button) once to stop button) once to start m winding the bobbin. Winding/Installing the Bobbin 27 Press (Start/stop the machine. Pass the end of the thread n wound around the bobbin. 1 1 a Guide slit in bobbin winder seat (with built-in cutter) CAUTION ● Be sure to cut it...
... the cutter built into the slit in the bobbin winder seat, the thread may become tangled in the bobbin or the needle may be damaged. If the bobbin is turned after winding the bobbin, the machine will make a clicking sound; Remove the spool for the bobbin thread from the shaft. this is not ... (Start/stop button) once to stop button) once to start m winding the bobbin. Winding/Installing the Bobbin 27 Press (Start/stop the machine. Pass the end of the thread n wound around the bobbin. 1 1 a Guide slit in bobbin winder seat (with built-in cutter) CAUTION ● Be sure to cut it...
Users Manual - English
Page 30
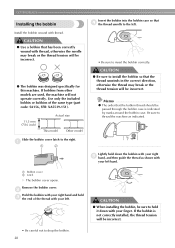
... sure to insert the bobbin correctly. a Bobbin cover b Latch X The bobbin cover opens. Remove the bobbin cover. GETTING READY Installing the bobbin Insert the bobbin into the bobbin case so that d the thread unrolls to the left . Slide the bobbin cover latch to thread the machine as shown with thread. Use only the included bobbin or bobbins of the thread with...
... sure to insert the bobbin correctly. a Bobbin cover b Latch X The bobbin cover opens. Remove the bobbin cover. GETTING READY Installing the bobbin Insert the bobbin into the bobbin case so that d the thread unrolls to the left . Slide the bobbin cover latch to thread the machine as shown with thread. Use only the included bobbin or bobbins of the thread with...
Users Manual - English
Page 31
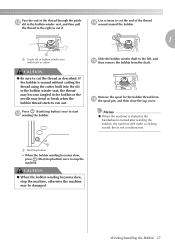
... lightly press down on the right side. 2 1 X The lower threading is not inserted correctly, reinsert the thread. 1 a Tension-adjusting spring Reattach the bobbin cover. Note z Make sure that the thread is correctly inserted through the slot as shown, and f then pull the thread out toward the front. 1... 1 a Cutter X The cutter cuts the thread. Continue with the procedure in the lower-left corner of the bobbin case. Winding/Installing the Bobbin 29 g Insert the tab in "Upper Threading" (page 30). If it is finished. Memo z You can start embroidering without pulling...
... lightly press down on the right side. 2 1 X The lower threading is not inserted correctly, reinsert the thread. 1 a Tension-adjusting spring Reattach the bobbin cover. Note z Make sure that the thread is correctly inserted through the slot as shown, and f then pull the thread out toward the front. 1... 1 a Cutter X The cutter cuts the thread. Continue with the procedure in the lower-left corner of the bobbin case. Winding/Installing the Bobbin 29 g Insert the tab in "Upper Threading" (page 30). If it is finished. Memo z You can start embroidering without pulling...
Users Manual - English
Page 41
...embroidery card (sold separately 55 Embroidering 56 Embroidering attractive finishes .....56 Embroidering a pattern 57 Appliquéing 59 Editing and Saving Patterns 61 Adjusting the layout 61 Storing patterns 63 Adjusting the thread tension...........64 Resewing 65 Thread runs out partway through a design 65 Stopping while embroidering .........66 Bobbin... Case Adjustment 68 Correct tension 68 Bobbin thread is loose 68 Bobbin thread is tight 68 Embroidering Neatly 40 What to prepare 40 ...
...embroidery card (sold separately 55 Embroidering 56 Embroidering attractive finishes .....56 Embroidering a pattern 57 Appliquéing 59 Editing and Saving Patterns 61 Adjusting the layout 61 Storing patterns 63 Adjusting the thread tension...........64 Resewing 65 Thread runs out partway through a design 65 Stopping while embroidering .........66 Bobbin... Case Adjustment 68 Correct tension 68 Bobbin thread is loose 68 Bobbin thread is tight 68 Embroidering Neatly 40 What to prepare 40 ...

Users Manual - English
Page 42
... a stabilizer material for embroidery to the fabric to the embroidery unit, and use embroidery thread designed for embroidery machines. Prepare a piece of fabric a little larger than the embroidery frame that are too thick. CAUTION ● Do not embroider fabrics that matches the size of the pattern you continue embroidering when the bobbin thread is enough bobbin thread. To...
... a stabilizer material for embroidery to the fabric to the embroidery unit, and use embroidery thread designed for embroidery machines. Prepare a piece of fabric a little larger than the embroidery frame that are too thick. CAUTION ● Do not embroider fabrics that matches the size of the pattern you continue embroidering when the bobbin thread is enough bobbin thread. To...


