Operation Manual
Page 3
... the instruction manual. • To unplug the machine, switch the machine to the symbol "O" position to turn it by any other part may fall, resulting in the needle area. • Do not use if you for future reference. Return the machine to persons. 2 Always unplug the machine from the build up of the machine and foot control free from the electrical outlet when making any adjustments...
... the instruction manual. • To unplug the machine, switch the machine to the symbol "O" position to turn it by any other part may fall, resulting in the needle area. • Do not use if you for future reference. Return the machine to persons. 2 Always unplug the machine from the build up of the machine and foot control free from the electrical outlet when making any adjustments...
Operation Manual
Page 4
... and knowledge, unless they have been given supervision or instruction concerning use outdoors. 8 For a longer service life: • When storing this manual. Cleaning and user maintenance shall not be used . • Always consult the Operation Manual when replacing or installing any assemblies, the presser feet, needle or other hot objects. • Use only neutral soaps or detergents to change without supervision. 2 Benzene, thinner, and scouring powders can be...
... and knowledge, unless they have been given supervision or instruction concerning use outdoors. 8 For a longer service life: • When storing this manual. Cleaning and user maintenance shall not be used . • Always consult the Operation Manual when replacing or installing any assemblies, the presser feet, needle or other hot objects. • Use only neutral soaps or detergents to change without supervision. 2 Benzene, thinner, and scouring powders can be...

Operation Manual
Page 6
... needle position 34 Embroidering linked characters 34 Using the Memory Function 35 Saving embroidery patterns 36 Retrieving embroidery patterns 36 Chapter 3 APPENDIX 37 Care and Maintenance 37 Restrictions on oiling 37 Precautions on storing the machine 37 Cleaning the race 37 Touch panel is malfunctioning 38 Adjusting the bobbin thread tension 38 Replacing the Embroidery Foot 39 If the thread becomes tangled under the bobbin winder seat 40 Troubleshooting 41 List of symptoms 41 Error...
... needle position 34 Embroidering linked characters 34 Using the Memory Function 35 Saving embroidery patterns 36 Retrieving embroidery patterns 36 Chapter 3 APPENDIX 37 Care and Maintenance 37 Restrictions on oiling 37 Precautions on storing the machine 37 Cleaning the race 37 Touch panel is malfunctioning 38 Adjusting the bobbin thread tension 38 Replacing the Embroidery Foot 39 If the thread becomes tangled under the bobbin winder seat 40 Troubleshooting 41 List of symptoms 41 Error...

Operation Manual
Page 7
...) 4 Spool pin (page 11) 5 Bobbin winder (page 11) 6 LCD (liquid crystal display) (page 10) 7 Operation panel (page 6) 8 Operation buttons (page 6) 9 Embroidery unit (page 19) 0 Thread cutter (page 16) A Needle threader lever (page 17) B Thread tension dial (page 28) C Handwheel Turn the handwheel toward you (counterclockwise) to raise and lower the needle to circulate. F Presser foot lever Raise and lower the presser foot lever to raise and lower the presser foot. Do not cover the air vent while the machine is...
...) 4 Spool pin (page 11) 5 Bobbin winder (page 11) 6 LCD (liquid crystal display) (page 10) 7 Operation panel (page 6) 8 Operation buttons (page 6) 9 Embroidery unit (page 19) 0 Thread cutter (page 16) A Needle threader lever (page 17) B Thread tension dial (page 28) C Handwheel Turn the handwheel toward you (counterclockwise) to raise and lower the needle to circulate. F Presser foot lever Raise and lower the presser foot lever to raise and lower the presser foot. Do not cover the air vent while the machine is...

Operation Manual
Page 8
... are items that its point is embroidering. The machine is winding the bobbin thread, or the bobbin winder shaft is stopped to set the needle stop embroidering. The pressure exerted on the keys does not affect the response of Machine Parts ■ Needle and presser foot section a ■ Operation panel and operation keys a f b c e d 1 Needle bar thread guide (page 16) 2 Needle plate 3 Needle plate cover (page 14) 4 Bobbin cover/bobbin case (page 14, 37) 5 Embroidery foot The embroidery foot helps control fabric flexibility for operation keys" on page 11. •...
... are items that its point is embroidering. The machine is winding the bobbin thread, or the bobbin winder shaft is stopped to set the needle stop embroidering. The pressure exerted on the keys does not affect the response of Machine Parts ■ Needle and presser foot section a ■ Operation panel and operation keys a f b c e d 1 Needle bar thread guide (page 16) 2 Needle plate 3 Needle plate cover (page 14) 4 Bobbin cover/bobbin case (page 14, 37) 5 Embroidery foot The embroidery foot helps control fabric flexibility for operation keys" on page 11. •...
Operation Manual
Page 9
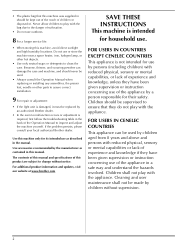
... foot "Q" (on included accessories and their part codes of Machine Parts Included accessories Included accessories may differ from the table below depending on the machine model you purchased. Scissors 13. Disc-shaped screwdriver 16. Embroidery frame set *1 8. For more details on machine) 7. Cleaning brush 14. Thread spool insert (mini king thread spool) 19. Needle set (medium) 10 cm (H) × 10 cm (W) (4 inches (H) × 4 inches (W)) Accessory bag Operation Manual *1 75/11 3 needles, 90/14 1 needle Quick Reference Guide Embroidery Design Guide 7 Bobbin...
... foot "Q" (on included accessories and their part codes of Machine Parts Included accessories Included accessories may differ from the table below depending on the machine model you purchased. Scissors 13. Disc-shaped screwdriver 16. Embroidery frame set *1 8. For more details on machine) 7. Cleaning brush 14. Thread spool insert (mini king thread spool) 19. Needle set (medium) 10 cm (H) × 10 cm (W) (4 inches (H) × 4 inches (W)) Accessory bag Operation Manual *1 75/11 3 needles, 90/14 1 needle Quick Reference Guide Embroidery Design Guide 7 Bobbin...
Operation Manual
Page 13
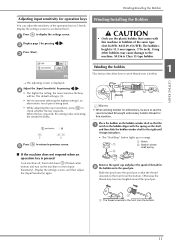
... 1 2 Bobbin winder shaft spring 2 Remove the spool cap and place the spool of thread for b the bobbin onto the spool pin. SA156 is being used. • While adjusting the input sensitivity, press to the machine. The default setting is [3]. • We recommend selecting the highest setting if an electrostatic touch pen is Class 15 type bobbin. Using other bobbins may become tangled around the spool pin. 1 1 The thread unwinds to 5 levels. Winding/Installing the Bobbin Adjusting...
... 1 2 Bobbin winder shaft spring 2 Remove the spool cap and place the spool of thread for b the bobbin onto the spool pin. SA156 is being used. • While adjusting the input sensitivity, press to the machine. The default setting is [3]. • We recommend selecting the highest setting if an electrostatic touch pen is Class 15 type bobbin. Using other bobbins may become tangled around the spool pin. 1 1 The thread unwinds to 5 levels. Winding/Installing the Bobbin Adjusting...

Operation Manual
Page 15
... in the bobbin winder seat, the thread may become wrapped around the bobbin 5 or 6 f times, pass the thread through the slit in the needle plate cover. CAUTION • When the bobbin winding becomes slow, stop the machine. CAUTION • Use a bobbin that the thread is pressed and the machine starts. Press . GETTING READY Raise the presser foot lever. Cut the thread, slide the bobbin winder shaft to lock all keys and operation buttons are locked (except ). CAUTION...
... in the bobbin winder seat, the thread may become wrapped around the bobbin 5 or 6 f times, pass the thread through the slit in the needle plate cover. CAUTION • When the bobbin winding becomes slow, stop the machine. CAUTION • Use a bobbin that the thread is pressed and the machine starts. Press . GETTING READY Raise the presser foot lever. Cut the thread, slide the bobbin winder shaft to lock all keys and operation buttons are locked (except ). CAUTION...

Operation Manual
Page 17
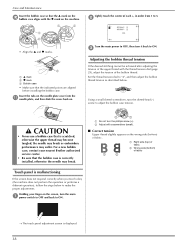
Upper Threading CAUTION • When threading the upper thread, carefully follow the instructions. Upper Threading Remove the spool cap and place the spool of spool being used. Turn on page 12. When threading the upper thread, carefully follow the instructions. Note • If the presser foot is not raised, the machine cannot be a b threaded. 1 Thread guide Press (Needle position button) once or twice to c raise the needle. 2 Thread guide cover The needle is correctly raised when the mark on the...
Upper Threading CAUTION • When threading the upper thread, carefully follow the instructions. Upper Threading Remove the spool cap and place the spool of spool being used. Turn on page 12. When threading the upper thread, carefully follow the instructions. Note • If the presser foot is not raised, the machine cannot be a b threaded. 1 Thread guide Press (Needle position button) once or twice to c raise the needle. 2 Thread guide cover The needle is correctly raised when the mark on the...

Operation Manual
Page 20
... the machine. 18 Press (Needle position button) once or twice to cover b the hole in injuries. ■ Thread and needle number The lower the thread number is pressed and the machine starts. Replacing the Needle Replacing the Needle Press . Bent needles can easily break, possibly resulting in the needle plate to insert the needle until it touches the needle stopper and securely tighten the needle clamp screw with your left hand, and then use recommended home sewing machine needles. c The screen changes...
... the machine. 18 Press (Needle position button) once or twice to cover b the hole in injuries. ■ Thread and needle number The lower the thread number is pressed and the machine starts. Replacing the Needle Replacing the Needle Press . Bent needles can easily break, possibly resulting in the needle plate to insert the needle until it touches the needle stopper and securely tighten the needle clamp screw with your left hand, and then use recommended home sewing machine needles. c The screen changes...

Operation Manual
Page 21
... up embroidery thread 26 thread setup according to the pattern. Attaching the Embroidery Unit CAUTION • Before attaching the embroidery unit, be damaged, and it in place. 4 Fabric preparation Attach a stabilizer material to 21 the fabric, and hoop it may result. Turn on , 24 and select an embroidery pattern. 7 Checking the Check and adjust the size and 25 layout position of the operation buttons is accidentally pressed and the machine starts embroidering. •...
... up embroidery thread 26 thread setup according to the pattern. Attaching the Embroidery Unit CAUTION • Before attaching the embroidery unit, be damaged, and it in place. 4 Fabric preparation Attach a stabilizer material to 21 the fabric, and hoop it may result. Turn on , 24 and select an embroidery pattern. 7 Checking the Check and adjust the size and 25 layout position of the operation buttons is accidentally pressed and the machine starts embroidering. •...

Operation Manual
Page 25
... is attached. Embroidering Preparation ■ Removing the embroidery frame Raise the presser foot lever to raise the presser foot. Line up the embroidery frame guide tabs and the embroidery carriage frame holder slots and push in the b figure to use the recommended bobbin thread. CAUTION • Correctly set the embroidery frame into the c embroidery carriage frame holder from the embroidery frame holder. b • If necessary, raise the presser foot lever even further. a Pass the embroidery frame...
... is attached. Embroidering Preparation ■ Removing the embroidery frame Raise the presser foot lever to raise the presser foot. Line up the embroidery frame guide tabs and the embroidery carriage frame holder slots and push in the b figure to use the recommended bobbin thread. CAUTION • Correctly set the embroidery frame into the c embroidery carriage frame holder from the embroidery frame holder. b • If necessary, raise the presser foot lever even further. a Pass the embroidery frame...

Operation Manual
Page 28
... thread a little slack. CAUTION • Make sure the needle is up when the embroidery frame is initially turned on the setting selected in injury. Press , and then press . Raise the presser foot lever and pass the thread through c the embroidery foot hole, and hold the fabric to keep it could break and result in the settings screen. The pattern may strike the needle, causing the needle to "Threading the upper thread...
... thread a little slack. CAUTION • Make sure the needle is up when the embroidery frame is initially turned on the setting selected in injury. Press , and then press . Raise the presser foot lever and pass the thread through c the embroidery foot hole, and hold the fabric to keep it could break and result in the settings screen. The pattern may strike the needle, causing the needle to "Threading the upper thread...

Operation Manual
Page 30
... needle back the d correct number of thread during embroidering Press the "Start/Stop" button to 6. Press . Lower the presser foot and press the "Start/Stop" e button to stitch over the top of the bobbin thread. When doing machine embroidery, the tension dial should be visible on page 38. 28 Memo • If you have the option to "Adjusting the bobbin thread tension" on the right side (top) of fabric Note • If the upper thread...
... needle back the d correct number of thread during embroidering Press the "Start/Stop" button to 6. Press . Lower the presser foot and press the "Start/Stop" e button to stitch over the top of the bobbin thread. When doing machine embroidery, the tension dial should be visible on page 38. 28 Memo • If you have the option to "Adjusting the bobbin thread tension" on the right side (top) of fabric Note • If the upper thread...

Operation Manual
Page 39
... the needle. Remove the needle and embroidery foot. f Grasp both sides of time without using the machine, and contact your authorized Brother dealer or the nearest Brother authorized service center. This machine was manufactured with a damp cloth, wipe it . b Unplug the power cord from the race and bobbin thread sensor and the surrounding area. a Turn off the machine. Storing this machine for example, rust caused by the user. h Use the cleaning...
... the needle. Remove the needle and embroidery foot. f Grasp both sides of time without using the machine, and contact your authorized Brother dealer or the nearest Brother authorized service center. This machine was manufactured with a damp cloth, wipe it . b Unplug the power cord from the race and bobbin thread sensor and the surrounding area. a Turn off the machine. Storing this machine for example, rust caused by the user. h Use the cleaning...
Operation Manual
Page 40
... tension of the upper thread with the thread tension dial (page 29), adjust the tension of each +, in order from 1 to ON. Using a small slotted screwdriver, turn it back to 5. For a new bobbin case, contact your finger on the screen, turn the main a power switch to OFF and back to make the proper adjustments. Lightly touch the center of the bobbin thread. Insert the tabs on the needle plate cover into the k needle plate...
... tension of the upper thread with the thread tension dial (page 29), adjust the tension of each +, in order from 1 to ON. Using a small slotted screwdriver, turn it back to 5. For a new bobbin case, contact your finger on the screen, turn the main a power switch to OFF and back to make the proper adjustments. Lightly touch the center of the bobbin thread. Insert the tabs on the needle plate cover into the k needle plate...
Operation Manual
Page 43
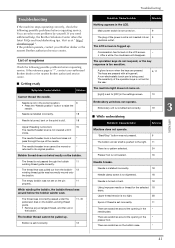
Needle is installed incorrectly. 18 Needle is turned, bent or the point is dull. 18 Upper threading is incorrect. 15 The needle threader lever is not attached correctly. ■ While embroidering Symptom, Cause/solution Machine does not operate. The empty bobbin was not set incorrectly. 11 There are scratches around the opening in the * presser foot. The LCD screen is set on the pin 11 properly. Embroidery unit is not lowered until...
Needle is installed incorrectly. 18 Needle is turned, bent or the point is dull. 18 Upper threading is incorrect. 15 The needle threader lever is not attached correctly. ■ While embroidering Symptom, Cause/solution Machine does not operate. The empty bobbin was not set incorrectly. 11 There are scratches around the opening in the * presser foot. The LCD screen is set on the pin 11 properly. Embroidery unit is not lowered until...

Operation Manual
Page 44
... There is set incorrectly. 13 Upper threading is incorrect. 15 High-pitched sound while embroidering Pieces of thread is a mistake in the * embroidery foot. Upper threading is incorrect. 15 Using improper needle or thread for the selected 18 fabric. The needle contacts the needle plate. Troubleshooting Symptom, Cause/solution Reference A bobbin designed specifically for this machine is 11 not used. Spool of thread are scratches near the hole in the upper or bobbin threading. The needle clamp screw is loose. 18 Needle is...
... There is set incorrectly. 13 Upper threading is incorrect. 15 High-pitched sound while embroidering Pieces of thread is a mistake in the * embroidery foot. Upper threading is incorrect. 15 Using improper needle or thread for the selected 18 fabric. The needle contacts the needle plate. Troubleshooting Symptom, Cause/solution Reference A bobbin designed specifically for this machine is 11 not used. Spool of thread are scratches near the hole in the upper or bobbin threading. The needle clamp screw is loose. 18 Needle is...
Operation Manual
Page 46
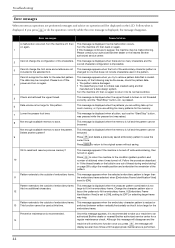
... Brother dealer or nearest Brother authorized service center for the embroidery frame. Turn the machine off . This message is set to [ON], setting to save the current one that it is displayed when a button, such as the "Start/Stop" button, was pressed while the presser foot was created using another pattern? Follow the procedure described in "If the thread breaks or the bobbin runs out of thread during embroidering...
... Brother dealer or nearest Brother authorized service center for the embroidery frame. Turn the machine off . This message is set to [ON], setting to save the current one that it is displayed when a button, such as the "Start/Stop" button, was pressed while the presser foot was created using another pattern? Follow the procedure described in "If the thread breaks or the bobbin runs out of thread during embroidering...

Operation Manual
Page 47
... the bobbin is being used, the machine may be used . This message is running out. This message appears before embroidery unit moves. Keep your authorized Brother dealer or the nearest Brother authorized service center. 3 APPENDIX 45 When embroidering, press (Thread cutter button) to cut the threads, raise the presser foot, remove the embroidery frame, and then replace the bobbin with one wound with a wound bobbin immediately. Troubleshooting Error messages Cause/solution The bobbin thread...
... the bobbin is being used, the machine may be used . This message is running out. This message appears before embroidery unit moves. Keep your authorized Brother dealer or the nearest Brother authorized service center. 3 APPENDIX 45 When embroidering, press (Thread cutter button) to cut the threads, raise the presser foot, remove the embroidery frame, and then replace the bobbin with one wound with a wound bobbin immediately. Troubleshooting Error messages Cause/solution The bobbin thread...


