Users Manual - English
Page 2
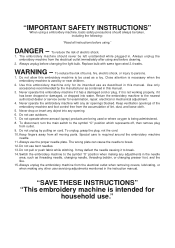
...bulb. Always use bent needles. 13. Do not use the proper needle plate. Always unplug the embroidery machine from the electrical outlet immediately after using ." The embroidery machine should always be used as a toy. It may deflect the needle causing it to the nearest ...Special care is not working properly, if it is required around the embroidery machine needle. 11. Always unplug before cleaning. 2. To disconnect, turn the main switch to be taken, including the following: "Read all moving parts. Never operate this manual. 3. Never drop or insert any object ...
...bulb. Always use bent needles. 13. Do not use the proper needle plate. Always unplug the embroidery machine from the electrical outlet immediately after using ." The embroidery machine should always be used as a toy. It may deflect the needle causing it to the nearest ...Special care is not working properly, if it is required around the embroidery machine needle. 11. Always unplug before cleaning. 2. To disconnect, turn the main switch to be taken, including the following: "Read all moving parts. Never operate this manual. 3. Never drop or insert any object ...
Users Manual - English
Page 4
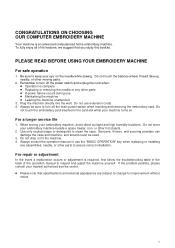
...balance wheel, thread take-up, needle, or other parts to assure correct installation. When storing your nearest authorized service center. ● Please note that you study this booklet. PLEASE READ BEFORE USING YOUR EMBROIDERY MACHINE For safe operation 1. Always consult the operation manual ...or use the "BASIC OPERATION" key when replacing or installing any other hot objects. 2. needle, or other moving parts. 2. Plug the machine directly into the wall. For a ...
...balance wheel, thread take-up, needle, or other parts to assure correct installation. When storing your nearest authorized service center. ● Please note that you study this booklet. PLEASE READ BEFORE USING YOUR EMBROIDERY MACHINE For safe operation 1. Always consult the operation manual ...or use the "BASIC OPERATION" key when replacing or installing any other hot objects. 2. needle, or other moving parts. 2. Plug the machine directly into the wall. For a ...

Users Manual - English
Page 5
... 18 Attaching stabilizer material 18 Embroidering different types of fabric 18 Setting the fabric in the embroidery frame 20 Fitting the embroidery frame to the machine 22 Removing the embroidery frame ...... 22 THREAD TENSION ADJUSTMENT....... 23 ADJUSTING THE LCD SCREEN CONTRAST 24 If the LCD...using a frame pattern 52 Embroidering onto small pieces of fabric or onto corners ........ 53 IF THREAD BREAKS DURING EMBROIDERING OR WHEN PARTLY COMPLETING A PATTERN 54 If thread breaks during embroidering 55 Re-embroidering from the beginning 56 MAINTENANCE 57 CHANGING THE LIGHT BULB 57...
... 18 Attaching stabilizer material 18 Embroidering different types of fabric 18 Setting the fabric in the embroidery frame 20 Fitting the embroidery frame to the machine 22 Removing the embroidery frame ...... 22 THREAD TENSION ADJUSTMENT....... 23 ADJUSTING THE LCD SCREEN CONTRAST 24 If the LCD...using a frame pattern 52 Embroidering onto small pieces of fabric or onto corners ........ 53 IF THREAD BREAKS DURING EMBROIDERING OR WHEN PARTLY COMPLETING A PATTERN 54 If thread breaks during embroidering 55 Re-embroidering from the beginning 56 MAINTENANCE 57 CHANGING THE LIGHT BULB 57...
Users Manual - English
Page 6
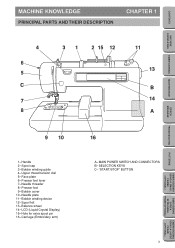
Spool cap 3- Face plate 6- Bobbin cover 10- Balance wheel 14- CONTENTS MACHINE KNOWLEDGE EMBROIDERING MAINTENANCE MACHINE KNOWLEDGE PRINCIPAL PARTS AND THEIR DESCRIPTION CHAPTER 1 4 6 5 C 7 8 31 2 15 12 11 13 B 14 A ERROR MESSAGE TROUBLESHOOTING PATTERNS EMBROIDERING USING A SMALL FRAME (OPTIONAL) 9 10...(OPTIONAL) EMBROIDERING USING A LARGE FRAME (OPTIONAL) 3 Needle threader 8- Presser foot 9- Upper thread tension dial 5- Bobbin winding device 12- Carriage (Embroidery arm) 16 A- Handle 2- Presser foot lever 7- Needle plate 11- Hole for extra spool pin 16-
Spool cap 3- Face plate 6- Bobbin cover 10- Balance wheel 14- CONTENTS MACHINE KNOWLEDGE EMBROIDERING MAINTENANCE MACHINE KNOWLEDGE PRINCIPAL PARTS AND THEIR DESCRIPTION CHAPTER 1 4 6 5 C 7 8 31 2 15 12 11 13 B 14 A ERROR MESSAGE TROUBLESHOOTING PATTERNS EMBROIDERING USING A SMALL FRAME (OPTIONAL) 9 10...(OPTIONAL) EMBROIDERING USING A LARGE FRAME (OPTIONAL) 3 Needle threader 8- Presser foot 9- Upper thread tension dial 5- Bobbin winding device 12- Carriage (Embroidery arm) 16 A- Handle 2- Presser foot lever 7- Needle plate 11- Hole for extra spool pin 16-
Users Manual - English
Page 9
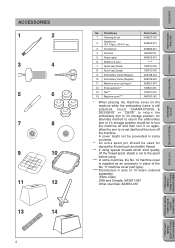
... 3pcs., 90/14 1 pc. 3 Screwdriver 4 Scissors 5 Seam ripper 6 Bobbins (4 pcs) 7 Spool cap (Small) 8 Spool cap (Large) 9 Embroidery sheet (Regular) 10 Embroidery frame (Regular) 11 Machine cover (soft type)* 12 Extra spool pin** 13 Net*** 14 Machine cover**** Parts Code XA4527-001 X59535-001 X53666-001 184783-001 X54243-001 ***** 130013-003 130012-003 XA3728-001...
... 3pcs., 90/14 1 pc. 3 Screwdriver 4 Scissors 5 Seam ripper 6 Bobbins (4 pcs) 7 Spool cap (Small) 8 Spool cap (Large) 9 Embroidery sheet (Regular) 10 Embroidery frame (Regular) 11 Machine cover (soft type)* 12 Extra spool pin** 13 Net*** 14 Machine cover**** Parts Code XA4527-001 X59535-001 X53666-001 184783-001 X54243-001 ***** 130013-003 130012-003 XA3728-001...
Users Manual - English
Page 10
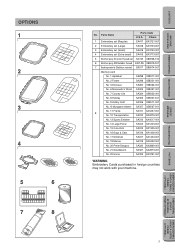
... (Regular) SA417 XA3727-001 2 Embroidery set (Large) SA418 XA3733-001 3 Embroidery set (Small) SA416 XA3730-001 4 Embroidery set (Extra-small) SA415 XA3713-001 5 Brother poly 40 color thread set SA740 X80928-100 6 Brother poly #90 bobbin thread EBT-PE X80919-001 7 Backing material (...Designs SA320 XA2869-001 No. 21 Needlework SA321 XA2873-001 No. 25 Horse SA325 XA3791-001 WARNING Embroidery Cards purchased in foreign countries may not work with your machine. 7 EMBROIDERING USING A LARGE FRAME (OPTIONAL) EMBROIDERING USING A EXTRA-SMALL FRAME (OPTIONAL) EMBROIDERING USING...
... (Regular) SA417 XA3727-001 2 Embroidery set (Large) SA418 XA3733-001 3 Embroidery set (Small) SA416 XA3730-001 4 Embroidery set (Extra-small) SA415 XA3713-001 5 Brother poly 40 color thread set SA740 X80928-100 6 Brother poly #90 bobbin thread EBT-PE X80919-001 7 Backing material (...Designs SA320 XA2869-001 No. 21 Needlework SA321 XA2873-001 No. 25 Horse SA325 XA3791-001 WARNING Embroidery Cards purchased in foreign countries may not work with your machine. 7 EMBROIDERING USING A LARGE FRAME (OPTIONAL) EMBROIDERING USING A EXTRA-SMALL FRAME (OPTIONAL) EMBROIDERING USING...
Users Manual - English
Page 51
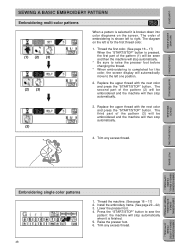
Lower the presser foot. 4. Trim any excess thread. CONTENTS MACHINE KNOWLEDGE EMBROIDERING MAINTENANCE SEWING A BASIC EMBROIDERY PATTERN Embroidering multi-color patterns (1) (2) (3) (2) (3) When a pattern is selected it is finished. 5. The third part of the pattern (2) will be embroidered and the machine will then stop automatically. * Be sure to the left one position. 2. The diagram on the...
Lower the presser foot. 4. Trim any excess thread. CONTENTS MACHINE KNOWLEDGE EMBROIDERING MAINTENANCE SEWING A BASIC EMBROIDERY PATTERN Embroidering multi-color patterns (1) (2) (3) (2) (3) When a pattern is selected it is finished. 5. The third part of the pattern (2) will be embroidered and the machine will then stop automatically. * Be sure to the left one position. 2. The diagram on the...
Users Manual - English
Page 57
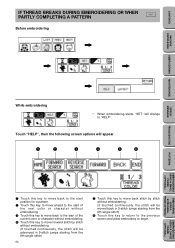
...the stitch will change to begin. CONTENTS IF THREAD BREAKS DURING EMBROIDERING OR WHEN PARTLY COMPLETING A PATTERN Before embroidering MACHINE KNOWLEDGE EMBROIDERING MAINTENANCE ERROR MESSAGE TROUBLESHOOTING PATTERNS EMBROIDERING USING A SMALL FRAME (OPTIONAL)... While embroidering * When embroidering starts, "SET" will be moved back in 9-stitch jumps starting from the 6th single stitch) 6 Touch this key to return to the previous screen and allow embroidery...
...the stitch will change to begin. CONTENTS IF THREAD BREAKS DURING EMBROIDERING OR WHEN PARTLY COMPLETING A PATTERN Before embroidering MACHINE KNOWLEDGE EMBROIDERING MAINTENANCE ERROR MESSAGE TROUBLESHOOTING PATTERNS EMBROIDERING USING A SMALL FRAME (OPTIONAL)... While embroidering * When embroidering starts, "SET" will be moved back in 9-stitch jumps starting from the 6th single stitch) 6 Touch this key to return to the previous screen and allow embroidery...
Users Manual - English
Page 60
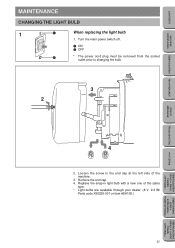
Loosen the screw in light bulb with a new one of the machine. 3. Turn the main power switch off. 1 ON 2 OFF * The power cord plug must be removed from the socket outlet prior to changing the bulb. 3 2 4 2. Remove ...the end cap. 4. Replace the snap-in the end cap at the left side of the same type. * Light bulbs are available through your dealer. (8 V, 2.4 W/ Parts code X50228-001 or item #SA105.) ERROR MESSAGE TROUBLESHOOTING PATTERNS EMBROIDERING USING A SMALL FRAME (OPTIONAL) EMBROIDERING USING A EXTRA-SMALL FRAME (OPTIONAL) EMBROIDERING USING A LARGE FRAME...
Loosen the screw in light bulb with a new one of the machine. 3. Turn the main power switch off. 1 ON 2 OFF * The power cord plug must be removed from the socket outlet prior to changing the bulb. 3 2 4 2. Remove ...the end cap. 4. Replace the snap-in the end cap at the left side of the same type. * Light bulbs are available through your dealer. (8 V, 2.4 W/ Parts code X50228-001 or item #SA105.) ERROR MESSAGE TROUBLESHOOTING PATTERNS EMBROIDERING USING A SMALL FRAME (OPTIONAL) EMBROIDERING USING A EXTRA-SMALL FRAME (OPTIONAL) EMBROIDERING USING A LARGE FRAME...

Users Manual - English
Page 70
in other words, the movement of stabilizer fabric onto the part to be embroidered, and then place the entire piece into the frame together with the fabric to be embroidered. 67 PATTERNS EMBROIDERING USING A SMALL FRAME ...) If you have changed the position of the pattern on the "LAYOUT" screen, check that the embroidering area for the carriage (embroidery arm) after the power is turned on - CONTENTS MACHINE KNOWLEDGE EMBROIDERING MAINTENANCE ERROR MESSAGE TROUBLESHOOTING EMBROIDERING USING A SMALL FRAME (OPTIONAL) Embroidering items such as handkerchiefs and collars If the accessory...
in other words, the movement of stabilizer fabric onto the part to be embroidered, and then place the entire piece into the frame together with the fabric to be embroidered. 67 PATTERNS EMBROIDERING USING A SMALL FRAME ...) If you have changed the position of the pattern on the "LAYOUT" screen, check that the embroidering area for the carriage (embroidery arm) after the power is turned on - CONTENTS MACHINE KNOWLEDGE EMBROIDERING MAINTENANCE ERROR MESSAGE TROUBLESHOOTING EMBROIDERING USING A SMALL FRAME (OPTIONAL) Embroidering items such as handkerchiefs and collars If the accessory...


