Users Manual - English
Page 2
... only accessories recommended by the manufacturer as contained in the needle area, such as threading needle, changing needle, threading bobbin, or changing presser foot, and the like. 15. Never operate the embroidery machine with same type rated 2.4 watts. To disconnect, turn the main switch to break.... To reduce the risk of burns, fire, electric shock, or injury to break. 14. "IMPORTANT SAFETY INSTRUCTIONS" When using a embroidery machine, basic safety precautions should never be used as a toy. Always use as described in the instruction manual. Never drop or insert any...
... only accessories recommended by the manufacturer as contained in the needle area, such as threading needle, changing needle, threading bobbin, or changing presser foot, and the like. 15. Never operate the embroidery machine with same type rated 2.4 watts. To disconnect, turn the main switch to break.... To reduce the risk of burns, fire, electric shock, or injury to break. 14. "IMPORTANT SAFETY INSTRUCTIONS" When using a embroidery machine, basic safety precautions should never be used as a toy. Always use as described in the instruction manual. Never drop or insert any...
Users Manual - English
Page 4
... adjustment is required, first follow the troubleshooting table in the card slot while your embroidery machine beside a space heater, iron, or other moving parts. 2. PLEASE READ BEFORE USING YOUR EMBROIDERY MACHINE For safe operation 1. Do not touch the balance wheel, thread take-up, needle, or other hot objects. 2. Always be used. 3. Do not store your...
... adjustment is required, first follow the troubleshooting table in the card slot while your embroidery machine beside a space heater, iron, or other moving parts. 2. PLEASE READ BEFORE USING YOUR EMBROIDERY MACHINE For safe operation 1. Do not touch the balance wheel, thread take-up, needle, or other hot objects. 2. Always be used. 3. Do not store your...

Users Manual - English
Page 5
... PREPARATION BEFORE EMBROIDERING 18 Attaching stabilizer material 18 Embroidering different types of fabric 18 Setting the fabric in the embroidery frame 20 Fitting the embroidery frame to the machine 22 Removing the embroidery frame ...... 22 THREAD TENSION ADJUSTMENT....... 23 ADJUSTING THE LCD SCREEN CONTRAST 24 If the LCD is hard to see when the power...
... PREPARATION BEFORE EMBROIDERING 18 Attaching stabilizer material 18 Embroidering different types of fabric 18 Setting the fabric in the embroidery frame 20 Fitting the embroidery frame to the machine 22 Removing the embroidery frame ...... 22 THREAD TENSION ADJUSTMENT....... 23 ADJUSTING THE LCD SCREEN CONTRAST 24 If the LCD is hard to see when the power...
Users Manual - English
Page 6
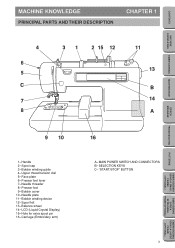
...A EXTRA-SMALL FRAME (OPTIONAL) EMBROIDERING USING A LARGE FRAME (OPTIONAL) 3 Balance wheel 14- Carriage (Embroidery arm) 16 A- Handle 2- Upper thread tension dial 5- Presser foot 9- Face plate 6- Needle plate 11- MAIN POWER SWITCH AND CONNECTORS B- ...Bobbin cover 10- Spool felt 13- Hole for extra spool pin 16- SELECTION KEYS C- Presser foot lever 7- CONTENTS MACHINE KNOWLEDGE EMBROIDERING MAINTENANCE MACHINE KNOWLEDGE PRINCIPAL...
...A EXTRA-SMALL FRAME (OPTIONAL) EMBROIDERING USING A LARGE FRAME (OPTIONAL) 3 Balance wheel 14- Carriage (Embroidery arm) 16 A- Handle 2- Upper thread tension dial 5- Presser foot 9- Face plate 6- Needle plate 11- MAIN POWER SWITCH AND CONNECTORS B- ...Bobbin cover 10- Spool felt 13- Hole for extra spool pin 16- SELECTION KEYS C- Presser foot lever 7- CONTENTS MACHINE KNOWLEDGE EMBROIDERING MAINTENANCE MACHINE KNOWLEDGE PRINCIPAL...
Users Manual - English
Page 9
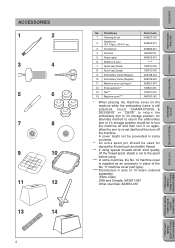
... 's storage position would be used for decorative thread such as metallic thread. *** If using . **** In some countries. ** An extra spool pin should be to turn the machine off and then turn off the machine. An alternate method to return the embroidery arm to it on the machine while the embroidery frame is supplied as an accessory in...
... 's storage position would be used for decorative thread such as metallic thread. *** If using . **** In some countries. ** An extra spool pin should be to turn the machine off and then turn off the machine. An alternate method to return the embroidery arm to it on the machine while the embroidery frame is supplied as an accessory in...
Users Manual - English
Page 10
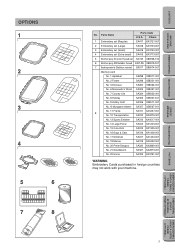
... Parts Code U.S.A. Others 1 Embroidery set (Regular) SA417 XA3727-001 2 Embroidery set (Large) SA418 XA3733-001 3 Embroidery set (Small) SA416 XA3730-001 4 Embroidery set (Extra-small) SA415 XA3713-001 5 Brother poly 40 color thread set SA740 X80928-100 6 Brother poly #90 bobbin thread EBT-PE X80919-001 7 ...SA320 XA2869-001 No. 21 Needlework SA321 XA2873-001 No. 25 Horse SA325 XA3791-001 WARNING Embroidery Cards purchased in foreign countries may not work with your machine. 7 EMBROIDERING USING A LARGE FRAME (OPTIONAL) EMBROIDERING USING A EXTRA-SMALL FRAME (OPTIONAL) ...
... Parts Code U.S.A. Others 1 Embroidery set (Regular) SA417 XA3727-001 2 Embroidery set (Large) SA418 XA3733-001 3 Embroidery set (Small) SA416 XA3730-001 4 Embroidery set (Extra-small) SA415 XA3713-001 5 Brother poly 40 color thread set SA740 X80928-100 6 Brother poly #90 bobbin thread EBT-PE X80919-001 7 ...SA320 XA2869-001 No. 21 Needlework SA321 XA2873-001 No. 25 Horse SA325 XA3791-001 WARNING Embroidery Cards purchased in foreign countries may not work with your machine. 7 EMBROIDERING USING A LARGE FRAME (OPTIONAL) EMBROIDERING USING A EXTRA-SMALL FRAME (OPTIONAL) ...
Users Manual - English
Page 13
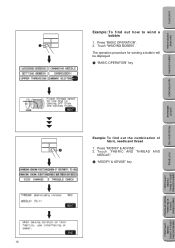
CONTENTS MACHINE KNOWLEDGE EMBROIDERING MAINTENANCE ERROR MESSAGE TROUBLESHOOTING Example: To find out the combination of fabric, needle and thread 1. Touch "WINDING BOBBIN". Press "MODIFY & ADVISE". 2. Press "BASIC OPERATION". 2. The operation procedure for winding a bobbin will be displayed. 1 "BASIC OPERATION" key Example: To find out how to wind a bobbin 1. Touch "FABRIC AND THREAD AND NEEDLE". 2 "MODIFY & ADVISE" key 10 PATTERNS EMBROIDERING USING A SMALL FRAME (OPTIONAL) EMBROIDERING USING A EXTRA-SMALL FRAME (OPTIONAL) EMBROIDERING USING A LARGE FRAME (OPTIONAL)
CONTENTS MACHINE KNOWLEDGE EMBROIDERING MAINTENANCE ERROR MESSAGE TROUBLESHOOTING Example: To find out the combination of fabric, needle and thread 1. Touch "WINDING BOBBIN". Press "MODIFY & ADVISE". 2. Press "BASIC OPERATION". 2. The operation procedure for winding a bobbin will be displayed. 1 "BASIC OPERATION" key Example: To find out how to wind a bobbin 1. Touch "FABRIC AND THREAD AND NEEDLE". 2 "MODIFY & ADVISE" key 10 PATTERNS EMBROIDERING USING A SMALL FRAME (OPTIONAL) EMBROIDERING USING A EXTRA-SMALL FRAME (OPTIONAL) EMBROIDERING USING A LARGE FRAME (OPTIONAL)

Users Manual - English
Page 16
CONTENTS MACHINE KNOWLEDGE EMBROIDERING MAINTENANCE BOBBIN WINDING AND INSTALLATION How to the power supply and turn on the spool post. * The spool cap should come from the thread on the spool before using. 1 Cross wound thread 2 Spool cap (small) 3 Separate slightly 4 No spool felt 13 EMBROIDERING USING A... from the bottom front of the spool. Set the thread spool. The spool cap closest to the thread spool size should be used to hold the spool securely on the main power. 1 ON 2 OFF 2. Connect the machine to wind a bobbin and set the lower thread. 1 1 "BASIC OPERATION" key 3 2 6 7...
CONTENTS MACHINE KNOWLEDGE EMBROIDERING MAINTENANCE BOBBIN WINDING AND INSTALLATION How to the power supply and turn on the spool post. * The spool cap should come from the thread on the spool before using. 1 Cross wound thread 2 Spool cap (small) 3 Separate slightly 4 No spool felt 13 EMBROIDERING USING A... from the bottom front of the spool. Set the thread spool. The spool cap closest to the thread spool size should be used to hold the spool securely on the main power. 1 ON 2 OFF 2. Connect the machine to wind a bobbin and set the lower thread. 1 1 "BASIC OPERATION" key 3 2 6 7...
Users Manual - English
Page 17
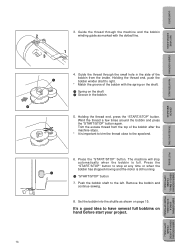
... side of the bobbin from the top of the bobbin with the dotted line. 1 4. Holding the thread end, press the "START/STOP" button. Guide the thread through the machine and the bobbin winding guide as shown on hand before start your project. It's a good idea to... USING A EXTRA-SMALL FRAME (OPTIONAL) EMBROIDERING USING A LARGE FRAME (OPTIONAL) 14 CONTENTS MACHINE KNOWLEDGE EMBROIDERING MAINTENANCE ERROR MESSAGE 2 3 3. Guide the thread through the small hole in the bobbin 5. Wind the thread a few times around the bobbin and press the "START/STOP" button again. Trim the...
... side of the bobbin from the top of the bobbin with the dotted line. 1 4. Holding the thread end, press the "START/STOP" button. Guide the thread through the machine and the bobbin winding guide as shown on hand before start your project. It's a good idea to... USING A EXTRA-SMALL FRAME (OPTIONAL) EMBROIDERING USING A LARGE FRAME (OPTIONAL) 14 CONTENTS MACHINE KNOWLEDGE EMBROIDERING MAINTENANCE ERROR MESSAGE 2 3 3. Guide the thread through the small hole in the bobbin 5. Wind the thread a few times around the bobbin and press the "START/STOP" button again. Trim the...
Users Manual - English
Page 18
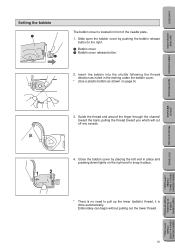
... around the finger through the channel toward the back, pulling the thread toward you which will cut off any excess. Embroidery can begin without pulling out the lower thread. 15 EMBROIDERING USING A LARGE FRAME (OPTIONAL) TROUBLESHOOTING PATTERNS EMBROIDERING USING A SMALL FRAME (OPTIONAL) EMBROIDERING USING A EXTRA-SMALL ... the bobbin release button to pull up the lower (bobbin) thread, it is located in the etching under the bobbin cover. * (Use a plastic bobbin as noted in front of the needle plate. 1. CONTENTS MACHINE KNOWLEDGE Setting the bobbin 1 2 The bobbin cover is done ...
... around the finger through the channel toward the back, pulling the thread toward you which will cut off any excess. Embroidery can begin without pulling out the lower thread. 15 EMBROIDERING USING A LARGE FRAME (OPTIONAL) TROUBLESHOOTING PATTERNS EMBROIDERING USING A SMALL FRAME (OPTIONAL) EMBROIDERING USING A EXTRA-SMALL ... the bobbin release button to pull up the lower (bobbin) thread, it is located in the etching under the bobbin cover. * (Use a plastic bobbin as noted in front of the needle plate. 1. CONTENTS MACHINE KNOWLEDGE Setting the bobbin 1 2 The bobbin cover is done ...
Users Manual - English
Page 19
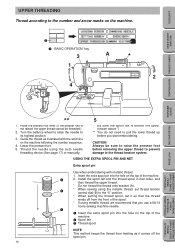
...) Install the spool felt and the thread spool in that order, and then thread the upper thread. * Do not thread the thread onto bracket (A). * When sewing using metallic thread, we recommend that the thread winds off from twisting as illustrated with metallic thread. 1. Insert the extra spool pin into the hole on the machine following the number sequence. 4. Turn...
...) Install the spool felt and the thread spool in that order, and then thread the upper thread. * Do not thread the thread onto bracket (A). * When sewing using metallic thread, we recommend that the thread winds off from twisting as illustrated with metallic thread. 1. Insert the extra spool pin into the hole on the machine following the number sequence. 4. Turn...
Users Manual - English
Page 20
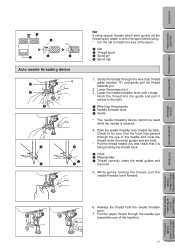
... under the metal guides and the hook. * Pull the thread toward you . 2. While gently holding the thread, pull the needle threader lever forward. Check to match the size of the machine. 17 Guide the thread through the wire loop thread guide (number "6") and gently pull the thread towards you and check that the hook has passed...
... under the metal guides and the hook. * Pull the thread toward you . 2. While gently holding the thread, pull the needle threader lever forward. Check to match the size of the machine. 17 Guide the thread through the wire loop thread guide (number "6") and gently pull the thread towards you and check that the hook has passed...
Users Manual - English
Page 26
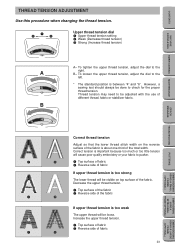
...2 Reverse side of the fabric. CONTENTS MACHINE KNOWLEDGE EMBROIDERING MAINTENANCE THREAD TENSION ADJUSTMENT Use this procedure when changing the thread tension. To loosen the upper thread tension, adjust the dial to check for the proper thread tension. Thread tension may need to be done to the...TROUBLESHOOTING PATTERNS EMBROIDERING USING A SMALL FRAME (OPTIONAL) Correct thread tension Adjust so that the lower thread stitch width on the reverse surface of the fabric is too strong The lower thread will cause poor quality embroidery or your fabric to the A right. Correct tension ...
...2 Reverse side of the fabric. CONTENTS MACHINE KNOWLEDGE EMBROIDERING MAINTENANCE THREAD TENSION ADJUSTMENT Use this procedure when changing the thread tension. To loosen the upper thread tension, adjust the dial to check for the proper thread tension. Thread tension may need to be done to the...TROUBLESHOOTING PATTERNS EMBROIDERING USING A SMALL FRAME (OPTIONAL) Correct thread tension Adjust so that the lower thread stitch width on the reverse surface of the fabric is too strong The lower thread will cause poor quality embroidery or your fabric to the A right. Correct tension ...
Users Manual - English
Page 29
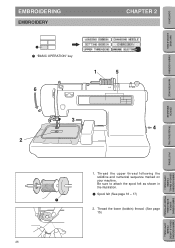
Thread the upper thread following the solidline and numerical sequence marked on your machine. Thread the lower (bobbin) thread. (See page 15) 26 EMBROIDERING USING A LARGE FRAME (OPTIONAL) CONTENTS MACHINE KNOWLEDGE EMBROIDERING MAINTENANCE EMBROIDERING EMBROIDERY CHAPTER 2 1 1 "BASIC OPERATION" key 6 1 5 3 4 2 ERROR MESSAGE TROUBLESHOOTING PATTERNS EMBROIDERING USING A SMALL FRAME (OPTIONAL) EMBROIDERING USING A EXTRA-SMALL FRAME (OPTIONAL) 1. Be sure to attach the spool felt as shown in the illustration. 1 Spool felt (See page 16 - 17) 2.
Thread the upper thread following the solidline and numerical sequence marked on your machine. Thread the lower (bobbin) thread. (See page 15) 26 EMBROIDERING USING A LARGE FRAME (OPTIONAL) CONTENTS MACHINE KNOWLEDGE EMBROIDERING MAINTENANCE EMBROIDERING EMBROIDERY CHAPTER 2 1 1 "BASIC OPERATION" key 6 1 5 3 4 2 ERROR MESSAGE TROUBLESHOOTING PATTERNS EMBROIDERING USING A SMALL FRAME (OPTIONAL) EMBROIDERING USING A EXTRA-SMALL FRAME (OPTIONAL) 1. Be sure to attach the spool felt as shown in the illustration. 1 Spool felt (See page 16 - 17) 2.
Users Manual - English
Page 31
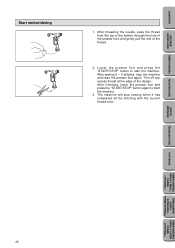
... sewing 5 - 6 stitches, stop sewing when it has completed all the stitching with the current thread color. Trim off any excess thread at the edge of the thread. 2. The machine will stop the machine and raise the presser foot again. Lower the presser foot and press the "START/STOP" button to the bottom through the hole...
... sewing 5 - 6 stitches, stop sewing when it has completed all the stitching with the current thread color. Trim off any excess thread at the edge of the thread. 2. The machine will stop the machine and raise the presser foot again. Lower the presser foot and press the "START/STOP" button to the bottom through the hole...
Users Manual - English
Page 32
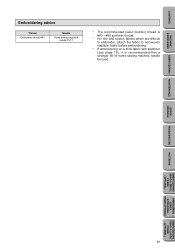
... A SMALL FRAME (OPTIONAL) EMBROIDERING USING A EXTRA-SMALL FRAME (OPTIONAL) EMBROIDERING USING A LARGE FRAME (OPTIONAL) 29 CONTENTS MACHINE KNOWLEDGE Embroidering advice Thread Embroidery thread #50 Needle Home sewing machine needle 75/11 * The recommended lower (bobbin) thread is #60 - #90 synthetic thread. * For thin and stretch fabrics which are difficult to embroider, attach the fabric to non-woven...
... A SMALL FRAME (OPTIONAL) EMBROIDERING USING A EXTRA-SMALL FRAME (OPTIONAL) EMBROIDERING USING A LARGE FRAME (OPTIONAL) 29 CONTENTS MACHINE KNOWLEDGE Embroidering advice Thread Embroidery thread #50 Needle Home sewing machine needle 75/11 * The recommended lower (bobbin) thread is #60 - #90 synthetic thread. * For thin and stretch fabrics which are difficult to embroider, attach the fabric to non-woven...
Users Manual - English
Page 35
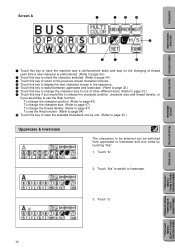
...OPTIONAL) EMBROIDERING USING A LARGE FRAME (OPTIONAL) 32 Touch "a". Touch "A". 2. CONTENTS MACHINE KNOWLEDGE EMBROIDERING MAINTENANCE ERROR MESSAGE Screen A 1 2 3 4 6 5 7 8 1 Touch this key to have the machine sew a reinforcement stitch and stop for the changing of thread each time a new character is embroidered. (Refer to page 34.) 2 Touch this... one of three different sizes. (Refer to page 33.) 7 Touch this key to change the character position, character size and thread density, or if you would like to use the Help function: (Refer to page 54) 8 Touch this key to clear ...
...OPTIONAL) EMBROIDERING USING A LARGE FRAME (OPTIONAL) 32 Touch "a". Touch "A". 2. CONTENTS MACHINE KNOWLEDGE EMBROIDERING MAINTENANCE ERROR MESSAGE Screen A 1 2 3 4 6 5 7 8 1 Touch this key to have the machine sew a reinforcement stitch and stop for the changing of thread each time a new character is embroidered. (Refer to page 34.) 2 Touch this... one of three different sizes. (Refer to page 33.) 7 Touch this key to change the character position, character size and thread density, or if you would like to use the Help function: (Refer to page 54) 8 Touch this key to clear ...
Users Manual - English
Page 37
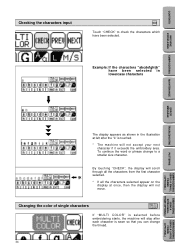
... or phrase change the thread. 34 EMBROIDERING USING A EXTRA-SMALL FRAME (OPTIONAL) EMBROIDERING USING A LARGE FRAME (OPTIONAL) ijk * If all the characters selected appear on the display at left after each character is touched. * The machine will not accept your next character if it exceeds the embroidery area. CONTENTS MACHINE KNOWLEDGE Checking the characters...
... or phrase change the thread. 34 EMBROIDERING USING A EXTRA-SMALL FRAME (OPTIONAL) EMBROIDERING USING A LARGE FRAME (OPTIONAL) ijk * If all the characters selected appear on the display at left after each character is touched. * The machine will not accept your next character if it exceeds the embroidery area. CONTENTS MACHINE KNOWLEDGE Checking the characters...
Users Manual - English
Page 39
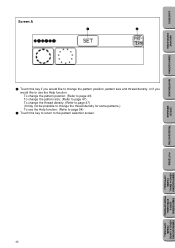
...(Refer to page 43) To change the pattern size: (Refer to page 47) To change the thread density: (Refer to page 47) (It may not be possible to change the pattern position, pattern size and thread density, or if you would like to use the Help function: (Refer to page 54) 2 Touch... this key if you would like to the pattern selection screen. CONTENTS MACHINE KNOWLEDGE EMBROIDERING MAINTENANCE Screen A 1 2 1 Touch this key to return to...
...(Refer to page 43) To change the pattern size: (Refer to page 47) To change the thread density: (Refer to page 47) (It may not be possible to change the pattern position, pattern size and thread density, or if you would like to use the Help function: (Refer to page 54) 2 Touch... this key if you would like to the pattern selection screen. CONTENTS MACHINE KNOWLEDGE EMBROIDERING MAINTENANCE Screen A 1 2 1 Touch this key to return to...
Users Manual - English
Page 41
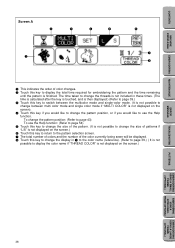
CONTENTS MACHINE KNOWLEDGE EMBROIDERING MAINTENANCE Screen A 2 3 4 5 1 6 7 8 1 This indicates the order of the color currently being sewn will be displayed. 8 Touch this key to ... is not displayed on the screen). 4 Touch this key if you would like to use the Help function. The time taken to change the threads is not included in 1 to the color name (reference). (Refer to page 39.) ( It is not possible to display the total time required...(Refer to page 43) To use the Help function: (Refer to page 54) 5 Touch this key to display the color name if "THREAD COLOR" is finished.
CONTENTS MACHINE KNOWLEDGE EMBROIDERING MAINTENANCE Screen A 2 3 4 5 1 6 7 8 1 This indicates the order of the color currently being sewn will be displayed. 8 Touch this key to ... is not displayed on the screen). 4 Touch this key if you would like to use the Help function. The time taken to change the threads is not included in 1 to the color name (reference). (Refer to page 39.) ( It is not possible to display the total time required...(Refer to page 43) To use the Help function: (Refer to page 54) 5 Touch this key to display the color name if "THREAD COLOR" is finished.


