

Users Manual - English
Page 2
... to persons. 1. "IMPORTANT SAFETY INSTRUCTIONS" When using the sewing machine, basic safety precautions should never be used as described in this manual. "Read all moving parts. Replace bulb with any opening. 6. Never operate this manual. 3. Return the sewing machine to break. 14. Never operate the sewing machine with same type rated...
... to persons. 1. "IMPORTANT SAFETY INSTRUCTIONS" When using the sewing machine, basic safety precautions should never be used as described in this manual. "Read all moving parts. Replace bulb with any opening. 6. Never operate this manual. 3. Return the sewing machine to break. 14. Never operate the sewing machine with same type rated...
Users Manual - English
Page 3
...Your machine is Sewing curve 30 required, first follow the troubleshooting table in the back of the operation manual to inspect and ad- PRINCIPAL PARTS 3 ACCESSORIES 4 OPTIONS 5 PLEASE READ BEFORE USING SELECTION KEY 6 YOUR SEWING MACHINE OPERATION KEY 8 ADJUSTING SCREEN CONTRAST 9 For safe ...a longer service life 1. Do 24 not store the sewing machine beside a space TRIAL SEWING 24 heater, iron, or other moving parts. Remember to clean Stitch selection 26 the case. If the problem persists, Free arm 31 please consult your sewing machine, avoid direct...
...Your machine is Sewing curve 30 required, first follow the troubleshooting table in the back of the operation manual to inspect and ad- PRINCIPAL PARTS 3 ACCESSORIES 4 OPTIONS 5 PLEASE READ BEFORE USING SELECTION KEY 6 YOUR SEWING MACHINE OPERATION KEY 8 ADJUSTING SCREEN CONTRAST 9 For safe ...a longer service life 1. Do 24 not store the sewing machine beside a space TRIAL SEWING 24 heater, iron, or other moving parts. Remember to clean Stitch selection 26 the case. If the problem persists, Free arm 31 please consult your sewing machine, avoid direct...

Users Manual - English
Page 5
... AND CONNECTOR O Card slot Slot for foot controller operation. • Power code Connect machine to power supply. - Main power switch and conne- SETTING UP PRINCIPAL PARTS 6 7 8 9 s el 10' 11 CHAPTER 1 12 -)N 13 14 C 1-Handle 2-Thread guide for bobbin winding 3-Spool cap 4-Needle threader lever 5-L.C.D. (Liquid Crystal Display) 6-Thread cutter 7-Buttonhole lever...
... AND CONNECTOR O Card slot Slot for foot controller operation. • Power code Connect machine to power supply. - Main power switch and conne- SETTING UP PRINCIPAL PARTS 6 7 8 9 s el 10' 11 CHAPTER 1 12 -)N 13 14 C 1-Handle 2-Thread guide for bobbin winding 3-Spool cap 4-Needle threader lever 5-L.C.D. (Liquid Crystal Display) 6-Thread cutter 7-Buttonhole lever...

Users Manual - English
Page 7
... foot "I" O Space for Zigzag foot "J" (**) O Monogramming foot "N" O Blind stitch foot "R" O Overcasting foot "G" O Bobbin O Needle set Parts code: (12 pcs) X80409-001 (24 pcs) X80417-001 (36 pcs) X80418-001 3- Seam ripper 6- Walking foot Parts code: 184961-001 2- Embroidery sheet (Small) Parts code: X57469-002 5- Scissors 4- Embroidery thread set O Seam ripper • Screw driver (Small) 6 Stitch guide...
... foot "I" O Space for Zigzag foot "J" (**) O Monogramming foot "N" O Blind stitch foot "R" O Overcasting foot "G" O Bobbin O Needle set Parts code: (12 pcs) X80409-001 (24 pcs) X80417-001 (36 pcs) X80418-001 3- Seam ripper 6- Walking foot Parts code: 184961-001 2- Embroidery sheet (Small) Parts code: X57469-002 5- Scissors 4- Embroidery thread set O Seam ripper • Screw driver (Small) 6 Stitch guide...
Users Manual - English
Page 24
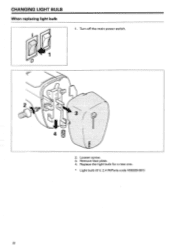
Remove face plate. 4. Replace the light bulb for a new one. * Light bulb (8 V, 2.4 W/Parts code X50228-001) 22 Loosen screw. 3. CHANGING LIGHT BULB When replacing light bulb 1. Turn off the main power switch. ( C, 2.
Remove face plate. 4. Replace the light bulb for a new one. * Light bulb (8 V, 2.4 W/Parts code X50228-001) 22 Loosen screw. 3. CHANGING LIGHT BULB When replacing light bulb 1. Turn off the main power switch. ( C, 2.

Users Manual - English
Page 31
... FUNCTION ( SWITCH FUNCTION USEFUL SKILL (PATTERN SELECTION)( ADJUSTMENT SEWING THICK MATERIAL)(SEWING MEDIUM MATERIAL SEWING THIN MATERIAL (SEWING ELASTIC MATERIAL) ONE POINT ADVICE (SEWING FOLDED PART)( SEWING CLIRUE SEWING CORNER 1[SCALE ON NEEDLEPLATE] FREE ARM 1. Touch key you raise presser foot lever further, presser foot is raised to higher position in...
... FUNCTION ( SWITCH FUNCTION USEFUL SKILL (PATTERN SELECTION)( ADJUSTMENT SEWING THICK MATERIAL)(SEWING MEDIUM MATERIAL SEWING THIN MATERIAL (SEWING ELASTIC MATERIAL) ONE POINT ADVICE (SEWING FOLDED PART)( SEWING CLIRUE SEWING CORNER 1[SCALE ON NEEDLEPLATE] FREE ARM 1. Touch key you raise presser foot lever further, presser foot is raised to higher position in...
Users Manual - English
Page 32
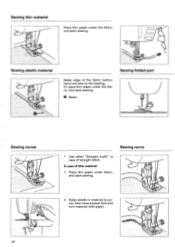
Sewing thin material Place thin paper under fabric, 4 and start sewing. 2. Keep needle in case of straight stitch. CD 0 4 q ../ 30 In case of the fabric beforehand and sew to the basting. Place thin paper under the fabric, and start sewing. 0 Baste ig Sewing corner Sewing curve * Use stitch "Straight (Left)" in material at corner, then raise presser foot and turn material with paper. Or place thin paper under the fabric, and start sewing. ( ) ) ,,- ,,--.--,-* Sewing elastic material 0 Sewing folded part Baste edge of thin material 1.
Sewing thin material Place thin paper under fabric, 4 and start sewing. 2. Keep needle in case of straight stitch. CD 0 4 q ../ 30 In case of the fabric beforehand and sew to the basting. Place thin paper under the fabric, and start sewing. 0 Baste ig Sewing corner Sewing curve * Use stitch "Straight (Left)" in material at corner, then raise presser foot and turn material with paper. Or place thin paper under the fabric, and start sewing. ( ) ) ,,- ,,--.--,-* Sewing elastic material 0 Sewing folded part Baste edge of thin material 1.

Users Manual - English
Page 33
... (0.079 inch) @ 18 (2 x 9) mm [0.709 (0.079 x 9) inch] NOTE Stitch guide foot "P" can be used for edge sewing. AV' Free arm is graduated at gap (folded part) of fabric. This foot cannot be used at interval 2 mm (0.079 inch). Sewing edge In case of short stitch less than 0.5 cm (0.20 inch) Set...
... (0.079 inch) @ 18 (2 x 9) mm [0.709 (0.079 x 9) inch] NOTE Stitch guide foot "P" can be used for edge sewing. AV' Free arm is graduated at gap (folded part) of fabric. This foot cannot be used at interval 2 mm (0.079 inch). Sewing edge In case of short stitch less than 0.5 cm (0.20 inch) Set...
Users Manual - English
Page 53
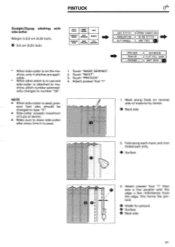
Mark along each mark, and iron folded part only. Fold along folds on the machine, only 4 stitches are applicable. * When other stitch is in-use and side-cutter is used , pres- O Width for ...
Mark along each mark, and iron folded part only. Fold along folds on the machine, only 4 stitches are applicable. * When other stitch is in-use and side-cutter is used , pres- O Width for ...
Users Manual - English
Page 68
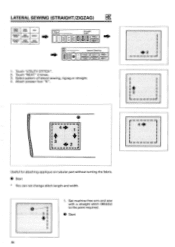
Touch "NEXT" 2 times. 3. Attach presser foot "N". + 2 •=011t =NM 13 0 r 4 3 Useful for attaching applique on tubular part without turning the fabric. 0 Start * You can not change stitch length and width. 1. Select pattern of lateral sewing, zigzag or straight. 4. Set machine free arm ...
Touch "NEXT" 2 times. 3. Attach presser foot "N". + 2 •=011t =NM 13 0 r 4 3 Useful for attaching applique on tubular part without turning the fabric. 0 Start * You can not change stitch length and width. 1. Select pattern of lateral sewing, zigzag or straight. 4. Set machine free arm ...

Users Manual - English
Page 95
.... 2. A ,--c, CD crFiiiLLnTi I1F LAYOU LAMM How to the first screen for pattern selection. 93 Select the pattern you select pattern, machine is selected in lower part of the pattern. 4- "LIST": Touch this key to change size of "Flower" card O LIST PREU NEXT 00 f _-0 AP- //. The pattern is automatically set automatic thread...
.... 2. A ,--c, CD crFiiiLLnTi I1F LAYOU LAMM How to the first screen for pattern selection. 93 Select the pattern you select pattern, machine is selected in lower part of the pattern. 4- "LIST": Touch this key to change size of "Flower" card O LIST PREU NEXT 00 f _-0 AP- //. The pattern is automatically set automatic thread...

Users Manual - English
Page 96
... 3. Mono-color mode MULTI COLOUR LAYOUT rS ,2P1FyIT,5 Lu _FP 1. Machine sews second part and stops automatically. * The screen will stop automatically after it finishes each part is indicated on LCD. r%1ULT I .IL, izilp LAYOUTIrS )I6R P ---.9. -5- Change... upper thread then start again. Cut unnecessary thread between each part. Change upper thread then start again. Release multi-color mode by touching "MULTI COLOUR". Machine sews third part and stops automatically. 4. Machine automatically stops after it finishes sewing the whole...
... 3. Mono-color mode MULTI COLOUR LAYOUT rS ,2P1FyIT,5 Lu _FP 1. Machine sews second part and stops automatically. * The screen will stop automatically after it finishes each part is indicated on LCD. r%1ULT I .IL, izilp LAYOUTIrS )I6R P ---.9. -5- Change... upper thread then start again. Cut unnecessary thread between each part. Change upper thread then start again. Release multi-color mode by touching "MULTI COLOUR". Machine sews third part and stops automatically. 4. Machine automatically stops after it finishes sewing the whole...
Users Manual - English
Page 101
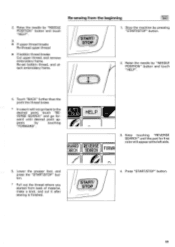
ward until the part for - Press "START/STOP" button. 99 VERSE SEARCH" and go for first color will not go back to the desired point, touch "RE- START/ STOP 4. ...
ward until the part for - Press "START/STOP" button. 99 VERSE SEARCH" and go for first color will not go back to the desired point, touch "RE- START/ STOP 4. ...
Users Manual - English
Page 104
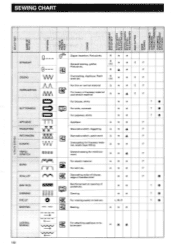
... of blouse, edge of handkerchief Reinforcement at opening of pocket etc. rg _____ - - - - `*".M / For elastic material For skirt etc. Darning For making eyelet on tob a part A * * A * * * * * * * * L, M, S A * * AAA W (-- 102 T • T • T • P P P P P P P P • T • T • T • A General sewing, gather, Pintuck etc. IAR) * * R A* C P P ZIGZAG WV Overcasting, Applique, Patch work A * A %AA / % t 1, I Zipper insertion, Pintuck...
... of blouse, edge of handkerchief Reinforcement at opening of pocket etc. rg _____ - - - - `*".M / For elastic material For skirt etc. Darning For making eyelet on tob a part A * * A * * * * * * * * L, M, S A * * AAA W (-- 102 T • T • T • P P P P P P P P • T • T • T • A General sewing, gather, Pintuck etc. IAR) * * R A* C P P ZIGZAG WV Overcasting, Applique, Patch work A * A %AA / % t 1, I Zipper insertion, Pintuck...

