

Users Manual - English
Page 14
... and updates, visit our web site at www.brother.com 8 APPENDIX INDEX CONTENTS GETTING READY SEWING BASICS UTILITY STITCHES CONGRATULATIONS ON CHOOSING OUR MACHINE Your machine is required, first follow the troubleshooting table in the back of the most advanced computerized household sewing machines. PLEASE READ BEFORE USING THIS MACHINE For safe operation 1. Be sure to keep...
... and updates, visit our web site at www.brother.com 8 APPENDIX INDEX CONTENTS GETTING READY SEWING BASICS UTILITY STITCHES CONGRATULATIONS ON CHOOSING OUR MACHINE Your machine is required, first follow the troubleshooting table in the back of the most advanced computerized household sewing machines. PLEASE READ BEFORE USING THIS MACHINE For safe operation 1. Be sure to keep...

Users Manual - English
Page 48
... is possible. Slide the part that you are finished with free-arm sewing, 3 install the flat bed attachment back in its original position. X With the flat bed attachment removed, freearm sewing is available through your brother retailer. 42 Open up the legs at the bottom of fabric, remove... the flat bed attachment. Install the wide table. 3 Keeping the wide table level, fully slide it easier to sew onto the 2 arm, and then sew from the top. ...
... is possible. Slide the part that you are finished with free-arm sewing, 3 install the flat bed attachment back in its original position. X With the flat bed attachment removed, freearm sewing is available through your brother retailer. 42 Open up the legs at the bottom of fabric, remove... the flat bed attachment. Install the wide table. 3 Keeping the wide table level, fully slide it easier to sew onto the 2 arm, and then sew from the top. ...

Users Manual - English
Page 79
... adjusting the stitch width, slowly turn the balance wheel toward the rear of the sewing machine. Position the fabric in the side cutter. 0 The cut while the stitching is sewn. • If the stitching is available through your brother retailer. Make a cut of about 5 mm (3/16 inch). 1 1 2 cm (1/16 inch) 1 5... the side cutter, 7 and then pull it by removing any lint or dust. ● If the side cutter can cut . CONTENTS GETTING READY SEWING BASICS UTILITY STITCHES Raise the presser foot lever to check that the needle does not touch the presser foot. Select a stitch. 8 • For ...
... adjusting the stitch width, slowly turn the balance wheel toward the rear of the sewing machine. Position the fabric in the side cutter. 0 The cut while the stitching is sewn. • If the stitching is available through your brother retailer. Make a cut of about 5 mm (3/16 inch). 1 1 2 cm (1/16 inch) 1 5... the side cutter, 7 and then pull it by removing any lint or dust. ● If the side cutter can cut . CONTENTS GETTING READY SEWING BASICS UTILITY STITCHES Raise the presser foot lever to check that the needle does not touch the presser foot. Select a stitch. 8 • For ...
Users Manual - English
Page 103
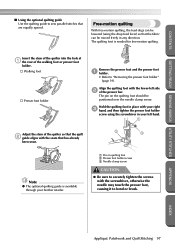
..., otherwise the needle may touch the presser foot, causing it to "Removing the presser foot holder" (page 39). CONTENTS GETTING READY SEWING BASICS UTILITY STITCHES ■ Using the optional quilting guide Use the quilting guide to securely tighten the screws with the lower-left hand.... be positioned over the needle clamp screw. APPENDIX INDEX Appliqué, Patchwork and Quilt Stitching 97 The quilting foot is available through your brother retailer. 1 Pin on the quilting foot should be moved freely in your left side 2 of the walking foot or presser foot holder...
..., otherwise the needle may touch the presser foot, causing it to "Removing the presser foot holder" (page 39). CONTENTS GETTING READY SEWING BASICS UTILITY STITCHES ■ Using the optional quilting guide Use the quilting guide to securely tighten the screws with the lower-left hand.... be positioned over the needle clamp screw. APPENDIX INDEX Appliqué, Patchwork and Quilt Stitching 97 The quilting foot is available through your brother retailer. 1 Pin on the quilting foot should be moved freely in your left side 2 of the walking foot or presser foot holder...


