Users Manual - English
Page 2
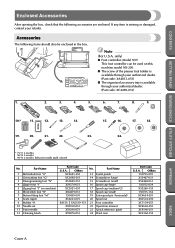
... (For U.S.A. Part Name 13 Eyelet punch 14 Screwdriver (large) 15 Screwdriver (small) 16 Spool cap (large) 17 Spool cap (medium)(2) 18 Spool cap (small) 19 Extra spool pin (horizontal) 20 Spool net 21 Foot controller 22 Operation manual 23 Quick reference guide 24 Hard case Part Code ...enclosed. Part Name 1 Buttonhole foot "A" 2 Overcasting foot "G" 3 Monogramming foot "N" 4 Zipper foot "I" 5 Zigzag foot "J" (on this machine model NX-200. ● The screw of the presser foot holder is available through your retailer. only) ● Foot controller: Model N5V This foot controller can ...
... (For U.S.A. Part Name 13 Eyelet punch 14 Screwdriver (large) 15 Screwdriver (small) 16 Spool cap (large) 17 Spool cap (medium)(2) 18 Spool cap (small) 19 Extra spool pin (horizontal) 20 Spool net 21 Foot controller 22 Operation manual 23 Quick reference guide 24 Hard case Part Code ...enclosed. Part Name 1 Buttonhole foot "A" 2 Overcasting foot "G" 3 Monogramming foot "N" 4 Zipper foot "I" 5 Zigzag foot "J" (on this machine model NX-200. ● The screw of the presser foot holder is available through your retailer. only) ● Foot controller: Model N5V This foot controller can ...

Users Manual - English
Page 19
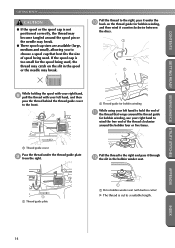
... spool cap onto the spool pin. 7 With the rounded side of the spool cap positioned toward the left, slide the spool cap onto the spool pin as far as possible until the right side of the spool touches the right end of the spool. Slide the spool onto the pin so that the spool is inserted onto the 5 spool pin. 1 2 1 Spool pin 2 Spool cap 3 1 Spool cap (large) 2 Spool cap (medium) 3 Spool...
... spool cap onto the spool pin. 7 With the rounded side of the spool cap positioned toward the left, slide the spool cap onto the spool pin as far as possible until the right side of the spool touches the right end of the spool. Slide the spool onto the pin so that the spool is inserted onto the 5 spool pin. 1 2 1 Spool pin 2 Spool cap 3 1 Spool cap (large) 2 Spool cap (medium) 3 Spool...
Users Manual - English
Page 20
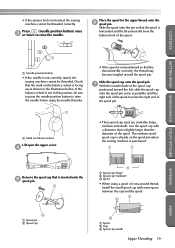
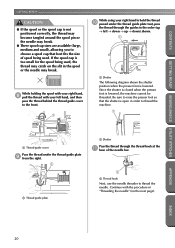
Pull the thread to the right and pass it through b the slit in the bobbin winder seat. INDEX 14 If the spool cap is cut to a suitable length. Pull the thread to the right, pass it under the thread guide plate 9 from the right. APPENDIX 1 1 Thread guide ... GETTING READY CONTENTS CAUTION ● If the spool or the spool cap is not positioned correctly, the thread may become tangled around the spool pin or the needle may break. ● Three spool cap sizes are available (large, medium and small), allowing you to choose a spool cap that wraps around the thread guide for bobbin ...
Pull the thread to the right and pass it through b the slit in the bobbin winder seat. INDEX 14 If the spool cap is cut to a suitable length. Pull the thread to the right, pass it under the thread guide plate 9 from the right. APPENDIX 1 1 Thread guide ... GETTING READY CONTENTS CAUTION ● If the spool or the spool cap is not positioned correctly, the thread may become tangled around the spool pin or the needle may break. ● Three spool cap sizes are available (large, medium and small), allowing you to choose a spool cap that wraps around the thread guide for bobbin ...
Users Manual - English
Page 25
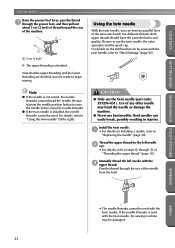
... machine is purchased. 1 2 Remove the spool cap that is inserted onto the 5 spool pin. 1 2 1 Spool pin 2 Spool cap 3 1 Spool cap (large) 2 Spool cap (medium) 3 Spool • When using the needle threader. • If the spool is not positioned so that is slightly larger than the diameter of the spool cap positioned toward the left, slide the spool cap onto the spool pin as far as shown in...
... machine is purchased. 1 2 Remove the spool cap that is inserted onto the 5 spool pin. 1 2 1 Spool pin 2 Spool cap 3 1 Spool cap (large) 2 Spool cap (medium) 3 Spool • When using the needle threader. • If the spool is not positioned so that is slightly larger than the diameter of the spool cap positioned toward the left, slide the spool cap onto the spool pin as far as shown in...
Users Manual - English
Page 26
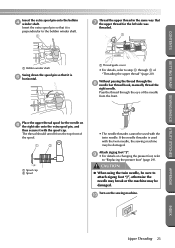
...INDEX 20 Since the shutter is closed when the presser foot is lowered, the machine cannot be threaded. If the spool cap is too small for the spool being used. While holding the spool with your right hand to thread the machine. 1 APPENDIX 1 Thread guide cover Pass the thread under the thread guide...thread through the thread hook at the a base of spool being used, the thread may catch on the slit in the spool or the needle may break. ● Three spool cap sizes are available (large, medium and small), allowing you to choose a spool cap that the shutter is open in order to hold ...
...INDEX 20 Since the shutter is closed when the presser foot is lowered, the machine cannot be threaded. If the spool cap is too small for the spool being used. While holding the spool with your right hand to thread the machine. 1 APPENDIX 1 Thread guide cover Pass the thread under the thread guide...thread through the thread hook at the a base of spool being used, the thread may catch on the slit in the spool or the needle may break. ● Three spool cap sizes are available (large, medium and small), allowing you to choose a spool cap that the shutter is open in order to hold ...
Users Manual - English
Page 28
... BASICS UTILITY STITCHES Note ● If the needle is used with the 3 upper thread. CAUTION ● Only use the twin needle, the extra spool pin and the spool cap. Use of any other needle may be damaged. 22 Both upper threads should have the same thickness and quality. Manually thread the left needle...
... BASICS UTILITY STITCHES Note ● If the needle is used with the 3 upper thread. CAUTION ● Only use the twin needle, the extra spool pin and the spool cap. Use of any other needle may be damaged. 22 Both upper threads should have the same thickness and quality. Manually thread the left needle...
Users Manual - English
Page 29
... threader is used with the twin needle, the sewing machine may be used with the spool cap. Place the upper thread spool for the needle on 6 the right side onto the extra spool pin, and then secure it is perpendicular to the bobbin winder shaft. 1 Thread the...CONTENTS GETTING READY SEWING BASICS UTILITY STITCHES Insert the extra spool pin onto the bobbin 4 winder shaft. Insert the extra spool pin so that it is 5 horizontal. 1 Thread guide cover • For details, refer to step 8 through 0 of the spool. 1 2 1 Spool cap 2 Spool • The needle threader cannot be damaged.
... threader is used with the twin needle, the sewing machine may be used with the spool cap. Place the upper thread spool for the needle on 6 the right side onto the extra spool pin, and then secure it is perpendicular to the bobbin winder shaft. 1 Thread the...CONTENTS GETTING READY SEWING BASICS UTILITY STITCHES Insert the extra spool pin onto the bobbin 4 winder shaft. Insert the extra spool pin so that it is 5 horizontal. 1 Thread guide cover • For details, refer to step 8 through 0 of the spool. 1 2 1 Spool cap 2 Spool • The needle threader cannot be damaged.
Users Manual - English
Page 30
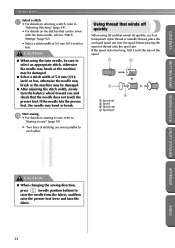
b • For details on the stitches that can be damaged. ● After adjusting the stitch width, slowly turn the fabric. 24 X Two lines of the spool. 1 2 3 4 1 Spool net 2 Spool 3 Spool cap 4 Spool pin APPENDIX INDEX CAUTION ● When changing the sewing direction, press (needle position button) to raise the needle from the fabric, and then raise the...
b • For details on the stitches that can be damaged. ● After adjusting the stitch width, slowly turn the fabric. 24 X Two lines of the spool. 1 2 3 4 1 Spool net 2 Spool 3 Spool cap 4 Spool pin APPENDIX INDEX CAUTION ● When changing the sewing direction, press (needle position button) to raise the needle from the fabric, and then raise the...
Users Manual - English
Page 105
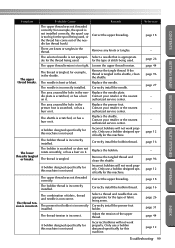
... . Only use a bobbin designed specifically for this machine. The upper thread was not threaded correctly (for example, the spool is not installed correctly, the spool cap is tangled, for the type of stitch being used . The presser foot holder is too tight. Adjust the tension of... Probable Cause Remedy The upper thread was not threaded correctly. Loosen the upper thread tension. Only use a bobbin designed specifically for the spool being used . A bobbin designed specifically for this machine is scratched, or has a burr on it . The combination of the needle...
... . Only use a bobbin designed specifically for this machine. The upper thread was not threaded correctly (for example, the spool is not installed correctly, the spool cap is tangled, for the type of stitch being used . The presser foot holder is too tight. Adjust the tension of... Probable Cause Remedy The upper thread was not threaded correctly. Loosen the upper thread tension. Only use a bobbin designed specifically for the spool being used . A bobbin designed specifically for this machine is scratched, or has a burr on it . The combination of the needle...

Users Manual - English
Page 110
... speed controller Cover B, Cover D shutter 20 shuttle 16, 96 shuttle hook 97 side cutter 1, 58 side view Cover C sleeves 82 smocking 87 spool cap Cover A, 13, 19 spool net Cover A, 24 spool pin Cover B, 13, 19 start/stop button Cover D, 39 starting sewing 39 stitch guide foot 1 stitch indicator Cover E stitch length 46 stitch...
... speed controller Cover B, Cover D shutter 20 shuttle 16, 96 shuttle hook 97 side cutter 1, 58 side view Cover C sleeves 82 smocking 87 spool cap Cover A, 13, 19 spool net Cover A, 24 spool pin Cover B, 13, 19 start/stop button Cover D, 39 starting sewing 39 stitch guide foot 1 stitch indicator Cover E stitch length 46 stitch...

