
Accessory Catalog
Page 4
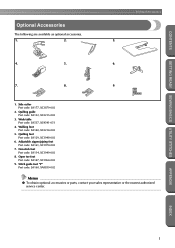
...on the edge of zipper/piping, avoiding the non-flat parts of the presser foot and slide the presser foot so that the needle fits on the opening on either left ). 2. SA161 All Brother home-use sewing machines www.brother.com Use these utility presser feet and accessories to add...Check the needle does not hit the presser foot, and then tighten the clamp screw with just right pressure. 1. Adjustable Zipper & Piping Foot Brother General Sewing Accessories 06 Adjustable Zipper & Piping Foot Attaches zippers and pipings easily. Sew. Position the presser foot over the long feed dogs on...
...on the edge of zipper/piping, avoiding the non-flat parts of the presser foot and slide the presser foot so that the needle fits on the opening on either left ). 2. SA161 All Brother home-use sewing machines www.brother.com Use these utility presser feet and accessories to add...Check the needle does not hit the presser foot, and then tighten the clamp screw with just right pressure. 1. Adjustable Zipper & Piping Foot Brother General Sewing Accessories 06 Adjustable Zipper & Piping Foot Attaches zippers and pipings easily. Sew. Position the presser foot over the long feed dogs on...

Accessory Catalog
Page 6
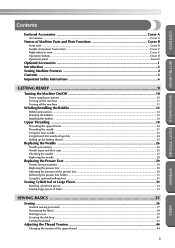
Hold the fabric from the back and front and roll it into the curled part of the foot. 5. Non Stick Foot Designed for details.) www.brother.com Select a desired stitch and sew. Overlock Foot For vertical bobbin machines only. Sews overcast seams to the end of the foot....presser foot. 6. Select an overlock stitch. 2. Sew along the guide. Slowly sew 2-3 stitches, making sure the fabric is rolling around the curled part of the foot. 7. SA164 ABCDEFJKMN SA149 GHILOP SA114 ABCDEFGHJKLMNO SA122 IP Travel Jewelr y Portfolio Innov-is Project Book (See page 53 for consistent ...
Hold the fabric from the back and front and roll it into the curled part of the foot. 5. Non Stick Foot Designed for details.) www.brother.com Select a desired stitch and sew. Overlock Foot For vertical bobbin machines only. Sews overcast seams to the end of the foot....presser foot. 6. Select an overlock stitch. 2. Sew along the guide. Slowly sew 2-3 stitches, making sure the fabric is rolling around the curled part of the foot. 7. SA164 ABCDEFJKMN SA149 GHILOP SA114 ABCDEFGHJKLMNO SA122 IP Travel Jewelr y Portfolio Innov-is Project Book (See page 53 for consistent ...
Users Manual - English
Page 2
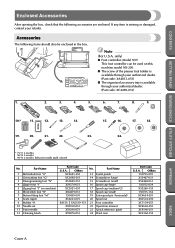
... U.S.A. only) ● Foot controller: Model N5V This foot controller can be enclosed in the box. Part Name 1 Buttonhole foot "A" 2 Overcasting foot "G" 3 Monogramming foot "N" 4 Zipper foot "I" 5 Zigzag foot "J" (on this machine model NX-200. ● The screw of the presser foot holder is available through your retailer. Others 135793-001 X55467-051 X55468-051...
... U.S.A. only) ● Foot controller: Model N5V This foot controller can be enclosed in the box. Part Name 1 Buttonhole foot "A" 2 Overcasting foot "G" 3 Monogramming foot "N" 4 Zipper foot "I" 5 Zigzag foot "J" (on this machine model NX-200. ● The screw of the presser foot holder is available through your retailer. Others 135793-001 X55467-051 X55468-051...
Users Manual - English
Page 3
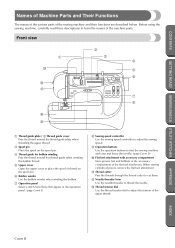
... tension of the sewing machine and their functions are described below. CONTENTS GETTING READY SEWING BASICS UTILITY STITCHES Names of Machine Parts and Their Functions The names of the various parts of the upper thread. APPENDIX INDEX Cover B Before using the sewing machine, carefully read these descriptions to start the sewing machine.... 6 Bobbin winder Use the bobbin winder when winding the bobbin. 7 Operation panel Select a stitch from those that appear in the accessory compartment of the machine parts.
... tension of the sewing machine and their functions are described below. CONTENTS GETTING READY SEWING BASICS UTILITY STITCHES Names of Machine Parts and Their Functions The names of the various parts of the upper thread. APPENDIX INDEX Cover B Before using the sewing machine, carefully read these descriptions to start the sewing machine.... 6 Bobbin winder Use the bobbin winder when winding the bobbin. 7 Operation panel Select a stitch from those that appear in the accessory compartment of the machine parts.
Users Manual - English
Page 4
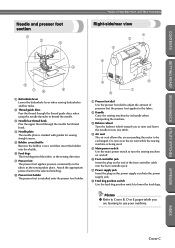
... jack Insert the plug on the fabric as the sewing takes place. APPENDIX INDEX Cover C CONTENTS GETTING READY SEWING BASICS UTILITY STITCHES Names of Machine Parts and Their Functions Needle and presser foot section 1 2 3 Right-side/rear view 1 2 3 4 4 8 76 5 1 Buttonhole lever Lower the buttonhole lever when sewing buttonholes and bar tacks...
... jack Insert the plug on the fabric as the sewing takes place. APPENDIX INDEX Cover C CONTENTS GETTING READY SEWING BASICS UTILITY STITCHES Names of Machine Parts and Their Functions Needle and presser foot section 1 2 3 Right-side/rear view 1 2 3 4 4 8 76 5 1 Buttonhole lever Lower the buttonhole lever when sewing buttonholes and bar tacks...
Users Manual - English
Page 7
...: SA132, XC2215-002 3. Non stick foot Part code: SA114, XC1949-002 8. Side cutter Part code: SA177, XC3879-002 2. Walking foot Part code: SA140, XC2214-002 5. Open toe foot Part code: SA147, XC1964-002 9. Adjustable zipper/piping foot Part code: SA161, XC1970-002 7. Stitch guide foot "P" Part code: SA160, XA8839-002 Memo ● To obtain optional accessories...
...: SA132, XC2215-002 3. Non stick foot Part code: SA114, XC1949-002 8. Side cutter Part code: SA177, XC3879-002 2. Walking foot Part code: SA140, XC2214-002 5. Open toe foot Part code: SA147, XC1964-002 9. Adjustable zipper/piping foot Part code: SA161, XC1970-002 7. Stitch guide foot "P" Part code: SA160, XA8839-002 Memo ● To obtain optional accessories...
Users Manual - English
Page 9
CONTENTS GETTING READY SEWING BASICS UTILITY STITCHES Contents Enclosed Accessories Cover A Accessories ...Cover A Names of Machine Parts and Their Functions Cover B Front view ...Cover B Needle and presser foot section ...Cover C Right-side/rear view ...Cover C Operation buttons ...Cover D Operation panel ...Cover E Optional ...
CONTENTS GETTING READY SEWING BASICS UTILITY STITCHES Contents Enclosed Accessories Cover A Accessories ...Cover A Names of Machine Parts and Their Functions Cover B Front view ...Cover B Needle and presser foot section ...Cover C Right-side/rear view ...Cover C Operation buttons ...Cover D Operation panel ...Cover E Optional ...
Users Manual - English
Page 12
... use by pulling on cord. Never drop or insert any object into water. Switch the machine to be taken, including the following: Read all moving parts. Use this machine to the symbol "{" position when making any opening. 6. Return the machine to the symbol "{" position which represents off, then remove plug from...
... use by pulling on cord. Never drop or insert any object into water. Switch the machine to be taken, including the following: Read all moving parts. Use this machine to the symbol "{" position when making any opening. 6. Return the machine to the symbol "{" position which represents off, then remove plug from...
Users Manual - English
Page 14
...the event a malfunction occurs or adjustment is completed • Replacing or removing the needle or any assemblies, the presser feet, needle, or other parts • A power failure occurs during use • Maintaining the machine • Leaving the machine unattended 3. When storing this machine, avoid ... foot controller. 4. up lever, needle, or other hot objects. 2. For additional product information and updates, visit our web site at www.brother.com 8 APPENDIX INDEX Plug the machine directly into the wall. Do not use or store the machine near a space heater, iron, halogen ...
...the event a malfunction occurs or adjustment is completed • Replacing or removing the needle or any assemblies, the presser feet, needle, or other parts • A power failure occurs during use • Maintaining the machine • Leaving the machine unattended 3. When storing this machine, avoid ... foot controller. 4. up lever, needle, or other hot objects. 2. For additional product information and updates, visit our web site at www.brother.com 8 APPENDIX INDEX Plug the machine directly into the wall. Do not use or store the machine near a space heater, iron, halogen ...

Users Manual - English
Page 18
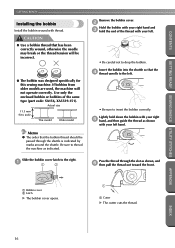
CAUTION ● Only use the bobbin (part code: SA156, XA5539-151) designed specifically for this sewing machine. Use only the enclosed bobbin or bobbins of any other bobbin may result in injuries ... line on the sewing machine. Be sure to wind the thread onto the bobbin, and then insert the bobbin thread. Use of the same type (part code: SA156, XA5539-151). Actual size 11.5 mm (7/16 inch) This model Older model Winding the bobbin Wind the thread around the bobbin to observe...
CAUTION ● Only use the bobbin (part code: SA156, XA5539-151) designed specifically for this sewing machine. Use only the enclosed bobbin or bobbins of any other bobbin may result in injuries ... line on the sewing machine. Be sure to wind the thread onto the bobbin, and then insert the bobbin thread. Use of the same type (part code: SA156, XA5539-151). Actual size 11.5 mm (7/16 inch) This model Older model Winding the bobbin Wind the thread around the bobbin to observe...
Users Manual - English
Page 22
... not to insert the bobbin correctly. Slide the bobbin cover latch to thread the machine as indicated. Lightly hold the end of the same type (part code: SA156, XA5539-151). Memo ● The order that has been correctly wound, otherwise the needle may break or the thread tension will not operate...
... not to insert the bobbin correctly. Slide the bobbin cover latch to thread the machine as indicated. Lightly hold the end of the same type (part code: SA156, XA5539-151). Memo ● The order that has been correctly wound, otherwise the needle may break or the thread tension will not operate...
Users Manual - English
Page 28
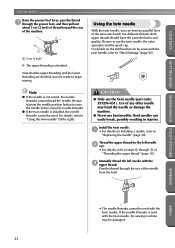
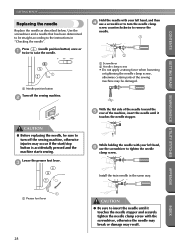
..., you are ready to begin sewing. Be sure to "Replacing the needle" (page 28). For details on installing a needle, refer to use the twin needle (part code: X59296-051). Now that can be used with the twin needle, refer to "Using the twin needle" (at the right). CAUTION ● Only use...
..., you are ready to begin sewing. Be sure to "Replacing the needle" (page 28). For details on installing a needle, refer to use the twin needle (part code: X59296-051). Now that can be used with the twin needle, refer to "Using the twin needle" (at the right). CAUTION ● Only use...
Users Manual - English
Page 34
... turn off the sewing machine. 2 1 Screwdriver 2 Needle clamp screw • Do not apply a strong force when loosening or tightening the needle clamp screw, otherwise certain parts of the machine, insert the needle until it touches the needle stopper. Hold the needle with your left hand, 6 use a screwdriver to the instructions in...
... turn off the sewing machine. 2 1 Screwdriver 2 Needle clamp screw • Do not apply a strong force when loosening or tightening the needle clamp screw, otherwise certain parts of the machine, insert the needle until it touches the needle stopper. Hold the needle with your left hand, 6 use a screwdriver to the instructions in...
Users Manual - English
Page 39
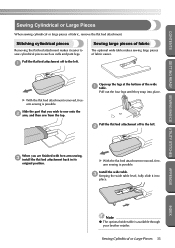
... Large Pieces When sewing cylindrical or large pieces of fabric easier. X With the flat bed attachment removed, freearm sewing is available through your brother retailer. Pull out the four legs until they snap into place. Sewing Cylindrical or Large Pieces 33 Pull the flat bed attachment off to...the left . 1 Sewing large pieces of fabric The optional wide table makes sewing large pieces of fabric, remove the flat bed attachment. Slide the part that you wish to the left . 2 When you are finished with free-arm sewing, 3 install the flat bed attachment back in its original ...
... Large Pieces When sewing cylindrical or large pieces of fabric easier. X With the flat bed attachment removed, freearm sewing is available through your brother retailer. Pull out the four legs until they snap into place. Sewing Cylindrical or Large Pieces 33 Pull the flat bed attachment off to...the left . 1 Sewing large pieces of fabric The optional wide table makes sewing large pieces of fabric, remove the flat bed attachment. Slide the part that you wish to the left . 2 When you are finished with free-arm sewing, 3 install the flat bed attachment back in its original ...
Users Manual - English
Page 42
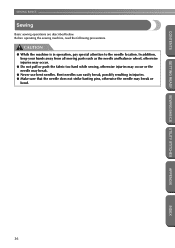
.... CONTENTS GETTING READY SEWING BASICS UTILITY STITCHES SEWING BASICS Sewing Basic sewing operations are described below. In addition, keep your hands away from all moving parts such as the needle and balance wheel, otherwise injuries may occur. ● Do not pull or push the fabric too hard while sewing, otherwise injuries...
.... CONTENTS GETTING READY SEWING BASICS UTILITY STITCHES SEWING BASICS Sewing Basic sewing operations are described below. In addition, keep your hands away from all moving parts such as the needle and balance wheel, otherwise injuries may occur. ● Do not pull or push the fabric too hard while sewing, otherwise injuries...

Users Manual - English
Page 70
... sewn from the front of the presser foot to the back, as shown below. 1 1 GETTING READY SEWING BASICS UTILITY STITCHES 1 1 Reinforcement stitching The names of parts of buttonhole foot "A", which is about 28 mm (1-1/8 inch) (diameter + thickness of buttonhole 2 foot "A", and then insert the button that will be put through the...
... sewn from the front of the presser foot to the back, as shown below. 1 1 GETTING READY SEWING BASICS UTILITY STITCHES 1 1 Reinforcement stitching The names of parts of buttonhole foot "A", which is about 28 mm (1-1/8 inch) (diameter + thickness of buttonhole 2 foot "A", and then insert the button that will be put through the...
Users Manual - English
Page 73
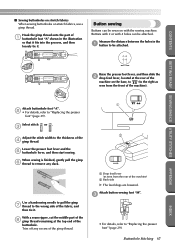
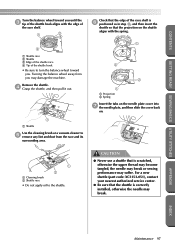
With a seam ripper, cut the middle part of the 8 gimp thread remaining at the rear of the machine on the base, to (to the right as seen from the front of the ... feed dogs are lowered. Attach button-sewing foot "M". 3 • For details, refer to "Replacing the presser foot" (page 29). Hook the gimp thread onto the part of the 4 gimp thread.
With a seam ripper, cut the middle part of the 8 gimp thread remaining at the rear of the machine on the base, to (to the right as seen from the front of the ... feed dogs are lowered. Attach button-sewing foot "M". 3 • For details, refer to "Replacing the presser foot" (page 29). Hook the gimp thread onto the part of the 4 gimp thread.
Users Manual - English
Page 103
CONTENTS GETTING READY SEWING BASICS UTILITY STITCHES Turn the balance wheel toward you. For a new shuttle (part code: XC3153-051), contact your nearest authorized service center. ● Be sure that is scratched, otherwise the upper thread may become tangled, the needle may ...
CONTENTS GETTING READY SEWING BASICS UTILITY STITCHES Turn the balance wheel toward you. For a new shuttle (part code: XC3153-051), contact your nearest authorized service center. ● Be sure that is scratched, otherwise the upper thread may become tangled, the needle may ...


