Basic Users Guide
Page 50
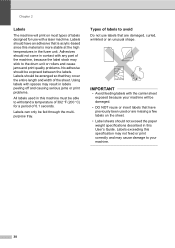
Labels should have previously been used in the fuser unit. Labels can only be damaged. • DO NOT reuse or insert labels that are missing a few labels on most types of labels designed for a period ... this specification may not feed or print correctly and may stick to avoid 2 Do not use with a laser machine. Types of labels to the drum unit or rollers and cause jams and print quality problems. No adhesive should be exposed between the labels. IMPORTANT • Avoid feeding labels with any part...
Labels should have previously been used in the fuser unit. Labels can only be damaged. • DO NOT reuse or insert labels that are missing a few labels on most types of labels designed for a period ... this specification may not feed or print correctly and may stick to avoid 2 Do not use with a laser machine. Types of labels to the drum unit or rollers and cause jams and print quality problems. No adhesive should be exposed between the labels. IMPORTANT • Avoid feeding labels with any part...
Basic Users Guide
Page 91
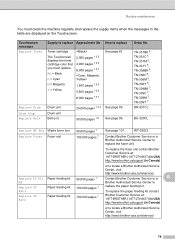
... Service Center to Replace PF Kit1 Paper feeding kit 100,000 pages 1 replace the paper feeding kit. Order No. WT-320CL Replace Fuser Fuser unit 100,000 pages 1 Contact Brother Customer Service or a Brother Authorized Service Center to replace See page 81. TN-331BK 5, TN-331C 5, TN-331M 5, TN-331Y 5, TN-336BK 6, TN-336C 6, TN...
... Service Center to Replace PF Kit1 Paper feeding kit 100,000 pages 1 replace the paper feeding kit. Order No. WT-320CL Replace Fuser Fuser unit 100,000 pages 1 Contact Brother Customer Service or a Brother Authorized Service Center to replace See page 81. TN-331BK 5, TN-331C 5, TN-331M 5, TN-331Y 5, TN-336BK 6, TN-336C 6, TN...
Basic Users Guide
Page 125
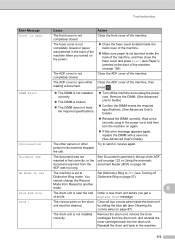
... the power cord, and then turn the machine on the drum Clean all four corona wires inside the drum unit unit must be cleaned. person's fax machine stopped the call. The fuser cover is not jammed inside the back cover of the machine, then press . The DIMM is ...User's Guide) Reinstall the DIMM correctly. You Distinctive Ring on page 39. The drum unit is near the end Order a new drum unit before you turned on the power. Close the fuser cover located inside the back of its life. Cause Action The front cover is not completely closed...
... the power cord, and then turn the machine on the drum Clean all four corona wires inside the drum unit unit must be cleaned. person's fax machine stopped the call. The fuser cover is not jammed inside the back cover of the machine, then press . The DIMM is ...User's Guide) Reinstall the DIMM correctly. You Distinctive Ring on page 39. The drum unit is near the end Order a new drum unit before you turned on the power. Close the fuser cover located inside the back of its life. Cause Action The front cover is not completely closed...
Basic Users Guide
Page 126
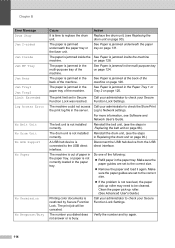
... Jam MP Tray Jam Rear Jam Tray1 Jam Tray2 Limit Exceeded Log Access Error No Belt Unit No Drum Unit No HUB Support No Paper No Permission No Response/Busy Cause It is jammed in the Paper...hub device is jammed in the back of the machine. Call your administrator to replace the drum unit. The paper is not correctly loaded in the multi-purpose tray of the machine. See Paper...correct size. Remove the paper and load it again. The belt unit is jammed underneath the paper tray or the fuser unit. The paper is not installed correctly. See Paper is jammed in the paper...
... Jam MP Tray Jam Rear Jam Tray1 Jam Tray2 Limit Exceeded Log Access Error No Belt Unit No Drum Unit No HUB Support No Paper No Permission No Response/Busy Cause It is jammed in the Paper...hub device is jammed in the back of the machine. Call your administrator to replace the drum unit. The paper is not correctly loaded in the multi-purpose tray of the machine. See Paper...correct size. Remove the paper and load it again. The belt unit is jammed underneath the paper tray or the fuser unit. The paper is not installed correctly. See Paper is jammed in the paper...
Basic Users Guide
Page 128
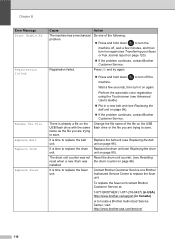
Registration failed. It is time to replace the fuser unit. To replace the fuser unit contact Brother Customer Service at: 1-877-BROTHER (1-877-276-8437) (in USA) http://www.brother.ca/support (in a new belt unit (see Replacing the belt unit on page 120). If the problem continues, contact Brother Customer Service. Chapter B Error Message Print Unable XX Registration failed...
Registration failed. It is time to replace the fuser unit. To replace the fuser unit contact Brother Customer Service at: 1-877-BROTHER (1-877-276-8437) (in USA) http://www.brother.ca/support (in a new belt unit (see Replacing the belt unit on page 120). If the problem continues, contact Brother Customer Service. Chapter B Error Message Print Unable XX Registration failed...
Basic Users Guide
Page 129
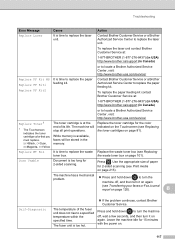
...seconds, and then turn it on page 120). Press . To replace the paper feeding kit contact Brother Customer Service at the end of the fuser unit does not rise to replace the paper feeding kit. The fuser unit is time to turn the machine off , and then turn it on again (see Replacing the... waste toner box on page 81). BK=Black, C=Cyan, M=Magenta, Y=Yellow Replace WT Box The toner cartridge is at : 1-877-BROTHER (1-877-276-8437) (in USA) http...
...seconds, and then turn it on page 120). Press . To replace the paper feeding kit contact Brother Customer Service at the end of the fuser unit does not rise to replace the paper feeding kit. The fuser unit is time to turn the machine off , and then turn it on again (see Replacing the... waste toner box on page 81). BK=Black, C=Cyan, M=Magenta, Y=Yellow Replace WT Box The toner cartridge is at : 1-877-BROTHER (1-877-276-8437) (in USA) http...
Basic Users Guide
Page 139
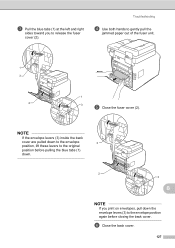
f Close the back cover. 127 NOTE If the envelope levers (3) inside the back cover are pulled down the envelope levers (3) to release the fuser cover (2). c Pull the blue tabs (1) at the left and right sides toward you to the envelope position again before pulling the blue tabs (1) down. 2 3 B NOTE If you print on envelopes, pull down to the envelope 3 position, lift these levers to the original position before closing the back cover. Troubleshooting d Use both hands to gently pull the jammed paper out of the fuser unit. 1 3 2 1 3 e Close the fuser cover (2).
f Close the back cover. 127 NOTE If the envelope levers (3) inside the back cover are pulled down the envelope levers (3) to release the fuser cover (2). c Pull the blue tabs (1) at the left and right sides toward you to the envelope position again before pulling the blue tabs (1) down. 2 3 B NOTE If you print on envelopes, pull down to the envelope 3 position, lift these levers to the original position before closing the back cover. Troubleshooting d Use both hands to gently pull the jammed paper out of the fuser unit. 1 3 2 1 3 e Close the fuser cover (2).
Basic Users Guide
Page 190
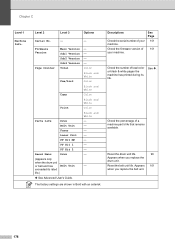
... White Color Black and White - The factory settings are shown in Bold with an asterisk. Reset the belt unit life. Reset the drum unit life. 96 Appears when you replace the belt unit. 178 See Page 151 151 Check the number of a machine part's life that remains available. Chapter C... Version Sub2 Version Sub4 Version Total Fax/List Copy Print Parts Life Drum Belt Unit Fuser Laser Unit PF Kit MP PF Kit 1 PF Kit 2 Reset Menu Drum (Appears only when the drum unit or belt unit has exceeded its life. Descriptions Check the serial number of your machine. Check ...
... White Color Black and White - The factory settings are shown in Bold with an asterisk. Reset the belt unit life. Reset the drum unit life. 96 Appears when you replace the belt unit. 178 See Page 151 151 Check the number of a machine part's life that remains available. Chapter C... Version Sub2 Version Sub4 Version Total Fax/List Copy Print Parts Life Drum Belt Unit Fuser Laser Unit PF Kit MP PF Kit 1 PF Kit 2 Reset Menu Drum (Appears only when the drum unit or belt unit has exceeded its life. Descriptions Check the serial number of your machine. Check ...
Advanced Users Guide
Page 91
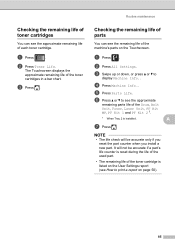
... remaining life of the toner cartridge is installed. a Press . b Press All Settings. f Press a or b to see the approximate remaining parts life of the Drum, Belt Unit, Fuser, Laser Unit, PF Kit MP, PF Kit 1 and PF Kit 2 1. 1 When Tray 2 is listed on the User Settings report (see How to display Machine Info.. b Press...
... remaining life of the toner cartridge is installed. a Press . b Press All Settings. f Press a or b to see the approximate remaining parts life of the Drum, Belt Unit, Fuser, Laser Unit, PF Kit MP, PF Kit 1 and PF Kit 2 1. 1 When Tray 2 is listed on the User Settings report (see How to display Machine Info.. b Press...
Advanced Users Guide
Page 92
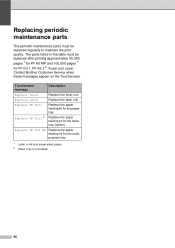
...tray. 1 Letter or A4 size single-sided pages. 2 When Tray 2 is installed. 86 Replace Laser Replace the laser unit. Touchscreen message Description Replace Fuser Replace the fuser unit. Replace PF Kit1 Replace the paper feeding kit for the multi- The parts listed in the table must be replaced after ...printing approximately 50,000 pages 1 for PF Kit MP and 100,000 pages 1 for PF Kit 1, PF Kit 2 2, Fuser and Laser. Contact Brother ...
...tray. 1 Letter or A4 size single-sided pages. 2 When Tray 2 is installed. 86 Replace Laser Replace the laser unit. Touchscreen message Description Replace Fuser Replace the fuser unit. Replace PF Kit1 Replace the paper feeding kit for the multi- The parts listed in the table must be replaced after ...printing approximately 50,000 pages 1 for PF Kit MP and 100,000 pages 1 for PF Kit 1, PF Kit 2 2, Fuser and Laser. Contact Brother ...

