Network Users Manual - English
Page 62
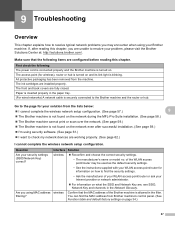
...-Pro Suite installation. (See page 58.) The Brother machine cannot print or scan over the network. (See page 59.) The Brother machine is not found on the network even after reading this chapter. The ink cartridges are fully closed. Paper is turned on what the SSID ...correct security settings. • The manufacturer's name or model no. Confirm that the following : The power cord is connected properly and the Brother machine is inserted properly in the filter. Go to the page for information on how to resolve your security settings (SSID/Network Key) correct?...
...-Pro Suite installation. (See page 58.) The Brother machine cannot print or scan over the network. (See page 59.) The Brother machine is not found on the network even after reading this chapter. The ink cartridges are fully closed. Paper is turned on what the SSID ...correct security settings. • The manufacturer's name or model no. Confirm that the following : The power cord is connected properly and the Brother machine is inserted properly in the filter. Go to the page for information on how to resolve your security settings (SSID/Network Key) correct?...
Quick Setup Guide - English
Page 1
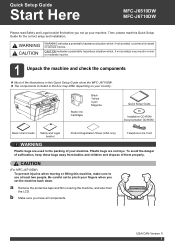
Quick Setup Guide Start Here MFC-J6510DW MFC-J6710DW Please read this machine, make sure to pinch your machine. Starter Ink Cartridges Black Yellow Cyan Magenta Quick Setup Guide Installation CD-ROM Documentation CD-ROM Basic User's Guide Safety and Legal booklet ...Product Registration Sheet (USA only) Telephone Line Cord WARNING Plastic bags are not toys. CAUTION (For MFC-J6710DW) To prevent injuries when ...
Quick Setup Guide Start Here MFC-J6510DW MFC-J6710DW Please read this machine, make sure to pinch your machine. Starter Ink Cartridges Black Yellow Cyan Magenta Quick Setup Guide Installation CD-ROM Documentation CD-ROM Basic User's Guide Safety and Legal booklet ...Product Registration Sheet (USA only) Telephone Line Cord WARNING Plastic bags are not toys. CAUTION (For MFC-J6710DW) To prevent injuries when ...
Quick Setup Guide - English
Page 5
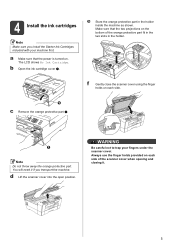
...Make sure that the power is turned on the bottom of the scanner cover when opening and closing it if you install the Starter Ink Cartridges included with your fingers under the scanner cover. a Make sure that the two projections on . d Lift the scanner cover into the open... position. WARNING Be careful not to trap your machine first. b Open the ink cartridge cover a. f Gently close the scanner cover using the finger holds on each side. 1 c Remove the orange protective part a. 1 Note Do not throw...
...Make sure that the power is turned on the bottom of the scanner cover when opening and closing it if you install the Starter Ink Cartridges included with your fingers under the scanner cover. a Make sure that the two projections on . d Lift the scanner cover into the open... position. WARNING Be careful not to trap your machine first. b Open the ink cartridge cover a. f Gently close the scanner cover using the finger holds on each side. 1 c Remove the orange protective part a. 1 Note Do not throw...
Quick Setup Guide - English
Page 6
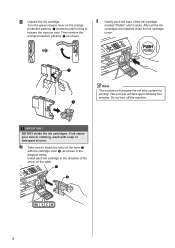
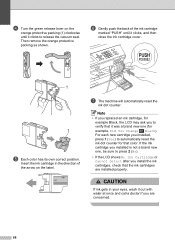
... clicks. If ink stains your skin or clothing, wash with the cartridge color b, as shown. IMPORTANT DO NOT shake the ink cartridges. This process will prepare the ink tube system for printing. Install each ink cartridge in the diagram below. Then remove the orange protective packing a as... on the orange protective packing a clockwise until it clicks to release the vacuum seal. After all the ink cartridges are installed close the ink cartridge cover. 1 1 Note The machine will take approximately four minutes. Turn the green release lever on the label. 1 2 6
... clicks. If ink stains your skin or clothing, wash with the cartridge color b, as shown. IMPORTANT DO NOT shake the ink cartridges. This process will prepare the ink tube system for printing. Install each ink cartridge in the diagram below. Then remove the orange protective packing a as... on the orange protective packing a clockwise until it clicks to release the vacuum seal. After all the ink cartridges are installed close the ink cartridge cover. 1 1 Note The machine will take approximately four minutes. Turn the green release lever on the label. 1 2 6
Quick Setup Guide - English
Page 7
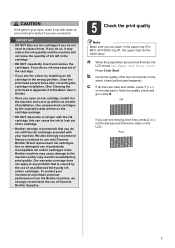
... you put paper in the machine and use of the Basic User's Guide.) • Once you continue to use only Genuine Brother Brand replacement ink cartridges. Use or attempted use of the four color blocks on the sheet. (black/yellow/cyan/magenta) c If all lines are concerned. a When the preparation process ...has finished, the LCD shows Set Paper and Press Start. OK If you can cause the ink to leak out of the cartridge. • Brother strongly recommends that you do so, it in the paper tray (For MFC-J6710DW, tray #1, the upper tray) for the initial setup.
... you put paper in the machine and use of the Basic User's Guide.) • Once you continue to use only Genuine Brother Brand replacement ink cartridges. Use or attempted use of the four color blocks on the sheet. (black/yellow/cyan/magenta) c If all lines are concerned. a When the preparation process ...has finished, the LCD shows Set Paper and Press Start. OK If you can cause the ink to leak out of the cartridge. • Brother strongly recommends that you do so, it in the paper tray (For MFC-J6710DW, tray #1, the upper tray) for the initial setup.

Quick Setup Guide - English
Page 40
...and professional use. Copyright and License ©2010 Brother Industries, Ltd. Consumables Replacement consumables When the time comes to replace ink cartridges, an error message will be responsible for your machine, visit http://www.brother.com/original/ or contact your desktop to access ... Corporation in the United States and/or other errors relating to the publication. Compilation and Publication Under the supervision of Brother Industries, Ltd. Ink cartridge Black LC75BK (High Yield) Yellow LC75Y (High Yield) Cyan LC75C (High Yield) Magenta LC75M (High Yield) LC79BK...
...and professional use. Copyright and License ©2010 Brother Industries, Ltd. Consumables Replacement consumables When the time comes to replace ink cartridges, an error message will be responsible for your machine, visit http://www.brother.com/original/ or contact your desktop to access ... Corporation in the United States and/or other errors relating to the publication. Compilation and Publication Under the supervision of Brother Industries, Ltd. Ink cartridge Black LC75BK (High Yield) Yellow LC75Y (High Yield) Cyan LC75C (High Yield) Magenta LC75M (High Yield) LC79BK...

Software Users Manual - English
Page 9
...application, and using a page description language, converts it into a format that individual cartridge. Brilliant High Quality Output Printing at : http://solutions.brother.com/ Features 1 This machine offers many other features. Using the Brother printer driver 1 A printer driver translates the data from the CD-ROM, see... the User's Guide for details.) 2 You can be understood by the printer/multi-function device. If you are from the Brother Solutions Center at up to get the best possible resolution. (See Resolution in the Specifications of the Basic User's Guide.) The printer...
...application, and using a page description language, converts it into a format that individual cartridge. Brilliant High Quality Output Printing at : http://solutions.brother.com/ Features 1 This machine offers many other features. Using the Brother printer driver 1 A printer driver translates the data from the CD-ROM, see... the User's Guide for details.) 2 You can be understood by the printer/multi-function device. If you are from the Brother Solutions Center at up to get the best possible resolution. (See Resolution in the Specifications of the Basic User's Guide.) The printer...
Software Users Manual - English
Page 175
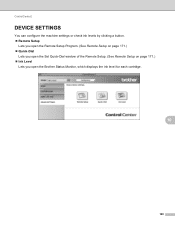
ControlCenter2 DEVICE SETTINGS 10 You can configure the machine settings or check ink levels by clicking a button. Remote Setup Lets you open the Remote Setup Program. (See Remote Setup on page 171.) Quick-Dial Lets you open the Set Quick-Dial window of the Remote Setup. (See Remote Setup on page 171.) Ink Level Lets you open the Brother Status Monitor, which displays the ink level for each cartridge. 10 168
ControlCenter2 DEVICE SETTINGS 10 You can configure the machine settings or check ink levels by clicking a button. Remote Setup Lets you open the Remote Setup Program. (See Remote Setup on page 171.) Quick-Dial Lets you open the Set Quick-Dial window of the Remote Setup. (See Remote Setup on page 171.) Ink Level Lets you open the Brother Status Monitor, which displays the ink level for each cartridge. 10 168
Software Users Manual - English
Page 177
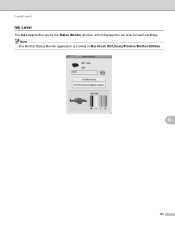
Note The Brother Status Monitor application is located in Macintosh HD/Library/Printers/Brother/Utilities. 10 170 ControlCenter2 Ink Level 10 The Ink Level button opens the Status Monitor window, which displays the ink level for each cartridge.
Note The Brother Status Monitor application is located in Macintosh HD/Library/Printers/Brother/Utilities. 10 170 ControlCenter2 Ink Level 10 The Ink Level button opens the Status Monitor window, which displays the ink level for each cartridge.

Advanced Users Manual - English
Page 78
... appears on the LCD, you can check the ink volume from your computer. (See Printing for Windows® or Printing and Faxing for paper tray #2 (MFC-J6710DW only) A a Unplug the machine from the AC power outlet. d Re-connect the power cord. 72 b Press a or b to choose Ink Volume. d Press Stop/Exit. Pull... tray #2 completely out of the machine. b Clean the paper pick-up rollers for Macintosh in the Software User's Guide.) 1 c Put tray #2 firmly back in each cartridge. c Press a or b to choose Ink. Press OK.
... appears on the LCD, you can check the ink volume from your computer. (See Printing for Windows® or Printing and Faxing for paper tray #2 (MFC-J6710DW only) A a Unplug the machine from the AC power outlet. d Re-connect the power cord. 72 b Press a or b to choose Ink Volume. d Press Stop/Exit. Pull... tray #2 completely out of the machine. b Clean the paper pick-up rollers for Macintosh in the Software User's Guide.) 1 c Put tray #2 firmly back in each cartridge. c Press a or b to choose Ink. Press OK.

Advanced Users Manual - English
Page 79
... to make sure that came with your machine. Then unplug the interface cable from the telephone wall jack and take out the ink cartridges. (See Replacing the ink cartridges in transit may lead to print problems and possible damage to trap your warranty. Not allowing the machine to "park" the print ... the orange protective part from the AC power outlet. Always use the finger holds provided on each side of the machine to release the ink cartridges and then take the telephone line cord out of the Basic User's Guide.) 73 g Press the ink release levers to lift the scanner cover ...
... to make sure that came with your machine. Then unplug the interface cable from the telephone wall jack and take out the ink cartridges. (See Replacing the ink cartridges in transit may lead to print problems and possible damage to trap your warranty. Not allowing the machine to "park" the print ... the orange protective part from the AC power outlet. Always use the finger holds provided on each side of the machine to release the ink cartridges and then take the telephone line cord out of the Basic User's Guide.) 73 g Press the ink release levers to lift the scanner cover ...
Advanced Users Manual - English
Page 80
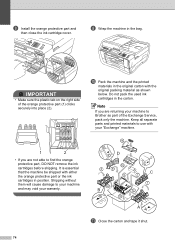
...1 2 • If you are not able to your machine and may void your machine to Brother as shown below. Shipping without them will cause damage to find the orange protective part, DO NOT remove the ink cartridges before shipping. h Install the orange protective part and then close the ink... (1) clicks securely into place (2). j Pack the machine and the printed materials in the original carton with either the orange protective part or the ink cartridges in position. Note If you are returning your warranty. 9 DD 10 3 8 6 4 B 5 C C 7 1 2 B A A A k Close the carton and ...
...1 2 • If you are not able to your machine and may void your machine to Brother as shown below. Shipping without them will cause damage to find the orange protective part, DO NOT remove the ink cartridges before shipping. h Install the orange protective part and then close the ink... (1) clicks securely into place (2). j Pack the machine and the printed materials in the original carton with either the orange protective part or the ink cartridges in position. Note If you are returning your warranty. 9 DD 10 3 8 6 4 B 5 C C 7 1 2 B A A A k Close the carton and ...

Advanced Users Manual - English
Page 86
... Real Time Transmission 15 Resolution 12 return to factory setting 12 set new default 12 Function Lock 7 G Groups for Broadcasting 35 I ID Copy 43 Ink cartridges checking ink volume 72 J Jacks Convert to RJ11 jack triplex adapter .... 30 EXT TAD 30 L LCD (Liquid Crystal Display) Brightness 4 Dim Timer 4 Help List 38...
... Real Time Transmission 15 Resolution 12 return to factory setting 12 set new default 12 Function Lock 7 G Groups for Broadcasting 35 I ID Copy 43 Ink cartridges checking ink volume 72 J Jacks Convert to RJ11 jack triplex adapter .... 30 EXT TAD 30 L LCD (Liquid Crystal Display) Brightness 4 Dim Timer 4 Help List 38...
Users Manual - English
Page 4
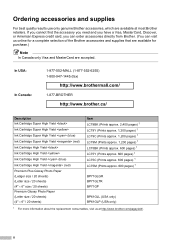
...-947-1445 (fax) http://www.brothermall.com/ 1-877-BROTHER http://www.brother.ca/ Description Ink Cartridge Super High Yield Ink Cartridge Super High Yield Ink Cartridge Super High Yield (blue) Ink Cartridge Super High Yield (red) Ink Cartridge High Yield Ink Cartridge High Yield Ink Cartridge High Yield (blue) Ink Cartridge High Yield (red) Premium Plus Glossy Photo Paper (Ledger...
...-947-1445 (fax) http://www.brothermall.com/ 1-877-BROTHER http://www.brother.ca/ Description Ink Cartridge Super High Yield Ink Cartridge Super High Yield Ink Cartridge Super High Yield (blue) Ink Cartridge Super High Yield (red) Ink Cartridge High Yield Ink Cartridge High Yield Ink Cartridge High Yield (blue) Ink Cartridge High Yield (red) Premium Plus Glossy Photo Paper (Ledger...
Users Manual - English
Page 12
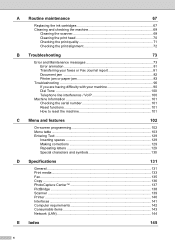
A Routine maintenance 67 Replacing the ink cartridges 67 Cleaning and checking the machine 69 Cleaning the scanner 69 Cleaning the print head 70 Checking the print quality 71 Checking the print alignment ...
A Routine maintenance 67 Replacing the ink cartridges 67 Cleaning and checking the machine 69 Cleaning the scanner 69 Cleaning the print head 70 Checking the print quality 71 Checking the print alignment ...
Users Manual - English
Page 23
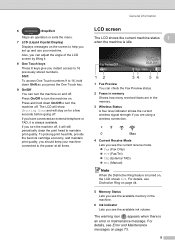
... exits the menu. 7 LCD (Liquid Crystal Display) Displays messages on the screen to maintain print quality. To prolong print head life, provide the best ink cartridge economy, and maintain print quality, you press the One Touch key. 9 On/Off You can adjust the angle of the LCD screen by lifting it...
... exits the menu. 7 LCD (Liquid Crystal Display) Displays messages on the screen to maintain print quality. To prolong print head life, provide the best ink cartridge economy, and maintain print quality, you press the One Touch key. 9 On/Off You can adjust the angle of the LCD screen by lifting it...

Users Manual - English
Page 81
... investment and obtain premium performance from the Brother machine, we strongly recommend the use of ink left in the ink cartridge. It is necessary to replace an ink cartridge, there will be a small amount of Genuine Brother Supplies. IMPORTANT Brother strongly recommends that is running out of ink... counter. Our warranty coverage does not apply to use only Genuine Brother Brand replacement ink cartridges. A c Open the new ink cartridge bag for the color indicated on the LCD, and then take out the ink cartridge. 67 The ink dot counter automatically monitors the level of ink...
... investment and obtain premium performance from the Brother machine, we strongly recommend the use of ink left in the ink cartridge. It is necessary to replace an ink cartridge, there will be a small amount of Genuine Brother Supplies. IMPORTANT Brother strongly recommends that is running out of ink... counter. Our warranty coverage does not apply to use only Genuine Brother Brand replacement ink cartridges. A c Open the new ink cartridge bag for the color indicated on the LCD, and then take out the ink cartridge. 67 The ink dot counter automatically monitors the level of ink...
Users Manual - English
Page 82
... packing (1) clockwise until it clicks to verify that it out with water at once and call a doctor if you replaced an ink cartridge, for that the ink cartridges are concerned. 68 d Turn the green release lever on the label. Note • If you are installed properly. g The machine... dot counter for example Black, the LCD may ask you install the ink cartridges, check that color. CAUTION If ink gets in the direction of the ink cartridge marked "PUSH" until it clicks, and then close the ink cartridge cover. 1 1 e Each color has its own correct position. Then remove...
... packing (1) clockwise until it clicks to verify that it out with water at once and call a doctor if you replaced an ink cartridge, for that the ink cartridges are concerned. 68 d Turn the green release lever on the label. Note • If you are installed properly. g The machine... dot counter for example Black, the LCD may ask you install the ink cartridges, check that color. CAUTION If ink gets in the direction of the ink cartridge marked "PUSH" until it clicks, and then close the ink cartridge cover. 1 1 e Each color has its own correct position. Then remove...
Users Manual - English
Page 83
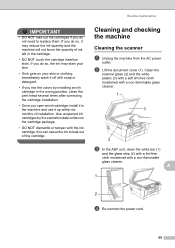
... glass cleaner. 1 3 2 c In the ADF unit, clean the white bar (1) and the glass strip (2) with a lint-free cloth moistened with the ink cartridge, this can cause the ink to replace them. A 1 2 d Re-connect the power cord. 69 IMPORTANT • DO NOT take out ink...need to leak out of the cartridge. Use unopened ink cartridges by installing an ink cartridge in the wrong position, clean the print head several times after correcting the cartridge installation. • Once you open an ink cartridge, install it in the cartridge. • DO NOT touch the cartridge insertion slots. If you do...
... glass cleaner. 1 3 2 c In the ADF unit, clean the white bar (1) and the glass strip (2) with a lint-free cloth moistened with the ink cartridge, this can cause the ink to replace them. A 1 2 d Re-connect the power cord. 69 IMPORTANT • DO NOT take out ink...need to leak out of the cartridge. Use unopened ink cartridges by installing an ink cartridge in the wrong position, clean the print head several times after correcting the cartridge installation. • Once you open an ink cartridge, install it in the cartridge. • DO NOT touch the cartridge insertion slots. If you do...
Users Manual - English
Page 84
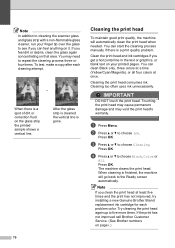
...touch the print head. Press OK. Press OK. d Press a or b to choose Ink. The machine cleans the print head. Clean the print head and ink cartridges if you get a horizontal line in the text or graphics, or blank text on page i.) b Press a or b to choose Black, Color or All. ...a time (Yellow/Cyan/Magenta), or all four colors at least five times and the print has not improved, try installing a new Genuine Brother Brand replacement ink cartridge for each cleaning attempt. i When there is a print quality problem. You may void the print head's warranty. Try cleaning the print head...
...touch the print head. Press OK. Press OK. d Press a or b to choose Ink. The machine cleans the print head. Clean the print head and ink cartridges if you get a horizontal line in the text or graphics, or blank text on page i.) b Press a or b to choose Black, Color or All. ...a time (Yellow/Cyan/Magenta), or all four colors at least five times and the print has not improved, try installing a new Genuine Brother Brand replacement ink cartridge for each cleaning attempt. i When there is a print quality problem. You may void the print head's warranty. Try cleaning the print head...


