Software Users Manual - English
Page 39
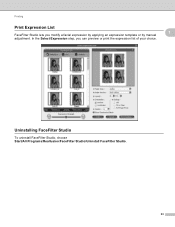
In the Select Expression step, you modify a facial expression by applying an expression template or by manual adjustment. Printing Print Expression List FaceFilter Studio lets you can preview or print the expression list of your choice. 1 1 Uninstalling FaceFilter Studio 1 To uninstall FaceFilter Studio, choose Start/All Programs/Reallusion/FaceFilter Studio/Uninstall FaceFilter Studio. 33
In the Select Expression step, you modify a facial expression by applying an expression template or by manual adjustment. Printing Print Expression List FaceFilter Studio lets you can preview or print the expression list of your choice. 1 1 Uninstalling FaceFilter Studio 1 To uninstall FaceFilter Studio, choose Start/All Programs/Reallusion/FaceFilter Studio/Uninstall FaceFilter Studio. 33

Software Users Manual - English
Page 59
Quick links to other applications 2 ScanSoft™ PaperPort™11SE automatically recognizes many other folders. When you can manually create a link using the Copy Text command, you choose to view in Desktop view. You can use with OCR lets you convert image text ...
Quick links to other applications 2 ScanSoft™ PaperPort™11SE automatically recognizes many other folders. When you can manually create a link using the Copy Text command, you choose to view in Desktop view. You can use with OCR lets you convert image text ...
Software Users Manual - English
Page 61
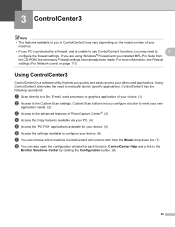
... model number of your machine. • If your device. (6) g You can also open the configuration window for each function, ControlCenter Help and a link to the Brother Solutions Center by a firewall, and is a software utility that lets you installed MFL-Pro Suite from the Model drop-down list. (7) h You can choose which... to configure your PC is protected by clicking the Configuration button. (8) 55 3 ControlCenter3 3 Note • The features available to you in ControlCenter3 may need to manually launch specific applications.
... model number of your machine. • If your device. (6) g You can also open the configuration window for each function, ControlCenter Help and a link to the Brother Solutions Center by a firewall, and is a software utility that lets you installed MFL-Pro Suite from the Model drop-down list. (7) h You can choose which... to configure your PC is protected by clicking the Configuration button. (8) 55 3 ControlCenter3 3 Note • The features available to you in ControlCenter3 may need to manually launch specific applications.
Software Users Manual - English
Page 152
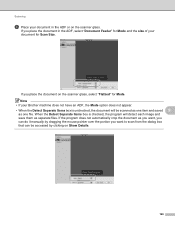
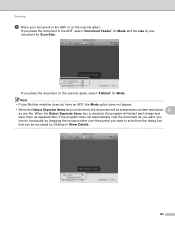
... as one file. If the program does not automatically crop the document as you want to scan from the dialog box that can do it manually by dragging the mouse pointer over the portion you place the document in the ADF or on the scanner glass, select "Flatbed" for Mode. Note... • If your document for Mode and the size of your Brother machine does not have an ADF, the Mode option does not appear. • When the Detect Separate Items box is checked, the program will be...
... as one file. If the program does not automatically crop the document as you want to scan from the dialog box that can do it manually by dragging the mouse pointer over the portion you place the document in the ADF or on the scanner glass, select "Flatbed" for Mode. Note... • If your document for Mode and the size of your Brother machine does not have an ADF, the Mode option does not appear. • When the Detect Separate Items box is checked, the program will be...

Software Users Manual - English
Page 153
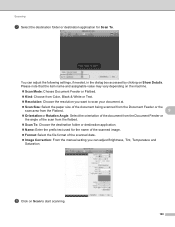
... or destination application for the name of the scanned image. Format: Select the file format of the scanned data. Image Correction: From the manual setting you can adjust the following settings, if needed, in the dialog box accessed by clicking on Show Details. f Click on the machine. Scan...
... or destination application for the name of the scanned image. Format: Select the file format of the scanned data. Image Correction: From the manual setting you can adjust the following settings, if needed, in the dialog box accessed by clicking on Show Details. f Click on the machine. Scan...
Software Users Manual - English
Page 155
... does not automatically crop the document as you want, you can be scanned as one item and saved 9 as separate files. Note • If your Brother machine does not have an ADF, the Mode option does not appear. • When the Detect Separate Items box is checked, the program will be... accessed by dragging the mouse pointer over the portion you want to scan from the dialog box that can do it manually by clicking on Show Details. 149 When the Detect Separate Items box is unchecked, the document will detect each image and save them as one...
... does not automatically crop the document as you want, you can be scanned as one item and saved 9 as separate files. Note • If your Brother machine does not have an ADF, the Mode option does not appear. • When the Detect Separate Items box is checked, the program will be... accessed by dragging the mouse pointer over the portion you want to scan from the dialog box that can do it manually by clicking on Show Details. 149 When the Detect Separate Items box is unchecked, the document will detect each image and save them as one...
Software Users Manual - English
Page 156
... or destination application for the name of the scanned image. Format: Select the file format of the scanned data. Image Correction: From the manual setting you can adjust the following settings, if needed, in the dialog box accessed by clicking on Scan to start scanning. 150
... or destination application for the name of the scanned image. Format: Select the file format of the scanned data. Image Correction: From the manual setting you can adjust the following settings, if needed, in the dialog box accessed by clicking on Scan to start scanning. 150
Software Users Manual - English
Page 160
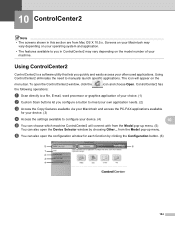
...; The features available to you quickly and easily access your machine. Using ControlCenter2 eliminates the need to configure your device. (3) d Access the settings available to manually launch specific applications. from Mac OS X 10.5.x. Screens on your Macintosh may vary depending on the model number of your choice. (1) b Custom Scan buttons let...
...; The features available to you quickly and easily access your machine. Using ControlCenter2 eliminates the need to configure your device. (3) d Access the settings available to manually launch specific applications. from Mac OS X 10.5.x. Screens on your Macintosh may vary depending on the model number of your choice. (1) b Custom Scan buttons let...
Network Users Manual - English
Page 1
... Center (http://solutions.brother.com/) is your one stop resource for all times. Multi-Protocol On-board Ethernet Multi-function Print Server and Wireless (IEEE 802.11b/g) Ethernet Multi-... keep the Documentation CD-ROM in a convenient place for your network. Version 0 ENG You can print or view this machine on your machine, read this manual thoroughly before using this manual from the Documentation CD-ROM at all your printing needs.
... Center (http://solutions.brother.com/) is your one stop resource for all times. Multi-Protocol On-board Ethernet Multi-function Print Server and Wireless (IEEE 802.11b/g) Ethernet Multi-... keep the Documentation CD-ROM in a convenient place for your network. Version 0 ENG You can print or view this machine on your machine, read this manual thoroughly before using this manual from the Documentation CD-ROM at all your printing needs.
Network Users Manual - English
Page 2
...caused by reliance on the materials presented, including but not limited to typographical and other features. The contents of this manual and the specifications of this product are subject to make changes without notice. Do not use in this document represents ...country of purchase only. Compilation and publication notice Under the supervision of Brother Industries, Ltd., this manual has been compiled and published, covering the latest product's descriptions and specifications. Brother reserves the right to change without notice in the specifications and materials contained...
...caused by reliance on the materials presented, including but not limited to typographical and other features. The contents of this manual and the specifications of this product are subject to make changes without notice. Do not use in this document represents ...country of purchase only. Compilation and publication notice Under the supervision of Brother Industries, Ltd., this manual has been compiled and published, covering the latest product's descriptions and specifications. Brother reserves the right to change without notice in the specifications and materials contained...
Network Users Manual - English
Page 14
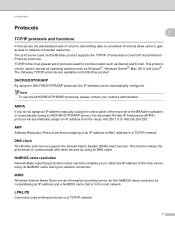
NetBIOS name resolution 1 Network Basic Input/Output System name resolution enables you do not assign an IP address manually (using the control panel of the machine or the BRAdmin software) or automatically (using its NetBIOS name during the network connection. Protocols...IP protocols are the standardized sets of protocols used in almost all operating systems such as Internet and E-mail. LPR/LPD 1 Commonly used on this Brother product. WINS 1 Windows Internet Name Service is an information providing service for transmitting data on a network. TCP/IP is in a TCP/IP network...
NetBIOS name resolution 1 Network Basic Input/Output System name resolution enables you do not assign an IP address manually (using the control panel of the machine or the BRAdmin software) or automatically (using its NetBIOS name during the network connection. Protocols...IP protocols are the standardized sets of protocols used in almost all operating systems such as Internet and E-mail. LPR/LPD 1 Commonly used on this Brother product. WINS 1 Windows Internet Name Service is an information providing service for transmitting data on a network. TCP/IP is in a TCP/IP network...
Network Users Manual - English
Page 35
... wireless network. 28 h Enter the Password (Network Key) and press OK. (For information how to enter text, see the SSID you chose No, go to manually add the SSID name. To cancel, choose No. k If your access point is connected successfully, the display shows Connected for 60 seconds. If your wireless...
... wireless network. 28 h Enter the Password (Network Key) and press OK. (For information how to enter text, see the SSID you chose No, go to manually add the SSID name. To cancel, choose No. k If your access point is connected successfully, the display shows Connected for 60 seconds. If your wireless...
Network Users Manual - English
Page 40
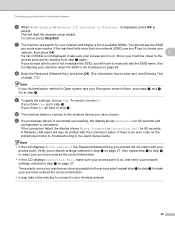
g Put your access point. Connecting to connect with the connection status. You can also manually configure the wireless settings following the steps starting from the access point. If the same message is an error code on the printed report refer ... has the Wi-Fi Protected Setup mode or the AOSS™ mode enabled and try starting from d again. Move the machine closer to the instruction manual that supports Wi-Fi Protected Setup or AOSS™ for an access point that came with the Wi-Fi Protected Setup mode or AOSS™...
g Put your access point. Connecting to connect with the connection status. You can also manually configure the wireless settings following the steps starting from the access point. If the same message is an error code on the printed report refer ... has the Wi-Fi Protected Setup mode or the AOSS™ mode enabled and try starting from d again. Move the machine closer to the instruction manual that supports Wi-Fi Protected Setup or AOSS™ for an access point that came with the Wi-Fi Protected Setup mode or AOSS™...
Network Users Manual - English
Page 42
...same message is different, depending on the brand of the device that is used as a Registrar, perform following instructions. See the instruction manual 3 that came with your access point/router. If the LCD shows No Access Point or Connection Fail, the machine has not successfully... connected to your router or access point. For resetting, see Restoring the network settings to factory default on page 77. See the instruction manual that came with your access point/router. 1 (Windows Vista®) Click , Network, and then Add a wireless device. (Windows® 7) Click...
...same message is different, depending on the brand of the device that is used as a Registrar, perform following instructions. See the instruction manual 3 that came with your access point/router. If the LCD shows No Access Point or Connection Fail, the machine has not successfully... connected to your router or access point. For resetting, see Restoring the network settings to factory default on page 77. See the instruction manual that came with your access point/router. 1 (Windows Vista®) Click , Network, and then Add a wireless device. (Windows® 7) Click...

Network Users Manual - English
Page 50
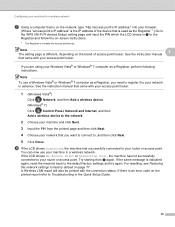
Wireless configuration using the Brother installer application j The wizard will search for wireless networks available from your network is not configured for Authentication and Encryption, the following screen will appear. k ... SSID, and then see if the machine and the access point are within range for entering the Name (SSID). Choose the access point you can manually add it by clicking the Advanced button. Follow the on-screen instructions for wireless communication.
Wireless configuration using the Brother installer application j The wizard will search for wireless networks available from your network is not configured for Authentication and Encryption, the following screen will appear. k ... SSID, and then see if the machine and the access point are within range for entering the Name (SSID). Choose the access point you can manually add it by clicking the Advanced button. Follow the on-screen instructions for wireless communication.

Network Users Manual - English
Page 51
Note • The settings will remain unchanged if you click Cancel. • If you want to manually enter the IP address settings of your machine, click Change IP Address and enter the necessary IP address settings for your network. • The control ... setup failure screen appears, click Retry and try starting from step j again. 44 The settings will be sent to your machine. Wireless configuration using the Brother installer application l Enter the Network Key and then enter the key again in Confirm Network Key, then click Next. 4 m Click Next.
Note • The settings will remain unchanged if you click Cancel. • If you want to manually enter the IP address settings of your machine, click Change IP Address and enter the necessary IP address settings for your network. • The control ... setup failure screen appears, click Retry and try starting from step j again. 44 The settings will be sent to your machine. Wireless configuration using the Brother installer application l Enter the Network Key and then enter the key again in Confirm Network Key, then click Next. 4 m Click Next.

Network Users Manual - English
Page 58
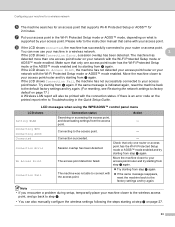
...point that came with your access point. Please refer to the instruction manual that supports Wi-Fi Protected Setup or AOSS™ for 2 minutes. f Press Menu, a or b to choose Network and press OK. (For DCP-J715W, MFC-J615W and MFC-J630W) Press a or b to choose WPS/AOSS and press OK. ...Check the box after you want to configure your wireless access point supports Wi-Fi Protected Setup (PIN Method) and you confirm the wireless setting is supported by your access point. 51 Note If your machine using the Brother...
...point that came with your access point. Please refer to the instruction manual that supports Wi-Fi Protected Setup or AOSS™ for 2 minutes. f Press Menu, a or b to choose Network and press OK. (For DCP-J715W, MFC-J615W and MFC-J630W) Press a or b to choose WPS/AOSS and press OK. ...Check the box after you want to configure your wireless access point supports Wi-Fi Protected Setup (PIN Method) and you confirm the wireless setting is supported by your access point. 51 Note If your machine using the Brother...

Network Users Manual - English
Page 68
l If your network is not configured for wireless communication. Then, click Refresh. • If your machine. Choose the Ad-hoc network you can manually add it by clicking the Advanced button. Check This is an Ad-hoc network and there is within range for Authentication and Encryption, the following ... if the machine is no access point., and then enter the Name (SSID) and the Channel number, and then click Next. Wireless configuration using the Brother installer application k The wizard will appear.
l If your network is not configured for wireless communication. Then, click Refresh. • If your machine. Choose the Ad-hoc network you can manually add it by clicking the Advanced button. Check This is an Ad-hoc network and there is within range for Authentication and Encryption, the following ... if the machine is no access point., and then enter the Name (SSID) and the Channel number, and then click Next. Wireless configuration using the Brother installer application k The wizard will appear.

Network Users Manual - English
Page 69
Note • The settings will be sent to manually enter the IP address settings of your machine, click Change IP Address and enter the necessary IP address settings for your machine. Wireless configuration using the Brother installer application m Then enter the Network Key and Confirm Network Key, and then click Next. 4 n Click Next. The settings will remain unchanged if you click Cancel. • If you want to your network. 62
Note • The settings will be sent to manually enter the IP address settings of your machine, click Change IP Address and enter the necessary IP address settings for your machine. Wireless configuration using the Brother installer application m Then enter the Network Key and Confirm Network Key, and then click Next. 4 n Click Next. The settings will remain unchanged if you click Cancel. • If you want to your network. 62
Network Users Manual - English
Page 71
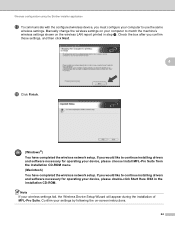
...the machine's wireless settings shown on -screen instructions. 64 If you would like to use the same wireless settings. Wireless configuration using the Brother installer application q To communicate with the configured wireless device, you confirm these settings, and then click Next. 4 r Click Finish. (...to continue installing drivers and software necessary for operating your device, please double-click Start Here OSX in step n. Manually change the wireless settings on your wireless settings fail, the Wireless Device Setup Wizard will appear during the installation of MFL-Pro ...
...the machine's wireless settings shown on -screen instructions. 64 If you would like to use the same wireless settings. Wireless configuration using the Brother installer application q To communicate with the configured wireless device, you confirm these settings, and then click Next. 4 r Click Finish. (...to continue installing drivers and software necessary for operating your device, please double-click Start Here OSX in step n. Manually change the wireless settings on your wireless settings fail, the Wireless Device Setup Wizard will appear during the installation of MFL-Pro ...


