
Advanced Users Guide
Page 5
A Routine maintenance 37 Cleaning and checking the machine 37 Cleaning the outside of the machine 37 Cleaning the machine's printer platen 38 Cleaning the paper feed rollers 39 Cleaning the paper pick-up rollers 40 Checking the ink volume 41 Packing and shipping the machine 42 B Glossary 44 C Index 48 iv
A Routine maintenance 37 Cleaning and checking the machine 37 Cleaning the outside of the machine 37 Cleaning the machine's printer platen 38 Cleaning the paper feed rollers 39 Cleaning the paper pick-up rollers 40 Checking the ink volume 41 Packing and shipping the machine 42 B Glossary 44 C Index 48 iv
Advanced Users Guide
Page 35
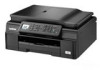
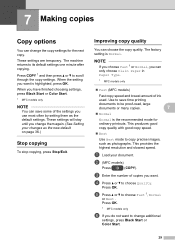
... amount of the settings you have finished choosing settings, press Black Start or Color Start. 1 MFC models only NOTE You can choose the copy quality. When the setting you want to save some of ink used. Use to change them as photographs. a Load your changes as the new default on ...page 36.) Stop copying 7 To stop copying, press Stop/Exit. NOTE If you choose Fast 1 or Normal, you do not want . Press OK. b (MFC models) Press (COPY). Press COPY...
... amount of the settings you have finished choosing settings, press Black Start or Color Start. 1 MFC models only NOTE You can choose the copy quality. When the setting you want to save some of ink used. Use to change them as photographs. a Load your changes as the new default on ...page 36.) Stop copying 7 To stop copying, press Stop/Exit. NOTE If you choose Fast 1 or Normal, you do not want . Press OK. b (MFC models) Press (COPY). Press COPY...

Advanced Users Guide
Page 40
... for use only when making color copies. c Enter the number of the document when copying. Press OK. b (MFC models) Press (COPY). d Press a or b to finish scanning. Remove Background Color 7 Remove Background Color removes... Start or Color Start. The background color is for all the pages have been scanned. Press OK. b (MFC models) Press (COPY). Press OK. e Press a or b to scan the next page. Press OK. ...the copy more readable and it will save some ink. Repeat steps g and h until all black & white copies. a Load your document. Press OK.
... for use only when making color copies. c Enter the number of the document when copying. Press OK. b (MFC models) Press (COPY). d Press a or b to finish scanning. Remove Background Color 7 Remove Background Color removes... Start or Color Start. The background color is for all the pages have been scanned. Press OK. b (MFC models) Press (COPY). Press OK. e Press a or b to scan the next page. Press OK. ...the copy more readable and it will save some ink. Repeat steps g and h until all black & white copies. a Load your document. Press OK.
Advanced Users Guide
Page 42
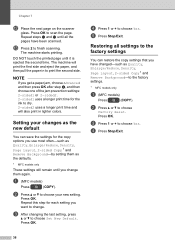
...after step i, and then choose one of the jam prevention settings: 2-sided1 or 2-sided2. 2-sided1 uses a longer print time for the ink to choose your changes as the new default 7 You can restore the copy settings that you have been scanned. NOTE If you want ... Restoring all the pages have changed-such as the defaults. 1 MFC models only These settings will also print in to the factory settings. 1 MFC models only a (MFC models) Press (COPY). d Press Stop/Exit. 36 Setting your new setting. a (MFC models) Press (COPY). Press OK. Press OK. Repeat this ...
...after step i, and then choose one of the jam prevention settings: 2-sided1 or 2-sided2. 2-sided1 uses a longer print time for the ink to choose your changes as the new default 7 You can restore the copy settings that you have been scanned. NOTE If you want ... Restoring all the pages have changed-such as the defaults. 1 MFC models only These settings will also print in to the factory settings. 1 MFC models only a (MFC models) Press (COPY). d Press Stop/Exit. 36 Setting your new setting. a (MFC models) Press (COPY). Press OK. Press OK. Repeat this ...

Advanced Users Guide
Page 44
... cause damage to lift the scanner cover into the open position. b Clean the machine's printer platen (1) and the area around it, wiping off any scattered ink with a dry, soft lint-free cloth to remove dust. Cleaning the machine's 2 printer platen A (DCP model) WARNING 1 Be sure to unplug the machine ...avoid an electrical shock. 2 a Place both hands under the plastic tabs on both sides of the paper tray with a dry, soft lint-free cloth. (MFC models) e Close the output paper tray cover and 1 put the paper tray firmly back in the machine. d Wipe the inside and outside of the ...
... cause damage to lift the scanner cover into the open position. b Clean the machine's printer platen (1) and the area around it, wiping off any scattered ink with a dry, soft lint-free cloth to remove dust. Cleaning the machine's 2 printer platen A (DCP model) WARNING 1 Be sure to unplug the machine ...avoid an electrical shock. 2 a Place both hands under the plastic tabs on both sides of the paper tray with a dry, soft lint-free cloth. (MFC models) e Close the output paper tray cover and 1 put the paper tray firmly back in the machine. d Wipe the inside and outside of the ...

Advanced Users Guide
Page 45
Routine maintenance b (MFC models) Clean the front side of the machine. d Re-connect the power cord. After cleaning, wipe the rollers with a dry, soft lint-free cloth to -..., using a side-to remove all moisture. 1 39 Pull the paper tray (1) completely out of the Paper Feed Rollers (1) with a soft lint-free cloth moistened with ink, it , and then close it may cause paper feed problems. a Unplug the machine from the AC power outlet. Cleaning the paper feed rollers A If the...
Routine maintenance b (MFC models) Clean the front side of the machine. d Re-connect the power cord. After cleaning, wipe the rollers with a dry, soft lint-free cloth to -..., using a side-to remove all moisture. 1 39 Pull the paper tray (1) completely out of the Paper Feed Rollers (1) with a soft lint-free cloth moistened with ink, it , and then close it may cause paper feed problems. a Unplug the machine from the AC power outlet. Cleaning the paper feed rollers A If the...

Advanced Users Guide
Page 47
...tray firmly back in each cartridge. There is a problem with a dry, soft lint-free cloth to see Software and Network User's Guide: Monitor the Ink Level and Status of the following icons is displayed. d Press Stop/Exit. Slowly turn the rollers so that is near the end of its life... or having a problem, one of the Machine from Your Computer (Windows®) or Monitor Machine status from your computer. b Press a or b to choose Ink Volume. A NOTE When the ink cartridge is left in the machine. NOTE You can use the Menu key to remove all moisture. 1 Routine maintenance Checking the...
...tray firmly back in each cartridge. There is a problem with a dry, soft lint-free cloth to see Software and Network User's Guide: Monitor the Ink Level and Status of the following icons is displayed. d Press Stop/Exit. Slowly turn the rollers so that is near the end of its life... or having a problem, one of the Machine from Your Computer (Windows®) or Monitor Machine status from your computer. b Press a or b to choose Ink Volume. A NOTE When the ink cartridge is left in the machine. NOTE You can use the Menu key to remove all moisture. 1 Routine maintenance Checking the...
Advanced Users Guide
Page 48
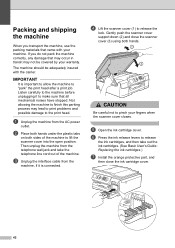
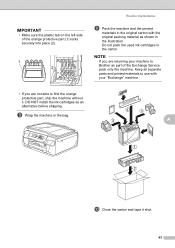
...process may not be adequately insured with your machine. a Unplug the machine from the telephone wall jack and take out the ink cartridges. (See Basic User's Guide: Replacing the ink cartridges.) g Install the orange protective part, and then close the scanner cover (3) using both sides of the machine. ... to "park" the print head after a print job. Then unplug the machine from the AC power outlet. f Press the ink release levers to release the ink cartridges, and then take the telephone line cord out of the machine to make sure that came with the carrier. Listen carefully...
...process may not be adequately insured with your machine. a Unplug the machine from the telephone wall jack and take out the ink cartridges. (See Basic User's Guide: Replacing the ink cartridges.) g Install the orange protective part, and then close the scanner cover (3) using both sides of the machine. ... to "park" the print head after a print job. Then unplug the machine from the AC power outlet. f Press the ink release levers to release the ink cartridges, and then take the telephone line cord out of the machine to make sure that came with the carrier. Listen carefully...
Advanced Users Guide
Page 49
... original carton with your "Exchange" machine. • If you are not able to Brother as an alternative before shipping. A j Close the carton and tape it . Do not pack the used ink cartridges in the bag. DO NOT install the ink cartridges as part of the orange protective part (1) locks securely into place (2). 1 2 Routine...
... original carton with your "Exchange" machine. • If you are not able to Brother as an alternative before shipping. A j Close the carton and tape it . Do not pack the used ink cartridges in the bag. DO NOT install the ink cartridges as part of the orange protective part (1) locks securely into place (2). 1 2 Routine...

Advanced Users Guide
Page 51
... before you to begin sending. ECM (Error Correction Mode) Detects errors during On- F/T Ring Time The length of paper. For best quality results, Brother recommends Innobella™ ink and paper. You can receive faxes and telephone calls. Memory Receive Receives faxes into a separate wall jack. Menu mode Programming mode for copying, scanning...
... before you to begin sending. ECM (Error Correction Mode) Detects errors during On- F/T Ring Time The length of paper. For best quality results, Brother recommends Innobella™ ink and paper. You can receive faxes and telephone calls. Memory Receive Receives faxes into a separate wall jack. Menu mode Programming mode for copying, scanning...
Advanced Users Guide
Page 55
... 10 overseas 13 Real Time Transmission 13 Resolution 9 return to factory setting 10 set new default 10 G Groups for Broadcasting 25 I ID Copy 33 Ink cartridges checking ink volume 41 J Jacks Convert to Address Book 22 Delete 22 Send a fax 22 P Packing and shipping the machine .......... 42 Power failure 1 Presto! O Outgoing Call...
... 10 overseas 13 Real Time Transmission 13 Resolution 9 return to factory setting 10 set new default 10 G Groups for Broadcasting 25 I ID Copy 33 Ink cartridges checking ink volume 41 J Jacks Convert to Address Book 22 Delete 22 Send a fax 22 P Packing and shipping the machine .......... 42 Power failure 1 Presto! O Outgoing Call...
Advanced Users Guide
Page 56
... Mode 3 T TAD (telephone answering device), external 21 with two-line jack 21 Telephone line roll over lines 20 two-line telephone system 20 Troubleshooting checking ink volume 41 Two-line telephone system 20 TX Lock turning on/off 7 V Volume, setting beeper 2 ring 1 speaker 2 W Warranties are in the box Windows® See...
... Mode 3 T TAD (telephone answering device), external 21 with two-line jack 21 Telephone line roll over lines 20 two-line telephone system 20 Troubleshooting checking ink volume 41 Two-line telephone system 20 TX Lock turning on/off 7 V Volume, setting beeper 2 ring 1 speaker 2 W Warranties are in the box Windows® See...
Software and Network Users Guide
Page 4
... IMPORTANT • DO NOT place your machine to an AC power outlet controlled by wall switches or automatic timers. Doing so may cause ink spillage and internal damage to the machine. • DO NOT connect your product next to sources of interference, such as speakers or the base units of... the power can delete information from the machine's memory, and repeated cycling of non-Brother cordless telephones. Doing so may interfere with the ...
... IMPORTANT • DO NOT place your machine to an AC power outlet controlled by wall switches or automatic timers. Doing so may cause ink spillage and internal damage to the machine. • DO NOT connect your product next to sources of interference, such as speakers or the base units of... the power can delete information from the machine's memory, and repeated cycling of non-Brother cordless telephones. Doing so may interfere with the ...

Basic Users Guide
Page 5
... (French for Canada) LEK458001 (MFC-J450DW) LEK464001 (MFC-J470DW) LEK460001 (MFC-J475DW) 1 For more information about the replacement consumables, visit us at http://www.brother.com/pageyield/. Accessories and Supplies Description Ink Cartridge Standard Yield Ink Cartridge Standard Yield Ink Cartridge Standard Yield (blue) Ink Cartridge Standard Yield (red) Ink Cartridge High Yield Ink Cartridge High Yield Ink Cartridge High Yield (blue...
... (French for Canada) LEK458001 (MFC-J450DW) LEK464001 (MFC-J470DW) LEK460001 (MFC-J475DW) 1 For more information about the replacement consumables, visit us at http://www.brother.com/pageyield/. Accessories and Supplies Description Ink Cartridge Standard Yield Ink Cartridge Standard Yield Ink Cartridge Standard Yield (blue) Ink Cartridge Standard Yield (red) Ink Cartridge High Yield Ink Cartridge High Yield Ink Cartridge High Yield (blue...

Basic Users Guide
Page 11
... machine's SCAN mode settings for PDF scanning 51 How to scan a document as a PDF file using the control panel 53 A Routine maintenance 54 Replacing the ink cartridges 54 Cleaning and checking the machine 57 Cleaning the scanner 57 Cleaning the print head 58 Checking the print quality 58 Checking the print...
... machine's SCAN mode settings for PDF scanning 51 How to scan a document as a PDF file using the control panel 53 A Routine maintenance 54 Replacing the ink cartridges 54 Cleaning and checking the machine 57 Cleaning the scanner 57 Cleaning the print head 58 Checking the print quality 58 Checking the print...

Basic Users Guide
Page 21
... always available. Also lets you turn off . If you should keep your machine connected to maintain print quality. To prolong print head life, provide better ink efficiency, and maintain print quality, you have connected an external telephone or TAD, it will stay on the machine. The LCD will show Shutting Down...
... always available. Also lets you turn off . If you should keep your machine connected to maintain print quality. To prolong print head life, provide better ink efficiency, and maintain print quality, you have connected an external telephone or TAD, it will stay on the machine. The LCD will show Shutting Down...

Basic Users Guide
Page 22
... for entering information into the machine. 8 Menu keys: While the machine is idle, you can see Distinctive Ring on page 33. 3 Ink See the remaining ink volume. Lets you are using a wireless connection. 0 Max 2 Receive Mode See the current Receive Mode: Fax (Fax Only) ... F/T (Fax/Tel) TAD (External TAD) Mnl (Manual) NOTE When the Distinctive Ring feature is displayed on the color ink. Chapter 1 7 Dial Pad Use these keys to adjust the ring volume. Press to the previous menu level. OK Lets you choose a...
... for entering information into the machine. 8 Menu keys: While the machine is idle, you can see Distinctive Ring on page 33. 3 Ink See the remaining ink volume. Lets you are using a wireless connection. 0 Max 2 Receive Mode See the current Receive Mode: Fax (Fax Only) ... F/T (Fax/Tel) TAD (External TAD) Mnl (Manual) NOTE When the Distinctive Ring feature is displayed on the color ink. Chapter 1 7 Dial Pad Use these keys to adjust the ring volume. Press to the previous menu level. OK Lets you choose a...

Basic Users Guide
Page 35
...) 17 to 24 lb (64 to 90 g/m2) How to load documents 3 IMPORTANT • DO NOT pull on the scanner glass. Make sure documents with ink or correction fluid are completely dry. Using the ADF 3 The ADF can send a fax, make copies, and scan from the ADF (automatic document feeder) and...
...) 17 to 24 lb (64 to 90 g/m2) How to load documents 3 IMPORTANT • DO NOT pull on the scanner glass. Make sure documents with ink or correction fluid are completely dry. Using the ADF 3 The ADF can send a fax, make copies, and scan from the ADF (automatic document feeder) and...

Basic Users Guide
Page 60
...change in the Print dialog box and click Properties or Preferences, depending on the application you want to begin printing. 46 a Install the Brother printer driver from the CD-ROM. (See Quick Setup Guide.) b From your computer. Commonly used settings include: Media Type... Print Quality Paper Size Orientation Color / Grayscale Ink Save Mode Scaling 2-sided / Booklet e Click OK. For more information, see Software and Network User's Guide: Print. c Choose ...
...change in the Print dialog box and click Properties or Preferences, depending on the application you want to begin printing. 46 a Install the Brother printer driver from the CD-ROM. (See Quick Setup Guide.) b From your computer. Commonly used settings include: Media Type... Print Quality Paper Size Orientation Color / Grayscale Ink Save Mode Scaling 2-sided / Booklet e Click OK. For more information, see Software and Network User's Guide: Print. c Choose ...

Basic Users Guide
Page 68
... end of the four cartridges. The LCD will show which ink cartridge is running out of ink, the machine will be a small amount of Genuine Brother Supplies. CAUTION If ink gets in the ink cartridge. To protect your investment and obtain premium performance from ... or Cannot Print. 1 54 IMPORTANT Brother strongly recommends that you to prevent air from the Brother machine, we strongly recommend the use of potentially incompatible ink and/or cartridges in the Brother machine may result in the ink cartridge to replace an ink cartridge, there will display a message....
... end of the four cartridges. The LCD will show which ink cartridge is running out of ink, the machine will be a small amount of Genuine Brother Supplies. CAUTION If ink gets in the ink cartridge. To protect your investment and obtain premium performance from ... or Cannot Print. 1 54 IMPORTANT Brother strongly recommends that you to prevent air from the Brother machine, we strongly recommend the use of potentially incompatible ink and/or cartridges in the Brother machine may result in the ink cartridge to replace an ink cartridge, there will display a message....


