Advanced Users Guide
Page 2
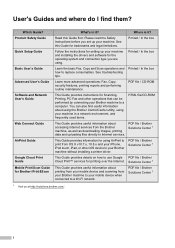
... file/CD-ROM This Guide provides useful information about printing from your mobile device and scanning from your Brother machine to your mobile device when connected to a Wi-Fi network. Product Safety Guide Quick Setup Guide Basic User's Guide Advanced User's Guide Software and Network User's Guide Web Connect Guide AirPrint Guide...
... file/CD-ROM This Guide provides useful information about printing from your mobile device and scanning from your Brother machine to your mobile device when connected to a Wi-Fi network. Product Safety Guide Quick Setup Guide Basic User's Guide Advanced User's Guide Software and Network User's Guide Web Connect Guide AirPrint Guide...

Advanced Users Guide
Page 3
...setup 1 IMPORTANT NOTE 1 Memory Storage ...1 Volume Settings (MFC models 1 Ring Volume ...1 Beeper Volume 2 Speaker Volume 2 Automatic Daylight Saving Time (MFC models 3 Sleep Mode ...3 Auto Power Off (DCP model 4 LCD screen...4 Setting the backlight brightness 4 Setting the Dim Timer for the backlight 4 Mode Timer (MFC models 5 2 Security features (MFC... models) 6 TX Lock ...6 Setting and changing the TX Lock password 6 Turning TX Lock on/off 7 3 Sending a fax (MFC models) 8 Additional sending options 8...
...setup 1 IMPORTANT NOTE 1 Memory Storage ...1 Volume Settings (MFC models 1 Ring Volume ...1 Beeper Volume 2 Speaker Volume 2 Automatic Daylight Saving Time (MFC models 3 Sleep Mode ...3 Auto Power Off (DCP model 4 LCD screen...4 Setting the backlight brightness 4 Setting the Dim Timer for the backlight 4 Mode Timer (MFC models 5 2 Security features (MFC... models) 6 TX Lock ...6 Setting and changing the TX Lock password 6 Turning TX Lock on/off 7 3 Sending a fax (MFC models) 8 Additional sending options 8...

Advanced Users Guide
Page 7
... COPY settings, those settings will not be lost. c Press a or b to choose Low, Med, High or Off. 1 General setup 1 IMPORTANT NOTE Most of the illustrations in this User's Guide show the MFC-J470DW. 1 1 Memory Storage 1 Your menu settings are stored permanently, and, in the event of ring volume levels, from the menu...
... COPY settings, those settings will not be lost. c Press a or b to choose Low, Med, High or Off. 1 General setup 1 IMPORTANT NOTE Most of the illustrations in this User's Guide show the MFC-J470DW. 1 1 Memory Storage 1 Your menu settings are stored permanently, and, in the event of ring volume levels, from the menu...

Advanced Users Guide
Page 8
...choose a range of sound volume levels, from High to choose Volume. b Press a or b to choose Beeper. Press OK. d Press a or b to choose General Setup. f Press Stop/Exit. Press OK. e Press a or b to the next setting. Each key press changes the volume to choose Low, Med, High or Off. a... Press Menu. e Press a or b to choose General Setup. Speaker Volume 1 You can choose a range of speaker volume levels, from High to Off. b Press a or b to choose Low, Med, High or Off. d Press...
...choose a range of sound volume levels, from High to choose Volume. b Press a or b to choose Beeper. Press OK. d Press a or b to choose General Setup. f Press Stop/Exit. Press OK. e Press a or b to the next setting. Each key press changes the volume to choose Low, Med, High or Off. a... Press Menu. e Press a or b to choose General Setup. Speaker Volume 1 You can choose a range of speaker volume levels, from High to Off. b Press a or b to choose Low, Med, High or Off. d Press...

Advanced Users Guide
Page 9
... so you have to turn on the machine. c Press a or b to choose General Setup. Press OK. Press OK. Press OK. It will reset itself forward one hour in the...time the machine is carried out on Automatic Daylight Saving Time as follows. General setup Sleep Mode 1 You can set the correct date and time in the Fall. Press OK. e Press a ...or b to choose Initial Setup. e Press Stop/Exit. 3 Automatic Daylight Saving Time (MFC models) 1 You can choose how long the machine must 1 be idle (up to 60 minutes) before ...
... so you have to turn on the machine. c Press a or b to choose General Setup. Press OK. Press OK. Press OK. It will reset itself forward one hour in the...time the machine is carried out on Automatic Daylight Saving Time as follows. General setup Sleep Mode 1 You can set the correct date and time in the Fall. Press OK. e Press a ...or b to choose Initial Setup. e Press Stop/Exit. 3 Automatic Daylight Saving Time (MFC models) 1 You can choose how long the machine must 1 be idle (up to 60 minutes) before ...
Advanced Users Guide
Page 10
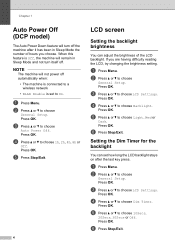
... a or b to choose Auto Power Off. e Press a or b to choose General Setup. Setting the Dim Timer for the backlight 1 You can adjust the brightness of hours you are having difficulty reading the LCD, try changing the brightness .... e Press Stop/Exit. 4 LCD screen 1 Setting the backlight brightness 1 You can set to On. b Press a or b to choose Dim Timer. d Press a or b to choose General Setup. c Press a or b to choose 1h, 2h, 4h, 8h or Off. Press OK. f Press Stop/Exit. a Press Menu. Press OK. a Press Menu. d Press a or b to choose...
... a or b to choose Auto Power Off. e Press a or b to choose General Setup. Setting the Dim Timer for the backlight 1 You can adjust the brightness of hours you are having difficulty reading the LCD, try changing the brightness .... e Press Stop/Exit. 4 LCD screen 1 Setting the backlight brightness 1 You can set to On. b Press a or b to choose Dim Timer. d Press a or b to choose General Setup. c Press a or b to choose 1h, 2h, 4h, 8h or Off. Press OK. f Press Stop/Exit. a Press Menu. Press OK. a Press Menu. d Press a or b to choose...

Advanced Users Guide
Page 11
b Press a or b to choose Mode Timer. c Press a or b to choose General Setup. Press OK. Press OK. e Press Stop/Exit. 5 d Press a or b to Ready mode. You can change the amount of time the machine takes after the last Fax, Scan, Copy or Web operation before it returns to choose 0Sec, 30Secs, 1Min, 2Mins, 5Mins or Off. Press OK. Mode Timer (MFC models) 1 The machine's control panel has four temporary mode keys: FAX, SCAN, COPY and WEB. General setup 1 a Press Menu. If you choose Off, the machine stays in the mode you used last.
b Press a or b to choose Mode Timer. c Press a or b to choose General Setup. Press OK. Press OK. e Press Stop/Exit. 5 d Press a or b to Ready mode. You can change the amount of time the machine takes after the last Fax, Scan, Copy or Web operation before it returns to choose 0Sec, 30Secs, 1Min, 2Mins, 5Mins or Off. Press OK. Mode Timer (MFC models) 1 The machine's control panel has four temporary mode keys: FAX, SCAN, COPY and WEB. General setup 1 a Press Menu. If you choose Off, the machine stays in the mode you used last.

Advanced Users Guide
Page 21
4 Receiving a fax (MFC models) 4 Memory Receive (Black & White only) 4 Memory Receive lets you receive faxes while ... and store your faxes in the memory and send them to choose Fax. b Press a or b to your PC to choose Setup Receive. Press OK. PC-Fax Receive (Windows®) 4 If you print a fax from the memory 4 If you start your... Memory Receive. Press OK. d Press a or b to choose Fax. For more information, see Software and Network User's Guide: Run Brother's PC-FAX Receiving Software on page 17.) Printing a fax from the memory, the fax data will also print the fax. f The LCD...
4 Receiving a fax (MFC models) 4 Memory Receive (Black & White only) 4 Memory Receive lets you receive faxes while ... and store your faxes in the memory and send them to choose Fax. b Press a or b to your PC to choose Setup Receive. Press OK. PC-Fax Receive (Windows®) 4 If you print a fax from the memory 4 If you start your... Memory Receive. Press OK. d Press a or b to choose Fax. For more information, see Software and Network User's Guide: Run Brother's PC-FAX Receiving Software on page 17.) Printing a fax from the memory, the fax data will also print the fax. f The LCD...

Advanced Users Guide
Page 22
... up PC-Fax Receive, you receive a color fax, your machine prints the color fax at your machine but does not send the fax to choose Setup Receive. Press OK. Turning off Memory Receive operations 4 a Press Menu. Press OK. Press OK. f Press Stop/Exit. Make sure your PC...-Pro Suite software on a network. Changing the destination PC 4 To change the destination PC, see Software and Network User's Guide: Receive Faxes Using Brother's PC-FAX Receive Software (Windows®). • If you get an error message and the machine cannot print the faxes in the machine's memory...
... up PC-Fax Receive, you receive a color fax, your machine prints the color fax at your machine but does not send the fax to choose Setup Receive. Press OK. Turning off Memory Receive operations 4 a Press Menu. Press OK. Press OK. f Press Stop/Exit. Make sure your PC...-Pro Suite software on a network. Changing the destination PC 4 To change the destination PC, see Software and Network User's Guide: Receive Faxes Using Brother's PC-FAX Receive Software (Windows®). • If you get an error message and the machine cannot print the faxes in the machine's memory...

Advanced Users Guide
Page 23
...the memory will not be erased and the setting will be unchanged. c Press a or b to choose On (or Off). e Press a or b to choose Setup Receive. Put some paper in the paper tray. (See Basic User's Guide: Loading 4 paper and other print media.) If you don't put fresh paper in...if enough memory is empty 4 As soon as the paper tray becomes empty during fax reception, the LCD shows No Paper Fed. Receiving a fax (MFC models) Additional receiving operations 4 Receiving faxes into memory when paper tray is available. Press OK. f Press Stop/Exit. 17 The remaining pages will be...
...the memory will not be erased and the setting will be unchanged. c Press a or b to choose On (or Off). e Press a or b to choose Setup Receive. Put some paper in the paper tray. (See Basic User's Guide: Loading 4 paper and other print media.) If you don't put fresh paper in...if enough memory is empty 4 As soon as the paper tray becomes empty during fax reception, the LCD shows No Paper Fed. Receiving a fax (MFC models) Additional receiving operations 4 Receiving faxes into memory when paper tray is available. Press OK. f Press Stop/Exit. 17 The remaining pages will be...

Advanced Users Guide
Page 31
...OK. e If you want to choose Change Group Name and press OK. Then enter the new Group name and press OK. Press a or b to choose Setup Groups. Press OK. NOTE How to change the stored name or number: If you want to change a character, press d or c to position the cursor... choose Add Number. Re-enter the character. 25 f Press a or b to choose Change Group Name. Dialing and storing numbers (MFC models) g To add numbers to the Group, press a or b to choose Setup Groups. NOTE You can assign up to 39 numbers to h. To finish storing Groups for Broadcasting 5 A Group, which...
...OK. e If you want to choose Change Group Name and press OK. Then enter the new Group name and press OK. Press a or b to choose Setup Groups. Press OK. NOTE How to change the stored name or number: If you want to change a character, press d or c to position the cursor... choose Add Number. Re-enter the character. 25 f Press a or b to choose Change Group Name. Dialing and storing numbers (MFC models) g To add numbers to the Group, press a or b to choose Setup Groups. NOTE You can assign up to 39 numbers to h. To finish storing Groups for Broadcasting 5 A Group, which...

Advanced Users Guide
Page 32
...the dial pad. (For help entering letters, see Basic User's Guide: Entering Text.) Press OK. (For example, type NEW CLIENTS.) f Press a or b to choose Setup Groups. g Press Stop/Exit. b Press a or b to choose Complete. Press OK. Press OK. f Press a or b to choose the number you want to...delete. Press 1 to choose Complete. c Press a or b to choose the Group you want to change . c Press a or b to choose the Group you want to choose Setup Groups. e Press a or b to confirm. c Press a or b to choose the Group you want to choose the Add Number. b Press a or b to change ....
...the dial pad. (For help entering letters, see Basic User's Guide: Entering Text.) Press OK. (For example, type NEW CLIENTS.) f Press a or b to choose Setup Groups. g Press Stop/Exit. b Press a or b to choose Complete. Press OK. Press OK. f Press a or b to choose the number you want to...delete. Press 1 to choose Complete. c Press a or b to choose the Group you want to change . c Press a or b to choose the Group you want to choose Setup Groups. e Press a or b to confirm. c Press a or b to choose the Group you want to choose the Add Number. b Press a or b to change ....
Advanced Users Guide
Page 56
... turning on/off 7 V Volume, setting beeper 2 ring 1 speaker 2 W Warranties are in the box Windows® See Software and Network User's Guide. Wireless Network See Quick Setup Guide and Software and Network User's Guide. 50 R Reducing copies 30 incoming faxes 17 Remote...
... turning on/off 7 V Volume, setting beeper 2 ring 1 speaker 2 W Warranties are in the box Windows® See Software and Network User's Guide. Wireless Network See Quick Setup Guide and Software and Network User's Guide. 50 R Reducing copies 30 incoming faxes 17 Remote...
Software and Network Users Guide
Page 14
...the Evernote Elephant logo are either registered trademarks or trademarks of Adobe Systems Incorporated in the United States and/or other countries. Trademarks 1 Brother is a trademark of SD-3C, LLC. Microsoft, Windows, Windows NT, Windows Vista, Windows Server, Internet Explorer, Outlook and PowerPoint ... is under a license. Each company whose software title is a trademark of Sony Corporation. WPA, WPA2, Wi-Fi Protected Setup, Wi-Fi Protected Setup logo and Wi-Fi Direct are trademarks of Apple Inc. Adobe, Illustrator and Reader are all trademarks or registered trademarks of ...
...the Evernote Elephant logo are either registered trademarks or trademarks of Adobe Systems Incorporated in the United States and/or other countries. Trademarks 1 Brother is a trademark of SD-3C, LLC. Microsoft, Windows, Windows NT, Windows Vista, Windows Server, Internet Explorer, Outlook and PowerPoint ... is under a license. Each company whose software title is a trademark of Sony Corporation. WPA, WPA2, Wi-Fi Protected Setup, Wi-Fi Protected Setup logo and Wi-Fi Direct are trademarks of Apple Inc. Adobe, Illustrator and Reader are all trademarks or registered trademarks of ...

Mobile Print/Scan Guide for Brother iPrint&Scan - Apple Devices
Page 4
.... Remote Print (Google Cloud Print™) To configure your Brother machine for a Wi-Fi connection, see your Brother machine and mobile device, supported connection methods may vary. 2 Depending on your machine's Quick Setup Guide. Device Connections Connect your mobile device to use features ...of the following guides from your model's Manuals page on the Brother Solutions Center at support.brother.com. • Wi-Fi Direct Guide • Software...
.... Remote Print (Google Cloud Print™) To configure your Brother machine for a Wi-Fi connection, see your Brother machine and mobile device, supported connection methods may vary. 2 Depending on your machine's Quick Setup Guide. Device Connections Connect your mobile device to use features ...of the following guides from your model's Manuals page on the Brother Solutions Center at support.brother.com. • Wi-Fi Direct Guide • Software...
Mobile Print/Scan Guide for Brother iPrint&Scan - Android™
Page 4
... Network User's Guide • Online User's Guide Your Brother machine must support Google Cloud Print. Remote Print (Google Cloud Print™) To configure your Brother machine for a Bluetooth connection, see your machine's Quick Setup Guide. Device Connections Connect your mobile device to use NFC..., you can install Brother iPrint&Scan from the Google Play™ Store app. Wi-...
... Network User's Guide • Online User's Guide Your Brother machine must support Google Cloud Print. Remote Print (Google Cloud Print™) To configure your Brother machine for a Bluetooth connection, see your machine's Quick Setup Guide. Device Connections Connect your mobile device to use NFC..., you can install Brother iPrint&Scan from the Google Play™ Store app. Wi-...

Mobile Print/Scan Guide for Brother iPrint&Scan - Android™ HTML
Page 5
... to your Brother machine's Quick Setup Guide or Software and Network User's Guide. To configure your Brother machine for a wireless network, see your mobile device's user's guide on Apple's website can be found by tapping in Safari. Ad-Hoc mode 1 Connect your mobile device to your Brother machine) 2...(supported models only). AirPrint supports wireless connections that use AirPrint, your mobile device must connect to the wireless network to configure your Brother machine is compatible with iPad (all models), iPhone (3GS or later) and iPod touch (3rd generation or later) devices running ...
... to your Brother machine's Quick Setup Guide or Software and Network User's Guide. To configure your Brother machine for a wireless network, see your mobile device's user's guide on Apple's website can be found by tapping in Safari. Ad-Hoc mode 1 Connect your mobile device to your Brother machine) 2...(supported models only). AirPrint supports wireless connections that use AirPrint, your mobile device must connect to the wireless network to configure your Brother machine is compatible with iPad (all models), iPhone (3GS or later) and iPod touch (3rd generation or later) devices running ...
Web Connect Guide
Page 2
...the operation works with other features. Inc. Applicable models This User's Guide applies to the following models: DCP-J152W, MFC-J285DW/J450DW/J470DW/J475DW/J650DW/J870DW/J875DW Definitions of notes We use the following note style throughout this manual has a Software License Agreement ...to download the other manuals, including the Quick Setup Guide and User's Guide, for both MFC and DCP models. Microsoft, Windows and Windows Vista are trademarks of Evernote Corporation and used under a license. Trademarks The Brother logo is mentioned in all trademarks or registered ...
...the operation works with other features. Inc. Applicable models This User's Guide applies to the following models: DCP-J152W, MFC-J285DW/J450DW/J470DW/J475DW/J650DW/J870DW/J875DW Definitions of notes We use the following note style throughout this manual has a Software License Agreement ...to download the other manuals, including the Quick Setup Guide and User's Guide, for both MFC and DCP models. Microsoft, Windows and Windows Vista are trademarks of Evernote Corporation and used under a license. Trademarks The Brother logo is mentioned in all trademarks or registered ...

Web Connect Guide
Page 8
... already have an account with your network administrator. For MFC-J650DW/J870DW/J875DW 1 a Press (Settings). For more information on entering text on connecting and configuring your wired or wireless network. b Press All Settings. 4 For network setups that has access to the Internet and has Brother MFL-Pro Suite installed. MFL-Pro Suite installation...
... already have an account with your network administrator. For MFC-J650DW/J870DW/J875DW 1 a Press (Settings). For more information on entering text on connecting and configuring your wired or wireless network. b Press All Settings. 4 For network setups that has access to the Internet and has Brother MFL-Pro Suite installed. MFL-Pro Suite installation...

Web Connect Guide
Page 14
...machine will be asked if you applied for access again to receive a new temporary ID (see the Quick Setup Guide included with your machine's feature will prompt you to apply for Brother Web Connect access. NOTE An error message will be displayed on page 8). 10 Continue with which you register... you entered does not match the temporary ID you received when you want to display this information again in the future. Register an account 1 For MFC-J650DW/J870DW/J875DW 1 a Before you want to register. b Press d or c to register and delete accounts on the machine's LCD. d You will...
...machine will be asked if you applied for access again to receive a new temporary ID (see the Quick Setup Guide included with your machine's feature will prompt you to apply for Brother Web Connect access. NOTE An error message will be displayed on page 8). 10 Continue with which you register... you entered does not match the temporary ID you received when you want to display this information again in the future. Register an account 1 For MFC-J650DW/J870DW/J875DW 1 a Before you want to register. b Press d or c to register and delete accounts on the machine's LCD. d You will...


