
Users Manual - English
Page 8
...to operate properly. For laser products: Failure to remove the Toner Cartridge (and Toner Drum Unit on applicable models) during shipping. Internet support: support@brother.ca or browse Brother's Web Site: www.brother.com We're at Brother Authorized Service Centers throughout Canada. Brother International Corporation (Canada) Ltd.... of a Sales Receipt. In order to obtain warranty service, the MFC/Facsimile machine must be the sole liability of supplies or consumable items that are non-Brother products. Warranty Service is available at your print head resulting from the...
...to operate properly. For laser products: Failure to remove the Toner Cartridge (and Toner Drum Unit on applicable models) during shipping. Internet support: support@brother.ca or browse Brother's Web Site: www.brother.com We're at Brother Authorized Service Centers throughout Canada. Brother International Corporation (Canada) Ltd.... of a Sales Receipt. In order to obtain warranty service, the MFC/Facsimile machine must be the sole liability of supplies or consumable items that are non-Brother products. Warranty Service is available at your print head resulting from the...
Users Manual - English
Page 9
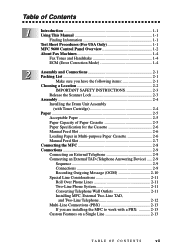
...MFC 9600 Control Panel Overview 1-2 About Fax Machines 1-4 Fax Tones and Handshake 1-4 ECM (Error Correction Mode 1-4 2 Assembly and Connections 2-1 Packing List 2-1 Make sure you have the following items 2-1 Choosing a Location 2-2 IMPORTANT SAFETY INSTRUCTIONS 2-3 Release the Scanner Lock 2-3 Assembly 2-4 Installing the Drum Unit Assembly (with Toner Cartridge...11 Converting Telephone Wall Outlets 2-11 Installing MFC, External Two-Line TAD, and Two-Line Telephone 2-12 Multi-Line Connections (PBX 2-13 If you are installing the MFC to work with a PBX 2-13 Custom...
...MFC 9600 Control Panel Overview 1-2 About Fax Machines 1-4 Fax Tones and Handshake 1-4 ECM (Error Correction Mode 1-4 2 Assembly and Connections 2-1 Packing List 2-1 Make sure you have the following items 2-1 Choosing a Location 2-2 IMPORTANT SAFETY INSTRUCTIONS 2-3 Release the Scanner Lock 2-3 Assembly 2-4 Installing the Drum Unit Assembly (with Toner Cartridge...11 Converting Telephone Wall Outlets 2-11 Installing MFC, External Two-Line TAD, and Two-Line Telephone 2-12 Multi-Line Connections (PBX 2-13 If you are installing the MFC to work with a PBX 2-13 Custom...

Users Manual - English
Page 17
...the Interface Cable 21-3 Industry Canada Compliance Statement (For Canada Only) .... 21-3 Laser Safety (For 110-120V Models Only 21-3 FDA Regulations 21-3 Manufacturing Information 21...Troubleshooting and Routine Maintenance 22-1 Troubleshooting 22-1 Brother fax-back system 22-1 Frequently Asked Questions (FAQs 22-1 Brother Bulletin Board 22-1 Error Messages 22-1 Document ...MFC 22-7 Packing and Shipping the MFC 22-14 Look the Scanner Lock 22-14 Routine Maintenance 22-17 Cleaning the Scanner 22-17 Cleaning the Printer 22-18 Cleaning the Drum Unit 22-19 Replacing the Toner Cartridge...
...the Interface Cable 21-3 Industry Canada Compliance Statement (For Canada Only) .... 21-3 Laser Safety (For 110-120V Models Only 21-3 FDA Regulations 21-3 Manufacturing Information 21...Troubleshooting and Routine Maintenance 22-1 Troubleshooting 22-1 Brother fax-back system 22-1 Frequently Asked Questions (FAQs 22-1 Brother Bulletin Board 22-1 Error Messages 22-1 Document ...MFC 22-7 Packing and Shipping the MFC 22-14 Look the Scanner Lock 22-14 Routine Maintenance 22-17 Cleaning the Scanner 22-17 Cleaning the Printer 22-18 Cleaning the Drum Unit 22-19 Replacing the Toner Cartridge...

Users Manual - English
Page 20
...Use this key to print a quick reference Help List. Set Stores a function setting in the MFC. Scan to E-mail Press this key to start scanning a text document. MFC 9600 Control Panel Overview 123 4 5 6 7 8 10 11 12 13 9 14 1 One Touch Keys These 16 keys give you instant access to previously stored...hold down the Shift key. 5 LCD (Liquid Crystal Display) LCD displays messages to help you set up and operate your MFC. 6 Toner Empty Indicator Blinks when toner cartridge is low and stays lit when toner is empty. 7 Resolution Indicator Lights These LEDs show the resolution mode you selected....
...Use this key to print a quick reference Help List. Set Stores a function setting in the MFC. Scan to E-mail Press this key to start scanning a text document. MFC 9600 Control Panel Overview 123 4 5 6 7 8 10 11 12 13 9 14 1 One Touch Keys These 16 keys give you instant access to previously stored...hold down the Shift key. 5 LCD (Liquid Crystal Display) LCD displays messages to help you set up and operate your MFC. 6 Toner Empty Indicator Blinks when toner cartridge is low and stays lit when toner is empty. 7 Resolution Indicator Lights These LEDs show the resolution mode you selected....

Users Manual - English
Page 23
...to 3,000 pages) Power Cord Bi-directional Parallel Cable Paper Cassette Owner's Manual StartCard Quick Reference Card If an item is missing, call Brother Customer Service at 1-800-284-4329 (USA), 1-800-853-6660 (from within Canada) or 1-514-685-6464 (from within Montreal). ...Whenever you have the following items: Telephone Line Cord CD-ROM Drum Unit Assembly (With free Standard Toner Cartridge - 2 Assembly and Connections Packing List Make sure you transport the MFC, use the packing materials that came with your warranty. If you do not pack the...
...to 3,000 pages) Power Cord Bi-directional Parallel Cable Paper Cassette Owner's Manual StartCard Quick Reference Card If an item is missing, call Brother Customer Service at 1-800-284-4329 (USA), 1-800-853-6660 (from within Canada) or 1-514-685-6464 (from within Montreal). ...Whenever you have the following items: Telephone Line Cord CD-ROM Drum Unit Assembly (With free Standard Toner Cartridge - 2 Assembly and Connections Packing List Make sure you transport the MFC, use the packing materials that came with your warranty. If you do not pack the...

Users Manual - English
Page 26
To prevent damage to the drum, do not expose it from side to side five or six times to light for longer than a few minutes. 2 Open the front cover of the machine. 3 Insert the drum unit assembly into the machine. 4 Close the front cover. 2-4 ASSEMBLY AND CONNECTIONS Assembly Installing the Drum Unit Assembly (with Toner Cartridge) 1 Unpack the drum unit assembly, including the toner cartridge, and gently rock it to distribute the toner evenly inside the cartridge.
To prevent damage to the drum, do not expose it from side to side five or six times to light for longer than a few minutes. 2 Open the front cover of the machine. 3 Insert the drum unit assembly into the machine. 4 Close the front cover. 2-4 ASSEMBLY AND CONNECTIONS Assembly Installing the Drum Unit Assembly (with Toner Cartridge) 1 Unpack the drum unit assembly, including the toner cartridge, and gently rock it to distribute the toner evenly inside the cartridge.

Users Manual - English
Page 39
... 5-3 5-3 5-4 5-6 5-4 12-15 ON-SCREEN PROGRAMMING 3-3 Fax Functions (continued) 2. SETUP RECEIVE Function Description Factory Set Page 1. Number of image. REDUCTION 6. Prints faxes darker or lighter. REMOTE CODE 5. PRINT DENSITY 8. Selects size of paper for PC receiving of toner cartridge. Sets up your needs: FAX..., EXT. ANSWER MODE 2. PAPER 7. Enter code to poll another fax machine. Reduces size of rings before MFC answers. Increases life of fax messages. EASY RECEIVE 4. ...
... 5-3 5-3 5-4 5-6 5-4 12-15 ON-SCREEN PROGRAMMING 3-3 Fax Functions (continued) 2. SETUP RECEIVE Function Description Factory Set Page 1. Number of image. REDUCTION 6. Prints faxes darker or lighter. REMOTE CODE 5. PRINT DENSITY 8. Selects size of paper for PC receiving of toner cartridge. Sets up your needs: FAX..., EXT. ANSWER MODE 2. PAPER 7. Enter code to poll another fax machine. Reduces size of rings before MFC answers. Increases life of fax messages. EASY RECEIVE 4. ...

Users Manual - English
Page 176
... the call Telephone Company to cool. Close the front cover for unit or toner cartridge is not in the paper cassette. Try to transmit or receive again. 22 - 2 TROUBLESHOOTING AND ROUTINE MAINTENANCE MFC cassette cover is open or MFC cassette is near the end of paper or paper is locked. If you have...
... the call Telephone Company to cool. Close the front cover for unit or toner cartridge is not in the paper cassette. Try to transmit or receive again. 22 - 2 TROUBLESHOOTING AND ROUTINE MAINTENANCE MFC cassette cover is open or MFC cassette is near the end of paper or paper is locked. If you have...

Users Manual - English
Page 178
Wait until the MFC warms up and printing Replace the toner cartridge is not jammed. 2 Lift the ADF cover. 3 Pull the jammed document out to remove it. with a new one. (See page 22-19.) If the display ... jammed, follow the appropriate set of the ADF Unit 1 Remove any paper from the ADF that the toner will soon run out. Order a new toner cartridge now. ADF Cover 22 - 4 TROUBLESHOOTING AND ROUTINE MAINTENANCE The print head detects low temperature. Document Jams and Paper Jams Based upon where the original document...
Wait until the MFC warms up and printing Replace the toner cartridge is not jammed. 2 Lift the ADF cover. 3 Pull the jammed document out to remove it. with a new one. (See page 22-19.) If the display ... jammed, follow the appropriate set of the ADF Unit 1 Remove any paper from the ADF that the toner will soon run out. Order a new toner cartridge now. ADF Cover 22 - 4 TROUBLESHOOTING AND ROUTINE MAINTENANCE The print head detects low temperature. Document Jams and Paper Jams Based upon where the original document...

Users Manual - English
Page 182
...plugged in. (See page 2-8.) • The toner cartridge and drum unit are using Windows® 3.1x, ...between the machine and computer. (See page 12-2 to 12-3 or 12-10.) • Check to see if ...to work with the supplied printer driver, see vertical streaks on your MFC, it back in your machine.... Difficulty Suggestions Custom Features on a Single Line If you have text missing. 22 - 8 TROUBLESHOOTING AND ROUTINE MAINTENANCE Copy Vertical streaks Quality appear in several ways. Difficulties For example: If you may be solved in copies. Brother...
...plugged in. (See page 2-8.) • The toner cartridge and drum unit are using Windows® 3.1x, ...between the machine and computer. (See page 12-2 to 12-3 or 12-10.) • Check to see if ...to work with the supplied printer driver, see vertical streaks on your MFC, it back in your machine.... Difficulty Suggestions Custom Features on a Single Line If you have text missing. 22 - 8 TROUBLESHOOTING AND ROUTINE MAINTENANCE Copy Vertical streaks Quality appear in several ways. Difficulties For example: If you may be solved in copies. Brother...
Users Manual - English
Page 187
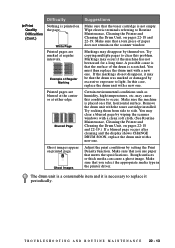
...Markings may disappear by setting the Print Density function. In this case, replace the drum unit with the toner cartridge installed. Certain environmental conditions such as humidity, high temperatures, etc. Remove the drum unit with a new one.... A N D R O U T I N E M A I N T E N A N C E 22 - 13 Make sure that the drum was marked or damaged by wiping the scanner windows with a clean soft cloth. (See Routine Maintenance, Cleaning the Printer and Cleaning the Drum Unit, on the page. Difficulty Print Quality Difficulties (Cont.) Nothing is printed on pages 22-18 and 22-19.) If a blurred...
...Markings may disappear by setting the Print Density function. In this case, replace the drum unit with the toner cartridge installed. Certain environmental conditions such as humidity, high temperatures, etc. Remove the drum unit with a new one.... A N D R O U T I N E M A I N T E N A N C E 22 - 13 Make sure that the drum was marked or damaged by wiping the scanner windows with a clean soft cloth. (See Routine Maintenance, Cleaning the Printer and Cleaning the Drum Unit, on the page. Difficulty Print Quality Difficulties (Cont.) Nothing is printed on pages 22-18 and 22-19.) If a blurred...

Users Manual - English
Page 189
Fold down the front output bin extension. Remove the telephone line cord. 8 Wrap the machine in the plastic bag and place it in the drum unit. 6 Place the drum unit and toner cartridge assembly into the plastic bag and seal the bag. 7 Close the front cover. Leave the toner cartridge installed in the original carton box with the original packing material. Caution Remove the drum unit and toner cartridge assembly. T R O U B L E S H O O T I N G A N D R O U T I N E M A I N T E N A N C E 22 - 15
Fold down the front output bin extension. Remove the telephone line cord. 8 Wrap the machine in the plastic bag and place it in the drum unit. 6 Place the drum unit and toner cartridge assembly into the plastic bag and seal the bag. 7 Close the front cover. Leave the toner cartridge installed in the original carton box with the original packing material. Caution Remove the drum unit and toner cartridge assembly. T R O U B L E S H O O T I N G A N D R O U T I N E M A I N T E N A N C E 22 - 15

Users Manual - English
Page 190
9 Place documents (manual and printed material) and the drum unit and toner cartridge assembly into the original carton as shown below: 10 Close the carton and tape it shut. 22 - 16 T R O U B L E S H O O T I N G A N D R O U T I N E M A I N T E N A N C E
9 Place documents (manual and printed material) and the drum unit and toner cartridge assembly into the original carton as shown below: 10 Close the carton and tape it shut. 22 - 16 T R O U B L E S H O O T I N G A N D R O U T I N E M A I N T E N A N C E

Users Manual - English
Page 193
...Drum Unit on page 22-22.) 4 Close the front cover. 5 Plug in the power cord first, then the telephone cord. When the toner cartridge is a good idea to seal the toner cartridge tightly so toner powder does not spill out of them separate from right to 6,000 pages using a high yield toner... cartridge. If you replace the toner cartridge. Cleaning the Drum Unit We recommend placing the drum unit on a drop cloth or large disposable paper to avoid spilling and scattering toner. 1 Clean ...
...Drum Unit on page 22-22.) 4 Close the front cover. 5 Plug in the power cord first, then the telephone cord. When the toner cartridge is a good idea to seal the toner cartridge tightly so toner powder does not spill out of them separate from right to 6,000 pages using a high yield toner... cartridge. If you replace the toner cartridge. Cleaning the Drum Unit We recommend placing the drum unit on a drop cloth or large disposable paper to avoid spilling and scattering toner. 1 Clean ...

Users Manual - English
Page 194
...low. Toner Empty Indicator When the toner cartridge is running low, the display shows TONER LOW and the Toner Empty icon on the control panel flashes on and off to Replace the Toner Cartridge WARNING Just after you use the machine, some internal parts of the machine will not resume ...printing until you install a new toner cartridge. So, never touch the shaded parts shown in the illustration. Display Toner Empty...
...low. Toner Empty Indicator When the toner cartridge is running low, the display shows TONER LOW and the Toner Empty icon on the control panel flashes on and off to Replace the Toner Cartridge WARNING Just after you use the machine, some internal parts of the machine will not resume ...printing until you install a new toner cartridge. So, never touch the shaded parts shown in the illustration. Display Toner Empty...

Users Manual - English
Page 195
... toner scatters on the right and pull the toner cartridge out of toner cartridge may void your hands or clothes, immediately wipe it off or wash it according to ensure top print quality. s You can use only a genuine Brother toner cartridge (TN-430 or TN-460), which is shortened.... Place the used toner cartridge into the machine. Lock Lever Caution Handle the toner cartridge carefully. If a toner cartridge is left unpacked for a long period of time, the toner ...
... toner scatters on the right and pull the toner cartridge out of toner cartridge may void your hands or clothes, immediately wipe it off or wash it according to ensure top print quality. s You can use only a genuine Brother toner cartridge (TN-430 or TN-460), which is shortened.... Place the used toner cartridge into the machine. Lock Lever Caution Handle the toner cartridge carefully. If a toner cartridge is left unpacked for a long period of time, the toner ...

Users Manual - English
Page 196
...shows CHANGE DRUM SOON, you replace the drum unit. (See page 22-18 to purchase a new one. 6 Install the new toner cartridge into the drum unit until it clicks into place. 7 Clean the primary corona wire inside the drum unit by gently sliding the blue ... and your hands or clothes get dirty, immediately wipe or wash with cold water. 22 - 22 T R O U B L E S H O O T I N G A N D R O U T I N E M A I N T E N A N C E Drum Unit Toner Cartridge Corona Wire Tab Home Position ( ) Replacing the Drum Unit The machine uses a drum unit to left several times. If the screen displays CHANGE DRUM SOON...
...shows CHANGE DRUM SOON, you replace the drum unit. (See page 22-18 to purchase a new one. 6 Install the new toner cartridge into the drum unit until it clicks into place. 7 Clean the primary corona wire inside the drum unit by gently sliding the blue ... and your hands or clothes get dirty, immediately wipe or wash with cold water. 22 - 22 T R O U B L E S H O O T I N G A N D R O U T I N E M A I N T E N A N C E Drum Unit Toner Cartridge Corona Wire Tab Home Position ( ) Replacing the Drum Unit The machine uses a drum unit to left several times. If the screen displays CHANGE DRUM SOON...

Users Manual - English
Page 197
... paper and how much toner you have no control over the many factors that determine the actual drum life, we have used the machine, some internal parts of the machine are extremely HOT! There are not sure of pages per print job, etc. WARNING Just after you use for the number... or disposable paper to replace the drum unit: 1 Open the front cover. 2 Remove the old drum unit. Be sure to local regulations. 5 Reinstall the toner cartridge into the aluminium bag and discard it according to seal the drum unit tightly so toner powder does not spill out of pages that will...
... paper and how much toner you have no control over the many factors that determine the actual drum life, we have used the machine, some internal parts of the machine are extremely HOT! There are not sure of pages per print job, etc. WARNING Just after you use for the number... or disposable paper to replace the drum unit: 1 Open the front cover. 2 Remove the old drum unit. Be sure to local regulations. 5 Reinstall the toner cartridge into the aluminium bag and discard it according to seal the drum unit tightly so toner powder does not spill out of pages that will...

Users Manual - English
Page 213
...2 DATA 1 3 DTAT 2 4 DATA 3 5 DATA 4 6 DATA 5 7 DATA 6 8 DATA 7 9 DATA 8 10 ACKNLG 11 BUSY 12 PE 13 SLCT 14 AUTO FEED 15 N.C. 16 0V (S.G.) 17 0V (S.G.) 18 +5V Direction Input Input Input Input Input Input Input Input Input Output Output... CD-ROM Parallel Interface Specifications Interface Connector Pin Assignment Printer Side: Amphenol FCN-685J036-L/X or equivalent A shielded cable should be used. Pin No. Pin No. Consumable Items Toner cartridge Life Expectancy: Up to 6,000 pages/high yield toner cartridges Up to 20,000 pages There are many factors...
...2 DATA 1 3 DTAT 2 4 DATA 3 5 DATA 4 6 DATA 5 7 DATA 6 8 DATA 7 9 DATA 8 10 ACKNLG 11 BUSY 12 PE 13 SLCT 14 AUTO FEED 15 N.C. 16 0V (S.G.) 17 0V (S.G.) 18 +5V Direction Input Input Input Input Input Input Input Input Input Output Output... CD-ROM Parallel Interface Specifications Interface Connector Pin Assignment Printer Side: Amphenol FCN-685J036-L/X or equivalent A shielded cable should be used. Pin No. Pin No. Consumable Items Toner cartridge Life Expectancy: Up to 6,000 pages/high yield toner cartridges Up to 20,000 pages There are many factors...

Users Manual - English
Page 217
...Brother accessories and supplies ii Bulletin Board i contact numbers i Customer Service i fax-back system i Frequently Asked Questions (FAQs) i test sheet, sending 1-1 warranty Canada vi Notice-Disclaimer of MFC 2-8 grounded 3-prong plug 2-8 telephone line cord 2-8 automatic dialing 7-4 fax receive 5-1 fax redial 6-5 transmission 6-4 B beeper 4-3 bi-directional parallel cable 12... answer mode EXT. See toner cartridge cleaning drum unit 22-19 printer 22-18 scanner 22-17 CNG tones 1-4 computer requirements 12-2 contrast 6-4 Control Center. See Brother Control Center control panel 1-2 converting...
...Brother accessories and supplies ii Bulletin Board i contact numbers i Customer Service i fax-back system i Frequently Asked Questions (FAQs) i test sheet, sending 1-1 warranty Canada vi Notice-Disclaimer of MFC 2-8 grounded 3-prong plug 2-8 telephone line cord 2-8 automatic dialing 7-4 fax receive 5-1 fax redial 6-5 transmission 6-4 B beeper 4-3 bi-directional parallel cable 12... answer mode EXT. See toner cartridge cleaning drum unit 22-19 printer 22-18 scanner 22-17 CNG tones 1-4 computer requirements 12-2 contrast 6-4 Control Center. See Brother Control Center control panel 1-2 converting...


