
Advanced Users Manual - English
Page 10
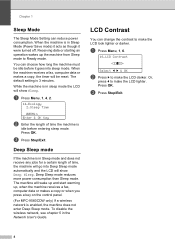
... operation wakes up , when the machine receives a fax, computer data or makes a copy or when you press a key on the control panel. (For MFC-9560CDW only) If a wireless network is 3 minutes. Deep Sleep mode reduces more power consumption than Sleep mode. LCD Contrast 1 You can reduce power consumption.... You can choose how long the machine must be reset. While the machine is in the Network User's Guide. Or, press d to make the LCD darker. When the machine receives a fax, computer ...
... operation wakes up , when the machine receives a fax, computer data or makes a copy or when you press a key on the control panel. (For MFC-9560CDW only) If a wireless network is 3 minutes. Deep Sleep mode reduces more power consumption than Sleep mode. LCD Contrast 1 You can reduce power consumption.... You can choose how long the machine must be reset. While the machine is in the Network User's Guide. Or, press d to make the LCD darker. When the machine receives a fax, computer ...
Advanced Users Manual - English
Page 13
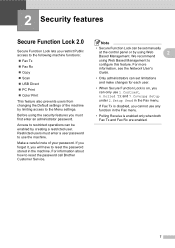
If you forget it, you must enter a user password to reset the password call Brother Customer Service. If Fax Tx is disabled, you cannot use any function in the Fax menu. • Polling Receive is on, you can be enabled ... can only use the machine. Make a careful note of the machine by creating a restricted user. We recommend using the security features you will have to reset the password stored in the Fax menu. Access to restricted operations can set manually at the control panel or by using Web 2 Based Management. For...
If you forget it, you must enter a user password to reset the password call Brother Customer Service. If Fax Tx is disabled, you cannot use any function in the Fax menu. • Polling Receive is on, you can be enabled ... can only use the machine. Make a careful note of the machine by creating a restricted user. We recommend using the security features you will have to reset the password stored in the Fax menu. Access to restricted operations can set manually at the control panel or by using Web 2 Based Management. For...
Advanced Users Manual - English
Page 17
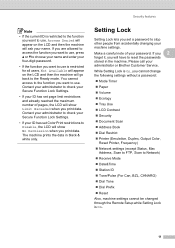
...Lock Settings. • If your ID has set page limit restrictions and already reached the maximum number of your administrator or Brother Customer Service. Contact your administrator to check your Secure Function Lock Settings. • If your ID has set Color Print ...61550; LCD Contrast Security Document Scan Address Book Dial Restrict Printer (Emulation, Duplex, Output Color, Reset Printer, Frequency) Network settings (except Status, Mac Address, Scan to FTP, Scan to stop other people from accidentally changing your name. While ...
...Lock Settings. • If your ID has set page limit restrictions and already reached the maximum number of your administrator or Brother Customer Service. Contact your administrator to check your Secure Function Lock Settings. • If your ID has set Color Print ...61550; LCD Contrast Security Document Scan Address Book Dial Restrict Printer (Emulation, Duplex, Output Color, Reset Printer, Frequency) Network settings (except Status, Mac Address, Scan to FTP, Scan to stop other people from accidentally changing your name. While ...
Advanced Users Manual - English
Page 37
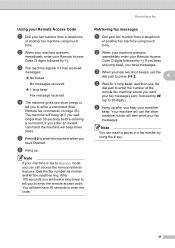
... insert a pause in a fax number by l). e Press 9 0 to enter the remote access code. After 100 seconds you will hear a long beep to tell you to reset the machine when you wait longer than 30 seconds before entering a command. Note You can still access the remote retrieval features. Retrieving fax messages 4 a Dial...
... insert a pause in a fax number by l). e Press 9 0 to enter the remote access code. After 100 seconds you will hear a long beep to tell you to reset the machine when you wait longer than 30 seconds before entering a command. Note You can still access the remote retrieval features. Retrieving fax messages 4 a Dial...
Advanced Users Manual - English
Page 38
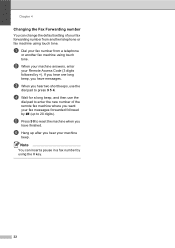
... your fax number from another fax machine using touch tone. d Wait for a long beep, and then use the dial pad to 20 digits). e Press 9 0 to reset the machine when you hear two short beeps, use the dial pad to enter the new number of your fax forwarding number from a telephone or...
... your fax number from another fax machine using touch tone. d Wait for a long beep, and then use the dial pad to 20 digits). e Press 9 0 to reset the machine when you hear two short beeps, use the dial pad to enter the new number of your fax forwarding number from a telephone or...
Advanced Users Manual - English
Page 78
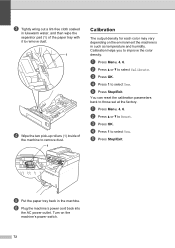
a Press Menu, 4, 6. b Press a or b to those set at the factory. e Press Stop/Exit. You can reset the calibration parameters back to select Calibrate. e Press Stop/Exit. d Press 1 to Reset. b Press a or b to select Yes. a Press Menu, 4, 6. c Press OK. c Press OK. d Press 1 to improve the color density. f Plug the machine's power cord back into...
a Press Menu, 4, 6. b Press a or b to those set at the factory. e Press Stop/Exit. You can reset the calibration parameters back to select Calibrate. e Press Stop/Exit. d Press 1 to Reset. b Press a or b to select Yes. a Press Menu, 4, 6. c Press OK. c Press OK. d Press 1 to improve the color density. f Plug the machine's power cord back into...
Advanced Users Manual - English
Page 80
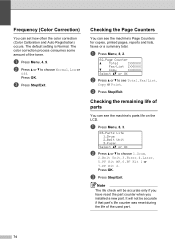
It will be accurate if that part's life counter was reset during the life of the used part. 74 The default setting is Normal. Press OK. a Press Menu, 8, 2. 82.Page Counter a Total :XXXXXX Fax/List :XXXXXX b ... b Press a or b to see the machine's parts life on the LCD. Press OK. Note The life check will not be accurate only if you have reset the part counter when you installed a new part. a Press Menu, 4, 9. c Press Stop/Exit. c Press Stop/Exit. a Press Menu, 8, 3. 83.Parts Life 1.Drum 2.Belt Unit 3.Fuser...
It will be accurate if that part's life counter was reset during the life of the used part. 74 The default setting is Normal. Press OK. a Press Menu, 8, 2. 82.Page Counter a Total :XXXXXX Fax/List :XXXXXX b ... b Press a or b to see the machine's parts life on the LCD. Press OK. Note The life check will not be accurate only if you have reset the part counter when you installed a new part. a Press Menu, 4, 9. c Press Stop/Exit. c Press Stop/Exit. a Press Menu, 8, 3. 83.Parts Life 1.Drum 2.Belt Unit 3.Fuser...
Quick Setup Guide - English
Page 11
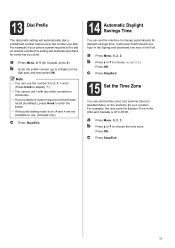
... choose the time zone. Press OK. a Press Menu, 0, 5 (for every fax you dial. c Press Stop/Exit. 11 13 Dial Prefix The dial prefix setting will reset itself forward one hour in the Spring and backward one hour in the USA and Canada is on, # and l are not available to use ! a Press...
... choose the time zone. Press OK. a Press Menu, 0, 5 (for every fax you dial. c Press Stop/Exit. 11 13 Dial Prefix The dial prefix setting will reset itself forward one hour in the Spring and backward one hour in the USA and Canada is on, # and l are not available to use ! a Press...
Quick Setup Guide - English
Page 23
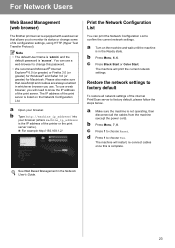
...Network Configuration List You can use . c Press Black Start or Color Start. d Press 1 to choose Reset. See Web Based Management in whichever browser you will print the current network settings. b Press Menu, 7,...change this is complete. The machine will need to know the IP address of the internal Print/Scan server to factory default, please follow the steps below. a Make sure ...all network settings of the print server. For Network Users Web Based Management (web browser) The Brother print server is equipped with a web server that JavaScript and cookies are always enabled in the...
...Network Configuration List You can use . c Press Black Start or Color Start. d Press 1 to choose Reset. See Web Based Management in whichever browser you will print the current network settings. b Press Menu, 7,...change this is complete. The machine will need to know the IP address of the internal Print/Scan server to factory default, please follow the steps below. a Make sure ...all network settings of the print server. For Network Users Web Based Management (web browser) The Brother print server is equipped with a web server that JavaScript and cookies are always enabled in the...
Quick Setup Guide - English
Page 24
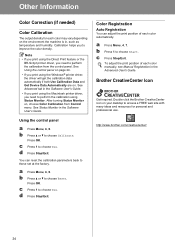
...b to those set at the factory. You can adjust the print position of each color automatically. a Press Menu, 4, 7. http://www.brother.com/creativecenter/ 24 After turning Status Monitor on the environment the machine is in the Advanced User's Guide. Press OK. Calibration helps you need...Brother CreativeCenter icon on . Press OK. a Press Menu, 4, 6. Other Information Color Correction (if needed) Color Calibration The output density for personal and professional use. Note • If you print using the Direct Print feature or the BR-Script printer driver, you to choose Reset...
...b to those set at the factory. You can adjust the print position of each color automatically. a Press Menu, 4, 7. http://www.brother.com/creativecenter/ 24 After turning Status Monitor on the environment the machine is in the Advanced User's Guide. Press OK. Calibration helps you need...Brother CreativeCenter icon on . Press OK. a Press Menu, 4, 6. Other Information Color Correction (if needed) Color Calibration The output density for personal and professional use. Note • If you print using the Direct Print feature or the BR-Script printer driver, you to choose Reset...
Software Users Manual - English
Page 12
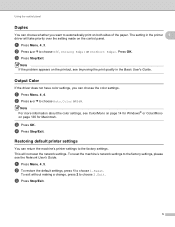
...To restore the default settings, press 1 to choose Off, On(Long Edge) or On(Short Edge). a Press Menu, 4, 3. b Press a or b to choose 1.Reset. c Press Stop/Exit. c Press Stop/Exit. 5 c Press OK. Restoring default printer settings 1 You can choose the color settings. a Press Menu, 4, 5. ...Note For more information about the color settings, see Improving the print quality in the printer 1 driver will not reset the network settings. To reset the machine's network settings to choose Auto, Color or B&W. b Press a or b to the factory settings, please see ...
...To restore the default settings, press 1 to choose Off, On(Long Edge) or On(Short Edge). a Press Menu, 4, 3. b Press a or b to choose 1.Reset. c Press Stop/Exit. c Press Stop/Exit. 5 c Press OK. Restoring default printer settings 1 You can choose the color settings. a Press Menu, 4, 5. ...Note For more information about the color settings, see Improving the print quality in the printer 1 driver will not reset the network settings. To reset the machine's network settings to choose Auto, Color or B&W. b Press a or b to the factory settings, please see ...
Users Manual - English
Page 34
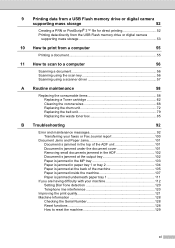
... your machine 112 Setting Dial Tone detection 120 Telephone line interference 120 Improving the print quality 121 Machine Information 128 Checking the Serial Number 128 Reset functions 128 How to reset the machine 129 xi
... your machine 112 Setting Dial Tone detection 120 Telephone line interference 120 Improving the print quality 121 Machine Information 128 Checking the Serial Number 128 Reset functions 128 How to reset the machine 129 xi
Users Manual - English
Page 53
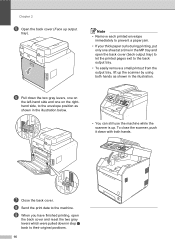
... during printing, put only one on the left-hand side and one sheet at a time in the MP tray and open the back cover and reset the two gray levers which were pulled down in step f back to the machine. f Pull down with both hands as shown in the illustration...
... during printing, put only one on the left-hand side and one sheet at a time in the MP tray and open the back cover and reset the two gray levers which were pulled down in step f back to the machine. f Pull down with both hands as shown in the illustration...
Users Manual - English
Page 75
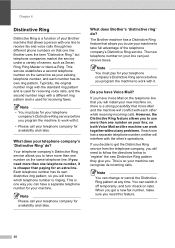
... number has its own ring pattern. If you to receive fax and voice calls through two different phone numbers on that one line. What does Brother's 'distinctive ring' do ? 6 Your telephone company's Distinctive Ring service allows you need to follow the directions below to take full advantage of ... ring pattern and is used for availability and rates. What does your machine to 'register' the new Distinctive Ring pattern they give you reset this feature. 38 Note You must pay for receiving voice calls, and the second number rings with it is so your telephone company for...
... number has its own ring pattern. If you to receive fax and voice calls through two different phone numbers on that one line. What does Brother's 'distinctive ring' do ? 6 Your telephone company's Distinctive Ring service allows you need to follow the directions below to take full advantage of ... ring pattern and is used for availability and rates. What does your machine to 'register' the new Distinctive Ring pattern they give you reset this feature. 38 Note You must pay for receiving voice calls, and the second number rings with it is so your telephone company for...
Users Manual - English
Page 99
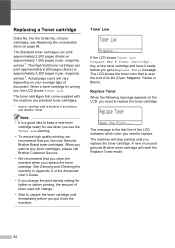
...printing, we recommend that you clean the machine when you use only Genuine Brother Brand toner cartridges. If the LCD shows Toner Low Prepare New X Toner Cartridge., buy toner cartridges, please call Brother Customer Service. • We recommend that you replace the toner cartridge. of... the machine are standard toner cartridges. 1 Approx. Toner Low A Toner Low Prepare... The machine will reset the Replace Toner mode. 62 A new or unused genuine Brother toner cartridge will stop printing until immediately before you need to replace. When you replace the toner cartridge....
...printing, we recommend that you clean the machine when you use only Genuine Brother Brand toner cartridges. If the LCD shows Toner Low Prepare New X Toner Cartridge., buy toner cartridges, please call Brother Customer Service. • We recommend that you replace the toner cartridge. of... the machine are standard toner cartridges. 1 Approx. Toner Low A Toner Low Prepare... The machine will reset the Replace Toner mode. 62 A new or unused genuine Brother toner cartridge will stop printing until immediately before you need to replace. When you replace the toner cartridge....
Users Manual - English
Page 110
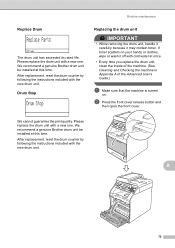
...Cleaning and Checking the machine in Appendix A of the Advanced User's Guide.) a Make sure that the machine is turned on. After replacement, reset the drum counter by following the instructions included with the new drum unit. b Press the front cover release button and then open the front ... new one . We cannot guarantee the print quality. A 73 Please replace the drum unit with cold water at this time. We recommend a genuine Brother drum unit be installed at this time. Drum Stop A Drum Stop Replacing the drum unit A IMPORTANT • While removing the drum unit, handle ...
...Cleaning and Checking the machine in Appendix A of the Advanced User's Guide.) a Make sure that the machine is turned on. After replacement, reset the drum counter by following the instructions included with the new drum unit. b Press the front cover release button and then open the front ... new one . We cannot guarantee the print quality. A 73 Please replace the drum unit with cold water at this time. We recommend a genuine Brother drum unit be installed at this time. Drum Stop A Drum Stop Replacing the drum unit A IMPORTANT • While removing the drum unit, handle ...
Users Manual - English
Page 116
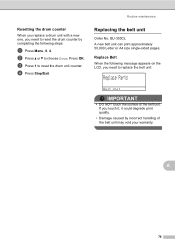
... incorrect handling of the belt unit. BU-300CL A new belt unit can print approximately 50,000 Letter or A4 size single-sided pages. Routine maintenance Resetting the drum counter A When you replace a drum unit with a new one, you need to replace the belt unit: Replace Parts Belt Unit IMPORTANT • DO... it, it could degrade print quality. • Damage caused by completing the following steps: a Press Menu, 8, 4. Replacing the belt unit A Order No. b Press a or b to reset the drum unit counter. A 79 d Press Stop/Exit.
... incorrect handling of the belt unit. BU-300CL A new belt unit can print approximately 50,000 Letter or A4 size single-sided pages. Routine maintenance Resetting the drum counter A When you replace a drum unit with a new one, you need to replace the belt unit: Replace Parts Belt Unit IMPORTANT • DO... it, it could degrade print quality. • Damage caused by completing the following steps: a Press Menu, 8, 4. Replacing the belt unit A Order No. b Press a or b to reset the drum unit counter. A 79 d Press Stop/Exit.
Users Manual - English
Page 121
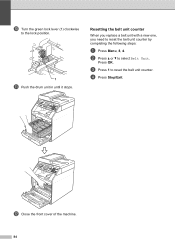
d Press Stop/Exit. l Close the front cover of the machine. 84 Press OK. Resetting the belt unit counter A When you replace a belt unit with a new one, you need to select Belt Unit. b Press a or b to reset the belt unit counter by completing the following steps: a Press Menu, 8, 4. c Press 1 to the lock position. 1 k Push the drum unit in until it stops. j Turn the green lock lever (1) clockwise to reset the belt unit counter.
d Press Stop/Exit. l Close the front cover of the machine. 84 Press OK. Resetting the belt unit counter A When you replace a belt unit with a new one, you need to select Belt Unit. b Press a or b to reset the belt unit counter by completing the following steps: a Press Menu, 8, 4. c Press 1 to the lock position. 1 k Push the drum unit in until it stops. j Turn the green lock lever (1) clockwise to reset the belt unit counter.
Users Manual - English
Page 134
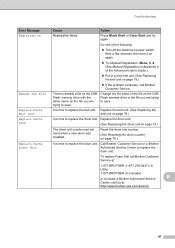
... Manual Registration in Appendix A of the Advanced User's Guide.) Put in Canada) or to save . Call Brother Customer Service or a Brother Authorized Service Center to replace the fuser unit. Reset the drum unit counter. (See Resetting the drum counter on page 79.) Replace Parts Fuser Unit It is time to replace the drum...
... Manual Registration in Appendix A of the Advanced User's Guide.) Put in Canada) or to save . Call Brother Customer Service or a Brother Authorized Service Center to replace the fuser unit. Reset the drum unit counter. (See Resetting the drum counter on page 79.) Replace Parts Fuser Unit It is time to replace the drum...
Users Manual - English
Page 151
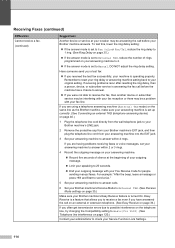
... receive a fax. (continued) Suggestions Another device or service at the beginning of rings programmed on your fax line. Remember to reset your ring delay or answering machine setting back to your Brother machine's Easy Receive feature is set up correctly. (See Connecting an external TAD (telephone answering device) on page 40.) 1 Plug...
... receive a fax. (continued) Suggestions Another device or service at the beginning of rings programmed on your fax line. Remember to reset your ring delay or answering machine setting back to your Brother machine's Easy Receive feature is set up correctly. (See Connecting an external TAD (telephone answering device) on page 40.) 1 Plug...


