
Advanced Users Manual - English
Page 5
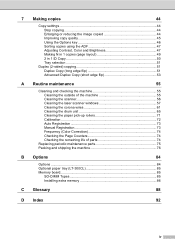
...the outside of the machine 55 Cleaning the scanner 56 Cleaning the laser scanner windows 57 Cleaning the corona wires 61 Cleaning the drum unit 65 Cleaning the paper pick-up rollers 71 Calibration ...72 Auto Registration 73 Manual Registration 73 Frequency (Color Correction 74 ...Checking the Page Counters 74 Checking the remaining life of parts 74 Replacing periodic maintenance parts 75 Packing and shipping the machine 76 B Options 84 Options ...84 Optional paper tray (LT-300CL 85 Memory board...
...the outside of the machine 55 Cleaning the scanner 56 Cleaning the laser scanner windows 57 Cleaning the corona wires 61 Cleaning the drum unit 65 Cleaning the paper pick-up rollers 71 Calibration ...72 Auto Registration 73 Manual Registration 73 Frequency (Color Correction 74 ...Checking the Page Counters 74 Checking the remaining life of parts 74 Replacing periodic maintenance parts 75 Packing and shipping the machine 76 B Options 84 Options ...84 Optional paper tray (LT-300CL 85 Memory board...
Advanced Users Manual - English
Page 61
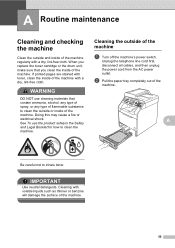
A Be careful not to clean the machine. When you replace the toner cartridge or the drum unit, make sure that contain ammonia, alcohol, any type of spray, or any type of flammable substance to clean the outside or inside of the ...
A Be careful not to clean the machine. When you replace the toner cartridge or the drum unit, make sure that contain ammonia, alcohol, any type of spray, or any type of flammable substance to clean the outside or inside of the ...
Quick Setup Guide - English
Page 25
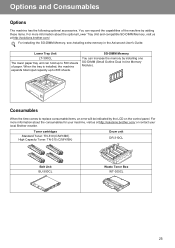
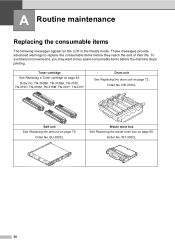
You can hold up to replace consumable items, an error will be indicated by the LCD on the control ... Memory Module). For more information about the consumables for your machine, visit us at http://solutions.brother.com/ or contact your local Brother reseller. SO-DIMM Memory You can increase the memory by adding these items. For more information ... Unit and compatible SO-DIMM Memory, visit us at http://solutions.brother.com/. Toner cartridges Standard Toner: TN-310 (C/M/Y/BK) High Capacity Toner: TN-315 (C/M/Y/BK) Drum unit DR-310CL Belt Unit BU-300CL Waste Toner Box WT-300CL...
You can hold up to replace consumable items, an error will be indicated by the LCD on the control ... Memory Module). For more information about the consumables for your machine, visit us at http://solutions.brother.com/ or contact your local Brother reseller. SO-DIMM Memory You can increase the memory by adding these items. For more information ... Unit and compatible SO-DIMM Memory, visit us at http://solutions.brother.com/. Toner cartridges Standard Toner: TN-310 (C/M/Y/BK) High Capacity Toner: TN-315 (C/M/Y/BK) Drum unit DR-310CL Belt Unit BU-300CL Waste Toner Box WT-300CL...
Users Manual - English
Page 30
...the date of purchase, Brother International Corporation (Canada) Ltd. ("Brother"), or its Authorized Service Centres, Distributors, Dealers, Agents or employees, shall create another warranty or modify this Laser Printer/MFC/Fax machine free of such damages. Neither Brother nor anyone other rights ...to provide on -site service providers, will repair or replace (at Brother Authorized Service Centres throughout Canada. vii This limited Warranty does not include cleaning, consumables (including, without limitation, toner cartridges and drum units, OPC belts, fixing units, print heads, ...
...the date of purchase, Brother International Corporation (Canada) Ltd. ("Brother"), or its Authorized Service Centres, Distributors, Dealers, Agents or employees, shall create another warranty or modify this Laser Printer/MFC/Fax machine free of such damages. Neither Brother nor anyone other rights ...to provide on -site service providers, will repair or replace (at Brother Authorized Service Centres throughout Canada. vii This limited Warranty does not include cleaning, consumables (including, without limitation, toner cartridges and drum units, OPC belts, fixing units, print heads, ...
Users Manual - English
Page 34
... 56 Scanning using the scan key 56 Scanning using a scanner driver 57 A Routine maintenance 58 Replacing the consumable items 58 Replacing a Toner cartridge 62 Cleaning the corona wires 68 Replacing the drum unit 72 Replacing the belt unit 79 Replacing the waste toner box 85 B Troubleshooting 92 Error and maintenance messages 92 Transferring your faxes or...
... 56 Scanning using the scan key 56 Scanning using a scanner driver 57 A Routine maintenance 58 Replacing the consumable items 58 Replacing a Toner cartridge 62 Cleaning the corona wires 68 Replacing the drum unit 72 Replacing the belt unit 79 Replacing the waste toner box 85 B Troubleshooting 92 Error and maintenance messages 92 Transferring your faxes or...
Users Manual - English
Page 95
...box on page 62. Order No. DR-310CL Belt unit See Replacing the belt unit on page 72. WT-300CL 58 TN-310BK, TN-315BK, TN-310C, TN-315C, TN-310M, TN-315M, TN-310Y, TN-315Y Drum unit See Replacing the drum unit on page 79. Order No. To avoid any inconvenience, you... may want to replace the consumable items before the machine stops printing. These messages provide advanced warnings to buy spare consumable...
...box on page 62. Order No. DR-310CL Belt unit See Replacing the belt unit on page 72. WT-300CL 58 TN-310BK, TN-315BK, TN-310C, TN-315C, TN-310M, TN-315M, TN-310Y, TN-315Y Drum unit See Replacing the drum unit on page 79. Order No. To avoid any inconvenience, you... may want to replace the consumable items before the machine stops printing. These messages provide advanced warnings to buy spare consumable...
Users Manual - English
Page 97
...sided pages. 2 Approx. Order No. WT-300CL Call your dealer or Brother Customer Service for a replacement paper feeding kit 2. You will need to replace See page 62. Call your dealer or Brother Customer Service for a replacement laser unit. cartridge yield is declared in accordance with ISO/IEC 19798. 3... 1 page per job. 4 Drum life is approximate and may vary by type of use. 5 Standard ...
...sided pages. 2 Approx. Order No. WT-300CL Call your dealer or Brother Customer Service for a replacement paper feeding kit 2. You will need to replace See page 62. Call your dealer or Brother Customer Service for a replacement laser unit. cartridge yield is declared in accordance with ISO/IEC 19798. 3... 1 page per job. 4 Drum life is approximate and may vary by type of use. 5 Standard ...
Users Manual - English
Page 100
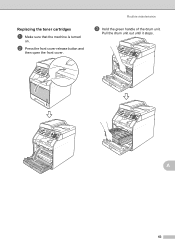
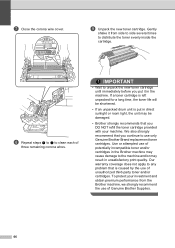
b Press the front cover release button and then open the front cover. Replacing the toner cartridges A a Make sure that the machine is turned on. Pull the drum unit out until it stops. A 63 Routine maintenance c Hold the green handle of the drum unit.
b Press the front cover release button and then open the front cover. Replacing the toner cartridges A a Make sure that the machine is turned on. Pull the drum unit out until it stops. A 63 Routine maintenance c Hold the green handle of the drum unit.
Users Manual - English
Page 103
... with your investment and obtain premium performance from side to side several times to any problem that you put it from the Brother machine, we strongly recommend the use of unauthorized third-party toner and/or cartridges. To protect your machine. Our warranty coverage...a toner cartridge is left unpacked for a long time, the toner life will be shortened. • If an unpacked drum unit is caused by the use only Genuine Brother Brand replacement toner cartridges. i Unpack the new toner cartridge. g Close the corona wire cover. Gently shake it in unsatisfactory print...
... with your investment and obtain premium performance from side to side several times to any problem that you put it from the Brother machine, we strongly recommend the use of unauthorized third-party toner and/or cartridges. To protect your machine. Our warranty coverage...a toner cartridge is left unpacked for a long time, the toner life will be shortened. • If an unpacked drum unit is caused by the use only Genuine Brother Brand replacement toner cartridges. i Unpack the new toner cartridge. g Close the corona wire cover. Gently shake it in unsatisfactory print...
Users Manual - English
Page 105
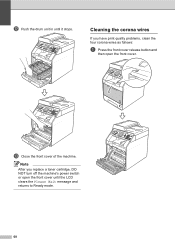
m Close the front cover of the machine. l Push the drum unit in until the LCD clears the Please Wait message and returns to Ready mode. 68 Note After you have print quality problems, clean the four corona wires as follows: a Press the front cover release button and then open the front cover until it stops. Cleaning the corona wires A If you replace a toner cartridge, DO NOT turn off the machine's power switch or open the front cover.
m Close the front cover of the machine. l Push the drum unit in until the LCD clears the Please Wait message and returns to Ready mode. 68 Note After you have print quality problems, clean the four corona wires as follows: a Press the front cover release button and then open the front cover until it stops. Cleaning the corona wires A If you replace a toner cartridge, DO NOT turn off the machine's power switch or open the front cover.
Users Manual - English
Page 109
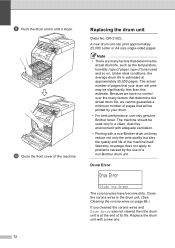
... be significantly less than this estimate. Clean the corona wires in the drum unit. (See Cleaning the corona wires on . Replace the drum unit with a non-Brother drum unit may be printed by the use only genuine Brother toner. Replacing the drum unit A Order No. i Push the drum unit in a clean, dust-free environment with adequate ventilation. • Printing...
... be significantly less than this estimate. Clean the corona wires in the drum unit. (See Cleaning the corona wires on . Replace the drum unit with a non-Brother drum unit may be printed by the use only genuine Brother toner. Replacing the drum unit A Order No. i Push the drum unit in a clean, dust-free environment with adequate ventilation. • Printing...
Users Manual - English
Page 110
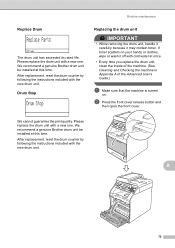
... cold water at this time. After replacement, reset the drum counter by following the instructions included with the new drum unit. We recommend a genuine Brother drum unit be installed at this time. After replacement, reset the drum counter by following the instructions included with the new drum unit. Routine maintenance Replace Drum A Replace Parts Drum The drum unit has exceeded its rated life...
... cold water at this time. After replacement, reset the drum counter by following the instructions included with the new drum unit. We recommend a genuine Brother drum unit be installed at this time. After replacement, reset the drum counter by following the instructions included with the new drum unit. Routine maintenance Replace Drum A Replace Parts Drum The drum unit has exceeded its rated life...
Users Manual - English
Page 116
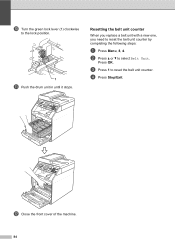
... or A4 size single-sided pages. b Press a or b to reset the drum unit counter. Replace Belt A When the following steps: a Press Menu, 8, 4. c Press 1 to choose Drum. Routine maintenance Resetting the drum counter A When you replace a drum unit with a new one, you need to reset the drum counter by incorrect handling of the belt unit. If you touch...
... or A4 size single-sided pages. b Press a or b to reset the drum unit counter. Replace Belt A When the following steps: a Press Menu, 8, 4. c Press 1 to choose Drum. Routine maintenance Resetting the drum counter A When you replace a drum unit with a new one, you need to reset the drum counter by incorrect handling of the belt unit. If you touch...
Users Manual - English
Page 121
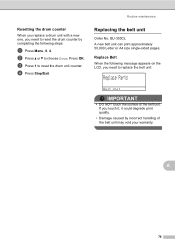
d Press Stop/Exit. c Press 1 to reset the belt unit counter by completing the following steps: a Press Menu, 8, 4. l Close the front cover of the machine. 84 Resetting the belt unit counter A When you replace a belt unit with a new one, you need to reset the belt unit counter. b Press a or b to the lock position. 1 k Push the drum unit in until it stops. Press OK. j Turn the green lock lever (1) clockwise to select Belt Unit.
d Press Stop/Exit. c Press 1 to reset the belt unit counter by completing the following steps: a Press Menu, 8, 4. l Close the front cover of the machine. 84 Resetting the belt unit counter A When you replace a belt unit with a new one, you need to reset the belt unit counter. b Press a or b to the lock position. 1 k Push the drum unit in until it stops. Press OK. j Turn the green lock lever (1) clockwise to select Belt Unit.

Users Manual - English
Page 129
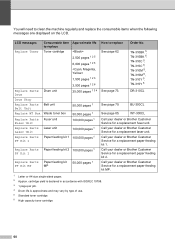
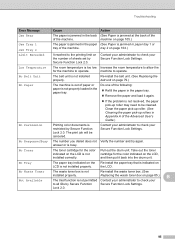
...the problem continues, call Brother Customer Service. Error Message Access Denied Access Error Calibrate Cartridge Error Put the Black (K) Toner Cartridge back in. 1 1 The toner cartridge color with Direct Print. Reinsert the device and try it on again. Put in a new drum unit. (See Replacing the drum unit on page 73....) Put in a new belt unit. (See Replacing the belt unit on page 79.) Put in a waste toner box. (See Replacing the waste toner box on the LCD, then re-install ...
...the problem continues, call Brother Customer Service. Error Message Access Denied Access Error Calibrate Cartridge Error Put the Black (K) Toner Cartridge back in. 1 1 The toner cartridge color with Direct Print. Reinsert the device and try it on again. Put in a new drum unit. (See Replacing the drum unit on page 73....) Put in a new belt unit. (See Replacing the belt unit on page 79.) Put in a waste toner box. (See Replacing the waste toner box on the LCD, then re-install ...

Users Manual - English
Page 130
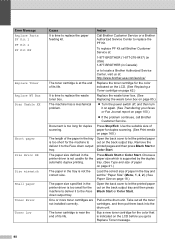
Troubleshooting Error Message Cause Action Condensation One of the drum unit or toner cartridge is too hot. During the cooling ... Fully open while loading a Close the ADF cover of the machine. If this error message appears again, replace the DIMM with a new one. (See Installing extra memory in the back of the machine when you ...on again. If this does not clear the error, call . 93 person's fax machine stopped the call Brother Customer Service. Cover is Open The front cover is not jammed inside the machine after a room temperature change. Connection ...
Troubleshooting Error Message Cause Action Condensation One of the drum unit or toner cartridge is too hot. During the cooling ... Fully open while loading a Close the ADF cover of the machine. If this error message appears again, replace the DIMM with a new one. (See Installing extra memory in the back of the machine when you ...on again. If this does not clear the error, call . 93 person's fax machine stopped the call Brother Customer Service. Cover is Open The front cover is not jammed inside the machine after a room temperature change. Connection ...
Users Manual - English
Page 131
... Turning off , and then turn it on again. (See Transferring your faxes or Fax Journal report on page 100.) If the problem continues, call Brother Customer Service. Error Message Cause Action Document Jam The document was not inserted or fed properly, or the document scanned from the ADF was pulled... in the MP tray tray of the ADF unit on page 101 or Using the automatic document feeder (ADF) on page 26. needs to replace the drum unit. The back of the machine is jammed in the top of the machine. Although the size of the fuser unit does not rise to...
... Turning off , and then turn it on again. (See Transferring your faxes or Fax Journal report on page 100.) If the problem continues, call Brother Customer Service. Error Message Cause Action Document Jam The document was not inserted or fed properly, or the document scanned from the ADF was pulled... in the MP tray tray of the ADF unit on page 101 or Using the automatic document feeder (ADF) on page 26. needs to replace the drum unit. The back of the machine is jammed in the top of the machine. Although the size of the fuser unit does not rise to...
Users Manual - English
Page 132
...(See Cleaning the paper pick-up roller may need to check your Secure Function Lock Settings. Contact your administrator to be canceled. Pull out the drum unit. Replacing the waste toner box on page 85.) B The tried function is jammed in paper tray 1 or tray of the machine. No Response/Busy The... room temperature is not properly loaded in the paper tray. Remove the paper and load it back into the drum unit. Re-install the belt unit. (See Replacing the belt unit on LCD is not installed correctly. No Tray The paper tray indicated on the Re-install the paper ...
...(See Cleaning the paper pick-up roller may need to check your Secure Function Lock Settings. Contact your administrator to be canceled. Pull out the drum unit. Replacing the waste toner box on page 85.) B The tried function is jammed in paper tray 1 or tray of the machine. No Response/Busy The... room temperature is not properly loaded in the paper tray. Remove the paper and load it back into the drum unit. Re-install the belt unit. (See Replacing the belt unit on LCD is not installed correctly. No Tray The paper tray indicated on the Re-install the paper ...
Users Manual - English
Page 134
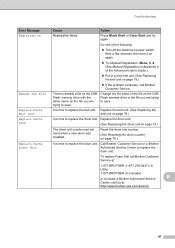
... turn it on the USB Flash memory drive or the file you are trying to save . Replace the drum unit. (See Replacing the drum unit on page 79.) Replace Parts Drum It is time to replace the drum unit. To replace Fuser Unit call Brother Customer Service. Change the file name of the file on again. Try Manual Registration...
... turn it on the USB Flash memory drive or the file you are trying to save . Replace the drum unit. (See Replacing the drum unit on page 79.) Replace Parts Drum It is time to replace the drum unit. To replace Fuser Unit call Brother Customer Service. Change the file name of the file on again. Try Manual Registration...
Users Manual - English
Page 135
Call Brother Customer Service or a Brother Authorized Service Center to let the printed paper out on the back output tray and then press Black Start or Color Start. Remove the printed pages and then press Black Start or Color Start. cartridges, and then put them back into the drum unit. Replace the... toner cartridge for the color that is indicated on the LCD before you get a Replace Toner message. 98 Load the correct size of paper in the tray and set the "...
Call Brother Customer Service or a Brother Authorized Service Center to let the printed paper out on the back output tray and then press Black Start or Color Start. Remove the printed pages and then press Black Start or Color Start. cartridges, and then put them back into the drum unit. Replace the... toner cartridge for the color that is indicated on the LCD before you get a Replace Toner message. 98 Load the correct size of paper in the tray and set the "...


