Software User's Guide - English
Page 8
... Network Scanning 222 Before using Network Scanning ...222 Network license (Windows®) ...222 Configuring Network Scanning (Windows 223 Configuring Network Scanning (Macintosh 226 Using the Scan key on your network ...227 Scan to E-mail ...229 Scan to E-mail (E-mail Server, For MFC-8910DW and MFC-8950DW(T): standard, MFC-8510DN and MFC-8710DW: available as a download 231 Scan to Image ...236 Scan to OCR ...238 Scan to File...240 Scan to FTP...242 Scan...
... Network Scanning 222 Before using Network Scanning ...222 Network license (Windows®) ...222 Configuring Network Scanning (Windows 223 Configuring Network Scanning (Macintosh 226 Using the Scan key on your network ...227 Scan to E-mail ...229 Scan to E-mail (E-mail Server, For MFC-8910DW and MFC-8950DW(T): standard, MFC-8510DN and MFC-8710DW: available as a download 231 Scan to Image ...236 Scan to OCR ...238 Scan to File...240 Scan to FTP...242 Scan...
Software User's Guide - English
Page 21
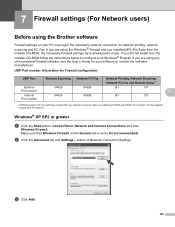
Install the drivers by a firewall, and you are unable to network print, network scan or PC Fax, you installed MFL-Pro Suite from Windows® XP. 2 Printing 2 Note • The screens in this section are on your operating system. 2 &#... from the installer CD-ROM, the necessary Firewall settings have supplied. Screens on your PC may need to configure your Windows® Firewall. Using the Brother printer driver 2 A printer driver is protected by following the Quick Setup Guide. If you did not install from the installer CD-ROM, see the User...
Install the drivers by a firewall, and you are unable to network print, network scan or PC Fax, you installed MFL-Pro Suite from Windows® XP. 2 Printing 2 Note • The screens in this section are on your operating system. 2 &#... from the installer CD-ROM, the necessary Firewall settings have supplied. Screens on your PC may need to configure your Windows® Firewall. Using the Brother printer driver 2 A printer driver is protected by following the Quick Setup Guide. If you did not install from the installer CD-ROM, see the User...
Software User's Guide - English
Page 56
... scanners and applications. Note • For Nuance™ PaperPort™ 12SE, see Firewall settings (For Network users) uu page 125. You can also scan images directly into the PC 3 There are using the TWAIN driver 3 The Brother MFL-Pro Suite software includes a TWAIN compliant scanner driver. a Load your machine, but you can either...
... scanners and applications. Note • For Nuance™ PaperPort™ 12SE, see Firewall settings (For Network users) uu page 125. You can also scan images directly into the PC 3 There are using the TWAIN driver 3 The Brother MFL-Pro Suite software includes a TWAIN compliant scanner driver. a Load your machine, but you can either...
Software User's Guide - English
Page 133
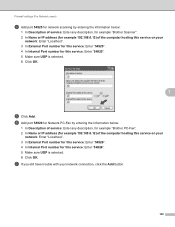
... made. UDP Port number information for Firewall configuration UDP Port Network Scanning Network PC-Fax Network Printing, Network Scanning, Network PC-Fax and Remote Setup 1 External 54925 54926 161 Port number Internal 54925 54926 161 Port number 137 7 137 1 Add Port number 137 if you are using the Brother software 7 Firewall settings on the General tab is set to...
... made. UDP Port number information for Firewall configuration UDP Port Network Scanning Network PC-Fax Network Printing, Network Scanning, Network PC-Fax and Remote Setup 1 External 54925 54926 161 Port number Internal 54925 54926 161 Port number 137 7 137 1 Add Port number 137 if you are using the Brother software 7 Firewall settings on the General tab is set to...
Software User's Guide - English
Page 134
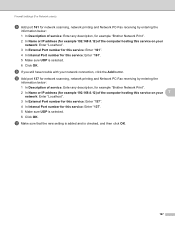
... number for this service: Enter "54925". 4 In Internal Port number for this service: Enter "54925". 5 Make sure UDP is selected. 6 Click OK. Firewall settings (For Network users) d Add port 54925 for network scanning by entering the information below : 1 In Description of service: Enter any description, for example "Brother PC-Fax". 2 In Name or IP address...
... number for this service: Enter "54925". 4 In Internal Port number for this service: Enter "54925". 5 Make sure UDP is selected. 6 Click OK. Firewall settings (For Network users) d Add port 54925 for network scanning by entering the information below : 1 In Description of service: Enter any description, for example "Brother PC-Fax". 2 In Name or IP address...
Software User's Guide - English
Page 135
... network scanning, network printing and Network PC-Fax receiving by entering the information below : 1 In Description of service: Enter any description, for example "Brother Network Print". 2 In Name or IP address (for example 192.168.0.12) of the computer hosting this service on your 7 network: Enter "Localhost". 3 In External Port number for this service: Enter "137". 4 In Internal...
... network scanning, network printing and Network PC-Fax receiving by entering the information below : 1 In Description of service: Enter any description, for example "Brother Network Print". 2 In Name or IP address (for example 192.168.0.12) of the computer hosting this service on your 7 network: Enter "Localhost". 3 In External Port number for this service: Enter "137". 4 In Internal...
Software User's Guide - English
Page 137
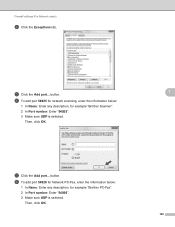
Then, click OK. 129 e Click the Add port... button. 7 f To add port 54925 for network scanning, enter the information below : 1 In Name: Enter any description, for example "Brother PC-Fax". 2 In Port number: Enter "54926". 3 Make sure UDP is selected. Then, click OK. button. g Click the Add port... h To add port 54926 for Network PC-Fax, enter the information below : 1 In Name: Enter any description, for example "Brother Scanner". 2 In Port number: Enter "54925". 3 Make sure UDP is selected. Firewall settings (For Network users) d Click the Exceptions tab.
Then, click OK. 129 e Click the Add port... button. 7 f To add port 54925 for network scanning, enter the information below : 1 In Name: Enter any description, for example "Brother PC-Fax". 2 In Port number: Enter "54926". 3 Make sure UDP is selected. Then, click OK. button. g Click the Add port... h To add port 54926 for Network PC-Fax, enter the information below : 1 In Name: Enter any description, for example "Brother Scanner". 2 In Port number: Enter "54925". 3 Make sure UDP is selected. Firewall settings (For Network users) d Click the Exceptions tab.
Software User's Guide - English
Page 138
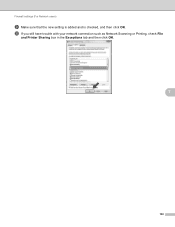
j If you still have trouble with your network connection such as Network Scanning or Printing, check File and Printer Sharing box in the Exceptions tab and then click OK. 7 130 Firewall settings (For Network users) i Make sure that the new setting is added and is checked, and then click OK.
j If you still have trouble with your network connection such as Network Scanning or Printing, check File and Printer Sharing box in the Exceptions tab and then click OK. 7 130 Firewall settings (For Network users) i Make sure that the new setting is added and is checked, and then click OK.
Software User's Guide - English
Page 140
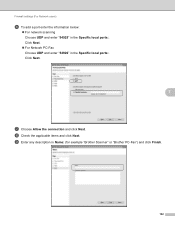
Click Next. 7 g Choose Allow the connection and click Next. i Enter any description in the Specific local ports:. h Check the applicable items and click Next. Firewall settings (For Network users) f To add a port enter the information below: For network scanning Choose UDP and enter "54925" in Name: (for example "Brother Scanner" or "Brother PC-Fax") and click Finish. 132 Click Next. For Network PC-Fax Choose UDP and enter "54926" in the Specific local ports:.
Click Next. 7 g Choose Allow the connection and click Next. i Enter any description in the Specific local ports:. h Check the applicable items and click Next. Firewall settings (For Network users) f To add a port enter the information below: For network scanning Choose UDP and enter "54925" in Name: (for example "Brother Scanner" or "Brother PC-Fax") and click Finish. 132 Click Next. For Network PC-Fax Choose UDP and enter "54926" in the Specific local ports:.
Software User's Guide - English
Page 142
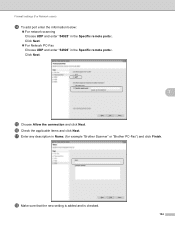
Click Next. For Network PC-Fax Choose UDP and enter "54926" in the Specific remote ports:. Firewall settings (For Network users) n To add port enter the information below: For network scanning Choose UDP and enter "54925" in the Specific remote ports:. p Check the applicable items and click Next. Click Next. 7 o Choose Allow the connection and click Next. r Make sure that the new setting is added and is checked. 134 q Enter any description in Name: (for example "Brother Scanner" or "Brother PC-Fax") and click Finish.
Click Next. For Network PC-Fax Choose UDP and enter "54926" in the Specific remote ports:. Firewall settings (For Network users) n To add port enter the information below: For network scanning Choose UDP and enter "54925" in the Specific remote ports:. p Check the applicable items and click Next. Click Next. 7 o Choose Allow the connection and click Next. r Make sure that the new setting is added and is checked. 134 q Enter any description in Name: (for example "Brother Scanner" or "Brother PC-Fax") and click Finish.

Software User's Guide - English
Page 212
Section IV Using the Scan key IV Scanning (For USB cable users) 205 Network Scanning 222
Section IV Using the Scan key IV Scanning (For USB cable users) 205 Network Scanning 222
Software User's Guide - English
Page 213
You can use (SCAN) or Scan, you have to install the Brother MFL-Pro Suite and connect the machine to a network, see Configuring Scan key settings uu page 82 for Home Mode or Configuring Scan key settings uu page 96 for Advanced Mode. Scanning from the included installer CD-ROM then the correct drivers and ControlCenter4 or ControlCenter2...
You can use (SCAN) or Scan, you have to install the Brother MFL-Pro Suite and connect the machine to a network, see Configuring Scan key settings uu page 82 for Home Mode or Configuring Scan key settings uu page 96 for Advanced Mode. Scanning from the included installer CD-ROM then the correct drivers and ControlCenter4 or ControlCenter2...
Software User's Guide - English
Page 230
...contact your PC is unable to network scan, you installed the machine following the instructions for a network user (uu Quick Setup Guide) then the machine should already be shown on the LCD. • (For Windows®) If your Brother dealer or Brother customer service. 13 222 This ... (See Before using the Brother software uu page 125.) Before using the BRAdmin Professional software. Note • For network scanning, a maximum of 25 clients can set or change the address settings from the control panel (see uu Network User's Guide: Printing the Network Configuration Report) or by ...
...contact your PC is unable to network scan, you installed the machine following the instructions for a network user (uu Quick Setup Guide) then the machine should already be shown on the LCD. • (For Windows®) If your Brother dealer or Brother customer service. 13 222 This ... (See Before using the Brother software uu page 125.) Before using the BRAdmin Professional software. Note • For network scanning, a maximum of 25 clients can set or change the address settings from the control panel (see uu Network User's Guide: Printing the Network Configuration Report) or by ...

Software User's Guide - English
Page 231
...PC during the installation of the following: (Windows® XP) Right-click the Scanner Device icon and choose Properties. The Network Scanner Properties dialog box appears. (Windows Vista® and Windows® 7) Click the Properties button. 13 223 a (..., Hardware and Sound, then Scanner and Cameras. (Windows® 7) Click the button, All Programs, Brother, MFC-xxxx LAN, Scanner Settings, then Scanners and Cameras. Network Scanning Configuring Network Scanning (Windows®) 13 If you are using a different machine than the one of MFL-Pro Suite software...
...PC during the installation of the following: (Windows® XP) Right-click the Scanner Device icon and choose Properties. The Network Scanner Properties dialog box appears. (Windows Vista® and Windows® 7) Click the Properties button. 13 223 a (..., Hardware and Sound, then Scanner and Cameras. (Windows® 7) Click the button, All Programs, Brother, MFC-xxxx LAN, Scanner Settings, then Scanners and Cameras. Network Scanning Configuring Network Scanning (Windows®) 13 If you are using a different machine than the one of MFL-Pro Suite software...
Software User's Guide - English
Page 232
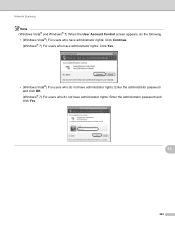
Network Scanning Note (Windows Vista® and Windows® 7) When the User Account Control screen appears, do the following. • (Windows Vista®) For users who have administrator rights: Click Continue. (Windows® 7) For users who have administrator rights: Click Yes. • (Windows Vista®) For users who do not have administrator rights: Enter the administrator password and click OK. (Windows® 7) For users who do not have administrator rights: Enter the administrator password and click Yes. 13 224
Network Scanning Note (Windows Vista® and Windows® 7) When the User Account Control screen appears, do the following. • (Windows Vista®) For users who have administrator rights: Click Continue. (Windows® 7) For users who have administrator rights: Click Yes. • (Windows Vista®) For users who do not have administrator rights: Enter the administrator password and click OK. (Windows® 7) For users who do not have administrator rights: Enter the administrator password and click Yes. 13 224
Software User's Guide - English
Page 233
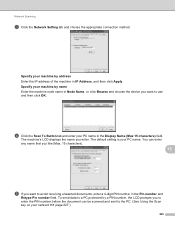
The machine's LCD displays the name you want to the PC. (See Using the Scan key on your PC name in Node Name, or click Browse and choose the device you enter. Network Scanning c Click the Network Setting tab and choose the appropriate connection method. Specify your machine by name Enter the machine node name.... The default setting is your machine by a PIN number, the LCD prompts you want to use and then click OK. d Click the Scan To Button tab and enter your network uu page 227.) 225 You can enter any name that you like (Max. 15 characters). 13 e If you to enter the PIN...
The machine's LCD displays the name you want to the PC. (See Using the Scan key on your PC name in Node Name, or click Browse and choose the device you enter. Network Scanning c Click the Network Setting tab and choose the appropriate connection method. Specify your machine by name Enter the machine node name.... The default setting is your machine by a PIN number, the LCD prompts you want to use and then click OK. d Click the Scan To Button tab and enter your network uu page 227.) 225 You can enter any name that you like (Max. 15 characters). 13 e If you to enter the PIN...
Software User's Guide - English
Page 234
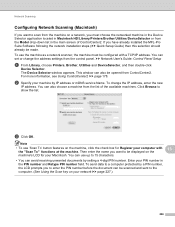
...application located in Macintosh HD/Library/Printers/Brother/Utilities/DeviceSelector or from the Model drop-down list in the PIN number and Retype PIN number field. To change the address settings from the control panel. Network Scanning Configuring Network Scanning (Macintosh) 13 If you want to... be opened from ControlCenter2. This window can be configured with 13 the "Scan To" functions at the machine. c Click OK. Click Browse to...
...application located in Macintosh HD/Library/Printers/Brother/Utilities/DeviceSelector or from the Model drop-down list in the PIN number and Retype PIN number field. To change the address settings from the control panel. Network Scanning Configuring Network Scanning (Macintosh) 13 If you want to... be opened from ControlCenter2. This window can be configured with 13 the "Scan To" functions at the machine. c Click OK. Click Browse to...
Software User's Guide - English
Page 235
...you can use (SCAN) or Scan, you have to install the Brother MFL-Pro Suite and connect the machine to launch the application of your computer. If you installed the MFL-Pro Suite from the (SCAN) button or Scan follows the configuration of the Device Scan Settings screen of ...Windows®, see Configuring Scan key settings uu page 82 for Home Mode or Configuring Scan key settings uu page 96 for Advanced Mode. Network Scanning Using the Scan key on your network 13 You can use (SCAN) on the control panel or Scan on the touchscreen to scan documents into your word processing...
...you can use (SCAN) or Scan, you have to install the Brother MFL-Pro Suite and connect the machine to launch the application of your computer. If you installed the MFL-Pro Suite from the (SCAN) button or Scan follows the configuration of the Device Scan Settings screen of ...Windows®, see Configuring Scan key settings uu page 82 for Home Mode or Configuring Scan key settings uu page 96 for Advanced Mode. Network Scanning Using the Scan key on your network 13 You can use (SCAN) on the control panel or Scan on the touchscreen to scan documents into your word processing...
Software User's Guide - English
Page 236
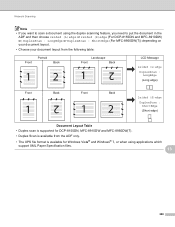
Network Scanning Note • If you want to scan a document using the duplex scanning feature, you need to put the document in the ADF and then choose 2sided (L)edge or 2sided (S)edge (For DCP-8155DN and MFC-8910DW) or, DuplexScan : LongEdge or DuplexScan : ShortEdge (For MFC-8950DW(T)) depending on...) Front Back Front Back 2sided (S)edge DuplexScan : ShortEdge (Short edge) Document Layout Table • Duplex scan is supported for DCP-8155DN, MFC-8910DW and MFC-8950DW(T). • Duplex Scan is available from the ADF only. • The XPS file format is available for Windows Vista®...
Network Scanning Note • If you want to scan a document using the duplex scanning feature, you need to put the document in the ADF and then choose 2sided (L)edge or 2sided (S)edge (For DCP-8155DN and MFC-8910DW) or, DuplexScan : LongEdge or DuplexScan : ShortEdge (For MFC-8950DW(T)) depending on...) Front Back Front Back 2sided (S)edge DuplexScan : ShortEdge (Short edge) Document Layout Table • Duplex scan is supported for DCP-8155DN, MFC-8910DW and MFC-8950DW(T). • Duplex Scan is available from the ADF only. • The XPS file format is available for Windows Vista®...
Software User's Guide - English
Page 237
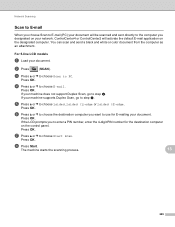
... 229 For 5-line LCD models 13 a Load your machine does not support Duplex Scan, go to step e. b Press (SCAN). Network Scanning Scan to E-mail 13 When you choose Scan to E-mail (PC) your document will activate the default E-mail application on your network. If your document. If the LCD prompts you want to use for the destination...
... 229 For 5-line LCD models 13 a Load your machine does not support Duplex Scan, go to step e. b Press (SCAN). Network Scanning Scan to E-mail 13 When you choose Scan to E-mail (PC) your document will activate the default E-mail application on your network. If your document. If the LCD prompts you want to use for the destination...


