Software User's Guide - English
Page 55
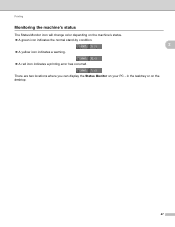
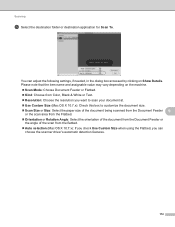
There are two locations where you can display the Status Monitor on the desktop. 47 in the tasktray or on your PC - Printing Monitoring the machine's status The Status Monitor icon will change color depending on the machine's status. A green icon indicates the normal stand-by condition. A yellow icon indicates a warning. 2 2 A red icon indicates a printing error has occurred.
There are two locations where you can display the Status Monitor on the desktop. 47 in the tasktray or on your PC - Printing Monitoring the machine's status The Status Monitor icon will change color depending on the machine's status. A green icon indicates the normal stand-by condition. A yellow icon indicates a warning. 2 2 A red icon indicates a printing error has occurred.
Software User's Guide - English
Page 59
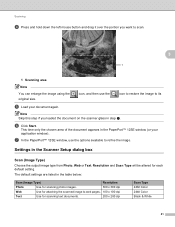
... options available to its e Load your application window). Resolution and Scan Type will be altered for scanning text documents. 200 x 200 dpi Scan Type 24bit Color 24bit Color Black & White 51 g In the PaperPort™ 12SE window, use the icon to restore the image to refine the image. The default settings are...
... options available to its e Load your application window). Resolution and Scan Type will be altered for scanning text documents. 200 x 200 dpi Scan Type 24bit Color 24bit Color Black & White 51 g In the PaperPort™ 12SE window, use the icon to restore the image to refine the image. The default settings are...
Software User's Guide - English
Page 60
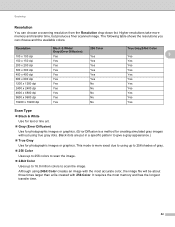
... Use for creating simulated gray images without using up to 256 shades of gray. 256 Color Uses up to 256 colors to scan the image. 24bit Color Uses up to 16.8 million colors to scan the image. The following table shows the resolutions you can choose a scanning resolution from... for photographic images or graphics. (Error Diffusion is more memory and transfer time, but produce a finer scanned image. It requires the most accurate color, the image file will be about three times larger than a file created with the most memory and has the longest transfer time. 52 This ...
... Use for creating simulated gray images without using up to 256 shades of gray. 256 Color Uses up to 256 colors to scan the image. 24bit Color Uses up to 16.8 million colors to scan the image. The following table shows the resolutions you can choose a scanning resolution from... for photographic images or graphics. (Error Diffusion is more memory and transfer time, but produce a finer scanned image. It requires the most accurate color, the image file will be about three times larger than a file created with the most memory and has the longest transfer time. 52 This ...
Software User's Guide - English
Page 61
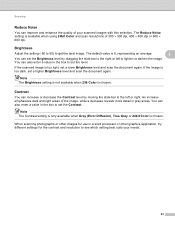
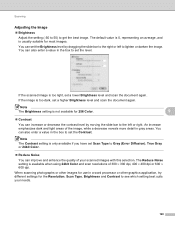
The default value is available when using 24bit Color and scan resolutions of the image, while a decrease reveals more detail in a word processor or other images for use in.... You can also enter a value in the box to lighten or darken the image. Note The Brightness setting is not available when 256 Color is too dark, set a higher Brightness level and scan the document again. Brightness 3 Adjust the setting (-50 to 50) to set... or left or right. Note The Contrast setting is only available when Gray (Error Diffusion), True Gray or 24bit Color is too light, set the Contrast.
The default value is available when using 24bit Color and scan resolutions of the image, while a decrease reveals more detail in a word processor or other images for use in.... You can also enter a value in the box to lighten or darken the image. Note The Brightness setting is not available when 256 Color is too dark, set a higher Brightness level and scan the document again. Brightness 3 Adjust the setting (-50 to 50) to set... or left or right. Note The Contrast setting is only available when Gray (Error Diffusion), True Gray or 24bit Color is too light, set the Contrast.
Software User's Guide - English
Page 72
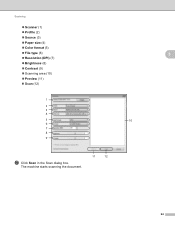
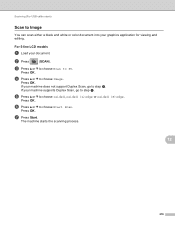
Scanning Scanner (1) Profile (2) Source (3) Paper size (4) Color format (5) File type (6) Resolution (DPI) (7) Brightness (8) Contrast (9) Scanning area (10) Preview (11) Scan (12) 1 2 3 4 5 6 7 8 9 3 10 g Click Scan in the Scan dialog box. The machine starts scanning the document. 11 12 64
Scanning Scanner (1) Profile (2) Source (3) Paper size (4) Color format (5) File type (6) Resolution (DPI) (7) Brightness (8) Contrast (9) Scanning area (10) Preview (11) Scan (12) 1 2 3 4 5 6 7 8 9 3 10 g Click Scan in the Scan dialog box. The machine starts scanning the document. 11 12 64

Software User's Guide - English
Page 174
... dpi Black & White/ Gray (Error Diffusion) Yes Yes Yes Yes Yes Yes Yes Yes Yes Yes Yes 256 Color Yes Yes Yes Yes Yes Yes No No No No No True Gray/24bit Color Yes Yes Yes Yes Yes Yes Yes Yes Yes Yes Yes 9 Scan Type 9 Black & White Use for.... Higher resolutions take more exact because it uses up to 256 shades of gray. 256 Color Uses up menu. Black dots are put in the Scanner window 9 Resolution 9 You can choose and the available colors. The following table shows the resolutions you can change the scanning resolution from the Resolution pop...
... dpi Black & White/ Gray (Error Diffusion) Yes Yes Yes Yes Yes Yes Yes Yes Yes Yes Yes 256 Color Yes Yes Yes Yes Yes Yes No No No No No True Gray/24bit Color Yes Yes Yes Yes Yes Yes Yes Yes Yes Yes Yes 9 Scan Type 9 Black & White Use for.... Higher resolutions take more exact because it uses up to 256 shades of gray. 256 Color Uses up menu. Black dots are put in the Scanner window 9 Resolution 9 You can choose and the available colors. The following table shows the resolutions you can change the scanning resolution from the Resolution pop...
Software User's Guide - English
Page 175
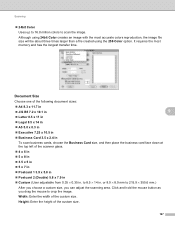
to 8.5 × 14 in . Width: Enter the width of the custom size. 167 Although using 24bit Color creates an image with the most memory and has the longest transfer time. Height: Enter the height of the custom size. Document Size 9 Choose one ... choose a custom size, you drag the mouse to scan the image. It requires the most accurate colors reproduction, the image file size will be about three times larger than a file created using the 256 Color option. Click and hold the mouse button as you can adjust the scanning area. Scanning 24bit...
to 8.5 × 14 in . Width: Enter the width of the custom size. 167 Although using 24bit Color creates an image with the most memory and has the longest transfer time. Height: Enter the height of the custom size. Document Size 9 Choose one ... choose a custom size, you drag the mouse to scan the image. It requires the most accurate colors reproduction, the image file size will be about three times larger than a file created using the 256 Color option. Click and hold the mouse button as you can adjust the scanning area. Scanning 24bit...
Software User's Guide - English
Page 176
...lighten or darken the image. Note The Contrast setting is not available for use in the box to Gray (Error Diffusion), True Gray or 24bit Color. Reduce Noise You can also enter a value in gray areas. An increase emphasizes dark and light areas of the image, while ...see which setting best suits your scanned images with this selection. You can also enter a value in a word processor or other images for 256 Color. 9 Contrast You can set the Contrast. When scanning photographs or other graphics application, try different settings for most images. You can ...
...lighten or darken the image. Note The Contrast setting is not available for use in the box to Gray (Error Diffusion), True Gray or 24bit Color. Reduce Noise You can also enter a value in gray areas. An increase emphasizes dark and light areas of the image, while ...see which setting best suits your scanned images with this selection. You can also enter a value in a word processor or other images for 256 Color. 9 Contrast You can set the Contrast. When scanning photographs or other graphics application, try different settings for most images. You can ...
Software User's Guide - English
Page 180
... that the item name and assignable value may vary depending on the machine. Scan Mode: Choose Document Feeder or Flatbed. Kind: Choose from Color, Black & White or Text. Resolution: Choose the resolution you want to scan your document at. Use Custom Size (Mac OS X 10.7.x): Check this...
... that the item name and assignable value may vary depending on the machine. Scan Mode: Choose Document Feeder or Flatbed. Kind: Choose from Color, Black & White or Text. Resolution: Choose the resolution you want to scan your document at. Use Custom Size (Mac OS X 10.7.x): Check this...
Software User's Guide - English
Page 215
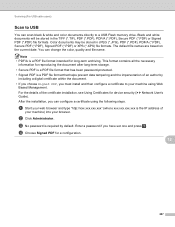
...TIFF (*.TIF), PDF (*.PDF), PDF/A (*.PDF), Secure PDF (*.PDF) or Signed PDF (*.PDF) file formats. After the installation, you can change the color, quality and file name. d Choose Signed PDF for device security (uu Network User's Guide). You can configure a certificate using Web Based Management. Note...207 b Click Administrator. For the details of an author by default. The default file names are based on the current date. a Start your browser. Color documents may be stored in JPEG (*.JPG), PDF (*.PDF), PDF/A (*.PDF), Secure PDF (*.PDF), Signed PDF (*.PDF) or XPS (*.XPS) file ...
...TIFF (*.TIF), PDF (*.PDF), PDF/A (*.PDF), Secure PDF (*.PDF) or Signed PDF (*.PDF) file formats. After the installation, you can change the color, quality and file name. d Choose Signed PDF for device security (uu Network User's Guide). You can configure a certificate using Web Based Management. Note...207 b Click Administrator. For the details of an author by default. The default file names are based on the current date. a Start your browser. Color documents may be stored in JPEG (*.JPG), PDF (*.PDF), PDF/A (*.PDF), Secure PDF (*.PDF), Signed PDF (*.PDF) or XPS (*.XPS) file ...
Software User's Guide - English
Page 216
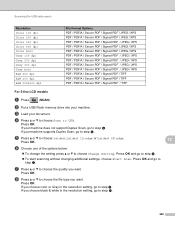
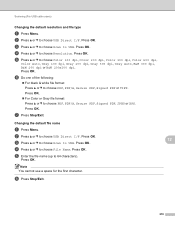
Scanning (For USB cable users) Resolution Color 100 dpi Color 200 dpi Color 300 dpi Color 600 dpi Color Auto Gray 100 dpi Gray 200 dpi Gray 300 dpi Gray Auto B&W 300 dpi B&W 200 dpi B&W 200x100 dpi File Format Options PDF / PDF/A / Secure PDF / ... OK and go to step k. Press OK. Press OK. If you choose black & white in the resolution setting, go to choose the quality you choose color or Gray in the resolution setting, go to step j. 208 b Put a USB Flash memory drive into your document. h Press a or b to step g. To start...
Scanning (For USB cable users) Resolution Color 100 dpi Color 200 dpi Color 300 dpi Color 600 dpi Color Auto Gray 100 dpi Gray 200 dpi Gray 300 dpi Gray Auto B&W 300 dpi B&W 200 dpi B&W 200x100 dpi File Format Options PDF / PDF/A / Secure PDF / ... OK and go to step k. Press OK. Press OK. If you choose black & white in the resolution setting, go to choose the quality you choose color or Gray in the resolution setting, go to step j. 208 b Put a USB Flash memory drive into your document. h Press a or b to step g. To start...
Software User's Guide - English
Page 217
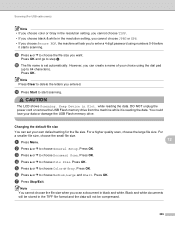
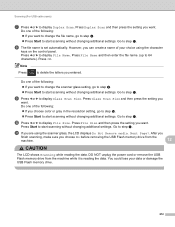
.... For a higher quality scan, choose the large file size. g Press Stop/Exit. However, you can set automatically. d Press a or b to choose Color or Gray. Changing the default file size 12 You can create a name of your data or damage the USB Flash memory drive. CAUTION The LCD...start scanning. Press OK. j The file name is reading the data. Press OK. Scanning (For USB cable users) Note • If you choose color or Gray in the resolution setting, you cannot choose TIFF. • If you choose black & white in the resolution setting, you cannot choose JPEG or...
.... For a higher quality scan, choose the large file size. g Press Stop/Exit. However, you can set automatically. d Press a or b to choose Color or Gray. Changing the default file size 12 You can create a name of your data or damage the USB Flash memory drive. CAUTION The LCD...start scanning. Press OK. j The file name is reading the data. Press OK. Scanning (For USB cable users) Note • If you choose color or Gray in the resolution setting, you cannot choose TIFF. • If you choose black & white in the resolution setting, you cannot choose JPEG or...
Software User's Guide - English
Page 218
e Press a or b to choose PDF, PDF/A, Secure PDF, Signed PDF, JPEG or XPS. Press OK. For Color or Gray file format: Press a or b to choose Color 100 dpi, Color 200 dpi, Color 300 dpi, Color 600 dpi, Color Auto, Gray 100 dpi, Gray 200 dpi, Gray 300 dpi, Gray Auto, B&W 300 dpi, B&W 200 dpi or B&W 200x100...
e Press a or b to choose PDF, PDF/A, Secure PDF, Signed PDF, JPEG or XPS. Press OK. For Color or Gray file format: Press a or b to choose Color 100 dpi, Color 200 dpi, Color 300 dpi, Color 600 dpi, Color Auto, Gray 100 dpi, Gray 200 dpi, Gray 300 dpi, Gray Auto, B&W 300 dpi, B&W 200 dpi or B&W 200x100...
Software User's Guide - English
Page 219
... the quality, go to step e. Press Start to start scanning without changing additional settings. Go to step k. 12 12 Note • If you choose color or gray in the quality setting, you cannot choose TIFF. • If you choose black and white in the quality setting, you cannot choose JPEG...
... the quality, go to step e. Press Start to start scanning without changing additional settings. Go to step k. 12 12 Note • If you choose color or gray in the quality setting, you cannot choose TIFF. • If you choose black and white in the quality setting, you cannot choose JPEG...
Software User's Guide - English
Page 220
... without changing additional settings. Press Duplex Scan and then press the setting you entered. Press OK. Do one of the following: If you choose color or gray in the resolution setting, go to step h. Press Start to start scanning without changing additional settings. Do one of your data or...
... without changing additional settings. Press Duplex Scan and then press the setting you entered. Press OK. Do one of the following: If you choose color or gray in the resolution setting, go to step h. Press Start to start scanning without changing additional settings. Do one of your data or...
Software User's Guide - English
Page 222
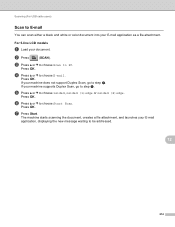
... a file attachment, and launches your machine supports Duplex Scan, go to step e. e Press a or b to E-mail 12 You can scan either a black and white or color document into your document. Press OK. For 5-line LCD models 12 a Load your E-mail application as a file attachment. b Press (SCAN). Press OK. Scanning (For USB...
... a file attachment, and launches your machine supports Duplex Scan, go to step e. e Press a or b to E-mail 12 You can scan either a black and white or color document into your document. Press OK. For 5-line LCD models 12 a Load your E-mail application as a file attachment. b Press (SCAN). Press OK. Scanning (For USB...
Software User's Guide - English
Page 223
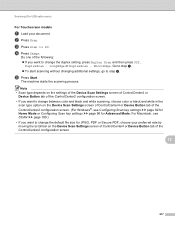
.... • Webmail services are not supported by Scan to step e. Do one of the following: If you want to change between color and black and white scanning, choose color or black and white in the scan type option on the Device Scan Settings screen of ControlCenter4 or Device Button tab of...
.... • Webmail services are not supported by Scan to step e. Do one of the following: If you want to change between color and black and white scanning, choose color or black and white in the scan type option on the Device Scan Settings screen of ControlCenter4 or Device Button tab of...
Software User's Guide - English
Page 224
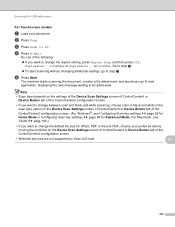
... viewing and editing. If your machine supports Duplex Scan, go to step f. e Press a or b to Image 12 You can scan either a black and white or color document into your document. Scanning (For USB cable users) Scan to choose 1sided, 2sided (L)edge or 2sided (S)edge. c Press a or b to choose Scan to step...
... viewing and editing. If your machine supports Duplex Scan, go to step f. e Press a or b to Image 12 You can scan either a black and white or color document into your document. Scanning (For USB cable users) Scan to choose 1sided, 2sided (L)edge or 2sided (S)edge. c Press a or b to choose Scan to step...
Software User's Guide - English
Page 225
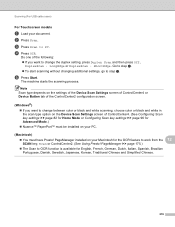
... want to change the default file size for Advanced Mode. Do one of the following: If you want to change between color and black and white scanning, choose color or black and white in the scan type option on the Device Scan Settings screen of ControlCenter4 or Device Button tab of...
... want to change the default file size for Advanced Mode. Do one of the following: If you want to change between color and black and white scanning, choose color or black and white in the scan type option on the Device Scan Settings screen of ControlCenter4 or Device Button tab of...
Software User's Guide - English
Page 227
... screen of ControlCenter4 or Device Button tab of the ControlCenter2 configuration screen. (Windows®) • If you want to change between color or black and white scanning, choose color or black and white in the scan type option on the Device Scan Settings screen of the following: If you want...
... screen of ControlCenter4 or Device Button tab of the ControlCenter2 configuration screen. (Windows®) • If you want to change between color or black and white scanning, choose color or black and white in the scan type option on the Device Scan Settings screen of the following: If you want...


