
Users Manual - English
Page 2
... You Need to Call Customer Service Please complete the following information for future reference: Model Number: FAX 4750 FAX 5750 MFC 8300 MFC 8600 MFC 8700 (Circle your purchase, in connection or combination with Brother fax machines, MFCs and bundled software, accurately exchange date data with your sales receipt as a permanent record of your model number) Serial...
... You Need to Call Customer Service Please complete the following information for future reference: Model Number: FAX 4750 FAX 5750 MFC 8300 MFC 8600 MFC 8700 (Circle your purchase, in connection or combination with Brother fax machines, MFCs and bundled software, accurately exchange date data with your sales receipt as a permanent record of your model number) Serial...

Users Manual - English
Page 3
...easy-to-use the system to send faxes to any fax machine, not just the one from which you can get instant answers to common technical questions and product information for all there. This system is all Brother products. Frequently Asked Questions (FAQs) You can find more ...(FAQs), it is available 24 hours a day, 7 days a week. Visit us at: http://www.brother.com Brother Bulletin Board Brother's Bulletin Board numbers are calling. You can 't resolve a difficulty with your Brother machine using the system and an index of fax-back subjects. If you can use fax-back system, so...
...easy-to-use the system to send faxes to any fax machine, not just the one from which you can get instant answers to common technical questions and product information for all there. This system is all Brother products. Frequently Asked Questions (FAQs) You can find more ...(FAQs), it is available 24 hours a day, 7 days a week. Visit us at: http://www.brother.com Brother Bulletin Board Brother's Bulletin Board numbers are calling. You can 't resolve a difficulty with your Brother machine using the system and an index of fax-back subjects. If you can use fax-back system, so...

Users Manual - English
Page 10
... or inability to use of the MFC/Facsimile machine to your Proof of Purchase in the form of charge if defective in material or workmanship. For Technical Support or for the name and location of such damages. Internet support: support@brother.ca or browse Brother's Web Site: www.brother.com Brother International Corporation (Canada) Ltd. This warranty...
... or inability to use of the MFC/Facsimile machine to your Proof of Purchase in the form of charge if defective in material or workmanship. For Technical Support or for the name and location of such damages. Internet support: support@brother.ca or browse Brother's Web Site: www.brother.com Brother International Corporation (Canada) Ltd. This warranty...

Users Manual - English
Page 11
... Contents 1 INTRODUCTION 1-1 Using this Manual 1-1 Finding Information 1-1 Test Sheet Procedures (For USA Only 1-1 FAX 4750 and FAX 5750 Control Panel Overview 1-2 MFC 8300, MFC 8600 and MFC 8700 Control Panel Overview .. 1-4 About Your Machine 1-6 Fax Tones and Handshake 1-6 ECM (Error Correction Mode 1-6 2 ASSEMBLY AND CONNECTIONS 2-1 Packing List 2-1 Choosing a Location 2-2 Assembly 2-3 Installing the Drum Unit Assembly...
... Contents 1 INTRODUCTION 1-1 Using this Manual 1-1 Finding Information 1-1 Test Sheet Procedures (For USA Only 1-1 FAX 4750 and FAX 5750 Control Panel Overview 1-2 MFC 8300, MFC 8600 and MFC 8700 Control Panel Overview .. 1-4 About Your Machine 1-6 Fax Tones and Handshake 1-6 ECM (Error Correction Mode 1-6 2 ASSEMBLY AND CONNECTIONS 2-1 Packing List 2-1 Choosing a Location 2-2 Assembly 2-3 Installing the Drum Unit Assembly...
Users Manual - English
Page 14
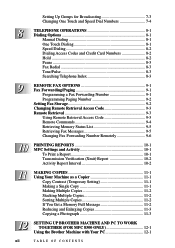
...Access Code 9-3 Remote Commands 9-4 Retrieving Memory Status List 9-5 Retrieving Fax Messages 9-5 Changing Fax Forwarding Number Remotely 9-6 10 PRINTING REPORTS 10-1 MFC Settings and Activity 10-1 To Print a Report 10-1 Transmission Verification (Xmit) Report 10-2 Activity Report Interval 10-2 11 MAKING COPIES 11-1 Using Your...-2 If You Get a Memory Full Message 11-2 Reducing and Enlarging Copies 11-3 Copying a Photograph 11-3 12 SETTING UP BROTHER MACHINE AND PC TO WORK TOGETHER (FOR MFC 8300 ONLY 12-1 Using the Brother Machine with Your PC 12-1 xii TABLE OF CONTENTS
...Access Code 9-3 Remote Commands 9-4 Retrieving Memory Status List 9-5 Retrieving Fax Messages 9-5 Changing Fax Forwarding Number Remotely 9-6 10 PRINTING REPORTS 10-1 MFC Settings and Activity 10-1 To Print a Report 10-1 Transmission Verification (Xmit) Report 10-2 Activity Report Interval 10-2 11 MAKING COPIES 11-1 Using Your...-2 If You Get a Memory Full Message 11-2 Reducing and Enlarging Copies 11-3 Copying a Photograph 11-3 12 SETTING UP BROTHER MACHINE AND PC TO WORK TOGETHER (FOR MFC 8300 ONLY 12-1 Using the Brother Machine with Your PC 12-1 xii TABLE OF CONTENTS
Users Manual - English
Page 15
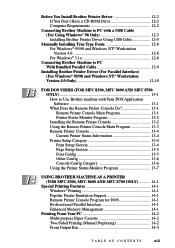
...-5 Font Config 13-5 Other Config 13-6 Console Config Category 13-6 Using the Printer Status Monitor Program 13-7 14 USING BROTHER MACHINE AS A PRINTER (FOR MFC 8300, MFC 8600 AND MFC 8700 ONLY 14-1 Special Printing Features 14-1 Windows® Printing 14-1 Popular Printer Emulation Support 14-1 Remote Printer Console Program for DOS 14-1 Bi-directional Parallel Interface 14-1 Enhanced Memory...
...-5 Font Config 13-5 Other Config 13-6 Console Config Category 13-6 Using the Printer Status Monitor Program 13-7 14 USING BROTHER MACHINE AS A PRINTER (FOR MFC 8300, MFC 8600 AND MFC 8700 ONLY 14-1 Special Printing Features 14-1 Windows® Printing 14-1 Popular Printer Emulation Support 14-1 Remote Printer Console Program for DOS 14-1 Bi-directional Parallel Interface 14-1 Enhanced Memory...
Users Manual - English
Page 17
... Drum Life 17-27 USING YOUR BROTHER MACHINE WITH YOUR APPLE® NEW POWER MACINTOSH® G3 OR IMAC™ (FOR MFC 8300 ONLY 18-1 For USB equipped Apple New Power Macintosh G3 or iMac with Mac OS 8.5/8.6 18-1 Install Brother Printer Driver for MFC 8300 18-1 SPECIFICATIONS S-1 Product Description S-1 Fax Specifications S-1 Printer Specifications S-2 Electrical and Environment S-3 Parallel Interface...
... Drum Life 17-27 USING YOUR BROTHER MACHINE WITH YOUR APPLE® NEW POWER MACINTOSH® G3 OR IMAC™ (FOR MFC 8300 ONLY 18-1 For USB equipped Apple New Power Macintosh G3 or iMac with Mac OS 8.5/8.6 18-1 Install Brother Printer Driver for MFC 8300 18-1 SPECIFICATIONS S-1 Product Description S-1 Fax Specifications S-1 Printer Specifications S-2 Electrical and Environment S-3 Parallel Interface...
Users Manual - English
Page 19
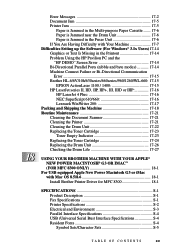
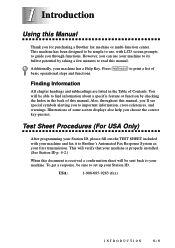
...Illustrations of Contents. 1 Introduction Using this document is properly installed. (See Station ID p. 4-2.) When this Manual Thank you for purchasing a Brother fax machine or multi-function center. Test Sheet Procedures (For USA Only) After programming your Station ID, please fill out the TEST SHEET included with ...LCD screen prompts to Brother's Automated Fax Response System as your machine and fax it to guide you choose the correct key-presses. To get a response, be simple to use ...
...Illustrations of Contents. 1 Introduction Using this document is properly installed. (See Station ID p. 4-2.) When this Manual Thank you for purchasing a Brother fax machine or multi-function center. Test Sheet Procedures (For USA Only) After programming your Station ID, please fill out the TEST SHEET included with ...LCD screen prompts to Brother's Automated Fax Response System as your machine and fax it to guide you choose the correct key-presses. To get a response, be simple to use ...
Users Manual - English
Page 20
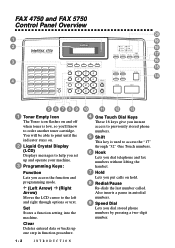
... toner is low, so you dial stored phone numbers by pressing a two-digit number. 1-2 INTRODUCTION Clear Deletes entered data or backs up and operate your machine. 3 Programming Keys: Function Lets you access the function and programming mode. (Left Arrow) (Right Arrow) Moves the LCD cursor to access the "17" through options... you set up one step in autodial numbers. 9 Speed Dial Lets you 'll know to order another toner cartridge. Set Stores a function setting into the machine.
... toner is low, so you dial stored phone numbers by pressing a two-digit number. 1-2 INTRODUCTION Clear Deletes entered data or backs up and operate your machine. 3 Programming Keys: Function Lets you access the function and programming mode. (Left Arrow) (Right Arrow) Moves the LCD cursor to access the "17" through options... you set up one step in autodial numbers. 9 Speed Dial Lets you 'll know to order another toner cartridge. Set Stores a function setting into the machine.
Users Manual - English
Page 21
...mode you look up numbers stored in order. INTRODUCTION 1-3 Reduce Reduces copies depending upon the ratio you send a fax. 17 Mode Select how the machine will handle incoming calls. Also, you can be used to enter the reduction ratio from function mode. 13 Start Starts an operation (such as a... keyboard for entering information into the machine. 11 Volume High/Low Keys Lets you adjust speaker, ring and handset volume. 12 Stop Stops a fax, cancels an operation or exits from 50...
...mode you look up numbers stored in order. INTRODUCTION 1-3 Reduce Reduces copies depending upon the ratio you send a fax. 17 Mode Select how the machine will handle incoming calls. Also, you can be used to enter the reduction ratio from function mode. 13 Start Starts an operation (such as a... keyboard for entering information into the machine. 11 Volume High/Low Keys Lets you adjust speaker, ring and handset volume. 12 Stop Stops a fax, cancels an operation or exits from 50...
Users Manual - English
Page 22
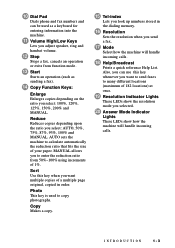
...autodial numbers. inserts a pause in function procedure. MFC 8300, MFC 8600 and MFC 8700 Control Panel Overview 1 2 16 3 15 14 4 5 6 7 8 9 10 11 12 13 1 Toner Empty Icon 5 Shift The Toner icon flashes on . Set 9 Speed Dial Stores a function setting into the machine. 11 Volume High/Low Keys previously stored phone ...numbers. Clear 10 Dial Pad Deletes entered data or backs up and default settings. Lets you dial stored phone numbers by machine. be able the printer mode when shift is pressed to print until the indicator stays on and off when This key is low, so you'...
...autodial numbers. inserts a pause in function procedure. MFC 8300, MFC 8600 and MFC 8700 Control Panel Overview 1 2 16 3 15 14 4 5 6 7 8 9 10 11 12 13 1 Toner Empty Icon 5 Shift The Toner icon flashes on . Set 9 Speed Dial Stores a function setting into the machine. 11 Volume High/Low Keys previously stored phone ...numbers. Clear 10 Dial Pad Deletes entered data or backs up and default settings. Lets you dial stored phone numbers by machine. be able the printer mode when shift is pressed to print until the indicator stays on and off when This key is low, so you'...

Users Manual - English
Page 23
.... Resolution Sets the resolution when you want to send faxes to print a test page. Mode Select how the machine will be printed later. Copy Makes a copy. 15 Printer Function Keys: On/Off Line This key is pressed together with Shift, it clears operation and... machine errors. Also, it clears the data from the printer memory, cancels an error status, and then resets and restores the machine to copy photographs. INTRODUCTION 1-5 Reduce Reduces copies depending upon the ratio you select...
.... Resolution Sets the resolution when you want to send faxes to print a test page. Mode Select how the machine will be printed later. Copy Makes a copy. 15 Printer Function Keys: On/Off Line This key is pressed together with Shift, it clears operation and... machine errors. Also, it clears the data from the printer memory, cancels an error status, and then resets and restores the machine to copy photographs. INTRODUCTION 1-5 Reduce Reduces copies depending upon the ratio you select...

Users Manual - English
Page 24
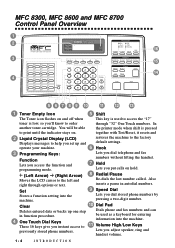
... receiving tones. Sufficient memory must begin until the call is answered, and the CNG tones only last for the receiving machine to display RECEIVING. During that time, the sending machine must be available in the Assembly and Connections chapter for connecting a TAD to the FAX mode, it will determine the... a fax, you are sending CNG tones over the phone line, and the screen displays RECEIVING. Pay special attention to the directions in your machine for these soft beeps each time you answer a phone on your fax line, so you can understand how each is sending and receiving the ...
... receiving tones. Sufficient memory must begin until the call is answered, and the CNG tones only last for the receiving machine to display RECEIVING. During that time, the sending machine must be available in the Assembly and Connections chapter for connecting a TAD to the FAX mode, it will determine the... a fax, you are sending CNG tones over the phone line, and the screen displays RECEIVING. Pay special attention to the directions in your machine for these soft beeps each time you answer a phone on your fax line, so you can understand how each is sending and receiving the ...
Users Manual - English
Page 25
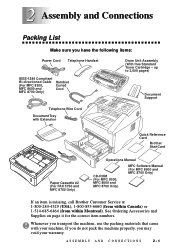
Whenever you transport the machine, use the packing materials that came with Extension Quick Reference Card Brother StartCard Paper Cassette #2 (For FAX 5750 and MFC 8700 Only) Operations Manual CD-ROM (For MFC 8300, MFC 8600 and MFC 8700 Only) MFC Software Manual (For MFC 8600 and MFC 8700 Only) If an item is missing, call Brother Customer Service at 1-800-284...
Whenever you transport the machine, use the packing materials that came with Extension Quick Reference Card Brother StartCard Paper Cassette #2 (For FAX 5750 and MFC 8700 Only) Operations Manual CD-ROM (For MFC 8300, MFC 8600 and MFC 8700 Only) MFC Software Manual (For MFC 8600 and MFC 8700 Only) If an item is missing, call Brother Customer Service at 1-800-284...
Users Manual - English
Page 26
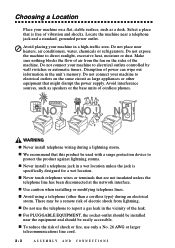
... that might disrupt the power supply. NO ! s Avoid using a telephone (other equipment that is specifically designed for a wet location. Locate the machine near heaters, air conditioners, water, chemicals or refrigerators. There may be a remote risk of power can wipe out information in the unit's memory.... Do not connect your machine in a wet location unless the jack is free of vibration and shocks. s We recommend that are not insulated unless the telephone line ...
... that might disrupt the power supply. NO ! s Avoid using a telephone (other equipment that is specifically designed for a wet location. Locate the machine near heaters, air conditioners, water, chemicals or refrigerators. There may be a remote risk of power can wipe out information in the unit's memory.... Do not connect your machine in a wet location unless the jack is free of vibration and shocks. s We recommend that are not insulated unless the telephone line ...
Users Manual - English
Page 27
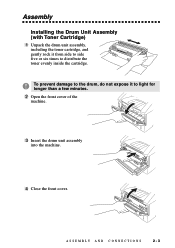
ASSEMBLY AND CONNECTIONS 2-3 To prevent damage to the drum, do not expose it from side to side five or six times to light for longer than a few minutes. 2 Open the front cover of the machine. 3 Insert the drum unit assembly into the machine. 4 Close the front cover. Assembly Installing the Drum Unit Assembly (with Toner Cartridge) 1 Unpack the drum unit assembly, including the toner cartridge, and gently rock it to distribute the toner evenly inside the cartridge.
ASSEMBLY AND CONNECTIONS 2-3 To prevent damage to the drum, do not expose it from side to side five or six times to light for longer than a few minutes. 2 Open the front cover of the machine. 3 Insert the drum unit assembly into the machine. 4 Close the front cover. Assembly Installing the Drum Unit Assembly (with Toner Cartridge) 1 Unpack the drum unit assembly, including the toner cartridge, and gently rock it to distribute the toner evenly inside the cartridge.

Users Manual - English
Page 28
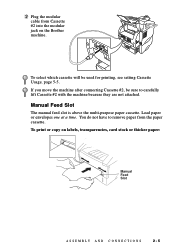
Document Tray with extension, and unfold the extension, which holds printed pages in place. Front Output Bin Extension Connect Paper Cassette #2 (For FAX 5750 and MFC 8700 Only) 1 Carefully pick up the machine and place it on top of Paper Cassette #2. 2-4 ASSEMBLY AND CONNECTIONS Attach the Trays 1 Attach the document support and document tray with Extension Document Support 2 Unfold the Front Output Bin Extension, which holds documents in place.
Document Tray with extension, and unfold the extension, which holds printed pages in place. Front Output Bin Extension Connect Paper Cassette #2 (For FAX 5750 and MFC 8700 Only) 1 Carefully pick up the machine and place it on top of Paper Cassette #2. 2-4 ASSEMBLY AND CONNECTIONS Attach the Trays 1 Attach the document support and document tray with Extension Document Support 2 Unfold the Front Output Bin Extension, which holds documents in place.
Users Manual - English
Page 29
... labels, transparencies, card stock or thicker paper: Manual Feed Slot ASSEMBLY AND CONNECTIONS 2-5 You do not have to carefully lift Cassette #2 with the machine because they are not attached. If you move the machine after connecting Cassette #2, be used for printing, see setting Cassette Usage, page 5-5. To print or copy on the...
... labels, transparencies, card stock or thicker paper: Manual Feed Slot ASSEMBLY AND CONNECTIONS 2-5 You do not have to carefully lift Cassette #2 with the machine because they are not attached. If you move the machine after connecting Cassette #2, be used for printing, see setting Cassette Usage, page 5-5. To print or copy on the...
Users Manual - English
Page 32
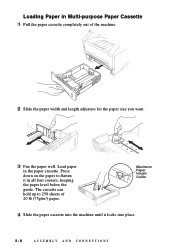
Press down on the paper to 250 sheets of the machine. 2 Slide the paper width and length adjusters for the paper size you want. 3 Fan the paper well. Maximum Paper Height Guide 4 Slide the paper cassette into place. 2-8 ASSEMBLY AND CONNECTIONS The cassette can hold up to flatten it locks into the machine until it in all four corners, keeping the paper level below the guide. Load paper in the paper cassette. Loading Paper in Multi-purpose Paper Cassette 1 Pull the paper cassette completely out of 20 lb (75g/m2) paper.
Press down on the paper to 250 sheets of the machine. 2 Slide the paper width and length adjusters for the paper size you want. 3 Fan the paper well. Maximum Paper Height Guide 4 Slide the paper cassette into place. 2-8 ASSEMBLY AND CONNECTIONS The cassette can hold up to flatten it locks into the machine until it in all four corners, keeping the paper level below the guide. Load paper in the paper cassette. Loading Paper in Multi-purpose Paper Cassette 1 Pull the paper cassette completely out of 20 lb (75g/m2) paper.
Users Manual - English
Page 33
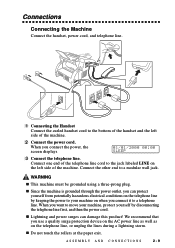
...at the paper exit. Connect the other end to the bottom of the handset and the left side of the telephone line cord to your machine, protect yourself by keeping the power to the jack labeled LINE on the telephone line, or unplug the lines during a lightning storm. s... the telephone line by disconnecting the telephone line first, and then the power cord. Connect one end of the machine. When you connect it to a telephone line. Connections Connecting the Machine Connect the handset, power cord, and telephone line. 1 Connecting the Handset Connect the curled handset cord to a ...
...at the paper exit. Connect the other end to the bottom of the handset and the left side of the telephone line cord to your machine, protect yourself by keeping the power to the jack labeled LINE on the telephone line, or unplug the lines during a lightning storm. s... the telephone line by disconnecting the telephone line first, and then the power cord. Connect one end of the machine. When you connect it to a telephone line. Connections Connecting the Machine Connect the handset, power cord, and telephone line. 1 Connecting the Handset Connect the curled handset cord to a ...


