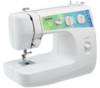
Operation Manual
Page 2
DANGER - Use only accessories recommended by or near children. 2. Keep the ventilation openings of the sewing machine and foot controller free from outlet. 9. Do not use this machine to the symbol "O" position which represents off , symbol "O" position when making any other user service adjustments mentioned ...
DANGER - Use only accessories recommended by or near children. 2. Keep the ventilation openings of the sewing machine and foot controller free from outlet. 9. Do not use this machine to the symbol "O" position which represents off , symbol "O" position when making any other user service adjustments mentioned ...
Operation Manual
Page 3
...occurs or adjustment is not suitable for use by persons (including children) with the appliance. carrying the mark, rating as marked on the foot controller. 4. Children should be supervised to inspect and adjust the machine yourself. Benzene, thinner, and scouring powders can damage the case and machine, ... be used. 3. Do not drop or hit the machine. 4. For additional product information and updates, visit our web site at www.brother.com The contents of this manual and specifications of the appliance by ASTA to assure correct installation. Never use plugs with the fuse cover ...
...occurs or adjustment is not suitable for use by persons (including children) with the appliance. carrying the mark, rating as marked on the foot controller. 4. Children should be supervised to inspect and adjust the machine yourself. Benzene, thinner, and scouring powders can damage the case and machine, ... be used. 3. Do not drop or hit the machine. 4. For additional product information and updates, visit our web site at www.brother.com The contents of this manual and specifications of the appliance by ASTA to assure correct installation. Never use plugs with the fuse cover ...
Operation Manual
Page 4
... FUNCTIONS 5 The main parts ...5 Needle and presser foot section ...6 Flat bed attachment ...6 ACCESSORIES ...7 OPTIONAL ACCESSORIES 7 USING YOUR SEWING MACHINE 8 Power supply precautions ...8 Power supply ...8 Foot controller ...9 Steadying the machine ...9 THREADING THE MACHINE 10 Winding the bobbin ...10 Lower threading ...11 Upper threading ...13 Drawing up the lower thread ...14 REPLACING THE...
... FUNCTIONS 5 The main parts ...5 Needle and presser foot section ...6 Flat bed attachment ...6 ACCESSORIES ...7 OPTIONAL ACCESSORIES 7 USING YOUR SEWING MACHINE 8 Power supply precautions ...8 Power supply ...8 Foot controller ...9 Steadying the machine ...9 THREADING THE MACHINE 10 Winding the bobbin ...10 Lower threading ...11 Upper threading ...13 Drawing up the lower thread ...14 REPLACING THE...
Operation Manual
Page 6
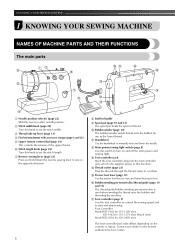
...use as the lower thread. j Bobbin winder (page 10) The bobbin winder winds thread onto the bobbin for 220-240V area The foot controller part code differs depending on and off the main power and sewing light. KNOWING YOUR SEWING MACHINE 1 KNOWING YOUR SEWING MACHINE NAMES OF ...select needle position. c Thread take-up lever (page 13) d Flat bed attachment with accessory storage (page 6 and 26) e Upper tension control dial (page 24) This controls the tension of thread. p Bobbin winding pre-tension disc/thread guide (page 10 and 13) The thread guide/bobbin winding pre-tension disc...
...use as the lower thread. j Bobbin winder (page 10) The bobbin winder winds thread onto the bobbin for 220-240V area The foot controller part code differs depending on and off the main power and sewing light. KNOWING YOUR SEWING MACHINE 1 KNOWING YOUR SEWING MACHINE NAMES OF ...select needle position. c Thread take-up lever (page 13) d Flat bed attachment with accessory storage (page 6 and 26) e Upper tension control dial (page 24) This controls the tension of thread. p Bobbin winding pre-tension disc/thread guide (page 10 and 13) The thread guide/bobbin winding pre-tension disc...
Operation Manual
Page 8
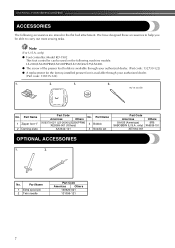
Part Name 1 Zipper foot "I" 2 Darning plate Part Code Americas Others No. No. only) ● Foot controller: Model KD-1902 This foot controller can be able to help you be used on the following accessories are stored in the flat bed attachment. Part ...For U.S.A. only) XA5539-151 XE7064-001 OPTIONAL ACCESSORIES 1. 2. KNOWING YOUR SEWING MACHINE ACCESSORIES The following machine models: LS-2000/LS2250PRW/LS2300PRW/LS2350/LX2375/LS2400. ● The screw of the presser foot holder is available through your authorized dealer. (Part code: 132730-122) ● A replacement for the...
Part Name 1 Zipper foot "I" 2 Darning plate Part Code Americas Others No. No. only) ● Foot controller: Model KD-1902 This foot controller can be able to help you be used on the following accessories are stored in the flat bed attachment. Part ...For U.S.A. only) XA5539-151 XE7064-001 OPTIONAL ACCESSORIES 1. 2. KNOWING YOUR SEWING MACHINE ACCESSORIES The following machine models: LS-2000/LS2250PRW/LS2300PRW/LS2350/LX2375/LS2400. ● The screw of the presser foot holder is available through your authorized dealer. (Part code: 132730-122) ● A replacement for the...

Operation Manual
Page 9
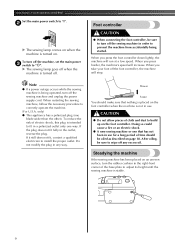
... supply jack on the machine. WARNING ● Use only regular household electricity for a long period of time. Power supply Insert the foot controller plug, located a between the foot controller and the power supply plug on the cord. Otherwise a fire may damage the cord and cause fire or electric shock. Using other appliances...
... supply jack on the machine. WARNING ● Use only regular household electricity for a long period of time. Power supply Insert the foot controller plug, located a between the foot controller and the power supply plug on the cord. Otherwise a fire may damage the cord and cause fire or electric shock. Using other appliances...
Operation Manual
Page 10
... oiled as described on an uneven surface, turn the rubber cushion in the right-front corner of the base plate to wipe off the foot controller, the machine will run at a low speed. If the plug does not fit fully in any excess oil. Doing so could cause a fire or an... intended to fit in order to "{". CAUTION ● Do not allow pieces of electric shock, this plug is being started. When you press the foot controller down lightly, the machine will stop. When you take your foot off any way. If it still does not fit, contact a qualified electrician to build...
... oiled as described on an uneven surface, turn the rubber cushion in the right-front corner of the base plate to wipe off the foot controller, the machine will run at a low speed. If the plug does not fit fully in any excess oil. Doing so could cause a fire or an... intended to fit in order to "{". CAUTION ● Do not allow pieces of electric shock, this plug is being started. When you press the foot controller down lightly, the machine will stop. When you take your foot off any way. If it still does not fit, contact a qualified electrician to build...
Operation Manual
Page 12
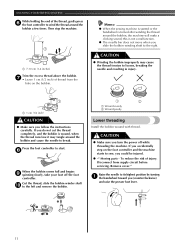
...may tangle around the bobbin and cause the needle to its highest position by turning a the handwheel toward you turn the power off the foot controller. h When the bobbin seems full and begins i spinning slowly, take your foot off while threading the machine. CAUTION ● Make sure you... Wound poorly Lower threading Install the bobbin wound with thread. If you accidentally step on the bobbin. Disconnect from the hole on the foot controller and the machine starts to wind the thread around the bobbin, the machine will make a clicking sound; Then stop the machine. Memo &#...
...may tangle around the bobbin and cause the needle to its highest position by turning a the handwheel toward you turn the power off the foot controller. h When the bobbin seems full and begins i spinning slowly, take your foot off while threading the machine. CAUTION ● Make sure you... Wound poorly Lower threading Install the bobbin wound with thread. If you accidentally step on the bobbin. Disconnect from the hole on the foot controller and the machine starts to wind the thread around the bobbin, the machine will make a clicking sound; Then stop the machine. Memo &#...
Operation Manual
Page 14
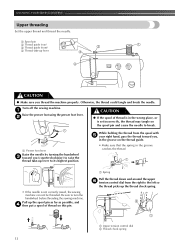
... up the thread check spring. While holding the thread from the right to its highest position. a Upper tension control dial b Thread check spring 13 a Spring Pull the thread down and around the upper f tension control dial from the spool with e your right hand, pass the thread toward you (counterclockwise) to raise the...
... up the thread check spring. While holding the thread from the right to its highest position. a Upper tension control dial b Thread check spring 13 a Spring Pull the thread down and around the upper f tension control dial from the spool with e your right hand, pass the thread toward you (counterclockwise) to raise the...

Operation Manual
Page 17
... been determined to be straight according to the instructions in "Checking the needle" . 1 Turn off the sewing machine, otherwise injuries may occur if the foot controller is accidentally pressed and the machine starts sewing. Use a coin and a needle that the distance between the needle and the flat surface is not even...
... been determined to be straight according to the instructions in "Checking the needle" . 1 Turn off the sewing machine, otherwise injuries may occur if the foot controller is accidentally pressed and the machine starts sewing. Use a coin and a needle that the distance between the needle and the flat surface is not even...
Operation Manual
Page 20
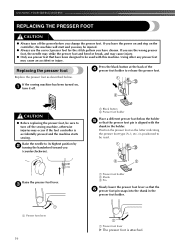
Using other any presser feet may occur if the foot controller is positioned to be sure to its highest position by b turning the handwheel toward you change the presser foot. CAUTION ● Before replacing the presser ...; Only use presser feet that the f presser foot pin snaps into the shank in the holder. If the sewing machine has been turned on the controller, the machine will start and you may be used with the shank in the presser foot holder. Position the presser foot so the letter indicating...
Using other any presser feet may occur if the foot controller is positioned to be sure to its highest position by b turning the handwheel toward you change the presser foot. CAUTION ● Before replacing the presser ...; Only use presser feet that the f presser foot pin snaps into the shank in the holder. If the sewing machine has been turned on the controller, the machine will start and you may be used with the shank in the presser foot holder. Position the presser foot so the letter indicating...
Operation Manual
Page 24
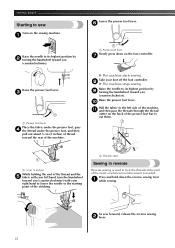
...sewing lever a while sewing. j Pull the fabric to the left hand, turn the handwheel toward you (counterclockwise) with your foot off the foot controller. h X The machine stops sewing. Raise the needle to the starting point of the stitching. a 5 cm (2 inches) While holding the end...presser foot lever. g X The machine starts sewing. a Thread cutter Sewing in reverse Reverse sewing is needed. f Turn on the foot controller. Raise the presser foot lever. SEWING BASICS Starting to lock the threads at the end of the seam or wherever reinforcement is used to ...
...sewing lever a while sewing. j Pull the fabric to the left hand, turn the handwheel toward you (counterclockwise) with your foot off the foot controller. h X The machine stops sewing. Raise the needle to the starting point of the stitching. a 5 cm (2 inches) While holding the end...presser foot lever. g X The machine starts sewing. a Thread cutter Sewing in reverse Reverse sewing is needed. f Turn on the foot controller. Raise the presser foot lever. SEWING BASICS Starting to lock the threads at the end of the seam or wherever reinforcement is used to ...

Operation Manual
Page 25
... tension is too loose Loops appear on a scrap of fabric before the next time that the machine is needed. 24 You may be too loose. control dial to a lower number. 2 3 5 4 a Wrong side b Surface c Upper thread d Lower thread e Loops appear on surface of fabric Solution Reduce the tension... by turning the upper tension- Note ● If the upper thread was incorrectly inserted, the upper thread may be too tight. control dial to a higher number. ■ Bobbin tension is too loose Loops may appear on the surface of the fabric when sewing thin fabric ...
... tension is too loose Loops appear on a scrap of fabric before the next time that the machine is needed. 24 You may be too loose. control dial to a lower number. 2 3 5 4 a Wrong side b Surface c Upper thread d Lower thread e Loops appear on surface of fabric Solution Reduce the tension... by turning the upper tension- Note ● If the upper thread was incorrectly inserted, the upper thread may be too tight. control dial to a higher number. ■ Bobbin tension is too loose Loops may appear on the surface of the fabric when sewing thin fabric ...
Operation Manual
Page 37
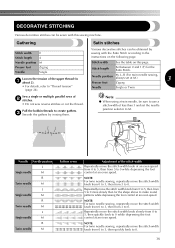
...move the stitch width knob from 0 to 3, then from 5 to 0 more slowly than 3 and set the needle position selector to 0 while depressing the foot control at an even speed. Stitch length Set between 0 and 1 (F) for the shape above to "Thread tension" (page 24). Note ● When using a twin...or multiple parallel rows of the stitch width Repeatedly move the stitch width knob from 0 to 5, then from 3 to 0 while depressing the foot control at an even speed. NOTE: For twin needle sewing, repeatedly move the stitch width knob slowly from 0 to 3, then quickly back to create gathers...
...move the stitch width knob from 0 to 3, then from 5 to 0 more slowly than 3 and set the needle position selector to 0 while depressing the foot control at an even speed. Stitch length Set between 0 and 1 (F) for the shape above to "Thread tension" (page 24). Note ● When using a twin...or multiple parallel rows of the stitch width Repeatedly move the stitch width knob from 0 to 5, then from 3 to 0 while depressing the foot control at an even speed. NOTE: For twin needle sewing, repeatedly move the stitch width knob slowly from 0 to 3, then quickly back to create gathers...

Operation Manual
Page 39
... screw. b 38 If the main power switch is on and you step on and use it . Storing this machine, periodically turn it on the foot controller, you may reduce its efficiency. Changing the bulb CAUTION ● Turn off the machine. 4 APPENDIX MAINTENANCE Simple sewing machine maintenance operations are described below...
... screw. b 38 If the main power switch is on and you step on and use it . Storing this machine, periodically turn it on the foot controller, you may reduce its efficiency. Changing the bulb CAUTION ● Turn off the machine. 4 APPENDIX MAINTENANCE Simple sewing machine maintenance operations are described below...

Operation Manual
Page 42
... upper thread to a higher number. After you adjust the upper tension, the bobbin thread may be adjusted adequately with the upper tension control dial. If the bobbin case does not descend even after you adjust the bobbin thread, adjust the upper thread to the procedure described ...tension. a Screw ■ Checking the tension of fabric Solution Increase the tension by turning the upper tension- Refer to increase bobbin tension. control dial to match the bobbin thread. If the bobbin case descends without being careful not to over -loosen the screw, approximately 30-45 ...
... upper thread to a higher number. After you adjust the upper tension, the bobbin thread may be adjusted adequately with the upper tension control dial. If the bobbin case does not descend even after you adjust the bobbin thread, adjust the upper thread to the procedure described ...tension. a Screw ■ Checking the tension of fabric Solution Increase the tension by turning the upper tension- Refer to increase bobbin tension. control dial to match the bobbin thread. If the bobbin case descends without being careful not to over -loosen the screw, approximately 30-45 ...
Operation Manual
Page 43
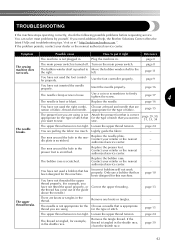
...thread properly. (for example, you are using is not appropriate for the type of fabric. page 10 You have not used the foot controller properly. page 15 The upper thread tension is loose. Remove the tangle thread. TROUBLESHOOTING If the machine stops operating correctly, check the ...that you are nation of stitch that has been designed for the thread you have not used a bobbin that you need additional help, the Brother Solutions Center offers the latest FAQs and troubleshooting tips. Choose a needle that are using . page 24 The thread is tangled in the shuttle...
...thread properly. (for example, you are using is not appropriate for the type of fabric. page 10 You have not used the foot controller properly. page 15 The upper thread tension is loose. Remove the tangle thread. TROUBLESHOOTING If the machine stops operating correctly, check the ...that you are nation of stitch that has been designed for the thread you have not used a bobbin that you need additional help, the Brother Solutions Center offers the latest FAQs and troubleshooting tips. Choose a needle that are using . page 24 The thread is tangled in the shuttle...
Operation Manual
Page 47
...buttonhole sewing 30 C cleaning 39 D darning 29 E embroidering 34 extra spool pin 18 F feed dogs flat bed attachment 66,, 40 26 foot controller 23 free-arm style 26 G gathering 36 H handwheel 5 M main parts 5 main power switch 8 monogramming 34 N needle 15 needle needle ... fabrics 26 thread cutter 23 thread guide 13 thread tension 24 trial sewing 25 ttwroiunbnleesehdoleoti.n..g...1..7..,.. 42 18 U upper tension-control dial 24, 41 upper threading 13 W winding the bobbin 10 Z zigzag stitches 25, 27, 34 zipper foot 33 zipper insertion...
...buttonhole sewing 30 C cleaning 39 D darning 29 E embroidering 34 extra spool pin 18 F feed dogs flat bed attachment 66,, 40 26 foot controller 23 free-arm style 26 G gathering 36 H handwheel 5 M main parts 5 main power switch 8 monogramming 34 N needle 15 needle needle ... fabrics 26 thread cutter 23 thread guide 13 thread tension 24 trial sewing 25 ttwroiunbnleesehdoleoti.n..g...1..7..,.. 42 18 U upper tension-control dial 24, 41 upper threading 13 W winding the bobbin 10 Z zigzag stitches 25, 27, 34 zipper foot 33 zipper insertion...


