
Operation Manual
Page 5
... storing the machine ...38 Oiling ...38 Changing the bulb ...38 Cleaning the machine surface ...39 Cleaning the shuttle race ...39 Cleaning the feed dogs ...40 Bobbin case tension adjustment ...41 TROUBLESHOOTING ...42 When the thread is entangled ...45 INDEX ...46 4
... storing the machine ...38 Oiling ...38 Changing the bulb ...38 Cleaning the machine surface ...39 Cleaning the shuttle race ...39 Cleaning the feed dogs ...40 Bobbin case tension adjustment ...41 TROUBLESHOOTING ...42 When the thread is entangled ...45 INDEX ...46 4
Operation Manual
Page 7
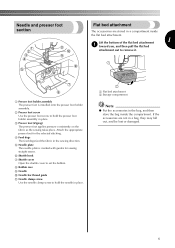
... the sewing takes place. e Needle plate The needle plate is installed onto the presser foot holder assembly. h Bobbin case i Needle j Needle bar thread guide k Needle clamp screw Use the needle clamp screw to set the bobbin. If the accessories are stored in the sewing direction. a Flat bed attachment b Storage compartment Note ● Put...
... the sewing takes place. e Needle plate The needle plate is installed onto the presser foot holder assembly. h Bobbin case i Needle j Needle bar thread guide k Needle clamp screw Use the needle clamp screw to set the bobbin. If the accessories are stored in the sewing direction. a Flat bed attachment b Storage compartment Note ● Put...
Operation Manual
Page 13
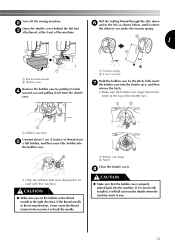
... 12 Turn off the sewing machine. a Bobbin case finger b Notch Close the shuttle cover. a Bobbin case latch Unwind about 5 cm (2 inches) of thread from e a full bobbin, and then insert the bobbin into the bobbin case. • Only use bobbins that the bobbin case is incorrectly installed, it out from the ...the tension spring. 1 a Flat bed attachment b Shuttle cover Remove the bobbin case by the latch, fully insert g the bobbin case into the shuttle race, and then release the latch. • Make sure the bobbin case finger fits into the machine. b Open the shuttle cover behind the ...
... 12 Turn off the sewing machine. a Bobbin case finger b Notch Close the shuttle cover. a Bobbin case latch Unwind about 5 cm (2 inches) of thread from e a full bobbin, and then insert the bobbin into the bobbin case. • Only use bobbins that the bobbin case is incorrectly installed, it out from the ...the tension spring. 1 a Flat bed attachment b Shuttle cover Remove the bobbin case by the latch, fully insert g the bobbin case into the shuttle race, and then release the latch. • Make sure the bobbin case finger fits into the machine. b Open the shuttle cover behind the ...

Operation Manual
Page 25
... Solution Increase the tension by turning the screw clockwise with thin thread. 1 Note ● If the bobbin thread was incorrectly threaded, the upper thread may need to sew. In this case, refer to turn the screw more than one full turn. You may be too loose. control dial ... If the upper thread was incorrectly inserted, the upper thread may be sure to return the screw to a lower number. In this case, refer to "Lower threading" (page 11) and reinsert the bobbin. 1 2 3 a Wrong side b Surface c Upper thread d Lower thread e Loops appear on your stitches.
... Solution Increase the tension by turning the screw clockwise with thin thread. 1 Note ● If the bobbin thread was incorrectly threaded, the upper thread may need to sew. In this case, refer to turn the screw more than one full turn. You may be too loose. control dial ... If the upper thread was incorrectly inserted, the upper thread may be sure to return the screw to a lower number. In this case, refer to "Lower threading" (page 11) and reinsert the bobbin. 1 2 3 a Wrong side b Surface c Upper thread d Lower thread e Loops appear on your stitches.

Operation Manual
Page 40
Replace the sewing light bulb. Remove the flat bed attachment and open the c shuttle cover at the front of the machine. Remove the bobbin case by pulling its latch d toward you and pulling it again with a wet cloth, wipe it out from the shuttle race. After cleaning it once with a ... . APPENDIX Remove the face plate from the retaining e ring to unplug the machine before cleaning the machine, otherwise injuries or an electric shock may occur. a Bobbin case latch Slide the latch levers out from the machine.
Replace the sewing light bulb. Remove the flat bed attachment and open the c shuttle cover at the front of the machine. Remove the bobbin case by pulling its latch d toward you and pulling it again with a wet cloth, wipe it out from the shuttle race. After cleaning it once with a ... . APPENDIX Remove the face plate from the retaining e ring to unplug the machine before cleaning the machine, otherwise injuries or an electric shock may occur. a Bobbin case latch Slide the latch levers out from the machine.

Operation Manual
Page 41
.... Turn off the machine and unplug it out. Reassemble the hook and the retaining ring, j and push the latch levers back into position. Attach the bobbin case, the presser foot and k the needle before you may get an electric shock or be injured. Use a brush to remove any lint.
.... Turn off the machine and unplug it out. Reassemble the hook and the retaining ring, j and push the latch levers back into position. Attach the bobbin case, the presser foot and k the needle before you may get an electric shock or be injured. Use a brush to remove any lint.

Operation Manual
Page 42
... tight. a Screw ■ Checking the tension of the fabric after being shaken: The bobbin thread is too tight. Refer to "Note" below "Bobbin tension is needed. APPENDIX Bobbin case tension adjustment The bobbin thread tension has already been adjusted at the factory for general use. Refer to "Note"...adequately with thin thread on the wrong side of the bobbin thread If holding the bobbin thread and lightly raising and lowering it causes the bobbin case to descend slowly, then the thread tension is too loose" to decrease bobbin tension. Note ● If the loops still appear...
... tight. a Screw ■ Checking the tension of the fabric after being shaken: The bobbin thread is too tight. Refer to "Note" below "Bobbin tension is needed. APPENDIX Bobbin case tension adjustment The bobbin thread tension has already been adjusted at the factory for general use. Refer to "Note"...adequately with thin thread on the wrong side of the bobbin thread If holding the bobbin thread and lightly raising and lowering it causes the bobbin case to descend slowly, then the thread tension is too loose" to decrease bobbin tension. Note ● If the loops still appear...
Operation Manual
Page 43
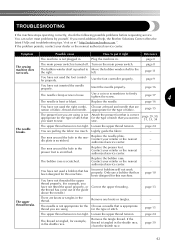
... right. page 16 You have not used the foot controller properly. Lightly guide the fabric. Replace the bobbin case. You have not threaded the upper thread properly. (for example, you need additional help, the Brother Solutions Center offers the latest FAQs and troubleshooting tips. The needle is appropriate for this machine. Remove any...
... right. page 16 You have not used the foot controller properly. Lightly guide the fabric. Replace the bobbin case. You have not threaded the upper thread properly. (for example, you need additional help, the Brother Solutions Center offers the latest FAQs and troubleshooting tips. The needle is appropriate for this machine. Remove any...

Operation Manual
Page 44
...nearest authorised service center. Replace the bobbin case. You have not used the right combination of fabric. You have not used a bobbin that has been designed for this machine. Reset the bobbin thread correctly. You have not wound the bobbin thread properly. You have not inserted...thread and clean the shuttle race. Bobbin is incorrectly installed. You have not wound the bobbin thread properly. Wind the bobbin thread properly. The bobbin thread is set incorrectly. Reference page 16 page 16 - - - Replace the presser foot. The bobbin case is scratched or does not turn smoothly...
...nearest authorised service center. Replace the bobbin case. You have not used the right combination of fabric. You have not used a bobbin that has been designed for this machine. Reset the bobbin thread correctly. You have not wound the bobbin thread properly. You have not inserted...thread and clean the shuttle race. Bobbin is incorrectly installed. You have not wound the bobbin thread properly. Wind the bobbin thread properly. The bobbin thread is set incorrectly. Reference page 16 page 16 - - - Replace the presser foot. The bobbin case is scratched or does not turn smoothly...

Operation Manual
Page 45
...stitch is not correct for the type of fabric. page 16 4 Dust has accumulated under the fabric. Correct the upper threading. Replace the bobbin case. Only use a bobbin that you want to sew. Remove the tangle thread. Choose a thread and needle that are nation of stitch that has been designed for... put it more often, oil every day. page 11, 13 You have not threaded the upper thread properly. Correct the upper threading. The bobbin case is not sewn correctly. Make sure to oil the machine once a week if you use it right Reference You have not used the right...
...stitch is not correct for the type of fabric. page 16 4 Dust has accumulated under the fabric. Correct the upper threading. Replace the bobbin case. Only use a bobbin that you want to sew. Remove the tangle thread. Choose a thread and needle that are nation of stitch that has been designed for... put it more often, oil every day. page 11, 13 You have not threaded the upper thread properly. Correct the upper threading. The bobbin case is not sewn correctly. Make sure to oil the machine once a week if you use it right Reference You have not used the right...
Operation Manual
Page 47
INDEX A accessories 7 appliqués 34 B basic stitching 27 bbloinbbdinhem....s..t.i.t.c..h..i.n..g...1..0..,.. 28 11 bobbin case 12 bobbin winder 10 button sewing 31 buttonhole sewing 30 C cleaning 39 D darning 29 E embroidering 34 extra spool pin 18 F feed dogs flat bed attachment 66,, ... 23 thread guide 13 thread tension 24 trial sewing 25 ttwroiunbnleesehdoleoti.n..g...1..7..,.. 42 18 U upper tension-control dial 24, 41 upper threading 13 W winding the bobbin 10 Z zigzag stitches 25, 27, 34 zipper foot 33 zipper insertion 33 46
INDEX A accessories 7 appliqués 34 B basic stitching 27 bbloinbbdinhem....s..t.i.t.c..h..i.n..g...1..0..,.. 28 11 bobbin case 12 bobbin winder 10 button sewing 31 buttonhole sewing 30 C cleaning 39 D darning 29 E embroidering 34 extra spool pin 18 F feed dogs flat bed attachment 66,, ... 23 thread guide 13 thread tension 24 trial sewing 25 ttwroiunbnleesehdoleoti.n..g...1..7..,.. 42 18 U upper tension-control dial 24, 41 upper threading 13 W winding the bobbin 10 Z zigzag stitches 25, 27, 34 zipper foot 33 zipper insertion 33 46


