
Users Manual - English
Page 2
... from the accumulation of lint, dust and loose cloth. 5. Use only accessories recommended by pulling on the cord. WARNING - Return the sewing machine to break. 12.Do not use the proper needle plate. Do not operate this machine where aerosol (spray) products are being administered... care is used as threading the needle, changing the needle, threading the bobbin, or changing the presser foot. 15.Always unplug the sewing machine from the electrical outlet when removing covers, lubricating, or when making any other user service adjustments mentioned in the needle area, such...
... from the accumulation of lint, dust and loose cloth. 5. Use only accessories recommended by pulling on the cord. WARNING - Return the sewing machine to break. 12.Do not use the proper needle plate. Do not operate this machine where aerosol (spray) products are being administered... care is used as threading the needle, changing the needle, threading the bobbin, or changing the presser foot. 15.Always unplug the sewing machine from the electrical outlet when removing covers, lubricating, or when making any other user service adjustments mentioned in the needle area, such...

Users Manual - English
Page 3
...use of the operation manual to inspect and adjust the machine yourself. If the problem persists, please consult your eye on the needle while sewing. This appliance is not suitable for use by a person responsible for household use a fuse approved by ASTA to BS 1362, i.e. ... safety. Remember to clean the case. Always consult the operation manual when replacing or installing any other parts to keep your local authorized Brother dealer. PLEASE READ BEFORE USING THIS MACHINE For safe operation 1. Benzene, thinner, and scouring powders can damage the case and machine, ...
...use of the operation manual to inspect and adjust the machine yourself. If the problem persists, please consult your eye on the needle while sewing. This appliance is not suitable for use by a person responsible for household use a fuse approved by ASTA to BS 1362, i.e. ... safety. Remember to clean the case. Always consult the operation manual when replacing or installing any other parts to keep your local authorized Brother dealer. PLEASE READ BEFORE USING THIS MACHINE For safe operation 1. Benzene, thinner, and scouring powders can damage the case and machine, ...

Users Manual - English
Page 4
...to sew ...23 Sewing in reverse ...23 Thread tension ...24 USEFUL SEWING TIPS ...25 Trial sewing ...25 Changing the sewing direction ...25 Sewing curves ...25 Sewing thick fabrics ...25 Sewing thin fabrics ...26 Sewing stretch fabrics ...26 Using a free-arm style ...26 3 KNOWING YOUR SEWING MACHINE...FUNCTIONS 5 The main parts ...5 Needle and presser foot section ...6 Flat bed attachment ...6 ACCESSORIES ...7 OPTIONAL ACCESSORIES 7 USING YOUR SEWING MACHINE 8 Power supply precautions ...8 Power supply ...8 Foot controller ...9 Steadying the machine ...9 THREADING THE MACHINE 10 Winding the ...
...to sew ...23 Sewing in reverse ...23 Thread tension ...24 USEFUL SEWING TIPS ...25 Trial sewing ...25 Changing the sewing direction ...25 Sewing curves ...25 Sewing thick fabrics ...25 Sewing thin fabrics ...26 Sewing stretch fabrics ...26 Using a free-arm style ...26 3 KNOWING YOUR SEWING MACHINE...FUNCTIONS 5 The main parts ...5 Needle and presser foot section ...6 Flat bed attachment ...6 ACCESSORIES ...7 OPTIONAL ACCESSORIES 7 USING YOUR SEWING MACHINE 8 Power supply precautions ...8 Power supply ...8 Foot controller ...9 Steadying the machine ...9 THREADING THE MACHINE 10 Winding the ...

Users Manual - English
Page 5
UTILITY STITCHES 27 USEFUL STITCHES ...27 Zigzag stitches ...27 Basic stitching ...27 Blind hem stitching ...28 Darning ...29 Over edge stitch ...29 BUTTONHOLE SEWING/ BUTTON SEWING 30 Buttonhole sewing ...30 Button sewing ...31 ZIPPER INSERTION ...33 APPLIQUÉ, MONOGRAMMING AND EMBROIDERING 34 Appliqués ...34 Monogramming and embroidering ...34 DECORATIVE STITCHING 36 Gathering ...36 Satin...
UTILITY STITCHES 27 USEFUL STITCHES ...27 Zigzag stitches ...27 Basic stitching ...27 Blind hem stitching ...28 Darning ...29 Over edge stitch ...29 BUTTONHOLE SEWING/ BUTTON SEWING 30 Buttonhole sewing ...30 Button sewing ...31 ZIPPER INSERTION ...33 APPLIQUÉ, MONOGRAMMING AND EMBROIDERING 34 Appliqués ...34 Monogramming and embroidering ...34 DECORATIVE STITCHING 36 Gathering ...36 Satin...
Users Manual - English
Page 6
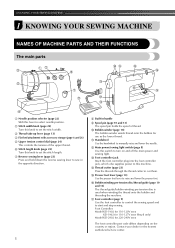
...tension disc is used when winding the thread onto the bobbin and threading the machine. q Foot controller (page 9) Use the foot controller to control the sewing speed and to manually raise and lower the needle. f Stitch length knob (page 22) Turn this machine. n Thread cutter (page 23) Pass the...to raise and lower the presser foot. o Presser foot lever (page 13) Use the presser foot lever to cut them. KNOWING YOUR SEWING MACHINE 1 KNOWING YOUR SEWING MACHINE NAMES OF MACHINE PARTS AND THEIR FUNCTIONS The main parts a Needle position selector (page 22) Shift this knob to set the ...
...tension disc is used when winding the thread onto the bobbin and threading the machine. q Foot controller (page 9) Use the foot controller to control the sewing speed and to manually raise and lower the needle. f Stitch length knob (page 22) Turn this machine. n Thread cutter (page 23) Pass the...to raise and lower the presser foot. o Presser foot lever (page 13) Use the presser foot lever to cut them. KNOWING YOUR SEWING MACHINE 1 KNOWING YOUR SEWING MACHINE NAMES OF MACHINE PARTS AND THEIR FUNCTIONS The main parts a Needle position selector (page 22) Shift this knob to set the ...
Users Manual - English
Page 7
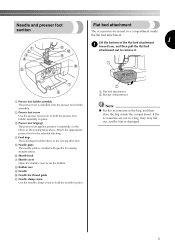
...bag, they may fall out, and be lost or damaged. 6 c Presser foot (Zigzag) The presser foot applies pressure consistently on the fabric as the sewing takes place. Lift the bottom of the flat bed attachment 1 a toward you, and then pull the flat bed attachment out to hold the needle in... place. Attach the appropriate presser foot for sewing straight seams. f Shuttle hook g Shuttle cover Open the shuttle cover to hold the presser foot holder assembly in place. e Needle plate The needle ...
...bag, they may fall out, and be lost or damaged. 6 c Presser foot (Zigzag) The presser foot applies pressure consistently on the fabric as the sewing takes place. Lift the bottom of the flat bed attachment 1 a toward you, and then pull the flat bed attachment out to hold the needle in... place. Attach the appropriate presser foot for sewing straight seams. f Shuttle hook g Shuttle cover Open the shuttle cover to hold the presser foot holder assembly in place. e Needle plate The needle ...

Users Manual - English
Page 8
...Extra spool pin 2 Twin needle Part Code Americas Others 130920-021 131096-121 7 KNOWING YOUR SEWING MACHINE ACCESSORIES The following machine models: LS-2000/LS2250PRW/LS2300PRW/LS2350. ● The screw of the presser foot holder is available through your authorized dealer. (...needle No. only) XA5539-151 XE7064-001 OPTIONAL ACCESSORIES 1. 2. Note (For U.S.A. We have designed these accessories to carry out most sewing tasks. Part Name X59370-021 (LS-2000/LS2250PRW) XE9369-001 (Others) 3 Bobbin XA3442-121 4 Needle set Part Code Americas Others SA156 ...
...Extra spool pin 2 Twin needle Part Code Americas Others 130920-021 131096-121 7 KNOWING YOUR SEWING MACHINE ACCESSORIES The following machine models: LS-2000/LS2250PRW/LS2300PRW/LS2350. ● The screw of the presser foot holder is available through your authorized dealer. (...needle No. only) XA5539-151 XE7064-001 OPTIONAL ACCESSORIES 1. 2. Note (For U.S.A. We have designed these accessories to carry out most sewing tasks. Part Name X59370-021 (LS-2000/LS2250PRW) XE9369-001 (Others) 3 Bobbin XA3442-121 4 Needle set Part Code Americas Others SA156 ...

Users Manual - English
Page 9
... to be cut, damaged, modified, forcefully bent, pulled, twisted, or bundled. Then, insert the power supply plug into the jack on the machine. USING YOUR SEWING MACHINE Power supply precautions 1 Be sure to observe the following circumstances: • When you are away from the outlet. These things may result. b Insert the...
... to be cut, damaged, modified, forcefully bent, pulled, twisted, or bundled. Then, insert the power supply plug into the jack on the machine. USING YOUR SEWING MACHINE Power supply precautions 1 Be sure to observe the following circumstances: • When you are away from the outlet. These things may result. b Insert the...

Users Manual - English
Page 10
... oil. When you press harder, the machine's speed will increase. Note ● If a power outage occurs while the sewing machine is being started. When restarting the sewing machine, follow the necessary procedure to install the proper outlet. If the plug does not fit fully in a polarized outlet ...only one way. X The sewing lamp goes off when the machine is stable. 9 If it still does not fit, contact a qualified electrician to correctly operate the machine. (...
... oil. When you press harder, the machine's speed will increase. Note ● If a power outage occurs while the sewing machine is being started. When restarting the sewing machine, follow the necessary procedure to install the proper outlet. If the plug does not fit fully in a polarized outlet ...only one way. X The sewing lamp goes off when the machine is stable. 9 If it still does not fit, contact a qualified electrician to correctly operate the machine. (...

Users Manual - English
Page 11
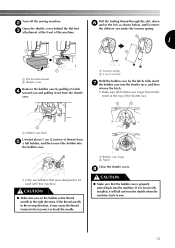
... the shaft slides into the groove of thread is not in as far as possible, and a then put a spool of the bobbin Turn on the sewing machine. e 10 Other models Put the bobbin onto the bobbin winder shaft and d slide the bobbin winder shaft to the right. Pass the thread around...
... the shaft slides into the groove of thread is not in as far as possible, and a then put a spool of the bobbin Turn on the sewing machine. e 10 Other models Put the bobbin onto the bobbin winder shaft and d slide the bobbin winder shaft to the right. Pass the thread around...

Users Manual - English
Page 12
... cut the thread completely, and the bobbin is not a malfunction. ● The needle bar does not move when you slide the bobbin winding shaft to sew, you (counterclockwise) and raise the presser foot lever. 11 CAUTION ● Make sure you follow the instructions carefully. g • Leave 1 cm (1/2 inch) of ...the bobbin. 1 2 a Wound evenly b Wound poorly Lower threading Install the bobbin wound with thread. Then stop the machine. Memo ● When the sewing machine is started or the handwheel is turned after winding the thread around the bobbin a few times. KNOWING YOUR...
... cut the thread completely, and the bobbin is not a malfunction. ● The needle bar does not move when you slide the bobbin winding shaft to sew, you (counterclockwise) and raise the presser foot lever. 11 CAUTION ● Make sure you follow the instructions carefully. g • Leave 1 cm (1/2 inch) of ...the bobbin. 1 2 a Wound evenly b Wound poorly Lower threading Install the bobbin wound with thread. Then stop the machine. Memo ● When the sewing machine is started or the handwheel is turned after winding the thread around the bobbin a few times. KNOWING YOUR...
Users Manual - English
Page 13
... insert the bobbin into the bobbin case. • Only use bobbins that the bobbin case is incorrectly installed, it may cause the thread tension to sew. 12 If the thread unrolls in the right direction. If it is properly placed back into the notch at the front of the shuttle race... out from the shuttle when the machine starts to be used with this machine. a Bobbin case finger b Notch Close the shuttle cover. Turn off the sewing machine. Pull the trailing thread through the slot, down f and to be incorrect or break the needle.
... insert the bobbin into the bobbin case. • Only use bobbins that the bobbin case is incorrectly installed, it may cause the thread tension to sew. 12 If the thread unrolls in the right direction. If it is properly placed back into the notch at the front of the shuttle race... out from the shuttle when the machine starts to be used with this machine. a Bobbin case finger b Notch Close the shuttle cover. Turn off the sewing machine. Pull the trailing thread through the slot, down f and to be incorrect or break the needle.

Users Manual - English
Page 14
... up the spool pin as far as possible, and d then put a spool of thread is in the wrong place, or is not correctly raised, the sewing machine can not be threaded. Be sure to break. b CAUTION ● If the spool of thread on this pin. a Spring Pull the thread down and... guide. • Make sure that the spring in the groove on the spool pin and cause the needle to turn the handwheel before threading the sewing machine. Otherwise, the thread could tangle and break the needle. Pull up the thread check spring. a Presser foot lever Raise the needle by turning the...
... up the spool pin as far as possible, and d then put a spool of thread is in the wrong place, or is not correctly raised, the sewing machine can not be threaded. Be sure to break. b CAUTION ● If the spool of thread on this pin. a Spring Pull the thread down and... guide. • Make sure that the spring in the groove on the spool pin and cause the needle to turn the handwheel before threading the sewing machine. Otherwise, the thread could tangle and break the needle. Pull up the thread check spring. a Presser foot lever Raise the needle by turning the...
Users Manual - English
Page 15
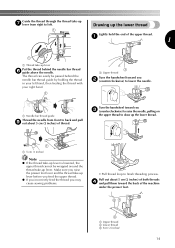
... thread h guide above the needle. a 1 a Thread take -up lever before you feed the upper thread. ● If you incorrectly feed the thread you may cause sewing problems. • Pull thread loop to finish threading process. a Needle bar thread guide Thread the needle from right to left hand, then feeding the thread...
... thread h guide above the needle. a 1 a Thread take -up lever before you feed the upper thread. ● If you incorrectly feed the thread you may cause sewing problems. • Pull thread loop to finish threading process. a Needle bar thread guide Thread the needle from right to left hand, then feeding the thread...
Users Manual - English
Page 16
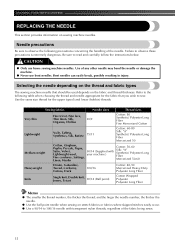
...number, the thicker the thread; and the larger the needle number, the thicker the needle. ● Use the ball point needle when sewing on stretch fabrics or fabrics where skipped stitches easily occur. ● Use a 90/14 to the following precautions concerning the handling of... provides information on the fabric and thread thickness. Needle precautions Be sure to sew. Failure to read and carefully follow the instructions below. Bent needles can easily break, possibly resulting in injury. Sewing fabrics Needle sizes Thread sizes Very thin Fine tricot, Fine lace, Thin linen...
...number, the thicker the thread; and the larger the needle number, the thicker the needle. ● Use the ball point needle when sewing on stretch fabrics or fabrics where skipped stitches easily occur. ● Use a 90/14 to the following precautions concerning the handling of... provides information on the fabric and thread thickness. Needle precautions Be sure to sew. Failure to read and carefully follow the instructions below. Bent needles can easily break, possibly resulting in injury. Sewing fabrics Needle sizes Thread sizes Very thin Fine tricot, Fine lace, Thin linen...

Users Manual - English
Page 17
... needle. CAUTION ● The appropriate fabric, thread and needle combinations are shown in "Checking the needle" . 1 Turn off the sewing machine, otherwise injuries may occur if the foot controller is being operated. Use a coin and a needle that the distance between the needle... toward you (counterclockwise). In addition, the stitching may be skipped stitches. a Presser foot lever 1 a Flat surface 16 Checking the needle Sewing with thin needles (such as described below. a Flat side b Needle type marking ■ Correct needle Lower the presser foot lever. If...
... needle. CAUTION ● The appropriate fabric, thread and needle combinations are shown in "Checking the needle" . 1 Turn off the sewing machine, otherwise injuries may occur if the foot controller is being operated. Use a coin and a needle that the distance between the needle... toward you (counterclockwise). In addition, the stitching may be skipped stitches. a Presser foot lever 1 a Flat surface 16 Checking the needle Sewing with thin needles (such as described below. a Flat side b Needle type marking ■ Correct needle Lower the presser foot lever. If...
Users Manual - English
Page 18
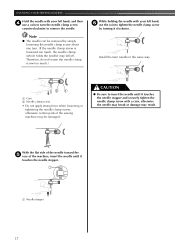
With the flat side of the needle toward the e rear of the sewing machine may fall off. Note ● The needle can be damaged. a Needle stopper 17 While holding the needle with your left hand, f use a coin to ... needle clamp screw about one turn. (If the needle clamp screw is loosened too much .) Install the twin needle in the same way. KNOWING YOUR SEWING MACHINE Hold the needle with your left hand, and then d use the coin to remove the needle. CAUTION ● Be sure to insert the needle...
With the flat side of the needle toward the e rear of the sewing machine may fall off. Note ● The needle can be damaged. a Needle stopper 17 While holding the needle with your left hand, f use a coin to ... needle clamp screw about one turn. (If the needle clamp screw is loosened too much .) Install the twin needle in the same way. KNOWING YOUR SEWING MACHINE Hold the needle with your left hand, and then d use the coin to remove the needle. CAUTION ● Be sure to insert the needle...
Users Manual - English
Page 19
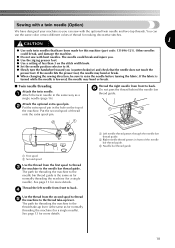
... needle may bend or break. ■ Twin needle threading Attach the twin needle. Attach the optional extra spool pin. See page 13 for more details. Sewing with a twin needle (Option) We have been made for this machine (part code: 131096-121). a First spool b Second spool Use the thread from ...front to the needle bar thread guide. See page 13 for more details. You can sew with the optional twin needle and two top threads. Thread the right needle from the first spool to thread c the machine to back. f Do not...
... needle may bend or break. ■ Twin needle threading Attach the twin needle. Attach the optional extra spool pin. See page 13 for more details. Sewing with a twin needle (Option) We have been made for this machine (part code: 131096-121). a First spool b Second spool Use the thread from ...front to the needle bar thread guide. See page 13 for more details. You can sew with the optional twin needle and two top threads. Thread the right needle from the first spool to thread c the machine to back. f Do not...

Users Manual - English
Page 20
...presser foot pin snaps into the shank in the holder. a Black button b Presser foot holder Place a different presser foot below . KNOWING YOUR SEWING MACHINE REPLACING THE PRESSER FOOT CAUTION ● Always turn off the power before you (counterclockwise). Replace the presser foot as described below the holder e... so that the presser foot pin is accidentally pressed and the machine starts sewing. If the sewing machine has been turned on the controller, the machine will start and you may be used with the shank in the presser...
...presser foot pin snaps into the shank in the holder. a Black button b Presser foot holder Place a different presser foot below . KNOWING YOUR SEWING MACHINE REPLACING THE PRESSER FOOT CAUTION ● Always turn off the power before you (counterclockwise). Replace the presser foot as described below the holder e... so that the presser foot pin is accidentally pressed and the machine starts sewing. If the sewing machine has been turned on the controller, the machine will start and you may be used with the shank in the presser...

Users Manual - English
Page 21
... the screw using a coin in your left side of the presser bar. 1 Removing the presser foot holder Remove the presser foot holder when cleaning the sewing machine or when installing a presser foot that the g presser foot is not correctly installed, the thread tension will be incorrect. 20 Raise the presser foot...
... the screw using a coin in your left side of the presser bar. 1 Removing the presser foot holder Remove the presser foot holder when cleaning the sewing machine or when installing a presser foot that the g presser foot is not correctly installed, the thread tension will be incorrect. 20 Raise the presser foot...


